- screen command in Linux with Examples
- How to Use Screen in Linux
- How to Use Screen in Linux
- Install Screen in Different Operating Systems in Linux
- Install GNU Screen in Linux
- Install Linux Screen on Linux
- Starting the Linux Screen
- Starting the Named Session
- Detaching Linux Screen Session
- Resume the Screen Session
- Linux Screen Customization
- Check Manual Page
- Conclusion
- About the author
- Prateek Jangid
screen command in Linux with Examples
screen command in Linux provides the ability to launch and use multiple shell sessions from a single ssh session. When a process is started with ‘screen’, the process can be detached from session & then can reattach the session at a later time. When the session is detached, the process that was originally started from the screen is still running and managed by the screen itself. The process can then re-attach the session at a later time, and the terminals are still there, the way it was left. Syntax:
- -a: It force all capabilities into each window’s termcap.
- -A -[r|R]: It adapt all windows to the new display width & height.
- -c file: It read configuration file instead of ‘.screenrc’.
- -d (-r): It detach the elsewhere running screen (and reattach here).
- -dmS name: It start as daemon: Screen session in detached mode.
- -D (-r): It detach and logout remote (and reattach here).
- -D -RR: It do whatever is needed to get a screen session.
- -e xy: It change the command characters.
- -f: It make the flow control on, -fn = off, -fa = auto.
- -h lines: It set the size of the scrollback history buffer.
- -i: It interrupt output sooner when flow control is on.
- -l: It make the login mode on (update /var/run/utmp), -ln = off.
- -ls [match]: It display all the attached screens.
- -L: It turn on output logging.
- -m: It ignore $STY variable, do create a new screen session.
- -O: It choose optimal output rather than exact vt100 emulation.
- -p window: It preselect the named window if it exists.
- -q: It quiet startup. Exits with non-zero return code if unsuccessful.
- -Q: It commands will send the response to the stdout of the querying process.
- -r [session]: It reattach to a detached screen process.
- -R: It reattach if possible, otherwise start a new session.
- -S sockname: It name this session .sockname instead of …
- -t title: It set title. (window’s name).
- -T term: It use term as $TERM for windows, rather than “screen”.
- -U: It tell screen to use UTF-8 encoding.
- -v: It print “Screen version 4.06.02 (GNU) 23-Oct-17”.
- -x: It attach to a not detached screen. (Multi display mode).
- -X: It execute as a screen command in the specified session.
Shortcut keys Options:
- Ctrl-a + c: It create a new windows.
- Ctrl-a + w: It display the list of all the windows currently opened.
- Ctrl-a + A: It rename the current windows. The name will appear when you will list the list of windows opened with Ctrl-a + w.
- Ctrl-a + n: It go to the next windows.
- Ctrl-a + p: It go to the previous windows.
- Ctrl-a + Ctrl-a: It back to the last windows used.
- Ctrl-a + k: It close the current windows (kill).
- Ctrl-a + S: It split the current windows horizontally. To switch between the windows, do Ctrl-a + Tab.
- Ctrl-a + |: It split the current windows vertically.
- Ctrl-a + X: Close active Split window
- Ctrl-a + Q: Close all Split windows
- Ctrl-a + d: It detach a screen session without stopping it.
- Ctrl-a + r: It reattach a detached screen session.
- Ctrl-a + [: It start the copy mode.
- Ctrl-a + ]: It paste the copied text.
- Installation of screen command: To install the screen command simply go to the terminal and type the following command:
- screen: It will start a new window within the screen.

- -S: It will start a new window within the screen and also gives a name to the window. It creates a session which is identified by that name. The name can be used to reattach screen at a later stage.

- -ls: It is used to display the currently opened screens including those running in the background. It will list all the attached as well as detached screen sessions.

- -d: It is used to detach a screen session so that it can be reattached in future. It can also be done with the help of shortcut key Ctrl-a + d

- Here 1643 is the screen id we want to detach.
- -r: It is used to reattach a screen session which was detached in past.

How to Use Screen in Linux
![]()
We often face a situation on a remote machine where we perform a task on Linux, and those tasks are very long-running. Therefore, many problems are generated, such as the session of SSH is terminated, suddenly our connection drops, our all work is corrupted or lost.
This screen is the tool we use for resuming sessions and continuing tasks. The screen helps physical console between typically interactive shells (several processes). A single terminal window manager screen allows the user to open several separate screen sessions.
How to Use Screen in Linux
GNU Screen or Screen is a terminal multiplexer. The screen allows us to resume or start a session, and then inside that session, we can open virtual terminals (any number of windows). Our running processes will continue to screen when we get disconnected for any reason or even if the window is not visible.
Install Screen in Different Operating Systems in Linux
As we know, there are different operating systems in Linux. So, there are different commands available to install the screen on the particular operating system of Linux.
Install GNU Screen in Linux
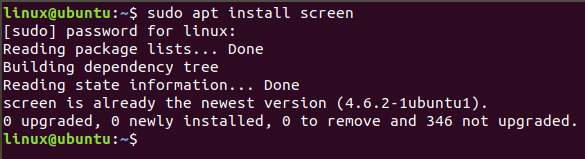
We can check that the screen package is pre-installed in our Linux system by following the command, because nowadays on most distros, the screen package comes pre-installed.

If we have a pre-installed screen package, then output shows the particular version of that package. Otherwise, if it is not, we can easily install the screen package with the help of the package manager of our distro.
Install Linux Screen on Linux
We can install the screen on Debian, Ubuntu, and Mint in the Linux system using the following command.
The following command can be installed by installing the screen on Fedora/CentOS/RHEL/AlmaLinux/Rocky Linux in Linux.
Install the screen on Gentoo Linux by using the following command.
Install the screen on Manjaro by using the following command.
Install the screen on Arch Linux by using the following command.
Install the screen on OpenSUSE by using the following command.
Starting the Linux Screen
Once the screen package is installed in Linux, it is easy to start it. You just have to run the below command:
The above command creates a new window by starting a shell in that window and opening a screen session.
Now we get a list of commands in the screen session opened above. The following command shows us the list of commands.
How to Use Screen
In Linux, when we start a screen session, choose between two windows. One screen session may contain multiple windows.
We can do all our work in the normal command-line environment. As we already know, a screen is an application, so it also has specific parameters or commands.
To check all the parameters on the screen, we can type the following command.
The above command is the shortcut key of the help screen. We can also use another command which is as follows.
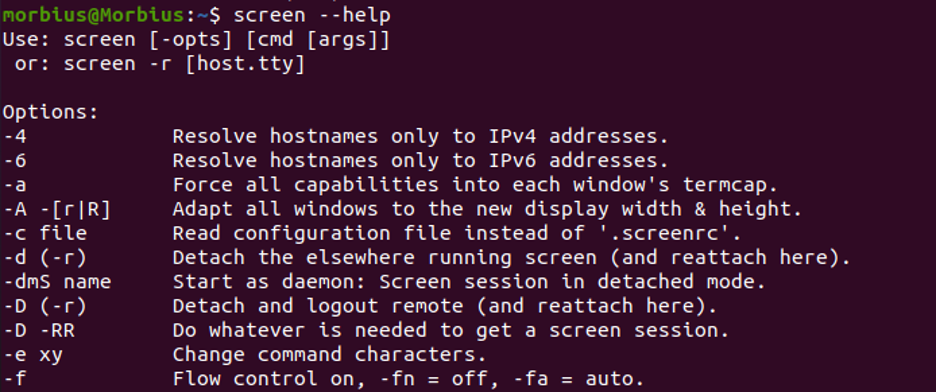
In the output, we can see all the parameters or commands on the screen.
To exit the help screen, we can press the “spacebar” or “Enter.” Note that all shortcuts “Ctrl+a” are done without quotes in the screen session.
For managing the Linux screen windows, some of the most common shortcut keys are as follows
| Commands | Usage |
|---|---|
| Ctrl+a c | New Window creates with a shell |
| Ctrl+a “ | Shows all list of windows |
| Ctrl+a 0 | By number (select window 0) |
| Ctrl+a A | Give the window a new name. |
| Ctrl+a S | Horizontally split the current region into two regions. |
| Ctrl+a | | Vertically split the current region into two regions. |
| Ctrl+a tab | Switch the input target to the next region. |
| Ctrl+a Ctrl+a | We can toggle between the previous and current windows |
| Ctrl+a Q | Close all regions but this one.f |
| Ctrl+a X | Shut down the current region |
Starting the Named Session
When we run multiple screen sessions in our Linux system, then named sessions are useful. We can easily create a session that identifies the session by that particular name. We can create a named session by running the screen command with the command given below.
Choosing a descriptive session name turns out to be a good idea.
Detaching Linux Screen Session
Detaching the screen is one of the best advantages. We write the following command, and by using that command, we can easily exit the screen session in Linux.
So, with the help of the above command, the screen session exits, but still, the running program continues to work.
Resume the Screen Session
Using the following command, we can again resume or reattach the screen session without losing anything we have done in the Screen session.
We can find the current session ID by listing the running screen sessions.
Running screen sessions and detached screen sessions are shown in the output, and we easily restore the particular version. We can use the following command to display the screen session running in the background and the currently opened screen.
Just suppose the output will be :

Now we want to restore the 10835-screen session. So, we have to write the following command.
Linux Screen Customization
If the file is present in our screen session and the session is started, the screen reads the configuration parameter of the screen from the following command.
According to our priorities, we can modify the default screen by using the below command.
Check Manual Page
By using the following command, we can check the manual page on the Linux screen.
Conclusion
In this article, we learned how to install and use Gnu Screen in Different Operating systems of Linux. We can easily create multiple screen windows in a single screen session, navigate between windows, resume and detach screen sessions and personalize our screen terminal with the help of specific commands or keys. We have tried to put all the information related to the user screen in Linux, and we hope that article is beneficial for you. We also make sure to grab all information in this single article. That is all you need to know.
About the author
Prateek Jangid
A passionate Linux user for personal and professional reasons, always exploring what is new in the world of Linux and sharing with my readers.