- How to Install Software from Source in Linux
- Downloading the Source Code
- Installing Vim from Source Code
- Basics Of Compiling Software From Source Code In Linux
- A Typical Example
- The INSTALL Or README Files
- Install A GitHub Program
- Autogen.sh
- Troubleshooting
- Missing Libraries
- Conclusion
- How to install a Program from Source on Linux
- What is the Source Code?
- Formats of Source packages
- Compiling and Installing Source Packages
- Step 1 – Extract the content of archive packages
- For .tar.bz2
How to Install Software from Source in Linux
The most widely used Linux distributions, for example, Debian, Ubuntu, RedHat, Fedora, and many more, have a packaging system for distribution software. Binaries and configuration files of software are bundled in a package, which is nothing but an archive file, from which the package managers install the software.
However, advanced Linux users, developers, and those who are more on the geeky side of things often install software directly from the source code; i.e., manual compilation and installation.
As almost all software in GNU/Linux systems is free and open-source software, the source code is publicly available, usually in a version control system repository or even in the standard repositories in some distributions.
Let us take a look at how you can install software directly from its source code in Linux. For the purpose of demonstration, I am using Ubuntu 20.10. However, the steps are common to all Linux distributions.
Downloading the Source Code
The source code of any open-source software is usually available in a version control system, for example, Git. Developers also often maintain a source code download page on their website, from where the source code archive files can be downloaded.
As an example, I will try to install the text editor ‘Vim‘ from the source. First of all, install Git if it is not already present in the system, with the following command:
$ sudo apt install git [On Debian, Ubuntu & Mint] $ sudo yum install git [On RHEL, CentOS & Fedora] $ sudo pacman -S git [On Arch & Manjaro Linux] $ sudo zypper in git-core [On OpenSuse]
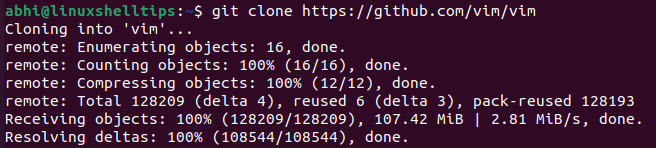
Then download the Vim source code using Git with the following syntax:
$ git clone https://github.com/vim/vim
If the source code for your software is not available via Git, you need to download the ‘.tar.gz’ package, extract the source code from the package with the following command:
Once the Git repository is cloned, or the package is extracted, go to the source code folder.

You can see the source code files for Vim in the screenshot above.
Installing Vim from Source Code
The first step while installing software from the source is to install the development tools. In Debian and Ubuntu, they are part of the package ‘build-essential‘.
In RedHat, CentOS, etc. these tools are a part of the Development Tools group. This package installs the most common software which are required to compile source code.
$ sudo apt install build-essential [On Debian, Ubuntu & Mint] $ sudo yum groupinstall "Development Tools" [On RHEL, CentOS & Fedora] $ sudo pacman -S base-devel [On Arch & Manjaro Linux] $ sudo zypper install -t pattern devel_C_C++ [On OpenSuse]
Next, run the ‘ ./configure ‘ file inside the Vim directory. The configure file is a script that checks various things; for example, if required environment variables are set, or if the dependencies required for the software are met in your system.
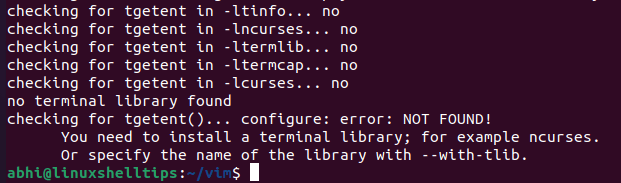
As you can see, the configure script has shown the error that no terminal library was found and suggested a library ‘ncurses‘. To install ‘ncurses‘ and all such missing dependencies use the package manager depending on which distro you are using.
$ sudo apt-get install libncurses5-dev libncursesw5-dev [On Debian, Ubuntu & Mint] $ sudo yum install ncurses-devel [On RHEL, CentOS & Fedora] $ sudo pacman -S ncurses [On Arch & Manjaro Linux] $ sudo zypper install ncurses [On OpenSuse]
and then run ‘ ./configure ‘ again.
Once the configure script is successfully completed, the next step is to compile the source code to generate the binaries. Run the ‘make‘ command to achieve this:
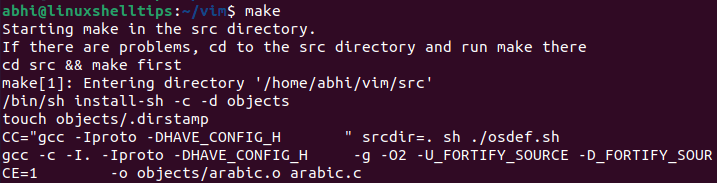
Make will take some time to compile, depending on the size of your software. Once ‘make‘ completes, the binary files are ready. Run the following to install the binaries and the configuration files in appropriate locations:
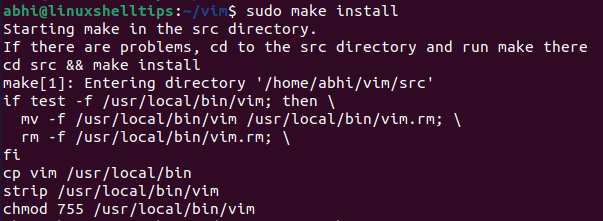
Once the command completes successfully, verify if Vim has been installed:

This completes the process of installing software in Linux from the source code.
Conclusion
We saw in a few easy steps how to install software from source in Linux. Obviously, software installed in this way is not managed by a package manager and hence all the latest updates, including the vital security updates, cannot be applied on Vim in this case.
Hence, this way should not usually be used for productive usage; only for development, learning, and similar purposes. Thanks a lot for reading and share your thoughts with us in the comments below!
Basics Of Compiling Software From Source Code In Linux
From time to time, you may want or need to compile a software/program from the source code. This involves compiling C or C++ code into something we can execute in Linux. Depending on the software you wish to compile, it’s often unnecessary to do so. This is because your distribution will likely have the binary form of the program already in the software repositories.
In fact, you should choose the binary packages over compiling from the source. One reason is that it could potentially introduce problems for your system. However, if ever the time should come where you need compile from source, this guide will give you some basic pointers.
A Typical Example
Let’s take a program written in either C or C++. Downloading the source code often involves either downloading and unpacking a package (often a tarball), or cloning a git repository. The typical method of operation is the execution of these three commands: $
./configure $ make $ sudo make install
The first command runs the configure script that analyses the libraries installed on your system. If a required library isn’t installed, it will report it and you will need to install it. Not only will you need the library installed, but also the development files must be present as well. Source code files use the functionality found in these libraries.
After the configure command is executed, you should have a Makefile present. By running ‘make’, it will read the Makefile in the current directory and start running the compiler (gcc for C, or g++ for C++) to compile the software.
The third command isn’t strictly essential but is recommended for system-wide access, that is running the executable from anywhere in the terminal. This command tells ‘make’ to run instructions for installing the program to the system.
The INSTALL Or README Files
There may be extra instructions that must be completed before compiling can begin. Reading this file (usually INSTALL) should also reveal what development libraries may need to be installed first. Such packages will contain the suffix “-dev” to indicate that these are the development headers and must be installed. The configure script may also require extra parameters as well. README will contain any other information.
You may even find that none of the three commands are run during the whole process. Even variations of make such as qmake (for Qt projects) or cmake could be used instead.
Install A GitHub Program
Let’s begin by installing a text editor called wxMEdit, found on GitHub. Here I demonstrate how to install a program by compiling from source. This is an almost typical example of the scope of this guide. If you visit the GitHub repository, you will see that the readme file has details about the application. There aren’t any compiling instructions so the standard sequence applies, with one difference: autogen.sh.
First, we change to where we wish to store the repository in the terminal and clone it:
$ cd wherever $ git clone git://github.com/wxMEdit/wxMEdit.git
Autogen.sh
If you find this file in the source code, you should run this first before “./configure” as this will perform tasks that will allow you to compile the software successfully. If that is successful, then you can run “./configure”, “make”, and then “sudo make install”, and whatever else you need to run (in this case, nothing else).


Troubleshooting
If you do so regularly, you are bound to encounter certain issues when compiling from source.
Missing Libraries
Remember, it’s not enough for the binary libraries to be installed; the source files or development headers must also be installed as well. The configure script, along with the documentation, will usually alert you of any libraries (development headers) you need to install for a successful compilation. Ensure these are installed on your system.

They’re Installed And Other Errors Occur
Conclusion
Compiling software can either be quite simple, or quite painful. Fortunately, many Linux distributions provide binary packages ready to install so compiling from source isn’t usually necessary. It is better to stick with the binary packages provided by the software repos provided by your distribution if they’re available.
How to install a Program from Source on Linux

O ne of the things open source programs are great to work with is flexibility. You can access the source code, which means that you can turn it into anything you want. Users have the permission to configure it however desired so that they can make it suit any system or add/remove any feature. Program developers often release their program in what is known as source code.
What is the Source Code?
The source code is a collection of code written using a readable programming language, which is typically a plain text. It is then transformed by a compiler into binary code for making ready to install packages like .deb, rpm, etc.. Most of the popular packages are readily packaged into the easily executable deb and rpm packages, but there are also thousands of other packages that aren’t compiled. Developers provide them ‘as is’ in the source code format.
Formats of Source packages
The most common formats and the ones that we are going to show here are .tar.xz, .tar.gz and .tar.bz2 packages. TAR is an archiving utility provided by GNU. The different formats use different archiving methods. Other than that, there is not much difference between the three.
Compiling and Installing Source Packages
We are going to show three different package types with three different scenarios. These are the situations that you are most likely to find while installing any kind of source package. The following image shows the three packages that I have:

Step 1 – Extract the content of archive packages
First off, extracting the source packages. The following are the commands for all three kinds of packages: