- Understanding Android Wi-Fi Settings And Connections
- Wi-Fi Overview
- Wi-Fi Connection Manager
- Secured and Unsecured Networks
- WPS Setup (Wi-FI Protected Setup)
- Public Network Notifications
- Moving With Android
- Quickly Enable and Disable Wi-fi
- Viewing Your Saved Networks
- Removing a Saved Network
- Airplane Mode and Wi-Fi
- Wi-Fi Direct
- Common Questions and Answers
- Как подключить и настроить Wi-Fi на Android смартфоне: полная инструкция
- Как подключить и включить ВайФай
- Настройка
Understanding Android Wi-Fi Settings And Connections
Android tablets and most android mobile phones have the ability to connect to Wi-Fi wireless networks.
Wi-Fi is common wireless technology for connecting devices together on small business/home networks.
The same technology is used in public Wireless connection points, like coffee shops and hotels, for connecting to the Internet.
Before we look at how you setup and configure Wi-Fi on Android it is useful to have a basic understanding of how Wi-Fi networks work.
Wi-Fi Overview
Wi-Fi supports three connection modes:
Infrastructure mode is the most common and it is the mode used in home/business and public Wi-Fi networks.
Infrastructure mode requires a Wireless Access point which is usually provided by your home Wireless router.
The Access point forms the Wireless network, and all nodes or clients connect to the access point. See Setting up a home network.
The access point, and network is identified by a SSID or security identifier.
A Wi-Fi access point is also configured to use a preset Wireless channel. Commonly used channels are 1,6,11. See Wiki
If you are responsible for setting up your home Wi-Fi access point /router then you would the access point up to use a channel that isn’t being used by another access point in your location.
You can use wi-Fi test Apps on your device to see what channels are being used in your location.
Wi-Fi Connection Manager
Android phones and tablets come with a Wi-Fi Connection Manager, which lets you manage your Wi-Fi connections.
There are also many more sophisticated connection manager Apps available to download from the Google Play store.
The connection manager will automatically scan for Wi-Fi networks and lets you add and remove wireless connections.
To Open the connection manager go to Settings>Wireless and Network and press on the Wi-Fi Link.

The connection manager will open and display a list of Wi-fi networks that are currently in range and their status, as well as Wi-Fi connections that have been saved.

- Connected – you are currently connected to this network
- Saved– this network is already setup and you can connect to it
- None– This network connection hasn’t been setup yet.
- Out of range – Saved connection not in range.
To connect to a new network press the network name and enter the network password or passphrase if the network is secured.

Once you have connected the connection settings are saved so that you don’t need to re-enter the password each time you connect.
If you don’t know the password then you might be able to use the WPS option if it is available on the Wireless Access Point (see later)
Older versions of the Android the connection manager show how the connection is secured, and if it supports WPS

Secured and Unsecured Networks
Most networks are secured which means that you will need to enter a password or passphrase to connect to them.
On a secured network the network traffic is encrypted and not vulnerable to eavesdropping.
Most public networks use unsecured networks and don’t require a password to connect to them.
However some have a secondary login web page that you need to login to in orderto connect.
You should be careful when using any public networks even secured ones. See Connecting Your Android Tablet to Public Wi-Fi Hotspots
WPS Setup (Wi-FI Protected Setup)
Android supports WPS which lets you connect to a new network without having the manually enter a password.
However to use it your Wi-Fi router/access point must support it, and have it enabled.
The old connection manage shows the WPS link above the network list.

On Android 5 and above you need to press the more link and select advanced.

There are two option available the easiest and quickest is the push button option.
This again requires support at the Access point and you must have physical access to the access point to press it.

This article explains the procedure in more detail.
Public Network Notifications
By default this option is enabled, and so when android detects a new unsecured network it will notify you. (screen shot above)
However it will not automatically connect to the network.
Moving With Android
As you move around with your tablet/phone you will come into range of other networks, some maybe new, others will already be saved. You will also fall out of range of the network you are currently connected to.
As you move and lose an existing connection Android will automatically connect to another saved network that is in range.
If it comes across a public network you will receive a notification and a prompt to allow you to connect.
There is a new feature available in Android 5.1 and above on Google nexus phones and tablets called Wi-Fi assist which will automatically connect you to trusted public networks that are available.
You can also get Apps from the app store that do the same thing.
Quickly Enable and Disable Wi-fi
You can tell whether or not Wi-Fi is enabled or disabled by looking in the system status area on the top right of the screen.
To enable or disable Wi-fi go to Settings>Wi-Fi>Wireless & Networks and toggle it on or off.

Viewing Your Saved Networks
You can see a list of all of your saved networks by going to Settings>wi-fi>Wireless & Networks. Press the more link (three vertical dots top right) and press saved networks.(Android 5 and above)
Removing a Saved Network
To Remove a network from the saved list click it and then click forget

The next time you try to connect to that network you will need to enter the password.
Airplane Mode and Wi-Fi

If you turn on Airplane mode which is a requirement when flying the Wi-fi and Bluetooth networks are disabled by default.
However you can enable them once you are in Airplane mode providing the operator allows this.
Here is a video which take your through the process:
Wi-Fi Direct

Wi-Fi direct allows you to connect two Wi_Fi equipped devices together without requiring an access point.
Essentially it works the same ways as Bluetooth but is much faster and is designed to be used for the same type of applications.
Here is a video from the Wi-Fi Alliance that explains how it works.
Here is video that shows you how to transfer files between phones using Wi-Fi direct and EFS file explorer.(skip to about 3:45.
Common Questions and Answers
Q- Will turning Off Wi-Fi save battery life?
A- Yes Next to the screen Wi-Fi is probably the next biggest drain on you battery and if you are reading Kindle Books on your Tablet you don’t really need to be connected to the Internet.
Q- I’m having trouble connecting in certain parts of my house?
A- Wi-fi signals don’t travel too well through walls and if you live in a large house then you may need install a second Wi-Fi access point to get a better coverage. See extending a home network on my other site.
If you have several access points in your house and find that you still have problems make sure you are connected to the access point that has the better signal.
Q- Will Pressing the WPS button on my Home router change my current Wi-Fi password?
A- No it just allows another device to connect without having to enter the password.
Related Articles and Resources:
- Connect Tablet to Mobile phone network with Wi-Fi
- Twin Hotspots –
- INSSider is a Wi-Fi network discovery tool. It displays every wireless hotspot’s MAC address, encryption, signal strength and channel. Very Useful troubleshooting tool. It comes as a windows program and Android APP.
- Understanding and Using Bluetooth
Как подключить и настроить Wi-Fi на Android смартфоне: полная инструкция
![]()
Привет всем! Сегодня мы поговорим – как правильно подключить и настроить вай-фай на смартфоне. Иногда бывает такое, что при подключении к беспроводной локалке появляются ошибки, или мобильник вообще отказывается подключаться. О решении этих проблем мы поговорим чуть позже, а сейчас давайте попробуем просто «приконектиться» к домашней или другой беспроводной сети.
ПОМОЩЬ! Если возникнут трудности, ошибки или непредвиденные ситуации – пишите об этом всём в комментариях, и я постараюсь вам помочь.
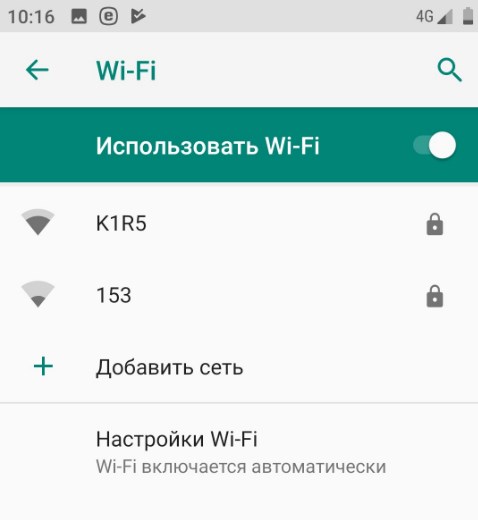
Как подключить и включить ВайФай
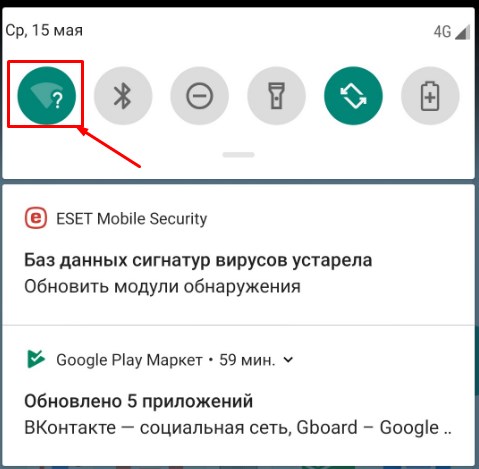
- Для подключения смахните верхнее меню и нажмите на значок Wi-Fi. Если вы находитесь в месте, где есть беспроводная сетка, к которой вы уже подключались, то вы должны к ней автоматически присоединиться, так как телефон хранит пароли всех уже подключенных Wi-Fi.
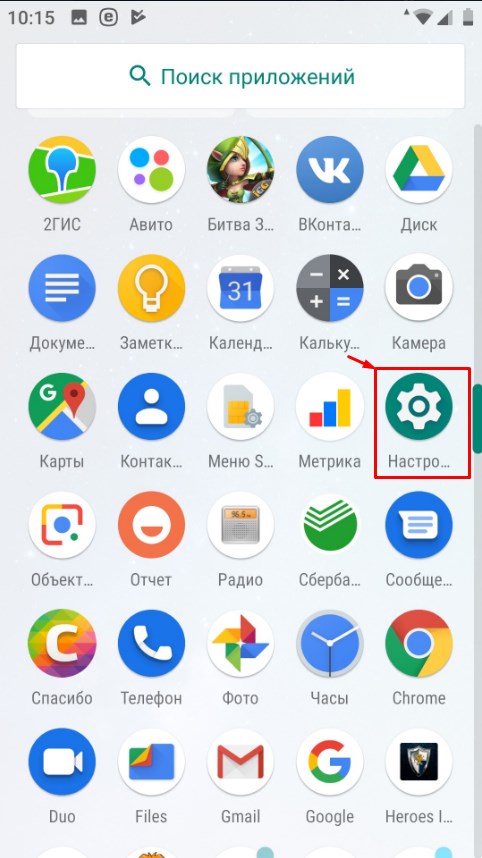
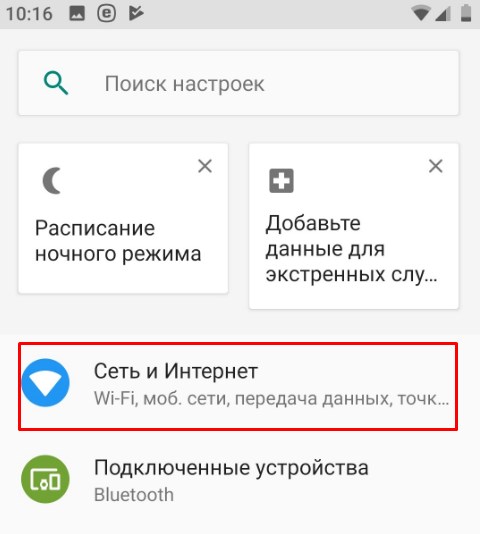
- Если контакта не произошло, то вайфай нужно выбрать вручную, также вы должны знать пароль от этой сети. Заходим в настройки – нажимаем на значок шестеренки.
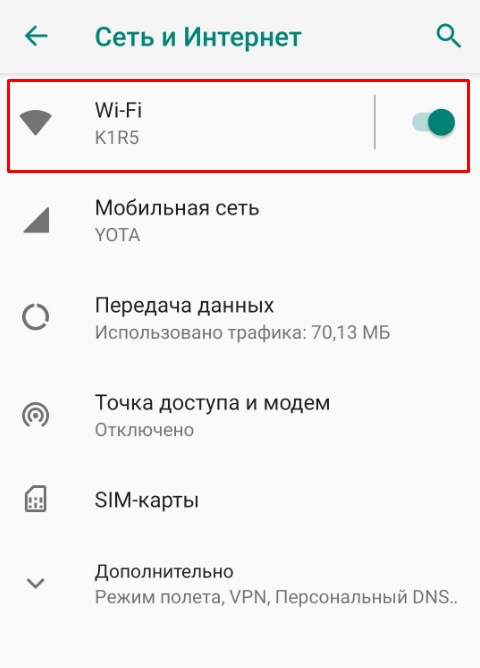
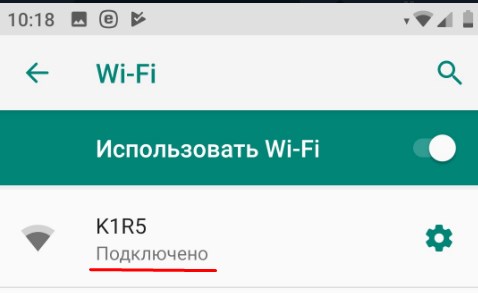
- Теперь если подключение будет установлено, то вы увидите имя вай-фай и надпись «Подключено». Если вы присоединяетесь к неизвестной сети, то нажмите на бегунок Wi-Fi, если он ещё выключен, а после нажмите на надпись беспроводного соединения.
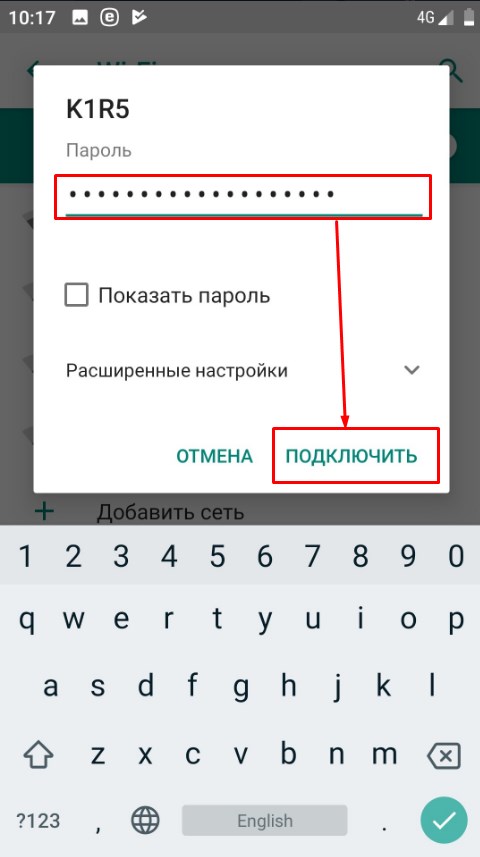
- Теперь вписываем пароль и нажимаем «Подключить». Если вы сомневаетесь в ключе, то можете нажать галочку «Показать пароль», чтобы вы его видели.
ПРИМЕЧАНИЕ! Если устройство не хочет подключаться и пишет, что ключ не подходит, то скорее всего вы вводите неверный пароль. Если вы забыли его, то советую прочесть эту статью.
Настройка
Настройка на Андроиде или iOS выполняется с введением вручную IP адреса устройства, шлюза и DNS адресов. Данные настройки частенько помогают при проблемах с подключением к интернету или к маршрутизатору. Основная настройка интернета и WiFi сети делается на роутере. Для этого на нашем портале есть все подробные инструкции в зависимости от модели и фирмы, которая выпустила ваш интернет-центр. Далее я расскажу, как детально настроить вай-фай на смартфоне с ОС Android.
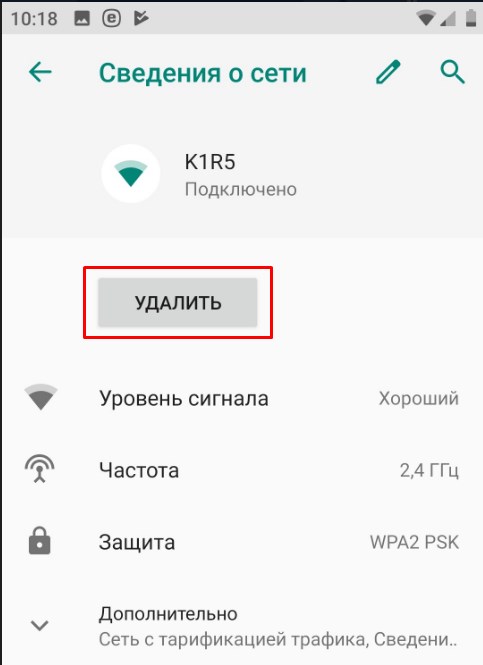
- Если вы уже подключились к сети, то нажмите по подключению и далее «Удалить». Таким образом вы отключитесь от неё.
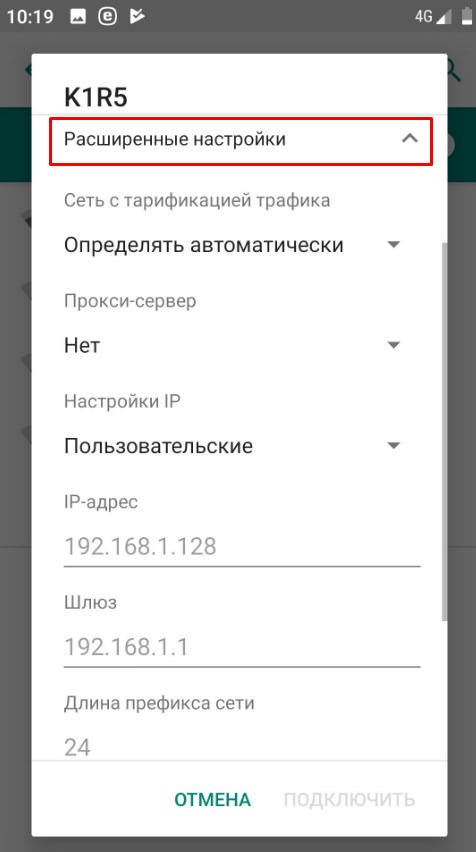
- Аналогично введите пароль при подключении, но пока не нажимайте на кнопку «Подключить». Чуть ниже нажмите «Расширенные настройки». В разделе «Настройки IP» выберите «Пользовательские». Теперь откроется меню, где вы должны будете ввести IP-адрес вашего телефона вручную. Для этого надо узнать IP вашего маршрутизатора. Адрес обычно находится под корпусом на этикетке. Если его там не будет, то зайдите с ноутбука или компьютера, который уже подключен к этому интернет-центру. Откройте командную строку и введите команду «ipconfig». В строке основной шлюз и будет нужная нам информация. Чаще всего это или 192.168.1.1 или 192.168.0.1.
- Теперь в строку IP-адрес нужно ввести первые три цифры как у вашего шлюза, а последнюю можете выбрать любую из диапазона 10 – 254. Я выбрал 128. В строке шлюза как раз и вписываем то самое значение, которое мы нашли на компе.
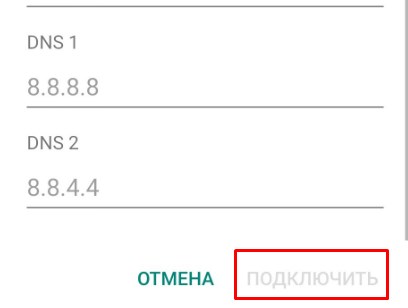
- Теперь пролистываем в самый низ. Нужно вписать DNS адреса. Впишите значения как на картинке выше и нажмите «Подключить». Если кнопка не доступна для нажатия, то скорее всего вы не ввели пароль, пролистайте вверх и проверьте.
После этого какие-то проблемы с подключением должны быть решены. Если и после этого вы не можете подключиться, то проверьте в первую очередь правильность ввода пароля. Если вы его забыли, то стоит зайти в настройки маршрутизатора – посмотреть или поменять ключ на новый.