- Installing VPN on Linux
- Using OpenVPN to Install VPN on Linux
- Step 1: Checking to see which version of Ubuntu you have
- Step 2: Updating System Apt Cache and Packages
- Step 3: Installation of OpenVPN
- Step 4: Installation of Network Manager Packages
- Step 5: Download the OpenVPN Configurations
- Step 5: Setting up the VPN
- For Ubuntu 18.04 and 19.10 Users:
- For Ubuntu 16.04 and early version Users:
- Conclusion
- How to set up a VPN on Linux in 5 minutes for free
- Update:
- Part 1: Changing your DNS
- Part 2: Setting up a VPN
- Further Reading
Installing VPN on Linux
![]()
You want to install a VPN on Linux right? We will show you how to install VPN in this article. But before we get started on the steps, let’s start with some background info to make sure you have the context.
With the rise of digital era, the world has undergone some fascinating technological changes. Moving on from landlines to mobile phones and then to smartphones, the world has reached a new horizon and it keeps on growing and growing. However, this growth hasn’t come without any repercussions. Data privacy is also at risk, and your data could be potentially accessed.
This is where we start to ask our self “How do we protect our data?” Choosing your Operating System should be your first step when defending your personal data. A popular choice by many users today would be Windows. But this popularity of Windows has itself proven to be a problem, as it has become a massive playing field for malware. A more reliable and secure alternative would be Linux, as it being open-source allows anyone to read and comment out on its code and thus there are much fewer vulnerabilities, bugs and threats to look out for. However, Linux itself isn’t flawless. It still further needs some extra resources to provide better security. One of these is a virtual private network (VPN), a private controlled network that secures your computer’s internet connection by ensuring that all data that you’re sending or receiving is encrypted which makes it difficult for anyone from the outside to eavesdrop on what you’re doing.
Using OpenVPN to Install VPN on Linux
OpenVPN is an open-source VPN protocol that itself is not a VPN provider but rather acts as a bridge between the VPN software and the VPN server. Using this, we will be able to install VPN on Linux. Let us go through the steps now.
Step 1: Checking to see which version of Ubuntu you have
Since there are 32 bit and 64 bit flavors of VPN Softwares available, the first thing you’ll want to do before getting started is checking to see which version of Ubuntu you’re currently using. To do this, first open the Terminal through either Ubuntu Dash or Ctrl+Alt+T shortcut. Once the Terminal is opened, enter the following command:

The CPU op-mode(s) entry tells you which bit version of Ubuntu you’re currently running.
Step 2: Updating System Apt Cache and Packages
Next we want to update our system’s apt cache and packages to the latest versions so that no issues arise during installation. This can be done by running the following commands:
Step 3: Installation of OpenVPN
In most Linux distros, OpenVPN is already installed. But it is better to verify this beforehand. Enter the following command to do this:
If OpenVPN is already installed in your desktop, you’d be presented with something like this:

Step 4: Installation of Network Manager Packages
The easiest way to set up and install VPN in Linux is through the Network Manager. It basically is a mandatory package that allows us to import and use the OpenVPN Config files. Installation of this package can be done by the following commands:
Step 5: Download the OpenVPN Configurations
Now you have to select your VPN service that you’ll be using to set up VPN on your Linux distro. It is important to note that you have to select the OpenVPN configuration files of your VPN service for the set up. To get your OpenVPN configurations, you have to sign in to your VPN account and check in the Linux support or OpenVPN support slot (different for all VPN Services). The files you’d get would be in a Zip Archive. For efficient running of our VPN, it would be better to create a separate directory for it. To do this, enter in the terminal:
filename here refers to the name of your directory. For example, in my case, it was:

Next we have to enter into this directory that we just created. To do this, we have to enter the command:
Again filename here refers to your directory name that you created before. Something like this:

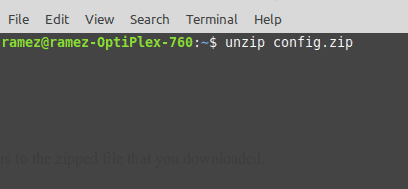
Since our file is in a Zip format, we have to first unzip to access it. This can be done by entering the following command:
filename.zip here refers to the zipped file that you downloaded. This will look like this:
Step 5: Setting up the VPN
Now finally we will be using the Network Manager to set up our VPN Connection.
For Ubuntu 18.04 and 19.10 Users:
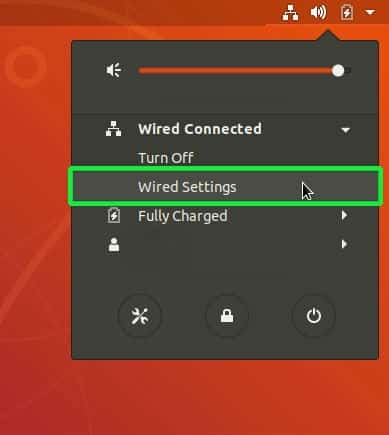
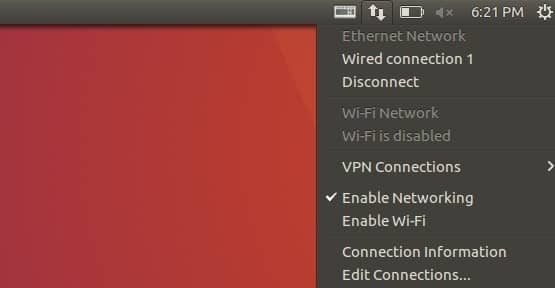
First of all, close the Terminal and click on the Network icon in the top right of the screen as shown below. Now click on Wired Connected and choose Wired Settings.
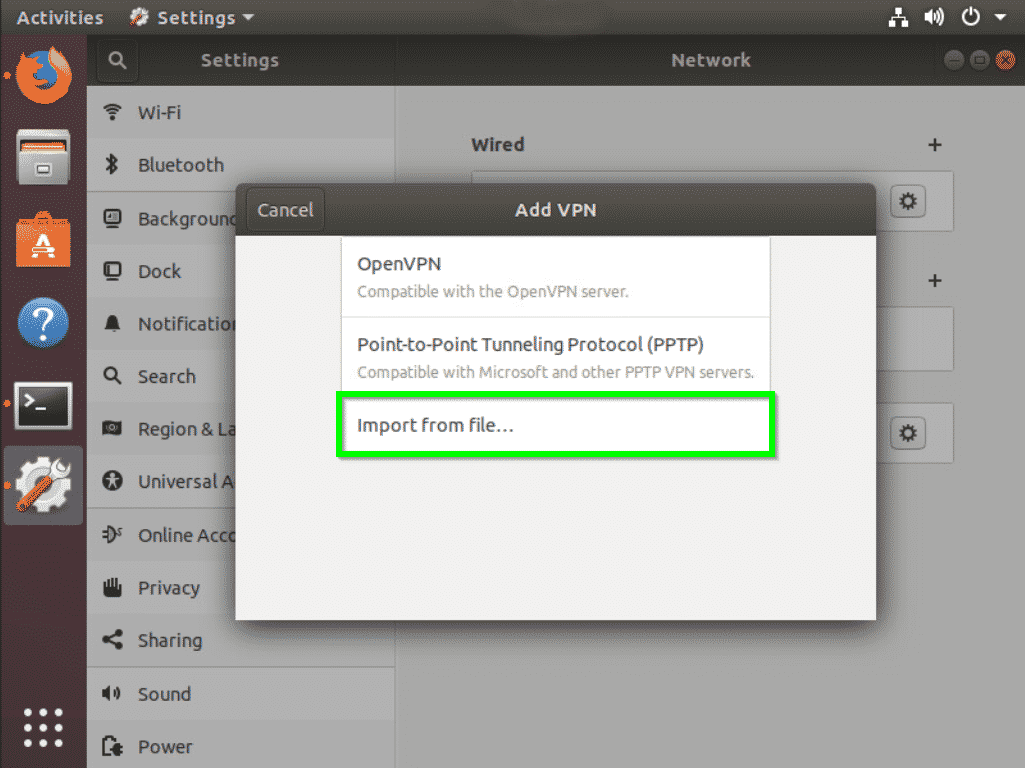
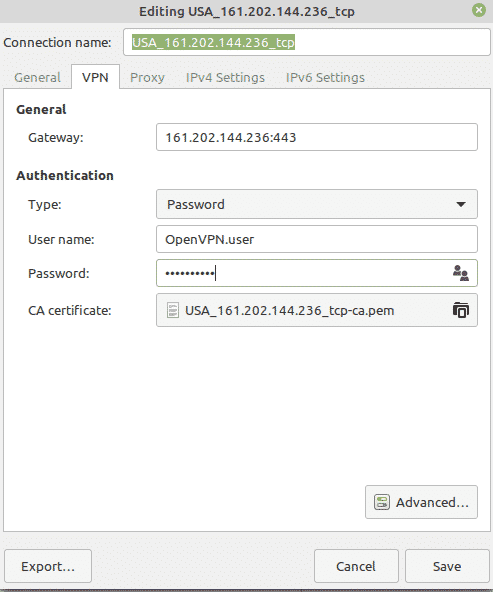
From here, you’d be directed to Settings and the Network tab will automatically open. Find the VPN heading, and click the plus sign icon (+) next to it.

You’d be greeted with the Add VPN window. Choose Import from file.
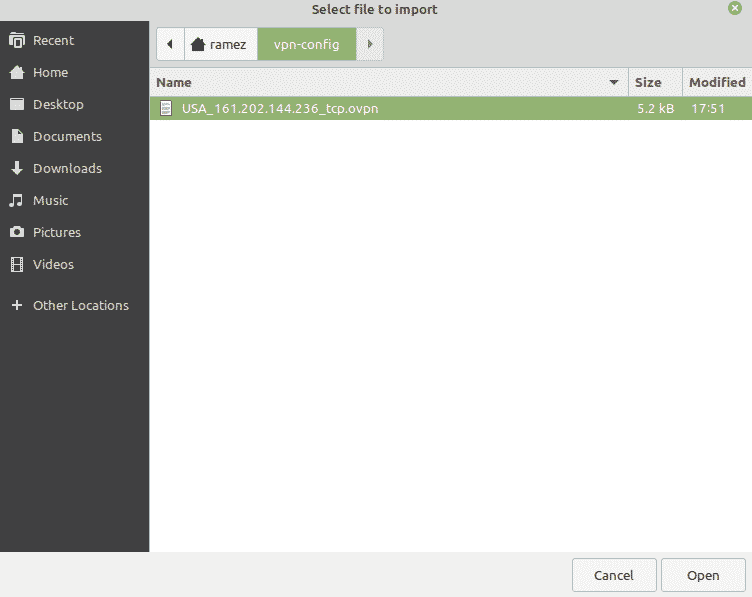
Now we have to import the OpenVPN config file of the VPN server that we want to connect to. This can be done by browsing to the directory where we unpacked the zipped config file that we downloaded before. Click on the file and select Open.
All the OpenVPN settings from that config file will be imported. Now you just have to input your Username and Password of your VPN Service and hit Save.
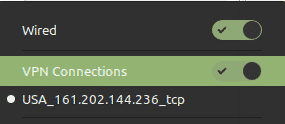
The VPN Connection has been added to your Network Manager now. You can now click on the Network icon in the top right of the screen and be able connect or disconnect the VPN from your home screen.
For Ubuntu 16.04 and early version Users:
Similarly, close the Terminal and click on the connection symbol icon in the top right of the screen as shown below and select Edit Connections.
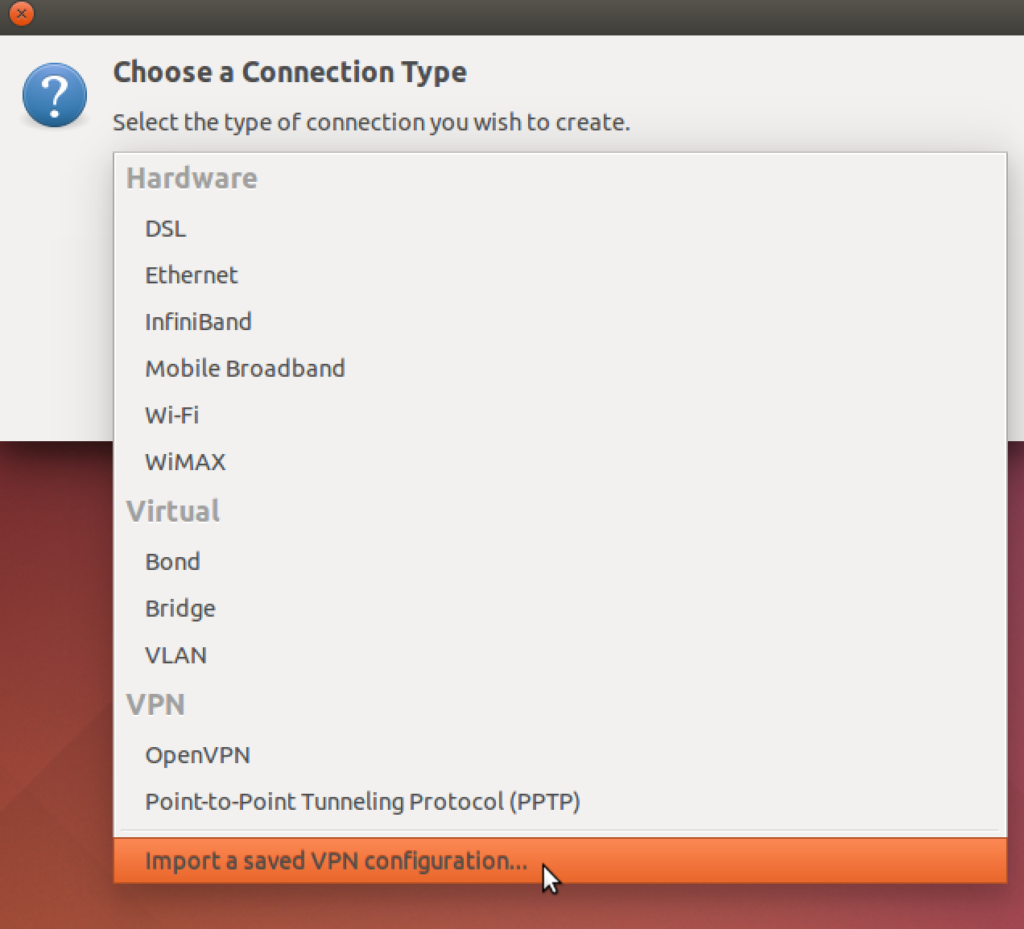
In the Network Connections, click on Add.

This is will then lead you to a prompt asking you to choose a Connection Type. Choose the I mport a saved VPN configuration option in the drop-down menu and click Create.
Now we have to import the OpenVPN config file of the VPN server that we want to connect to. This can be done by browsing to the directory where we unpacked the zipped config file that we downloaded before. Click on the file and select Open.

All the OpenVPN settings from that config file will be imported. Now you just have to input your Username and Password of your VPN Service and hit Save.

The VPN Connection has been added to your Network Connections now.
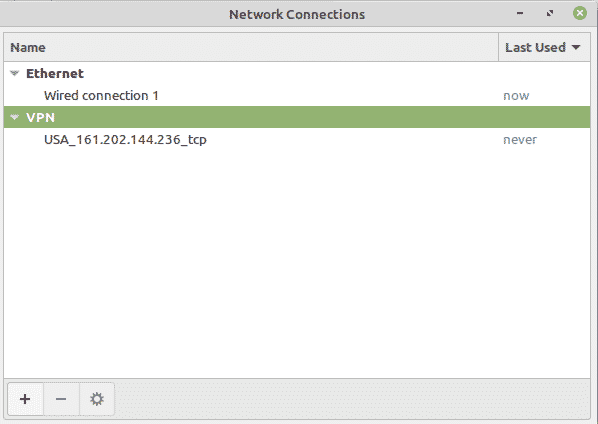
You can now click on your connection symbol icon in the top right of the screen, select VPN Connections and then click on the name of your VPN Server that you want to connect to. You should get this after a successful connection:

Conclusion
With the encryption provided by a VPN you can feel confident your communications and data are fairly safe.
How to set up a VPN on Linux in 5 minutes for free


In this short and overdue tutorial, we will set up a virtual private network (VPN) to help protect your online anonymity. I will not be covering much on what a VPN is or what these settings are. We’re going to set one up. Let’s get straight to it.
Windows Version:
Update:
If you have any issues run a test on ipleak.net to find out what exactly is leaking information then view this response and the one linked in it. If it doesn’t help solve your problem then post a comment with as much information as possible.
- Computer with Linux OS. I’m using Ubuntu. The commands may be different if you’re not on a Debian based distro.
- Admin/Sudo privileges
- Basic computer skills
- Basic knowledge of what a VPN is
Take note of everything you change and make backups in case something goes wrong. Also, for the record, I’m not affiliated with any of the sites linked here. Follow this tutorial at your own risk since you could mess up some settings.
Part 1: Changing your DNS
Your domain name server (DNS) can give away some information about you, so we will want to change that. Start by using a tool such as DNS leak test to see what information is visible. Then work on hiding it.
- We’re going to use OpenDNS. Head to their website and grab their two name server IP addresses that can be found on their Setup Guide Page
- 208.67.222.222
- 208.67.220.220
2. Edit: /etc/dhcp/dhclient.conf
In your terminal type or copy/paste the command below. Nano is a text editor in the terminal. If the file is located somewhere else on your machine google or look for it.
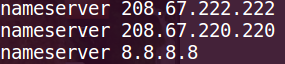
sudo nano /etc/dhcp/dhclient.confLook for the line that says “prepend domain-name-servers.” If it’s commented out with a # symbol at the beginning of the line, uncomment it by removing the #. Now change the line so it uses the IP addresses from OpenDNS, and add one more 8.8.8.8 like mine below. Your internet may temporarily stop working at this point!
prepend domain-name-servers 208.67.222.222, 208.67.220.220, 8.8.8.8;That line means it will use the first address, then the second if the first one fails, and finally 8.8.8.8 if the first two fail. This usually will not happen. We add 8.8.8.8 because by default it uses 3 addresses. If we don’t add the third one and the first two fail then your real address gets used. Now save and exit as shown below:
Press CTRL + O
Press ENTER
Press CTRL + X
This will save and close the file. Now we’ll need to restart network-manager with the next command.
sudo service network-manager restartYou should now check to see if it works. Enter the command below, and see if the nameservers show up. Do a DNS leak test on the website linked above.
Potential Issues
I did the steps, but the cat command only shows nameserver 127.0.1.1
Thanks to Dietmar and AnalyzeTrades for this issue/solution
Try commenting/removing dns=dnsmasq from /etc/NetworkManager/NetworkManager.conf
Part 2: Setting up a VPN
Fixing a DNS leak in web browser:
- In Firefox type about:config in your address bar and press Enter.
- On the config page search for: media.peerconnection.enabled
- Change it to false by double clicking on it.
- Restart Firefox.
I don’t know how this is done in other browsers.
Getting a Free VPN
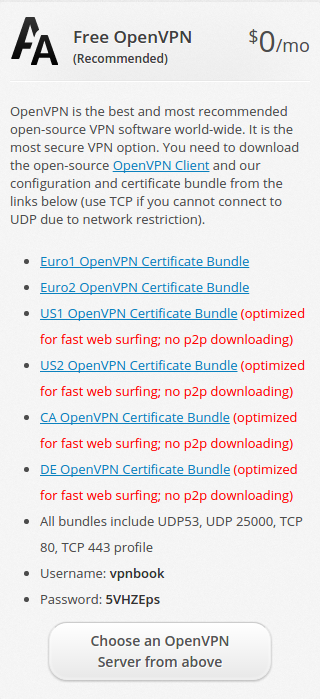
- Google for a free VPN, and make sure it’s good. I’ll be using VPNBook for the rest of the steps.
- On VPNBook, you just download the config file for the VPN you want. Copy the username and password. The password changes periodically, so you will need to get it again later. It doesn’t matter where you are located when choosing your config file. You can be in the U.S., download the Euro one, and appear to be from Europe.
3. After you extract the downloaded zip file, open your terminal again. Change to the directory where you extracted it, or right click and choose “Open in Terminal.” We have just a few more steps now.
4. Install OpenVPN to use the config.
sudo apt-get install openvpn5. Close your browser and anything connected to the internet. To use OpenVPN, enter the command below to run the config you want. Once it says “Initialization Complete,” you’re all set. You should keep the terminal open. If it fails, try a different VPN, or read the error and try to figure it out.
sudo openvpn vpnbook-ca1-tcp443.ovpn6. Finally, test if it works by doing another DNS leak test.

Congratulations if you made it this far and it works! Here’s a bonus simple bash script that you can run. You just need to change the password when needed.
Bash Script 1
credits to Adnan Rahić
cd /path/to/VPNBook.com-OpenVPN-Euro1username="vpnbook"password="he2qv5h"read -sp "Enter Sudo Password: " sudopasswordspawn sudo openvpn vpnbook-euro1-tcp443.ovpnexpect "password for $USER: "send "$sudopassword\r"expect "Enter Auth Username: "send "$username\r"expect "Enter Auth Password: "send "$password\r"expect "$ "This will start the VPN without the need to enter the username and password manually. The VPN will also stay running in the background. Here’s a script for killing it if the need arises.
Bash Script 2
#!/bin/bashecho "user: vpnbook"echo "pass: 5VHZEps"sudo openvpn vpnbook-ca1-tcp443.ovpnJust put that into a new file, right click > properties > permissions, and allow executing file as a program. This example uses the Canada tcp 443 config.
Further Reading
Here are a few great articles by Quincy Larson that talk about VPNs, internet privacy, and security.
If you’re interested in ethical hacking and security, there’s a free 15 hour course on YouTube.