exemen’s blog
As part of the disk-based backup project, my Bacula Director is going on an Ubunutu 10.04 LTS server on HP Proliant hardware. All well and good, but this is my first Ubuntu Server deployment on HP hardware. Under Dell, I’m used to using the MegaRAID CLI tools to monitor and manage the RAID controller, but was stuck trying to find the equivalent for Ubuntu.
The answer is to use HP’s ProLiant Support Pack which offers a bunch of CLI tools. The one I was interested in here was hpacucli
To install (as root, obviously):
- wget http://downloads.linux.hp.com/SDR/downloads/bootstrap.sh
- ./bootstrap.sh ProLiantSupportPack (this adds the HP repo to apt’s sources)
- wget http://downloads.linux.hp.com/SDR/downloads/ProLiantSupportPack/GPG-KEY-ProLiantSupportPack
- apt-key add GPG-KEY-ProLiantSupportPack
- aptitude update
- apt-get install hpacucli
Like any good CLI program, it is finicky to learn, and intuitive thereafter 🙂 Here’s the thing I wanted to do:
root@rm-bac-1:~# hpacucli HP Array Configuration Utility CLI 8.50-6.0 Detecting Controllers. Done. Type "help" for a list of supported commands. Type "exit" to close the console. ==> ctrl slot=0 logicaldrive all show detail Smart Array P410i in Slot 0 (Embedded) array A Logical Drive: 1 Size: 136.7 GB Fault Tolerance: RAID 1 Heads: 255 Sectors Per Track: 32 Cylinders: 35132 Stripe Size: 128 KB Status: OK Unique Identifier: 600508B1001031303434393834300300 Disk Name: /dev/cciss/c0d0 Mount Points: / 131.1 GB OS Status: LOCKED Logical Drive Label: A01197DF5001438010449840590B Mirror Group 0: physicaldrive 1I:1:1 (port 1I:box 1:bay 1, SAS, 146 GB, OK) Mirror Group 1: physicaldrive 1I:1:2 (port 1I:box 1:bay 2, SAS, 146 GB, OK)
Cool! There are other bits I’ll want – I see one of the packages offers SNMP monitoring, which naturally, I’m going to use so Nagios can keep an eye on this server.
A list of the 7 packages in the Proliant Support Pack is in this file, but here’s an abridged listing:
Package: hpacucli Description: HP Command Line Array Configuration Utility The HP Command Line Array Configuration Utility is the disk array configuration program for Array Controllers. Package: cpqacuxe Description: HP Array Configuration Utility The HP Array Configuration Utility is the web-based disk array configuration program for Array Controllers. Package: hpsmh Description: HP System Management Homepage Provides HTTP infrastructure for HP Agent & Utility system packages. Homepage: http://hp.com/go/proliantlinux Package: hp-smh-templates Description: HP System Management Homepage Templates This package contains the System Management Homepage Templates for all hp Proliant systems with ASM, ILO, & ILO2 embedded management asics. Package: hp-snmp-agents Description: Insight Management SNMP Agents for HP ProLiant Systems This package contains the SNMP server, storage, and nic agents for all hp Proliant systems with ASM, ILO, & ILO2 embedded management asics. Package: hponcfg Description: RILOE II/iLo online configuration utility Hponcfg is a command line utility that can be used to configure iLO/RILOE II from within the operating system without requiring a reboot of the server. Homepage: http://hp.com/go/proliantlinux Package: hp-health Description: hp System Health Application and Command line Utility Package This package contains the System Health Monitor for all hp Proliant systems with ASM, ILO, & ILO2 embedded management asics. Also contained are the command line utilities.
Installing and Using HP Smart Storage Utilities on Ubuntu 18.04 LTS

As I branch out of the networking world and into general systems administration duties, I find myself having to learn a lot more about the tools and utilities used to manage said systems. I recently deployed Cinder in my OpenStack-Ansible based homelab, and am attempting to learn and use the tools available to me in a more efficient way.
My OpenStack cluster consists of the following:
- 1x Infrastructure Node: HP DL360e G8 (4x LFF)
- 1x Compute Node: HP DL380p G8 (12x LFF w/ HP 420i)
The task was simple: Add a new disk to the host to be setup in a RAID 0 and used for Cinder volumes.
Install the packages
Installing a new drive and preparing it for use in the system can be accomplished in one of two ways:
- Insert the drive and reboot the host into the Smart Storage Utility where you can configure the drive.
- Use the HP Smart Storage Utilities for Linux to modify the RAID configuration within the host OS
Option 2 sounded much better. However, many of the posts that walk through this process are outdated and reference APT sources that are no longer available or utilities whose names have changed a few times over the years.
The following instructions will help you, the reader, configure the latest packages for Ubuntu 18.04 LTS (Bionic) to manage your RAID within the host OS.
First, create a new APT source named hpe.list at /etc/apt/sources.list.d/ and add the following:
deb http://downloads.linux.hpe.com/SDR/repo/mcp bionic/current non-free Finally, install the relevant packages:
# apt install ssa ssacli ssaducli Basic sscli commands
Once the packages have been installed, use the ssacli ctrl all show config command to view the current configuration:
root@lab-compute01:~# ssacli ctrl all show config Smart Array P420i in Slot 0 (Embedded) (sn: 00143802965EB30) Gen8 ServBP 12+2 at Port 1I, Box 1, OK Port Name: 1I Port Name: 2I Array A (SATA, Unused Space: 0 MB) logicaldrive 1 (7.28 TB, RAID 1+0, OK) physicaldrive 1I:1:1 (port 1I:box 1:bay 1, SATA HDD, 2 TB, OK) physicaldrive 1I:1:2 (port 1I:box 1:bay 2, SATA HDD, 2 TB, OK) physicaldrive 1I:1:4 (port 1I:box 1:bay 4, SATA HDD, 2 TB, OK) physicaldrive 1I:1:5 (port 1I:box 1:bay 5, SATA HDD, 2 TB, OK) physicaldrive 1I:1:7 (port 1I:box 1:bay 7, SATA HDD, 2 TB, OK) physicaldrive 1I:1:8 (port 1I:box 1:bay 8, SATA HDD, 2 TB, OK) physicaldrive 1I:1:10 (port 1I:box 1:bay 10, SATA HDD, 2 TB, OK) physicaldrive 1I:1:11 (port 1I:box 1:bay 11, SATA HDD, 2 TB, OK) Enclosure SEP (Vendor ID HP, Model Gen8 ServBP 12+2) 378 (WWID: 50014380303EAAF9, Port: 1I, Box: 1) Expander 380 (WWID: 50014380303EAAE0, Port: 1I, Box: 1) SEP (Vendor ID PMCSIERA, Model SRCv8x6G) 379 (WWID: 500143802965EB3F) Use the ssacli ctrl all show status command to view the current status of the controller:
root@lab-compute01:~# ssacli ctrl all show status Smart Array P420i in Slot 0 (Embedded) Controller Status: OK Cache Status: OK Battery/Capacitor Status: OK I found a recently-updated blog containing additional useful commands at https://wiki.phoenixlzx.com/page/ssacli/. Check it out!
Adding a drive
At this point, I inserted the drive into the chassis. Re-running the ssacli ctrl all show config command, I could see the controller recognized the drive:
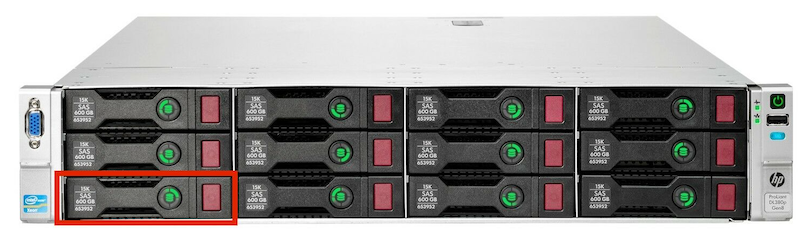
root@lab-compute01:~# ssacli ctrl all show config Smart Array P420i in Slot 0 (Embedded) (sn: 00143802965EB30) Gen8 ServBP 12+2 at Port 1I, Box 1, OK Port Name: 1I Port Name: 2I Array A (SATA, Unused Space: 0 MB) logicaldrive 1 (7.28 TB, RAID 1+0, OK) physicaldrive 1I:1:1 (port 1I:box 1:bay 1, SATA HDD, 2 TB, OK) physicaldrive 1I:1:2 (port 1I:box 1:bay 2, SATA HDD, 2 TB, OK) physicaldrive 1I:1:4 (port 1I:box 1:bay 4, SATA HDD, 2 TB, OK) physicaldrive 1I:1:5 (port 1I:box 1:bay 5, SATA HDD, 2 TB, OK) physicaldrive 1I:1:7 (port 1I:box 1:bay 7, SATA HDD, 2 TB, OK) physicaldrive 1I:1:8 (port 1I:box 1:bay 8, SATA HDD, 2 TB, OK) physicaldrive 1I:1:10 (port 1I:box 1:bay 10, SATA HDD, 2 TB, OK) physicaldrive 1I:1:11 (port 1I:box 1:bay 11, SATA HDD, 2 TB, OK) Unassigned physicaldrive 1I:1:3 (port 1I:box 1:bay 3, SATA HDD, 2 TB, OK) Enclosure SEP (Vendor ID HP, Model Gen8 ServBP 12+2) 378 (WWID: 50014380303EAAF9, Port: 1I, Box: 1) Expander 380 (WWID: 50014380303EAAE0, Port: 1I, Box: 1) SEP (Vendor ID PMCSIERA, Model SRCv8x6G) 379 (WWID: 500143802965EB3F) Unassigned physicaldrive 1I:1:3 (port 1I:box 1:bay 3, SATA HDD, 2 TB, OK) In my system, Bay 3 is located at the bottom left, as shown here:
To create a new RAID 0 logical drive, use sscli ctrl create command:
# ssacli ctrl slot=0 create type=ld drives=1I:1:3 raid=0 Another look at the config should reflect the newly-built logical drive:
root@lab-compute01:~# ssacli ctrl all show config . Array A (SATA, Unused Space: 0 MB) logicaldrive 1 (7.28 TB, RAID 1+0, OK) physicaldrive 1I:1:1 (port 1I:box 1:bay 1, SATA HDD, 2 TB, OK) physicaldrive 1I:1:2 (port 1I:box 1:bay 2, SATA HDD, 2 TB, OK) physicaldrive 1I:1:4 (port 1I:box 1:bay 4, SATA HDD, 2 TB, OK) physicaldrive 1I:1:5 (port 1I:box 1:bay 5, SATA HDD, 2 TB, OK) physicaldrive 1I:1:7 (port 1I:box 1:bay 7, SATA HDD, 2 TB, OK) physicaldrive 1I:1:8 (port 1I:box 1:bay 8, SATA HDD, 2 TB, OK) physicaldrive 1I:1:10 (port 1I:box 1:bay 10, SATA HDD, 2 TB, OK) physicaldrive 1I:1:11 (port 1I:box 1:bay 11, SATA HDD, 2 TB, OK) Array B (SATA, Unused Space: 0 MB) logicaldrive 2 (1.82 TB, RAID 0, OK) physicaldrive 1I:1:3 (port 1I:box 1:bay 3, SATA HDD, 2 TB, OK) . You can then use the sscli ctrl show command to see how this drive was mapped within the operating system (where ld 2 maps to logicaldrive 2 above):
root@lab-compute01:~# ssacli ctrl slot=0 ld 2 show Smart Array P420i in Slot 0 (Embedded) Array B Logical Drive: 2 Size: 1.82 TB Fault Tolerance: 0 Heads: 255 Sectors Per Track: 32 Cylinders: 65535 Strip Size: 256 KB Full Stripe Size: 256 KB Status: OK Caching: Enabled Unique Identifier: 600508B1001CA08B21AD7F9F4DAFDA25 Disk Name: /dev/sdd Mount Points: None Logical Drive Label: 058522AB00143802965EB30B380 Drive Type: Data LD Acceleration Method: Con A quick look at fdisk shows the drive ready for use:
root@lab-compute01:~# fdisk -l /dev/sdd Disk /dev/sdd: 1.8 TiB, 2000365379584 bytes, 3906963632 sectors Units: sectors of 1 * 512 = 512 bytes Sector size (logical/physical): 512 bytes / 512 bytes I/O size (minimum/optimal): 262144 bytes / 262144 bytes Disklabel type: dos Disk identifier: 0x44c89b3a Device Boot Start End Sectors Size Id Type /dev/sdd1 2048 3907020799 3907018752 1.8T 83 Linux If you have some thoughts or comments on this process, I’d love to hear ‘em. Feel free to reach out on Twitter at @jimmdenton or hit me up on LinkedIn.
Related Posts
How to install and detect raid controller in latest Ubuntu (20+) on HP Proliant 360 Gen6 [closed]
Questions should demonstrate reasonable information technology management practices. Questions that relate to unsupported hardware or software platforms or unmaintained environments may not be suitable for Server Fault.
I recently purchased a set of 6 HP rack servers off of ebay for what seemed liked a fairly good deal. The gen6 servers were launched by HP in 2009. I am able to install and properly detect the HP Smart Array 410 Raid Controller that the servers drives are plugged into with 14.04, but having troubles with later versions of Ubuntu (does not detect block device). Unfortunately, Ubuntu 14.04 has reached EOL so I’d like to get something more modern onto the servers. Any suggestions? Are there any communities on the web where I might find technical folks trying to do something similar? As it was suggested below there is support on 20.*, I tried my focal usb stick again and here is what I got: (helpful link: https://dwaves.de/2019/09/05/linux-bash-how-to-find-hardware-raid-controller-get-info-about-hardware-hp-server-get-raid-and-power-watt-usage-status-from-command-line/)
root@ubuntu-server:/dev# lsscsi [0:0:0:0] disk JetFlash Transcend 16GB 1100 /dev/sda (just my usb stick) hpacucli ctrl all show status Error: No controllers detected. (using alien converted RPM) 03:00.0 RAID bus controller: Hewlett-Packard Company Smart Array G6 controllers (rev 01) Subsystem: Hewlett-Packard Company Smart Array P410i Control: I/O+ Mem+ BusMaster- SpecCycle- MemWINV- VGASnoop- ParErr+ Stepping- SERR- FastB2B- DisINTx- Status: Cap+ 66MHz- UDF- FastB2B- ParErr- DEVSEL=fast >TAbort- SERR- root@ubuntu-server:/dev# dmesg|grep RAID root@ubuntu-server:/dev#
root@ubuntu-server:/dev# dmesg|grep scsi [ 2.612058] scsi host0: usb-storage 1-5:1.0 [ 3.824880] scsi 0:0:0:0: Direct-Access JetFlash Transcend 16GB 1100 PQ: 0 ANSI: 6 [ 3.825382] sd 0:0:0:0: Attached scsi generic sg0 type 0 root@ubuntu-server:/dev#