- OPTIONS (GENERAL)
- OPTIONS (SCAN AREA)
- OPTIONS (‘FILE’ DEST)
- OPTIONS (‘PDF’ DEST)
- OPTIONS (‘VIEWER’ DEST)
- OPTIONS (‘EDITOR’ DEST)
- OPTIONS (‘EMAIL’ DEST)
- OPTIONS (‘PRINTER’ DEST)
- OPTIONS (ADVANCED)
- SEE ALSO
- AUTHOR
- REPORTING BUGS
- COPYRIGHT
- 🤾 Как установить сетевой принтер и сканер HP в Ubuntu Linux
- Введение.
- Установка сетевого принтера и сканера HP в Ubuntu Linux
- Шаг 1. Обновите Ubuntu Linux
- Шаг 2. Поиск программного обеспечения HPLIP
- Шаг 3. Установите HPLIP в Ubuntu Linux 16.04 / 18.04 LTS или выше
- Шаг 4. Настройте принтер HP в Ubuntu Linux
- hp-scan: Scan Utility (ver. 2.2)
- Installing HPLIP
- Manual Install
OPTIONS (GENERAL)
Scan destinations: -s
OPTIONS (SCAN AREA)
Specify the units for area/box measurements: -t
OPTIONS (‘FILE’ DEST)
OPTIONS (‘PDF’ DEST)
OPTIONS (‘VIEWER’ DEST)
OPTIONS (‘EDITOR’ DEST)
OPTIONS (‘EMAIL’ DEST)
From: address for ’email’ dest: —email-from=
OPTIONS (‘PRINTER’ DEST)
Printer queue/printer dest: —dp= or —dest-printer= Printer device-URI dest: —dd= or —dest-device=
OPTIONS (ADVANCED)
Set the scanner compression mode: -x
SEE ALSO
AUTHOR
HPLIP (HP Linux Imaging and Printing) is an HP developed solution for printing, scanning, and faxing with HP inkjet and laser based printers in Linux.
REPORTING BUGS
The HPLIP Launchpad.net site https://launchpad.net/hplip is available to get help, report bugs, make suggestions, discuss the HPLIP project or otherwise contact the HPLIP Team.
COPYRIGHT
This software comes with ABSOLUTELY NO WARRANTY. This is free software, and you are welcome to distribute it under certain conditions. See COPYING file for more details.
| Source file: | hp-scan.1.en.gz (from hplip 3.18.12+dfsg0-2) |
| Source last updated: | 2018-12-10T19:12:18Z |
| Converted to HTML: | 2021-05-16T21:11:53Z |
🤾 Как установить сетевой принтер и сканер HP в Ubuntu Linux
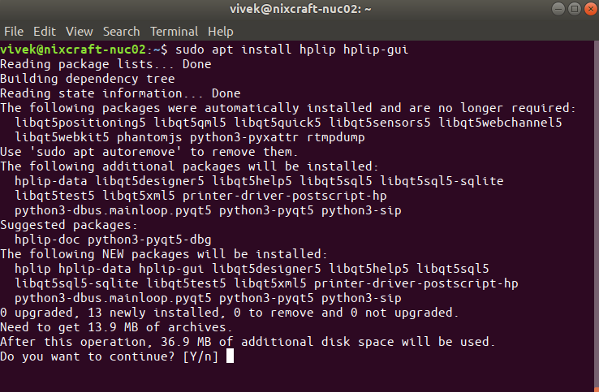
Мы собираемся установить hplip-gui и hplip с помощью команды apt:У меня есть принтер и сканер HP Officejet Pro.
Введение.
Это официальное программное обеспечение, которое поддерживает широкий спектр принтеров HP, включая Deskjet, Officejet, Photosmart, PSC, Business Inkjet, OfficeJet, LaserJet и другие.
Установка сетевого принтера и сканера HP в Ubuntu Linux
Вы можете скачать программное обеспечение, посетив эту страницу.
Тем не менее, Ubuntu Linux также включает программное обеспечение в свой репозиторий.
Итак, мы собираемся использовать официальный репо Ubuntu.
Шаг 1. Обновите Ubuntu Linux
Просто запустите команду apt:
sudo apt update
sudo apt upgrade
Шаг 2. Поиск программного обеспечения HPLIP
Найдите HPLIP, выполните следующую команду apt-cache или apt-get:
hplip - HP Linux Printing and Imaging System (HPLIP) hplip-data - HP Linux Printing and Imaging - data files hplip-doc - HP Linux Printing and Imaging - documentation libhpmud-dev - HP Multi-Point Transport Driver (hpmud) development libraries libhpmud0 - HP Multi-Point Transport Driver (hpmud) run-time libraries libsane-hpaio - HP SANE backend for multi-function peripherals openprinting-ppds - OpenPrinting printer support - PostScript PPD files printer-driver-hpcups - HP Linux Printing and Imaging - CUPS Raster driver (hpcups) printer-driver-hpijs - HP Linux Printing and Imaging - printer driver (hpijs) printer-driver-pxljr - printer driver for HP Color LaserJet 35xx/36xx hpijs-ppds - HP Linux Printing and Imaging - HPIJS PPD files hplip-gui - HP Linux Printing and Imaging - GUI utilities (Qt-based)
Шаг 3. Установите HPLIP в Ubuntu Linux 16.04 / 18.04 LTS или выше
Мы собираемся установить hplip-gui и hplip с помощью команды apt:
sudo apt install hplip hplip-gui
Шаг 4. Настройте принтер HP в Ubuntu Linux
Вам нужно запустить команду hp-setup, которая настраивает принтеры и факсы HPLIP в спулере CUPS.
Утилиты попытается автоматически определить правильный файл PPD.
Позволяет распечатать тестовую страницу.
Также в ыполняет основные настройки факса.
Однако сначала включите принтер.
Настройте принтер HP в Ubuntu Linux с помощью графического интерфейса, запустите:
Если у вас есть принтер HP на базе USB, попробуйте:
hp-scan: Scan Utility (ver. 2.2)
SANE-based scan utility for HPLIP supported all-in-one/mfp devices.
Usage: hp-scan [DEVICE_URI|PRINTER_NAME] [MODE] [OPTIONS]
[PRINTER|DEVICE-URI]
| To specify a device-URI: | -d or —device= |
| To specify a CUPS printer: | -p or —printer= |
| Run in interactive mode: | -i or —interactive |
| Set the logging level: | -l or —logging= |
| : none, info*, error, warn, debug (*default) | |
| Run in debug mode: | -g (same as option: -ldebug) |
| This help information: | -h or —help |
[OPTIONS] (General)
| Scan destinations: | -s or —dest= |
| where is a comma separated list containing one or more of: ‘file’*, | |
| ‘viewer’, ‘editor’, ‘pdf’, or ‘print’. Use only commas between values, no spaces. | |
| Scan mode: | -m or —mode=. Where is ‘gray’*, ‘color’ or ‘lineart’. |
| Scanning resolution: | -r or —res= or —resolution= |
| where 300 is default. | |
| Image resize: | —resize= (min=1%, max=400%, default=100%) |
| Image contrast: | —contrast= |
| ADF mode: | —adf (Note, only PDF output is supported when using the ADF) |
[OPTIONS] (Scan area)
| Specify the units for area/box measurements: | -t or —units= |
| where is ‘mm’*, ‘cm’, ‘in’, ‘px’, or ‘pt’ (‘mm’ is default). | |
| Scan area: | -a,,, or —area=,,, |
| Coordinates are relative to the upper left corner of the scan area. | |
| Units for tlx, tly, brx, and bry are specified by -t/—units (default is ‘mm’). | |
| Use only commas between values, no spaces. | |
| Scan box: | —box=,,, |
| tlx and tly coordinates are relative to the upper left corner of the scan area. | |
| Units for tlx, tly, width, and height are specified by -t/—units (default is ‘mm’). | |
| Use only commas between values, no spaces. | |
| Top left x of the scan area: | —tlx= |
| Coordinates are relative to the upper left corner of the scan area. | |
| Units are specified by -t/—units (default is ‘mm’). | |
| Top left y of the scan area: | —tly= |
| Coordinates are relative to the upper left corner of the scan area. | |
| Units are specified by -t/—units (default is ‘mm’). | |
| Bottom right x of the scan area: | —brx= |
| Coordinates are relative to the upper left corner of the scan area. | |
| Units are specified by -t/—units (default is ‘mm’). | |
| Bottom right y of the scan area: | —bry= |
| Coordinates are relative to the upper left corner of the scan area. | |
| Units are specified by -t/—units (default is ‘mm’). | |
| Specify the scan area based on a paper size: | —size= |
| where is one of: 5×7, photo, a2_env, b4, b5, 3×5, 4×6, higaki, flsa, c6_env, legal, no_10_env, exec, a3, a5, a4, letter, a6, super_b, oufufu-hagaki, dl_env, japan_env_4, japan_env_3 |
[OPTIONS] (‘file’ dest)
| Filename for ‘file’ destination: | -o or -f or —file= or —output= |
[OPTIONS] (‘pdf’ dest)
| PDF viewer application: | —pdf= |
[OPTIONS] (‘viewer’ dest)
| Image viewer application: | -v or —viewer= |
[OPTIONS] (‘editor’ dest)
| Image editor application: | -e or —editor= |
[OPTIONS] (’email’ dest)
| From: address for ’email’ dest: | —email-from= (required for ’email’ dest.) |
| To: address for ’email’ dest: | —email-to= (required for ’email’ dest.) |
| Email subject for ’email’ dest: | —email-subject=»» or —subject=»» |
| Use double quotes («) around the subject if it contains space characters. | |
| Note or message for the ’email’ dest: | —email-msg=»» or —email-note=»» |
| Use double quotes («) around the note/message if it contains space characters. |
[OPTIONS] (‘printer’ dest)
| Printer queue/printer: | —printer= |
[OPTIONS] (advanced)
| Set the scanner compression mode: | -x or —compression=, =’raw’, ‘none’ or ‘jpeg’ (‘jpeg’ is default) (‘raw’ and ‘none’ are equivalent) |
Installing HPLIP
A pre-build package is available for certain Linux distributions, based on the popularity of the distribution.
Download a package by click here.
We recommend that most users use the Automatic Installer .
Linux distributions supported by the automatic installer:
- SUSE Linux (13.2, 42.1, 42.2, 42.3,15.0,15.1,15.2,15.3,15.4)
- Fedora (22, 23, 24, 25, 26, 27, 28, 29, 30, 31, 32, 33, 34, 35, 36,37)
- Linux Mint (17, 17.1, 17.2, 17.3, 18, 18.1, 18.2, 18.3, 19, 19.1,19.2,19.3, 20.04, 20.1, 20.2, 20.3,21.0,21.1)
- Red Hat Enterprise Linux (8.0, 8.2, 8.3, 8.4, 8.5,8.6,8.7,9.0,9.1)
- Boss (5.0)
- Ubuntu (12.04, 14.04, 15.10, 16.04, 16.10, 17.04, 17.10, 18.04,18.10,19.04,19.10, 20.04, 20.10, 21.04, 21.10, 22.04,22.10)
- Debian (7.0, 7.1, 7.2, 7.3, 7.4, 7.5, 7.6, 7.7, 7.8, 7.9, 8.0, 8.1, 8.2, 8.3, 8.4, 8.5, 8.6, 8.7, 8.8, 9.1, 9.2, 9.3, 9.4, 9.5, 9.6, 9.7, 9.8, 9.9, 10.10.1, 10.2, 10.3, 10.4, 10.5, 10.6, 10.7, 10.8, 10.9, 11)
- Manjaro Linux (17.1.4, 18.0, 18.0.4, 18.1.0, 18.1.2, 19.0, 20.0, 20.2, 21.0, 21.2,21.3)
- Zorin (16)
- MX Linux (21, 21.1,21.2,21.3)
- Elementary OS (6, 6.1,7)
Instructions for using the Automatic Installer.
Manual Install
While this is the more traditional method to download and install HPLIP, it requires a degree of knowledge that users new to Linux may find difficult. It requires that you manually install dependencies and run build and install commands in a console/terminal.
To use it, follow the directions at our Manual Installation Instructions page.