- How to Install and Use htop in Linux
- Install htop utility in Linux
- What different colors and statistics indicate in htop
- CPU usage bar
- Memory bar
- Statistics
- How to use htop in Linux
- Sort processes based on Resource Consumption
- Search for a specific process
- Filter ongoing processes
- Kill process
- Customize htop
- More than htop?
- Htop – An Interactive Process Viewer for Linux
- Install Htop in Linux
- Install Htop on Debian
- Install Htop on Ubuntu
- Install Htop on Linux Mint
- Install Htop on Fedora
- Install Htop on CentOS 8/7
- Install Htop on RHEL 8/7
- Install Htop on Rocky Linux/AlmaLinux
- Install Htop on Gentoo
- Install Htop on Arch Linux
- Install Htop on OpenSUSE
- Compile and Install Htop from Sources in Linux
- On RHEL/CentOS and Fedora
- On Debian, Ubuntu, and Mint
- How do I use htop?
- Htop is having three sections mainly
- Htop Shortcut and Function Keys
- Astra Linux. Полезные плюшки.
- Полезные программы.
- Установим WEBMIN.
- Разрешим подключаться к серверу по SSH.
- Аренда серверов.
- 1С:Предприятие «в облаке».
- IP-телефония в офис.
How to Install and Use htop in Linux
htop is an excellent utility for monitoring system resources in Linux. It provides a better user experience than the default top command.
Windows has its famous task manager. Linux has several GUI and command line system monitors. Every Linux system comes with a couple of them. On the command line, the top command is perhaps the goto command for checking the system resource utilization quickly. Using top command apart from viewing the processes could be tricky. And this is where htop tops top. Pun aside, htop is a top-like utility but with a better and user-friendly interface. In this guide, I will be showing you how you can install and use htop in Linux.
Install htop utility in Linux
You won’t find htop pre-installed on the majority of Linux distributions but being one of the most popular utilities, you will find htop in default repositories of almost every Linux distro. So if your machine is powered by something that is based on Debian/Ubuntu, the following command should get your job done:
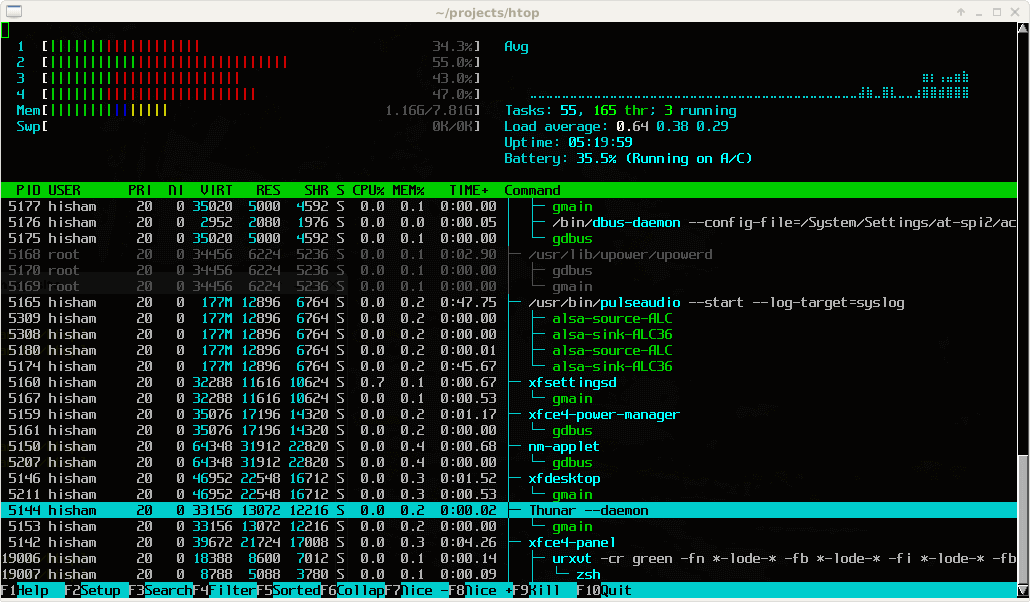
If you’re on something else or want to build from a source, you can always refer to htop’s GitHub page for detailed instructions. Once you’re done with the installation, you just have to use the htop command in the terminal, and it will reflect all the ongoing processes in your system:
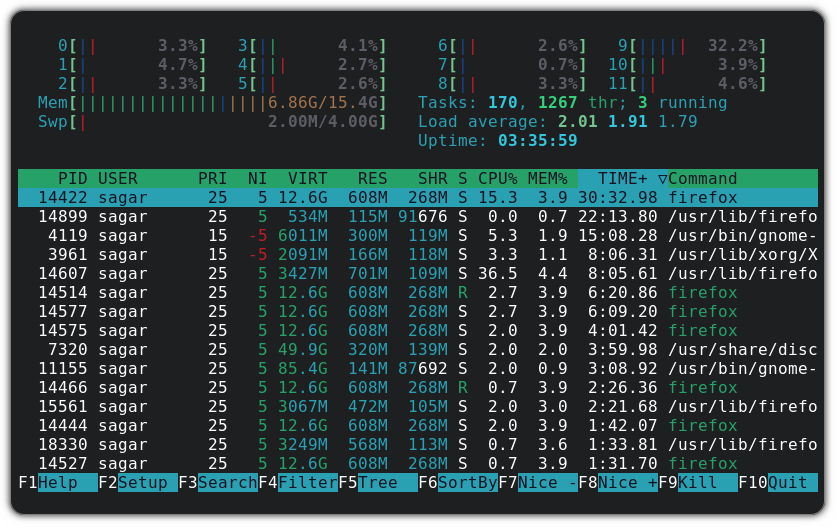
In htop, there is a color coding for the individual section, so let’s have a look at what each color indicates while using htop.
What different colors and statistics indicate in htop
CPU usage bar

- Green: Resources consumed by user processes.
- Blue: Indicates low-priority threads.
- Red: CPU resources used by system (kernel) processes.
- Aqua blue: Indicates virtualized processes.
Memory bar

- Green: Memory being utilized by system processes.
- Blue: Memory used by buffer pages.
- Orange: Memory allocated for cache pages.
Statistics

- Tasks: 166 shows there is a total of 166 ongoing processes.
- 1249 thr indicates that those 166 processes are handled by 1249 threads.
- 1 running indicates that from those 166 processes, only one task is in a state of running.
- The load average indicates the average system load over a period of time. Since my system is Hexa-Core, anything under 6.0 is ok. This number may exceed, such as 6.1, so the upcoming processes have to wait for ongoing tasks to be completed.
- 1.86 is the average load for the last minute.
- 1.75 is the average load for the last 4 minutes.
- 1.47 is the average load for the last 15 minutes.
- Uptime tells how long the system has been running since last reboot.
Now, let’s jump to the actual implementation part.
How to use htop in Linux
As the htop is mainly used to check for system resources, let’s have a look at how you can sort the processes based on resource consumption.
Sort processes based on Resource Consumption
The easiest way to sort processes based on CPU and memory usage is to use your mouse pointer. Hover the cursor over the CPU or Memory section and click on any of those.
And there you will see an icon of a triangle △ and based on that you can sort the process based on highest to lowest resource consumption:
But if you are dealing with remote servers, you might not have the privilege to use a mouse and in those cases, you can use keyboard shortcuts.
Press F6 and it will bring up every option available to sort the ongoing processes:
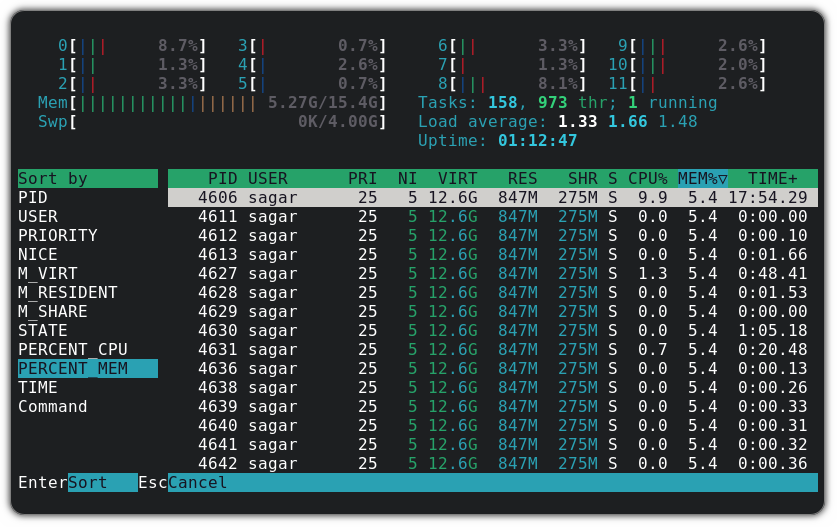
You can use arrow keys to select a preferred sorting option and then press the Enter key, results should reflect as intended.
Search for a specific process
If you want to look for a specific process and its resource consumption, you can press F3 and it will get you a search prompt as shown below:
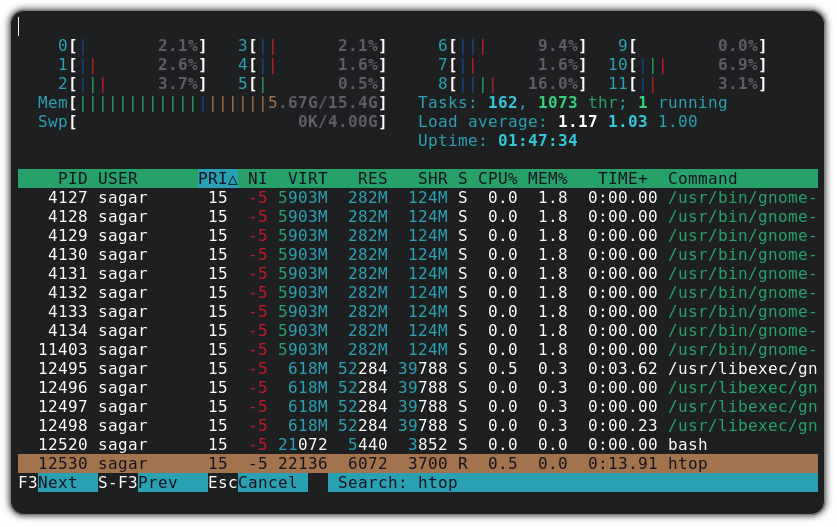
For example, I searched for htop, and it highlighted the process with light orange color. And you can press F3 for the next result.
Filter ongoing processes
While searching may get you the intended results, I find the filtering process using keywords even more effective as it presents a list of processes.
To filter processes, you have to press F4 and type the name of the process. For example, I filtered processes related to gnome-boxes:

Kill process
Once you made it to find the most resource-hungry and unnecessary process, you just have to press F9, and it will present you with termination signals:
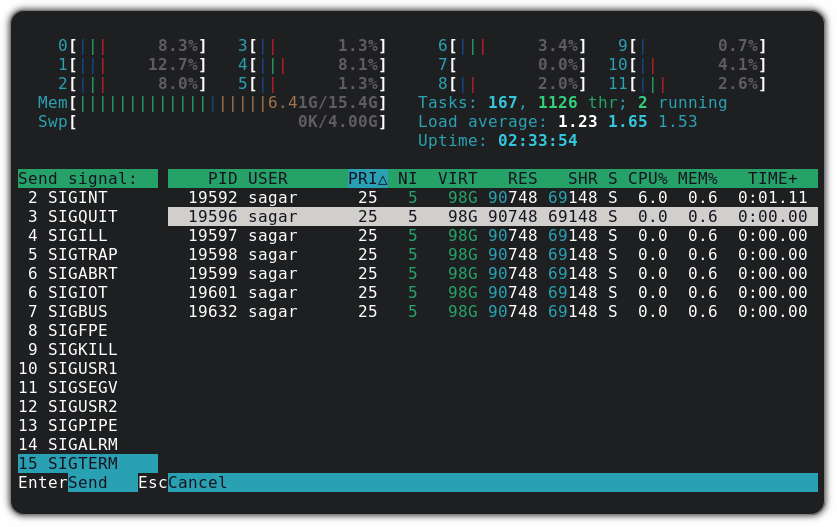
I can’t cover all 15 termination signals, we have a separate guide on different termination signals, so you can refer to that guide if you intend to learn more about them.
But I will recommend you use SIGTERM first, as it is the most efficient and friendly way to kill the process.
Customize htop
Here, my aim is to add a date and time and change the color scheme to monochrome.
First, press F2, and it will being setup prompt allowing users to change how htop looks:
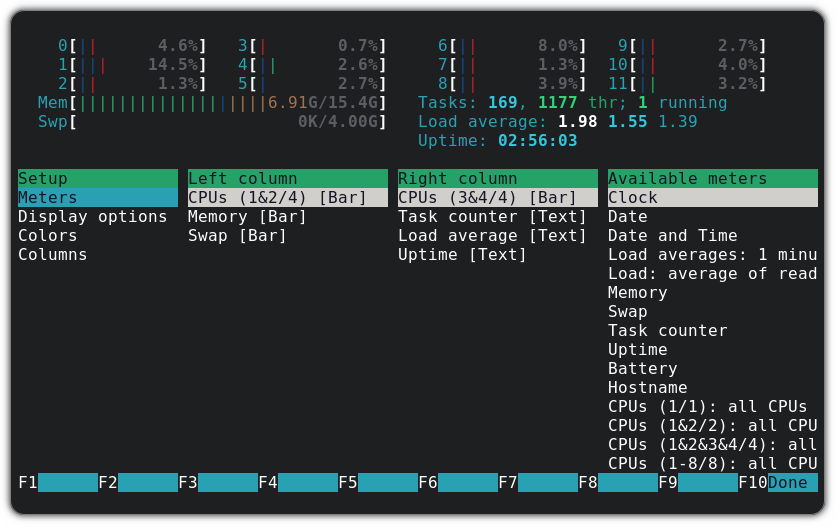
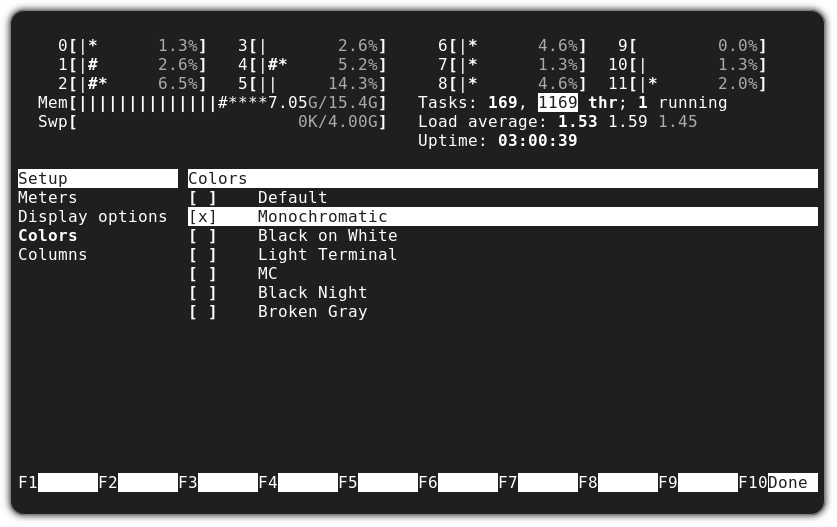
First, hover to the Colors sections and press Enter and it will allow us to change the color scheme. From there, select the Monochrome option and press Enter to save changes:
Now, go back to the setup option, and from there, use the left arrow key to explore available meters:
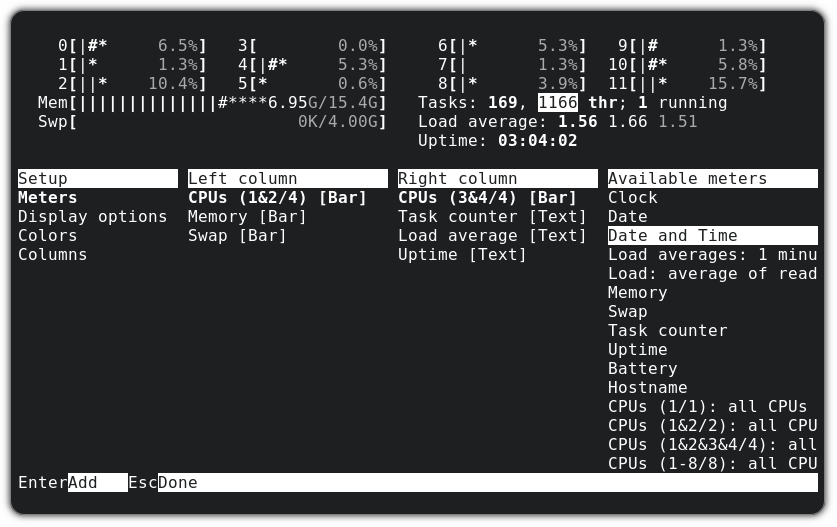
As I intend to add the Date and time, I have to press Enter once I find the option for it.
Here, it will allow you to place the date and time in any of the left and right columns and you can use the up and down arrow keys to change the order of columns.
So I placed the date and time meter with the last styling option (you can change styles using the spacebar):
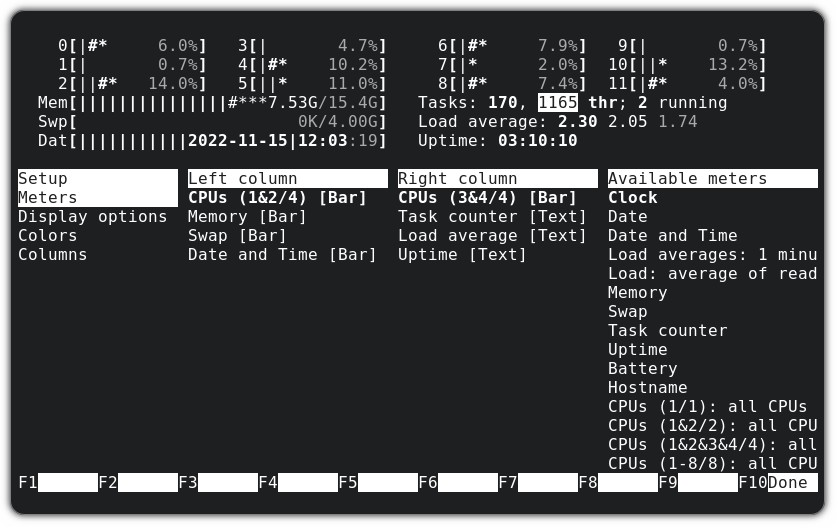
Once you are done aligning the date and time meter, press the enter key to save changes and F10 to close the setup prompt.
More than htop?
htop is good. But there are other similar tools that might be better than it. Check them out if you want to.
In this guide, I explained how you can install the htop utility in different Linux distributions and how you can use some basic functionalities of htop to manage system resources efficiently.
But htop can do a lot more and for that and to learn more, you can always refer to its man page, and we have a detailed guide on how you can get the most out of the man page in Linux.
Htop – An Interactive Process Viewer for Linux
This article is the continuation of our Linux system monitoring series, today we’re talking about the most popular monitoring tool called htop, which is just reached version 3.0.5 and comes with some cool new features.
Htop is an interactive real-time process monitoring application for Linux/Unix-like systems and also a handy alternative to top command, which is a default process monitoring tool that comes pre-installed on all Linux operating systems.
Htop has numerous other user-friendly features, which are not available under the top command and they are:
- In htop, you can scroll vertically to view the full process list and scroll horizontally to view the full command lines.
- It starts very quickly as compared to the top because it doesn’t wait to fetch data during startup.
- In htop, you can kill more than one process at once without inserting their PIDs.
- In htop, you no longer needed to enter the process number or priority value to re-nice a process.
- Press “e” to print the set of environment variables for a process.
- Use the mouse to select list items.
Install Htop in Linux
The htop packages are mostly available in all modern Linux distributions and can be installed using the default package manager from your system.
Install Htop on Debian
Install Htop on Ubuntu
Install Htop on Linux Mint
Install Htop on Fedora
Install Htop on CentOS 8/7
$ sudo yum install epel-release $ sudo yum install htop
Install Htop on RHEL 8/7
--------- On RHEL 8 --------- $ sudo yum -y install https://dl.fedoraproject.org/pub/epel/epel-release-latest-8.noarch.rpm $ sudo yum install htop --------- On RHEL 7 --------- $ sudo yum -y install https://dl.fedoraproject.org/pub/epel/epel-release-latest-7.noarch.rpm $ sudo yum install htop
Install Htop on Rocky Linux/AlmaLinux
$ sudo yum install epel-release $ sudo yum install htop
Install Htop on Gentoo
Install Htop on Arch Linux
Install Htop on OpenSUSE
Compile and Install Htop from Sources in Linux
To build Htop from sources, you must have Development Tools and Ncurses installed on your system, to do so run the following series of commands on your respective distributions.
On RHEL/CentOS and Fedora
$ sudo yum groupinstall "Development Tools" $ sudo yum install ncurses ncurses-devel
On Debian, Ubuntu, and Mint
$ sudo apt-get install build-essential $ sudo apt-get install libncurses5-dev libncursesw5-dev
Next, download the latest htop from the Github repo and run the configure and make a script to install and compile htop.
$ wget -O htop-3.0.5.tar.gz https://github.com/htop-dev/htop/archive/refs/tags/3.0.5.tar.gz $ tar xvfvz htop-3.0.5.tar.gz $ cd htop-3.0.5/ $ ./configure $ make $ sudo make install
How do I use htop?
Now run the htop monitoring tool by executing the following command on the terminal.
Htop is having three sections mainly
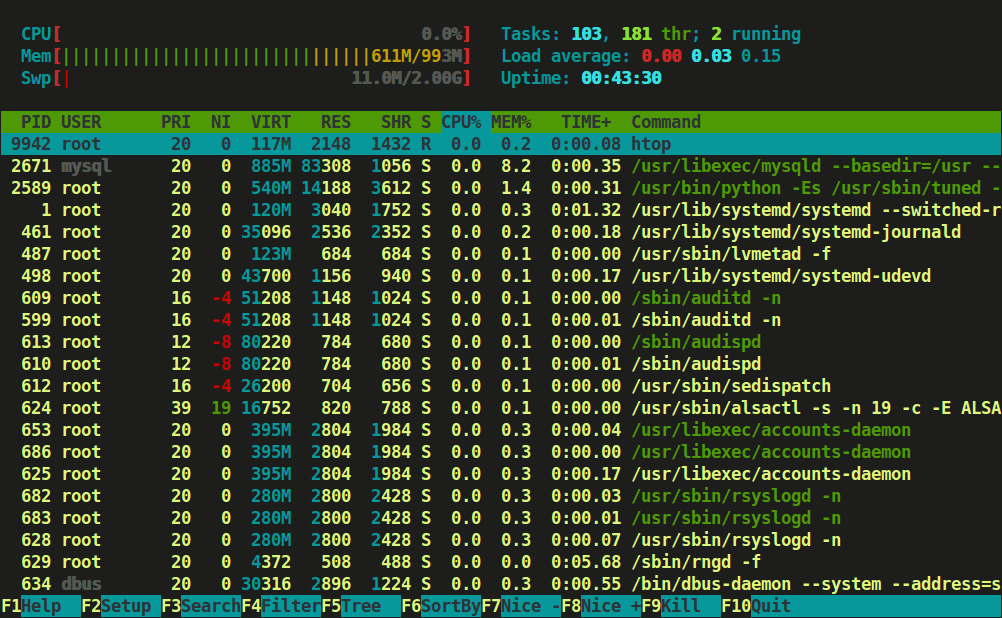
- Header, where we can see info like CPU, Memory, Swap and also shows tasks, load average, and Up-time.
- List of processes sorted by CPU utilization.
- Footer shows different options like help, setup, filtertreekill, nice, quit, etc.
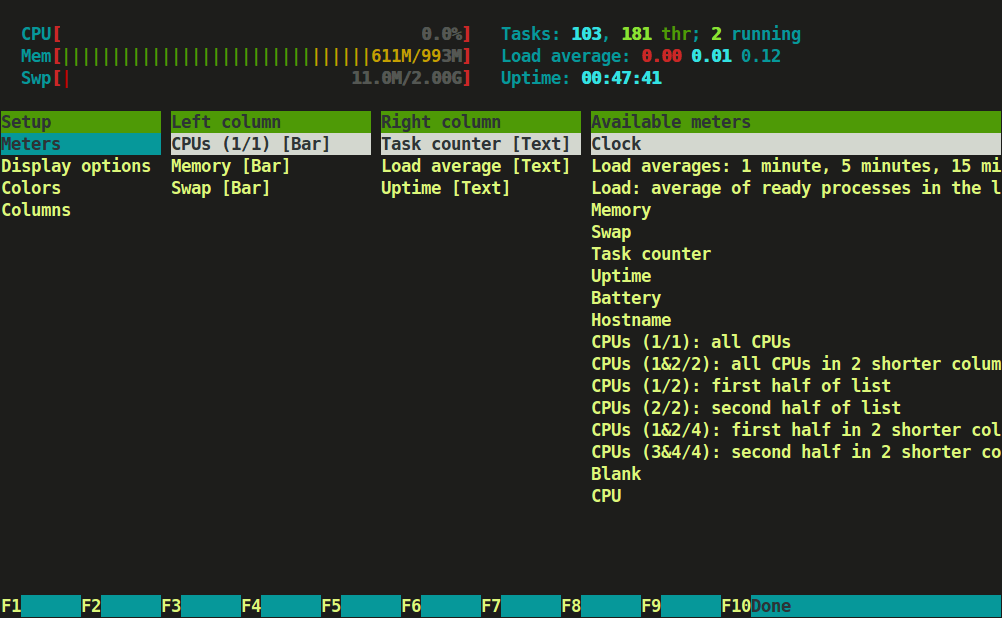
Press F2 or S for setup menu > there are four columns i.e Setup, Left Column, Right Column, and Available Meters.
Here, you can configure the meters printed at the top of the window, set various display options, select among color patterns and choose which columns are printed in which order.
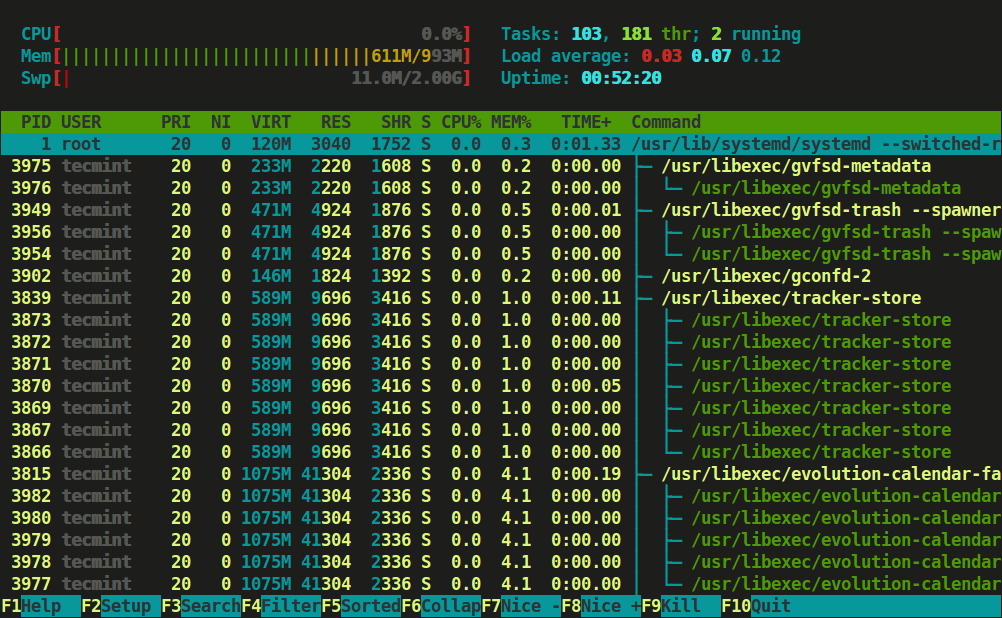
Type tree or t to display processes tree view.
You can refer to function keys displayed at the footer to use this nifty htop application to monitor Linux running processes. However, we advise using character keys or shortcut keys instead of function keys as they may have mapped with some other functions during secure connection.
Htop Shortcut and Function Keys
Some of the shortcut and function keys and their functionality to interact with htop.
Astra Linux. Полезные плюшки.

Здесь постараюсь собрать полезные «плюшки», которые облегчают жизнь системному администратору.
Полезные программы.
Запускаем терминал и начинаем ставить полезные программы
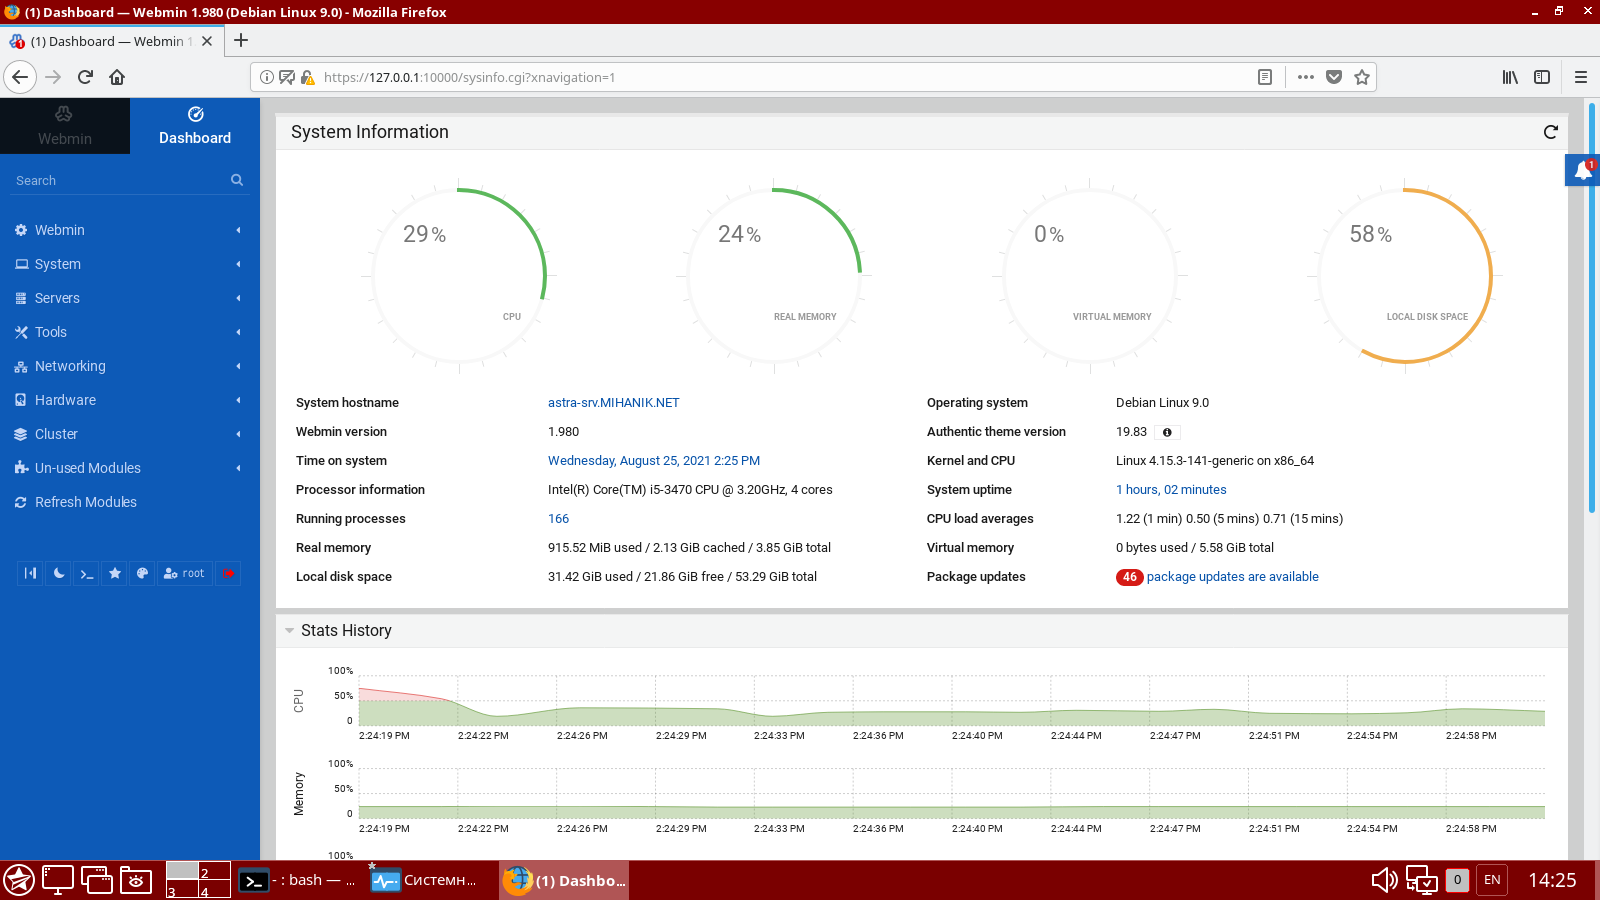
Установим WEBMIN.
Начинающему системному администратору некоторые вещи удобнее делать при помощи WEBMIN. Установим его.
mkdir /opt/distr/ mkdir /opt/distr/webmin cd /opt/distr/webmin wget --no-check-certificate http://www.webmin.com/download/deb/webmin-current.deb apt -y install ./webmin-current.deb ufw allow 10000/tcp ufw reload
Теперь зайдя по адресу https://127.0.0.1:10000 мы получим удобный web-интерфейс для управления сервером.
Разрешим подключаться к серверу по SSH.
Разрешаем подключаться пользователю root удалённо по SSH.
sed -i 's/#PermitRootLogin prohibit-password/PermitRootLogin yes/' /etc/ssh/sshd_config
Включаем автозапуск службы SSH.
Включаем межсетевой экран
Разрешаем подключаться по SSH
Просим межсетевой экран перечитать правила.
Аренда серверов.

Надёжные сервера с Pro-бегом
У ВАС В ОФИСЕ!
1С:Предприятие «в облаке».

Безопасный доступ к своей 1С из офиса, командировки и т.п.!
IP-телефония в офис.

IP-телефония давно перестала быть роскошью в офисах.
Хотите себе в офис цифровую АТС — обращайтесь. !