- How to quickly set up http file sharing on GNU/Linux
- Installing lighttpd
- Edit configuration file
- Connect to the web server
- How to secure?
- Firewall rules
- Netfilter/iptables rules
- nftables rules
- Add authentication
- Add https support
- Об HTTP-серверах для трансфера файлов в Linux
- Python
- Nginx
- How to Quickly Setup HTTP File Server in Ubuntu 20.04
- Ji m
- One Command to Setup HTTP File Server in Linux [Tip]
- Check Python version.
- Single command to setup basic HTTP server:
- How to Access the HTTP File Server you created:
How to quickly set up http file sharing on GNU/Linux
If you have a good internet connexion it could be useful to be able to share files with friends via a home made solution.
We will see here how to set up a web server in order to easily share files via a http protocol on GNU/Linux.
The goal here is to do it quickly with minimal configuration.
We will use lighttpd wich is an open-source web server optimized for speed-critical environments while remaining standards-compliant, secure and flexible.
Small CPU load and low memory footprint, everything I’m looking for.
Installing lighttpd
Edit configuration file
- Edit /etc/lighttpd/lighttpd.conf, and add this line :
- Create upload directory :
- Create example file :
- Reload lighttpd service :
Connect to the web server

- From your web browser connect to your newly web server (http://IP_ADDRESS/upload). From the Index of page you should see your file :
How to secure?
We have a our brand new http server but if we make it accessible from the internet (that’s what we wanted right?), everyone can potentially connect to it.
We will see here, how we can improve security.
Firewall rules
We can use the netfilter/iptables or nftables firewall to restrict access and thus allow only certain ip addresses.
Netfilter/iptables rules
root@host:~# iptables -A INPUT -p tcp —dport 80 -m state -s ALLOWED_IP —state NEW,ESTABLISHED,RELATED -j ACCEPT root@host:~# iptables -A INPUT -p tcp —dport 80 -m state —state NEW,ESTABLISHED,RELATED -j DROP
nftables rules
root@host:~# nft add rule ip filter INPUT tcp dport 80 ip saddr ALLOWED_IP ct state new,established counter accept root@host:~# nft add rule ip filter INPUT tcp dport 80 ct state new,established counter drop
Add authentication
We can also add a user/password prompt window to prevent unwanted users.

- Edit /etc/lighttpd/lighttpd.conf, and add this lines :
server.modules = ( «mod_indexfile», «mod_access», «mod_alias», «mod_redirect», «mod_auth», «mod_authn_file» ) auth.backend = «plain» auth.backend.plain.userfile = «/etc/lighttpd/lighttpd-plain.user» auth.require = ( «/» => ( «method» => «basic», «realm» => «Auth», «require» => «valid-user» ) )
- Add new user login:password :
root@host:~# echo «agent007:secret» > /etc/lighttpd/lighttpd-plain.user
- Restart lighttpd service :
root@host:~# systemctl restart lighttpd.service
- The next time someone tries to log in an authentication request will appear :
Add https support
- Create a self signed certificate :
- Set rights :
- Edit /etc/lighttpd/lighttpd.conf, and add this lines :
- Restart lighttpd service :
This work is licensed under a Creative Commons Attribution-NonCommercial-ShareAlike 4.0 International License.
This work is licensed under a Creative Commons Attribution-NonCommercial-ShareAlike 4.0 International License.
Об HTTP-серверах для трансфера файлов в Linux
Последнее время часто сталкивался с необходимостью обмена файлами между Linux-машинами. В этом посте опишу 3 удобных способа, как можно быстро и легко развернуть тривиальный HTTP-сервер для трансфера файлов.

Local – 10.10.10.1, remote – 10.10.10.2.
Python
Питон может выручить практически в любой ситуации, и наш случай не исключение.
Всем известны эти замечательные команды для запуска HTTP-серверов для второй версии питона:
local@server:~$ python -m SimpleHTTPServer [port] local@server:~$ python3 -m http.server [-h] [--cgi] [--bind ADDRESS] [port] Таким способом можно только выдергивать файлы оттуда, где подняли сервер, т. к. единственные методы, который он понимает “из коробки”, это HEAD и GET . Однако никто не запрещает нам немного модифицировать дефолтное поведение, добавив, к примеру, обработку POST (выводим содержимое в консоль для примера) и PUT -запросов.
#!/usr/bin/env python3 # -*- coding: utf-8 -*- # Usage: python3 SimpleHTTPServer+.py [-h] [--bind ADDRESS] [port] import http.server import os from argparse import ArgumentParser class HTTPRequestHandler(http.server.SimpleHTTPRequestHandler): def _set_headers(self): self.send_response(200) self.send_header('Content-type', 'text/html') self.end_headers() def do_POST(self): content_length = int(self.headers['Content-Length']) post_data = self.rfile.read(content_length) self._set_headers() self.wfile.write(b'POST!
') print(post_data.decode('utf-8')) def do_PUT(self): path = self.translate_path(self.path) if path.endswith('/'): self.send_response(405, 'Method Not Allowed') self.wfile.write(b'PUT not allowed on a directory\n') return else: try: os.makedirs(os.path.dirname(path)) except FileExistsError: pass length = int(self.headers['Content-Length']) with open(path, 'wb') as f: f.write(self.rfile.read(length)) self.send_response(201, 'Created') self.end_headers() def cli_options(): parser = ArgumentParser() parser.add_argument( '--bind', '-b', default='', metavar='ADDRESS', help='Specify alternate bind address [default: all interfaces]' ) parser.add_argument( 'port', action='store', default=8000, type=int, nargs='?', help='Specify alternate port [default: 8000]' ) return parser.parse_args() if __name__ == '__main__': args = cli_options() http.server.test(HandlerClass=HTTPRequestHandler, port=args.port, bind=args.bind) Позволяет успешно как выгружать файлы с:
local@server:~$ wget 10.10.10.2:8881/message --2018-10-11 10:51:35-- http://10.10.10.2:8881/message Connecting to 10.10.10.2:8881. connected. HTTP request sent, awaiting response. 200 OK Length: 10 [application/octet-stream] Saving to: ‘message’ message 100%[===================>] 10 --.-KB/s in 0s 2018-10-11 10:51:35 (2.40 MB/s) - ‘message’ saved [10/10] local@server:~$ cat message Hi there! remote@server:~$ python3 SimpleHTTPServer+.py 8881 Serving HTTP on 0.0.0.0 port 8881 (http://0.0.0.0:8881/) . 10.10.10.1 - - [11/Oct/2018 11:04:37] "GET /message HTTP/1.1" 200 - Так и загружать на Linux-машину:
local@server:~$ curl --upload-file message 10.10.10.2:8881 % Total % Received % Xferd Average Speed Time Time Time Current Dload Upload Total Spent Left Speed 100 10 0 0 100 10 0 9 0:00:01 0:00:01 --:--:-- 9 local@server:~$ curl -d @message -X POST 10.10.10.2:8881 POST!
remote@server:~$ python3 SimpleHTTPServer+.py 8881 Serving HTTP on 0.0.0.0 port 8881 (http://0.0.0.0:8881/) . 10.10.10.1 - - [11/Oct/2018 10:52:10] "PUT /message HTTP/1.1" 201 - 10.10.10.1 - - [11/Oct/2018 10:52:18] "POST / HTTP/1.1" 200 - Hi there! remote@server:~$ cat message Hi there! Доступные методы: GET , POST , PUT .
Неудивительно, что двухстрочный скрипт на PHP может решить все наши проблемы — “препроцессор гипертекста” как-никак
Итак, для тривиального PHP-сервера нам понадобится такой код:
$fname = basename($_REQUEST['filename']); file_put_contents('uploads/' . $fname, file_get_contents('php://input')); ?> На скриншоте ниже (кликабельно) можно видеть всю процедуру запуска сервера: предварительная настройка на панели слева, тесты — справа.

Несколько слов о том, что здесь происходит:
- Создаем необходимые директории и скрипт с содержимым выше.
- Создаем пользователя, от которого будет крутиться сервер. Новый пользователь нужен для того, чтобы недруги не смогли выполнить код, который сами загрузят. Поэтому командой umask 555 задаем настройку прав доступа, выдаваемых всем новым файлам, которые будет создавать наш юзер. 555 это 777 XOR 222 , следовательно дефолтные биты будут выставлены, как если бы мы каждому новому файлу вручную задавали chmod 222 (разрешена только запись).
- Запускаем сервер и тестируем.
- .
- PROFIT
Доступные методы: GET , POST , PUT .
Nginx
Ну и куда же без the High-Performance Web Server and Reverse Proxy? Благо, на большинстве Linux-дистрибутивах Nginx предустановлен, поэтому настроить и развернуть его можно в считанные минуты.
Опять же на скриншоте ниже можно видеть всю процедуру запуска: предварительная настройка на панели сверху, тесты — снизу.

- Создаем необходимые директории и конфигурацию сервера по образцу из default ‘а (содержимое конфига есть ниже).
- Делаем конфиг активным (симлинк в /etc/nginx/sites-enabled/ )
- Перезапускаем службу nginx , проверяем ее активность и тестируем сервер.
- .
- PROFIT
root@kali:~# cat /etc/nginx/sites-available/file_upload server < listen 8881 default_server; server_name snovvcrash.top; location / < root /var/www/uploads; dav_methods PUT; create_full_put_path on; dav_access group:rw all:r; >> Как напользовались, не забываем остановить сервер:
root@kali:~# systemctl stop nginx Доступные методы: GET , PUT .
How to Quickly Setup HTTP File Server in Ubuntu 20.04

There are quite a few ways to transfer files over home network. One of the easiest ways is to run a single python command in terminal.
Python contains a script that sets up simple http server. No need to install anything, and even no internet connection required.
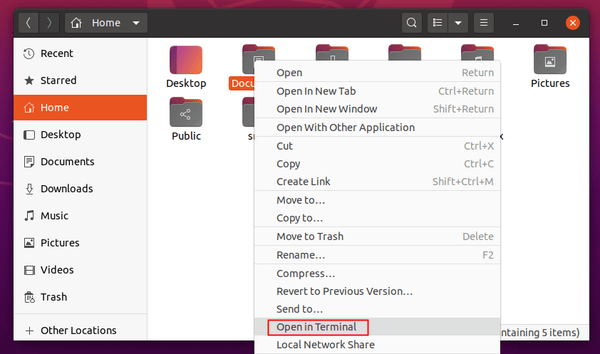
1. Simply right-click on the folder that contains the files you want to transfer, then select ‘Open in Terminal‘
2. When terminal opens, run the single command:

UPDATE: You can specify the listening port (e.g., 9900) if you get “Address already in use” error, by running command:
python3 -m http.server 9900
Now any device in the same network can access the http file server by going to (change 8000 if you specified another listening port): http://server_ip:8000
In addition, you may run python3 -m http.server & instead to start the http server in background, so the terminal window can be closed.
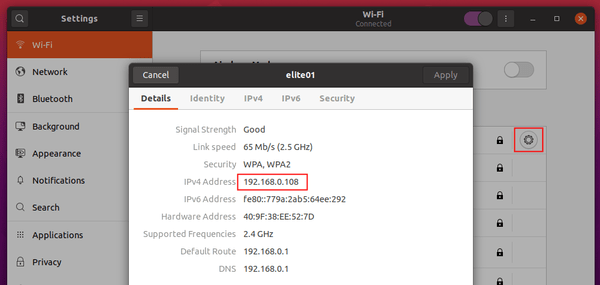
To check your IP address, go to Settings > Wi-Fi (or Network), click on the gear button after your connected network and check the IPv4 Address.

Ji m
I’m a freelance blogger who started using Ubuntu in 2007 and wishes to share my experiences and some useful tips with Ubuntu beginners and lovers. Please comment to remind me outdated tutorial! And, notify me if you find any typo/grammar/language mistakes. English is not my native language. Contact me via [email protected] Buy me a coffee: https://ko-fi.com/ubuntuhandbook1
One Command to Setup HTTP File Server in Linux [Tip]

Python is a popular programming language pre-installed in most Linux systems. It comes with a module for implementing HTTP web servers.
Check Python version.
Python 2.x and 3.x have the HTTP module with different names. While most Linux in 2020 have Python 3.x, some old systems may still ship with Python 2.
Single command to setup basic HTTP server:
Warning: This is not recommended for production use. For Python2, use python -m SimpleHTTPServer instead in following commands. Open terminal or connect to your Linux server, then run command:
- Create HTTP server with default port 8000, serve files in the current working directory:
python3 -m http.server 8800
Instead of current directory, you can also specify a folder to serve:
python3 -m http.server 8899 --directory /usr/share/backgrounds/
How to Access the HTTP File Server you created:
In any device, desktop PC, notebook, mobile phone, with a web browser, go to URL: “IP_ADDRESS:port_number”

If the Linux machine has public IP, you’ll be able to access the HTTP server anywhere with internet connection.
If the Linux is behind a home network router and you want to access outside your network, edit your router’s configuration to forward port 8000 (or other port you specified) to the computer on which you ran the Python command.