- Saved searches
- Use saved searches to filter your results more quickly
- License
- rejetto/hfs
- Name already in use
- Sign In Required
- Launching GitHub Desktop
- Launching GitHub Desktop
- Launching Xcode
- Launching Visual Studio Code
- Latest commit
- Git stats
- Files
- README.md
- About
- How to Quickly Setup HTTP File Server in Ubuntu 20.04
- Ji m
- How to quickly set up http file sharing on GNU/Linux
- Installing lighttpd
- Edit configuration file
- Connect to the web server
- How to secure?
- Firewall rules
- Netfilter/iptables rules
- nftables rules
- Add authentication
- Add https support
Saved searches
Use saved searches to filter your results more quickly
You signed in with another tab or window. Reload to refresh your session. You signed out in another tab or window. Reload to refresh your session. You switched accounts on another tab or window. Reload to refresh your session.
HFS is a web file server to run on your computer. Share folders or even a single file thanks to the virtual file system.
License
rejetto/hfs
This commit does not belong to any branch on this repository, and may belong to a fork outside of the repository.
Name already in use
A tag already exists with the provided branch name. Many Git commands accept both tag and branch names, so creating this branch may cause unexpected behavior. Are you sure you want to create this branch?
Sign In Required
Please sign in to use Codespaces.
Launching GitHub Desktop
If nothing happens, download GitHub Desktop and try again.
Launching GitHub Desktop
If nothing happens, download GitHub Desktop and try again.
Launching Xcode
If nothing happens, download Xcode and try again.
Launching Visual Studio Code
Your codespace will open once ready.
There was a problem preparing your codespace, please try again.
Latest commit
Git stats
Files
Failed to load latest commit information.
README.md
HFS: HTTP File Server (version 3)
HFS is the best way via web to access or share files from your disk.
- You be the server, share files fresh from your disk, with unlimited space and bandwidth.
- It’s all very fast. Try download zipping 100GB, it starts immediately!
- Easy to use. HFS tries to detect problems and suggest solutions.
- Share even a single file with our virtual file system, even with a different name, all without touching the real file. Present things the way you want!
- Watch all activities in real-time.
- Control bandwidth, decide how much to give.
- No intermediaries, give a huge file to your friend without waiting for it to be uploaded on a server first.
This is a full rewrite of the Delphi version.
- run HFS on your computer, administration page automatically shows up
- select what files and folders you want to be accessible
- access those files from a phone or another computer just using a browser
- possibly create accounts and limit access to files
- https
- unicode
- virtual file system
- mobile friendly front-end
- search
- accounts
- resumable downloads
- resumable uploads
- download folders as zip archive
- remote delete
- simple website serving
- plug-ins
- log file
- speed throttler
- admin web interface
- multi-language front-end
- virtual hosting (plug-in)
- anti-brute-force (plug-in)
- reverse-proxy support
NB: minimum Windows version required is 8.1 , Windows Server 2012 R2 (because of Node.js 16)
- go to https://github.com/rejetto/hfs/releases
- click on Assets
- download the right version for your computer
- launch hfs file
- the browser should automatically open on localhost address, so you can configure the rest in the Admin-panel.
- if a browser cannot be opened on the computer where you are installing HFS, you should enter this command in HFS console: create-admin
If you access Admin-panel via localhost, by default HFS won’t require you to login. If you don’t like this behavior, disable it in the Admin-panel or enter this console command config localhost_admin false .
If your system is not Windows/Linux/Mac or you just don’t want to run the binaries, you can try this alternative version:
The @latest part is optional, and ensures that you are always up to date.
If this procedure fails, it may be that you are missing one of these requirements.
Configuration and other files will be stored in %HOME%/.vfs
If you want to run HFS at boot (as a service), we suggest the following methods
[Unit] Description=HFS After=network.target [Service] Type=simple Restart=always ExecStart=/usr/bin/npx -y hfs@latest [Install] WantedBy=multi-user.target - run sudo systemctl daemon-reload && sudo systemctl enable hfs && sudo systemctl start hfs && sudo systemctl status hfs
NB: update will be attempted at each restart
- install node.js
- run npm -g i hfs
- run npx qckwinsvc2 install name=»HFS» description=»HFS» path=»%APPDATA%\npm\node_modules\hfs\src\index.js» args=»—cwd %HOMEPATH%\.hfs» now
- run npx qckwinsvc2 uninstall name=»HFS»
- run npm -g update hfs
- run npx qckwinsvc2 install name=»HFS» description=»HFS» path=»%APPDATA%\npm\node_modules\hfs\src\index.js» args=»—cwd %HOMEPATH%\.hfs» now
It is possible to show the Front-end in other languages. Translation for some languages is already provided. If you find an error, consider reporting it or editing the source file.
In the Languages section of the Admin-panel you can install additional language files.
If your language is missing, please consider translating yourself.
Why you should upgrade from HFS 2.x to 3
As you can see from the list of features, we already have some goods that you cannot find in HFS 2. Other than that, you can also consider:
- it’s more robust: it was designed to be an always-running server, while HFS 1-2 was designed for occasional usage (transfer and quit)
- passwords are never really stored, just a non-reversible hash is
- faster search (up to 12x)
- more flexible permissions
But you may still want to stay with HFS 2.x (so far) for the following reasons
If you have access to HFS’ console, you can enter commands. Start with help to have a full list.
Configuration can be done in several ways
- accessing the Admin-panel with your browser
- it will automatically open when you start HFS. Bookmark it. if your port is 8000 the address will be http://localhost:8000/~/admin
NAME stands for the property name that you want to change. See the complete list.
Configuration is stored in the file config.yaml , exception made for custom HTML which is stored in custom.html .
These files are kept in the Current Working Directory (cwd), which is by default the same folder of hfs.exe if you are using this kind of distribution on Windows, or USER_FOLDER/.hfs on other systems. You can decide a different cwd passing —cwd SOME_FOLDER parameter at command line.
You can decide also a different file for config by passing —config SOME_FILE , or inside an env called HFS_CONFIG . Any relative path provided is relative to the cwd.
While this project focuses on ease of use, we care about security.
- HTTPS support
- Passwords are not saved, and user password is safe even logging in without https thanks to SRP
- Automated tests ran on every release, including libraries audit
- No default admin password
Some actions you can take for improved security:
- use https, better if using a proper certificate, even free with Letsencrypt.
- have a domain (ddns is ok too), start vhosting plugin, configure your domain, enable «Block requests that are not using any of the domains above»
- install rejetto/antidos plugin
- start antibrute plugin (but it’s started by default)
- disable «unprotected admin on localhost»
- Appending #LOGIN to address will bring up the login dialog
- Appending ?lang=CODE to address will force a specific language
- right/ctrl/command click on toggle-all checkbox will invert each checkbox state
There are several ways to contribute
- Report bugs It’s very important to report bugs, and if you are not so sure about it, don’t worry, we’ll discuss it. If you find important security problems, please contact us privately so that we can publish a fix before the problem is disclosed, for the safety of other users.
- Translate to your language.
- Suggest ideas While the project should not become too complex, yours may be an idea for a plugin.
- Submit your code If you’d like to make a change yourself in the code, please first open an «issue» or «discussion» about it, so we’ll try to cooperate and understand what’s the best path for it.
- Make a plugin A plugin can change the look (a theme), and/or introduce a new functionality.
About
HFS is a web file server to run on your computer. Share folders or even a single file thanks to the virtual file system.
How to Quickly Setup HTTP File Server in Ubuntu 20.04

There are quite a few ways to transfer files over home network. One of the easiest ways is to run a single python command in terminal.
Python contains a script that sets up simple http server. No need to install anything, and even no internet connection required.
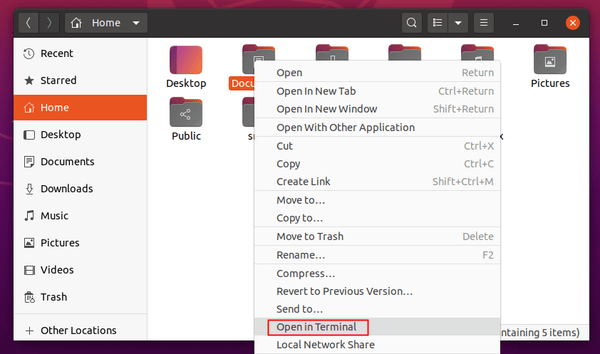
1. Simply right-click on the folder that contains the files you want to transfer, then select ‘Open in Terminal‘
2. When terminal opens, run the single command:
UPDATE: You can specify the listening port (e.g., 9900) if you get “Address already in use” error, by running command:
python3 -m http.server 9900
Now any device in the same network can access the http file server by going to (change 8000 if you specified another listening port): http://server_ip:8000
In addition, you may run python3 -m http.server & instead to start the http server in background, so the terminal window can be closed.
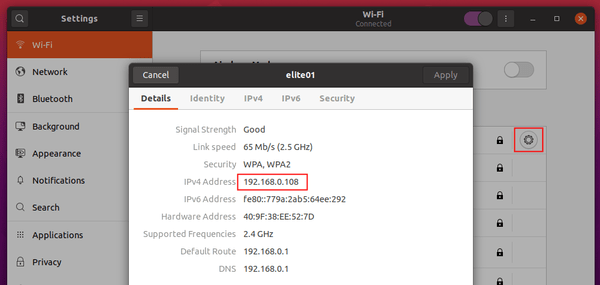
To check your IP address, go to Settings > Wi-Fi (or Network), click on the gear button after your connected network and check the IPv4 Address.
Ji m
I’m a freelance blogger who started using Ubuntu in 2007 and wishes to share my experiences and some useful tips with Ubuntu beginners and lovers. Please comment to remind me outdated tutorial! And, notify me if you find any typo/grammar/language mistakes. English is not my native language. Contact me via [email protected] Buy me a coffee: https://ko-fi.com/ubuntuhandbook1
How to quickly set up http file sharing on GNU/Linux
If you have a good internet connexion it could be useful to be able to share files with friends via a home made solution.
We will see here how to set up a web server in order to easily share files via a http protocol on GNU/Linux.
The goal here is to do it quickly with minimal configuration.
We will use lighttpd wich is an open-source web server optimized for speed-critical environments while remaining standards-compliant, secure and flexible.
Small CPU load and low memory footprint, everything I’m looking for.
Installing lighttpd
Edit configuration file
- Edit /etc/lighttpd/lighttpd.conf, and add this line :
- Create upload directory :
- Create example file :
- Reload lighttpd service :
Connect to the web server

- From your web browser connect to your newly web server (http://IP_ADDRESS/upload). From the Index of page you should see your file :
How to secure?
We have a our brand new http server but if we make it accessible from the internet (that’s what we wanted right?), everyone can potentially connect to it.
We will see here, how we can improve security.
Firewall rules
We can use the netfilter/iptables or nftables firewall to restrict access and thus allow only certain ip addresses.
Netfilter/iptables rules
root@host:~# iptables -A INPUT -p tcp —dport 80 -m state -s ALLOWED_IP —state NEW,ESTABLISHED,RELATED -j ACCEPT root@host:~# iptables -A INPUT -p tcp —dport 80 -m state —state NEW,ESTABLISHED,RELATED -j DROP
nftables rules
root@host:~# nft add rule ip filter INPUT tcp dport 80 ip saddr ALLOWED_IP ct state new,established counter accept root@host:~# nft add rule ip filter INPUT tcp dport 80 ct state new,established counter drop
Add authentication
We can also add a user/password prompt window to prevent unwanted users.

- Edit /etc/lighttpd/lighttpd.conf, and add this lines :
server.modules = ( «mod_indexfile», «mod_access», «mod_alias», «mod_redirect», «mod_auth», «mod_authn_file» ) auth.backend = «plain» auth.backend.plain.userfile = «/etc/lighttpd/lighttpd-plain.user» auth.require = ( «/» => ( «method» => «basic», «realm» => «Auth», «require» => «valid-user» ) )
- Add new user login:password :
root@host:~# echo «agent007:secret» > /etc/lighttpd/lighttpd-plain.user
- Restart lighttpd service :
root@host:~# systemctl restart lighttpd.service
- The next time someone tries to log in an authentication request will appear :
Add https support
- Create a self signed certificate :
- Set rights :
- Edit /etc/lighttpd/lighttpd.conf, and add this lines :
- Restart lighttpd service :
This work is licensed under a Creative Commons Attribution-NonCommercial-ShareAlike 4.0 International License.
This work is licensed under a Creative Commons Attribution-NonCommercial-ShareAlike 4.0 International License.