- Overview of DNS
- Configuration Precautions for DNS
- Feature Requirements
- Configuring DNS Client
- Usage Scenario
- Pre-configuration Tasks
- Procedure
- Verifying the Configuration of a DNS Client
- Maintaining DNS
- Clearing Dynamic DNS Entries
- Context
- Procedure
- Monitoring the DNS Running Status
- Context
- Procedure
- Configuration Examples for DNS
- Example for Configuring Static DNS
- Networking Requirements
- Configuration Roadmap
- Data Preparation
- Procedure
- Configuration Files
- How to Set Custom DNS Settings on Your Huawei Router
- How to change the DNS settings on a Huawei HG8245T router
- Other Huawei HG8245T Guides
- What is the DNS setting on a Router
- Why Change Your Router’s DNS Setting
- What Should I Change My DNS To
- Login To The Huawei HG8245T
- Change the DNS settings on a Huawei HG8245T
- Configure the DNS section of your Huawei HG8245T
- Possible Problems when Changing your DNS settings
- Other Huawei HG8245T Info
Overview of DNS
Domain Name System (DNS) is a distributed database for TCP/IP applications that provides conversion between domain names and IP addresses.
DNS uses a hierarchical naming method to specify a meaningful name for each device on the network and uses a resolver to establish mappings between IP addresses and domain names. DNS allows users to use meaningful and easy-to-memorize domain names instead of IP addresses to identify devices.
Configuration Precautions for DNS
Feature Requirements
Configuring DNS Client
This section describes how to configure DNS and establish mappings between domain names and IP addresses, so that a device can communicate with other devices using domain names.
Usage Scenario
- If you seldom use domain names to visit other devices or no DNS server is available, configure static DNS on the DNS client. To configure static DNS, you must know the mappings between domain names and IP addresses. If a mapping changes, you must manually modify the DNS entry on the DNS client.
- If you want to use domain names to visit many devices and DNS servers are available, configure dynamic DNS on the DNS client. Dynamic DNS requires DNS servers.
Figure 1-545 Networking diagram for typical domain name resolution
Pre-configuration Tasks
- Configuring a route between the DNS client and server, so that the DNS client and server can communicate
- Configuring DNS servers
Procedure
- Configure static DNS.
- Run system-view The system view is displayed.
- Run ip hosthost-nameip-address [ vpn-instancevpn-name ] The mapping between the domain name and IPv4 address of the host is configured.
- Run commit The configuration is committed.
- Run system-view The system view is displayed.
- Run dns resolve Dynamic DNS is enabled.
- Run dns serverip-address [ vpn-instancevpn-name ] [ tcp ssl-policyssl-policy-name ] A DNS server is configured.
- (Optional) Run dns server source-ip [ vpn-instancevpn-name ] ipv4Addr The IP address of the local NE is specified. An IP address is specified for the DNS client to communicate with the DNS server. Using a specified source address ensures the security of communication between the DNS client and DNS server.
- Run dns domaindomain-name [ vpn-instancevpn-name ] A domain name suffix is added.
- (Optional) Run dns timeoutinterval-time A DNS query response timeout period is configured.
- (Optional) Run dns trytimes The number of retransmission times for DNS query packets is configured.
- Run commit The configuration is committed.
To configure multiple DNS servers, repeatedly perform Step 3. To configure multiple domain name suffixes, repeatedly perform Step 5.
Verifying the Configuration of a DNS Client
After configuring a DNS client, verify the configuration.
- Run the display ip host command to view static DNS entries, including mappings between domain names and IP addresses.
- Run the display dns server command to view the IP addresses of all configured DNS servers.
- Run the display dns domain command to view the domain name suffix list.
- Run the display dns dynamic-host command to view dynamic DNS entries stored in the cache.
Maintaining DNS
This chapter describes how to maintain DNS, which includes clearing dynamic DNS entries and monitoring the DNS running status.
Clearing Dynamic DNS Entries
This section describes how to clear dynamic DNS entries using a reset command.
Context
The dynamic DNS entries cannot be restored after they are cleared. Exercise caution when running the reset command.
Procedure
- After confirming the dynamic DNS entries to be deleted from the cache, run the reset dns dynamic-host [ vpn-instancevpn-name ] [ hostname ] command in the user view.
Monitoring the DNS Running Status
This section describes how to monitor the DNS running status.
Context
In routine maintenance, you can run the following commands in all views to check the running status of DNS.
Procedure
- Run the display ip host [ vpn-instancevpn-name ] command to check information about the static domain name resolution table.
- Run the display dns server(IPv4) [ vpn-instancevpn-name ] command to check DNS server configurations.
- Run the display dns domain(IPv4) [ vpn-instancevpn-name ] command to check domain name suffixes.
- Run the display dns dynamic-host [ vpn-instancevpn-name ] command to check information about dynamic DNS entries in the cache.
Configuration Examples for DNS
Each configuration example consists of the networking requirements, configuration roadmap, configuration procedures, and configuration files.
Example for Configuring Static DNS
This section describes how to configure static DNS.
Networking Requirements
As shown in Figure 1-546, Device A frequently uses the domain name «host.com» to visit the host. To improve the efficiency of domain name resolution, you can establish a static mapping between the domain name «host.com» and IP address 10.100.1.2 in the static domain name resolution table of Device A.
Figure 1-546 Configuring static DNS
Configuration Roadmap
The configuration roadmap is as follows:
Data Preparation
To complete the configuration, you need the following data:
Procedure
HUAWEI> system-view
[~HUAWEI]sysname DeviceA
[*HUAWEI]commit
[~DeviceA] ip host host.com 10.100.1.2
[*DeviceA] commit
# Run the ping host.com command on Device A. The host can be pinged. The destination IP address for the ping operation is 10.100.1.2.
DeviceA> ping host.com
ping host.com (10.100.1.2):56 data bytes, press CTRL_C to break Reply from 10.100.1.2: bytes=56 Sequence=1 ttl=128 time=1 ms Reply from 10.100.1.2: bytes=56 Sequence=2 ttl=128 time=4 ms Reply from 10.100.1.2: bytes=56 Sequence=3 ttl=128 time=3 ms Reply from 10.100.1.2: bytes=56 Sequence=4 ttl=128 time=2 ms Reply from 10.100.1.2: bytes=56 Sequence=5 ttl=128 time=3 ms --- host.com ping statistics --- 5 packet(s) transmitted 5 packet(s) received 0.00% packet loss round-trip min/avg/max = 1/2/4 ms
# Run the display ip host command on Device A to check static DNS entry information, including mappings between domain names and IP addresses.
DeviceA> display ip host
Host Age Flags Address host.com 0 static 10.100.1.2
Configuration Files
# sysname DeviceA # ip host host.com 10.100.1.2 # return How to Set Custom DNS Settings on Your Huawei Router
Even with the recent rollout of Fibre across Ireland, there are still many of us just off the grid when it comes to fixed line broadband, the easy alternative is to use a Mobile Broadband service such as 3 – one downside to this is generally the modems/routers supplied by 3 can be locked down in some areas that us nerds like to customise, custom DNS servers being an example. In this guide I will show you how to set a custom primary and secondary DNS server on your Huawei router, in this example I am using the B525-23a as that’s the modem I have on hand, but this should work on most other Huawei modems supplied by 3, Vodafone etc.
Let’s get in to it! To begin, we need to log in to the web browser of your 4G modem:
- Open your favourite web browser (e.g. Brave, Chrome, Firefox)
- Type 192.168.8.1 (the default IP to access the admin web UI) in the address bar
- The default username will be admin
- The default password is the default WiFi password, which can be found on the sticker on the bottom of the modem.
After you log in, you now need to navigate to the DHCP page, this can be found by first opening the Advanced menu item in the top menu, and then following the Router > DHCP menu items on the left, alternatively you use this link to bring you directly to the DHCP page (once are you already logged in).
Now we need to get a console window open, to do this in Chrome, press Command + Option + J (Mac) or Control + Shift + J (Windows, Linux, Chrome OS).
In the console type the below:
Now, we can paste in the code to reveal the DNS fields, depending on which version firmware you are running on your modem, the steps will differ slightly.
If you are on an older firmware version – your admin panel looks like this:

If this is the case , paste the following in your console:
$('#dhcp_dns_statistic').show(); $('#dhcp_primary_dns').show(); $('#dhcp_secondary_dns').show();If you are on the newer Firmware – your admin panel looks like this:
Then you just need to paste this:
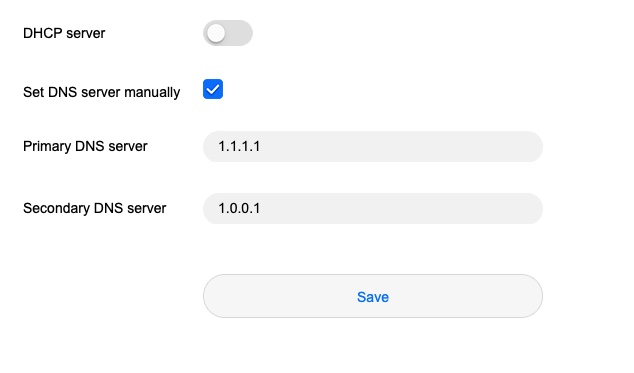
Tick the box beside “Set DNS server manually”
Now, whichever option you need to choose, you will now be able to set a customer primary and secondary DNS server. Also, once you save the settings and refresh the page, the fields will be hidden again, but yourDNS settings will be saved – I promise.
In my next post, I’ll recommended DNS servers to use, be sure to check back – or even better, sign up to the newsletter below!
How to change the DNS settings on a Huawei HG8245T router
This page shows how to change the DNS settings on the Huawei HG8245T router.
Other Huawei HG8245T Guides
What is the DNS setting on a Router
When you connect a router to the Internet it gets a few settings from your ISP automatically. One of the settings that the ISP sets in your router is the DNS setting. DNS stands for Domain Name System and it is used to convert Internet names into actual IP addresses. For instance, when you go to «google.com», your are really connecting to an IP address that is mapped through DNS to a number such as:
This mapping happens automatically every time you visit any page on the Internet.
Why Change Your Router’s DNS Setting
Some ISPs choose to abuse the DNS system and map unknown names to servers that they control. This can be done in a way that you don’t know it is happening since your router is getting its DNS settings from your ISP. For instance, if you have one of these ISPs who is hijacking your DNS, and you try to surf the web to «some-random-site.com» and «some-random-site.com» does not exist, you might get a page back from your ISP with local advertisements on it.
By changing your DNS setting in your router you will effectively change the DNS setting for every computer on your network. This is because when a device is connected to your network your router automatically hands out its own DNS settings to that device. This way you can protect your entire network from ISP hijacking with just one setting.
What Should I Change My DNS To
There are 2 really great DNS servers on the Internet that you can choose from right now: Google Public DNS and OpenDNS. If you are not sure which one to pick then just use Google Public DNS.
When you change the DNS settings in your router, you usually have to enter a Primary and a Secondary setting. The secondary is only used if the primary can not be located. Here are common settings:
If you want to use Google Public DNS, use the following settings:
If you want to use OpenDNS, use the following settings:
Login To The Huawei HG8245T
To get started configuring the Huawei HG8245T DNS page you need to login to your router. If you are already logged in you can skip this step.
To login to the Huawei HG8245T, follow our Huawei HG8245T Login Guide.
Change the DNS settings on a Huawei HG8245T
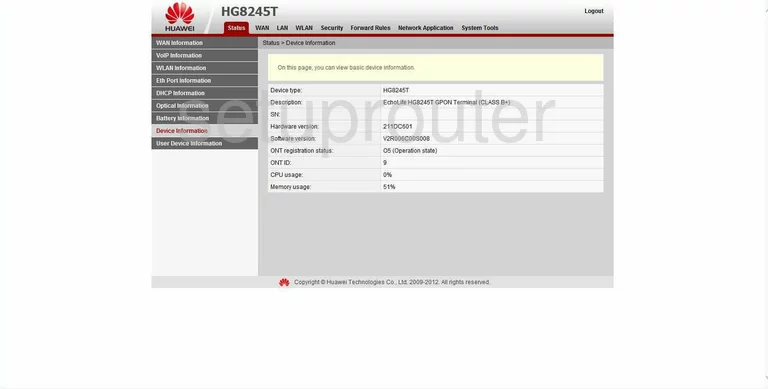
If you followed our login guide above then you should see this screen.
Start this guide on the Status page of the Huawei HG8245T router. Click the link at the top of the page labeled LAN. Then on the left click the link titled DHCP Server Configuration.
Configure the DNS section of your Huawei HG8245T
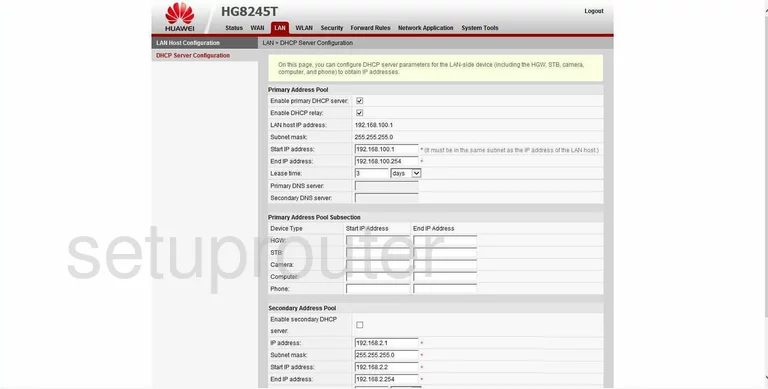
On this page, locate the space labeled Primary DNS Server and enter the main DNS server address you want to use here.
Below that is the Secondary DNS Server. Enter the alternate DNS Server address here. Remember that this address is only used if the first can’t be found.
That’s all there is to it, simply click the Apply button before you exit.
Possible Problems when Changing your DNS settings
Most devices on your network will not begin using the new DNS settings until they have been rebooted. After rebooting a device you can go to it’s network settings and verify that it is using the DNS servers that you specified.
Other Huawei HG8245T Info
Don’t forget about our other Huawei HG8245T info that you might be interested in.