- Configuring a Port Group
- Procedure
- Verifying the Configuration
- Follow-up Procedure
- Настройка сетевого оборудования компании HUAWEI (коммутация, статическая маршрутизация)
- Глобальные команды, режимы работы, cходства и различия с CLI CISCO.
- Настройка vlan интерфейсов, режимы работы физических портов коммутатора
- Настройка STP
- How do I configure port mapping rules on my HUAWEI router
- Huawei маршрутизатор настройка порта
- Проброс одного порта TCP или диапазона.
- Проброс всех портов (крайний случай). Добавление серевера в DMZ.
Configuring a Port Group
If you need to perform the same operations on multiple Ethernet interfaces, configuring each interface one by one easily causes incorrect configurations and is labor-intensive. The port group function easily solves the problem. You can add all the Ethernet interfaces to the same port group. After you run a configuration command once in the port group view, the configuration takes effect on all the Ethernet interfaces in the port group, reducing the configuration workload.
- Temporary port group: To temporarily deliver a configuration to multiple interfaces, you can create a temporary port group. After you deliver the configuration and exit from the port group view, the system automatically deletes the temporary port group.
- Permanent port group: To deliver configurations to interfaces multiple times, you can create a permanent port group. After you exit from the port group view, the port group and member interfaces in the group still exist, facilitating subsequent batch configuration for the member interfaces. To delete a permanent port group, run the undo port-group< all | port-group-name > command.
Procedure
- Configure a temporary port group.
- Run system-view The system view is displayed.
- Run port-group group-member< interface-typeinterface-number1 [ tointerface-typeinterface-number2 ] > & or interface range< interface-typeinterface-number1 [ tointerface-typeinterface-number2 ] > & A temporary port group is created and the port group view is displayed.
- Run system-view The system view is displayed.
- Run port-groupport-group-name A permanent port group is created and the port group view is displayed.
- Run group-member< interface-type interface-number1 [ tointerface-type interface-number2 ] > & Ethernet interfaces are added to the permanent port group.
- Only the S6720EI, S6720S-EI, S5720HI, and S5720EI support Ethernet sub-interfaces.
- Only hybrid and trunk interfaces on the preceding switches support Ethernet sub-interface configuration.
- After you run the undo portswitch command to switch Layer 2 interfaces on the preceding series of switches into Layer 3 interfaces, you can configure Ethernet sub-interfaces on the interfaces.
- After an interface is added to an Eth-Trunk, sub-interfaces cannot be configured on the interface.
- VLAN termination sub-interfaces cannot be created on a VCMP client.
Verifying the Configuration
Run the display port-group [ all | port-group-name ] command to check member interfaces in a permanent port group.
The port group function allows you to configure interfaces in a batch. However, the device does not support query or saving of the port group configuration. You can run the display this command in the interface view of a member interface to check the configuration that takes effect on the interface.
Follow-up Procedure
- Configuring the Working Mode of a Combo Interface
- Switching an Interface to Layer 3 Mode
- Configuring Auto-Negotiation
- Configuring the Interface Rate
- Configuring Flow Control
- Configuring the Delay in Reporting Physical Status Changes
- Configuring Link Flapping Protection
- Configuring an Interface to Transit to the Error-Down State When the Number of Received Error Packets Exceeds the Threshold
- Configuring the IFG
- Setting the Jumbo Frame Length Allowed on an Interface
- Configuring Unidirectional Single-Fiber Communication
- Configuring the MDI Type
- Configuring the Duplex Mode
- Configuring Port Isolation
You can configure both interface attribute commands and service commands in the port group view. For details about the service commands, see the related documentation.
A command run in the port group view takes effect only on member interfaces that support the command. Therefore, a configuration that is batch delivered may not take effect on all member interfaces. For example, a port group consists of optical and electrical interfaces. If you run the transceiver power low trigger error-down command in the port group view, the configuration will only take effect on the optical interfaces.
Настройка сетевого оборудования компании HUAWEI (коммутация, статическая маршрутизация)
HUAWEI – одна из крупнейших китайских компаний в сфере телекоммуникаций. Основана в 1988 году.
Компания HUAWEI достаточно недавно вышла на российский рынок сетевого оборудования уровня Enterprise. С учётом тенденции тотальной экономии, на нашем предприятии очень остро встал вопрос о подборе достойной замены оборудованию Cisco.
В статье я попытаюсь рассмотреть базовые аспекты настройки сервисов коммутации и маршрутизации оборудования HUAWEI на примере коммутатора Quidway серии 5300.
Глобальные команды, режимы работы, cходства и различия с CLI CISCO.
- system-view – аналог цисковского режима конфигурирования conf t. В этом режиме приглашение командной строки выглядит как [Switch].
- user-view – аналог цисковского непривилегированного режима. Режим приглашения выглядит так: .
Основные команды:
- system-view – переход из user-view в привилегированный режим system-view;
- save – запись текущих настроек в энергонезависимую память устройства;
- display current-configuration – вывод текущего файла конфигурации
- display current-configuration configuration XXXX – вывод настроек секции XXXX.
- display this – вывод конфигурации текущей секции;
- quit – выход из текущей секции в родительскую.
Настройка vlan интерфейсов, режимы работы физических портов коммутатора
Создание vlan
Для создания vlan как сущности, на коммутаторе в режиме system-view выполняется команда vlan XXX, где XXX – номер vlan.
system-view Enter system view, return user view with Ctrl+Z. [Quidway]vlan [Quidway]vlan 1 [Quidway-vlan1] Vlan создан. Так же командой description можно задать описание или название vlan. В отличие от Cisco имя не является обязательным атрибутом при создании vlan.
Для передачи созданых vlan в пределах локальной сети используется протокол GVRP. Включается он командой gvrp в режиме system-view.
[Quidway]gvrp Info: GVRP has been enabled. [Quidway] # interface GigabitEthernet0/0/23 port link-type trunk port trunk allow-pass vlan 100 to 200 gvrp # Совместимости с Cisco VTP (vlan transfer protocol) нет и быть не может.
Создание vlan интерфейса.
system-view Enter system view, return user view with Ctrl+Z. [Quidway]int vlanif 1 [Quidway-Vlanif1]ip address 2.2.2.2 24 [Quidway-Vlanif1]display this # interface Vlanif1 ip address 2.2.2.2 255.255.255.0 # return [Quidway-Vlanif1] В отличие от Cisco, маску можно писать сокращённо. Очень удобно.
Думаю, что комментарии излишни.
Режимы работы портов
Собственно, ничего нового. Существуют два основных режима работы порта: access и trunk.
Режим trunk
Настройка порта:
system-view Enter system view, return user view with Ctrl+Z. [Quidway]int gi0/0/1 [Quidway-GigabitEthernet0/0/1]port link-type trunk [Quidway-GigabitEthernet0/0/1]port trunk allow-pass vlan 1 [Quidway-GigabitEthernet0/0/1]di th # interface GigabitEthernet0/0/1 port link-type trunk port trunk allow-pass vlan 100 900 # return В отличие от коммутаторов Cisco, по-умолчанию, все vlan запрещены и их необходимо принудительно разрешить командой port trunk allow-pass vlan.
Нетэггированный native vlan на порту включается командой:
[Quidway-GigabitEthernet0/0/1]port trunk pvid vlan 600 [Quidway-GigabitEthernet0/0/1]port link-type access [Quidway-GigabitEthernet0/0/1]port default vlan 2 [Quidway-GigabitEthernet0/0/1]di th # interface GigabitEthernet0/0/1 port link-type access port default vlan 2 # return Настройка eth-trunk
interface Vlanif100 ip address 1.1.1.2 255.255.255.252 # interface GigabitEthernet0/0/23 eth-trunk 1 # interface GigabitEthernet0/0/24 eth-trunk 1 # interface Eth-Trunk0 port link-type trunk port trunk allow-pass vlan 100 # Настройка STP
Для тестирование STP были соединены коммутаторы Cisco 2960 и HUAWEI Quidway S5328C-EI.
Для включения STP на коммутаторе необходимо в режиме system-view ввести команду
По умолчанию, приоритет коммутатора HUAWEI, так же как и коммутатора Cisco равен 32768.
Просмотр информации о текущем состоянии портов:
[Quidway]display stp brief MSTID Port Role STP State Protection 0 GigabitEthernet0/0/1 ALTE DISCARDING NONE 0 GigabitEthernet0/0/2 ROOT FORWARDING NONE Видно, что один из портов заблокирован, т. к. приоритет коммутатора Cisco оказался больше.
Просмотр глобальной информации об STP:
[Quidway]disp stp -------[CIST Global Info][Mode STP]------- CIST Bridge :32768.781d-baa4-b6a7 Config Times :Hello 2s MaxAge 20s FwDly 15s MaxHop 20 Active Times :Hello 2s MaxAge 20s FwDly 15s MaxHop 20 CIST Root/ERPC :8192 .2893-fe2a-9a80 / 199999 CIST RegRoot/IRPC :32768.781d-baa4-b6a7 / 0 CIST RootPortId :128.2 BPDU-Protection :Disabled TC or TCN received :107 TC count per hello :0 STP Converge Mode :Normal Share region-configuration :Enabled Time since last TC :0 days 1h:16m:17s Number of TC :9 Last TC occurred :GigabitEthernet0/0/2 Изменим приоритет коммутатора HUAWEI. Сделаем его наименьшим: 4096.
[Quidway]disp stp brief MSTID Port Role STP State Protection 0 GigabitEthernet0/0/1 DESI FORWARDING NONE 0 GigabitEthernet0/0/2 DESI FORWARDING NONE [Quidway] [Quidway]disp stp -------[CIST Global Info][Mode STP]------- CIST Bridge :4096 .781d-baa4-b6a7 Config Times :Hello 2s MaxAge 20s FwDly 15s MaxHop 20 Active Times :Hello 2s MaxAge 20s FwDly 15s MaxHop 20 CIST Root/ERPC :4096 .781d-baa4-b6a7 / 0 CIST RegRoot/IRPC :4096 .781d-baa4-b6a7 / 0 CIST RootPortId :0.0 BPDU-Protection :Disabled TC or TCN received :123 TC count per hello :0 STP Converge Mode :Normal Share region-configuration :Enabled Time since last TC :0 days 0h:0m:44s Number of TC :11 Last TC occurred :GigabitEthernet0/0/1 Статическая маршрутизация
[Quidway]ip route 0.0.0.0 0.0.0.0 1.1.1.1 [Quidway]disp ip routing-table Route Flags: R - relay, D - download to fib ------------------------------------------------------------------------------ Routing Tables: Public Destinations : 6 Routes : 6 Destination/Mask Proto Pre Cost Flags NextHop Interface 2.2.2.0/24 Direct 0 0 D 2.2.2.2 Vlanif1 2.2.2.2/32 Direct 0 0 D 127.0.0.1 Vlanif1 10.0.0.3/32 Direct 0 0 D 127.0.0.1 LoopBack0 90.0.0.1/32 Direct 0 0 D 127.0.0.1 LoopBack10 127.0.0.0/8 Direct 0 0 D 127.0.0.1 InLoopBack0 127.0.0.1/32 Direct 0 0 D 127.0.0.1 InLoopBack0 На этом всё.
Если уважаемое сообщество заинтересуется материалом, планирую продолжить освещать настройку оборудования HUAWEI. В следующей статье рассмотрим настройку динамической маршрутизации.
How do I configure port mapping rules on my HUAWEI router
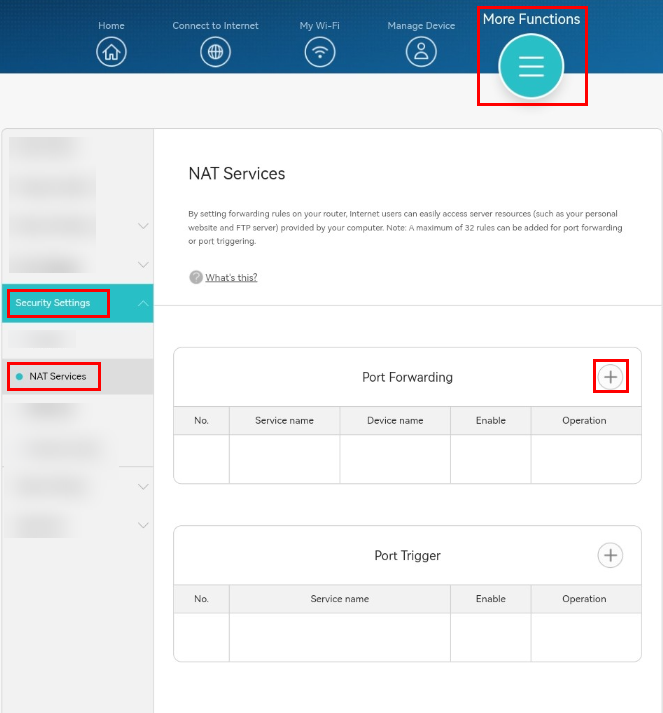
Huawei маршрутизатор настройка порта

Иногда требуется пробросить порт (иногда говорят открыть, но это не правильно) на Huawei HG8245H-256M. Собственно опытные сисадмины с этим легко справляются, но я всё же раскажу об этом. Сразу добавлю, что если вы не выкупили стаческий (белый IP) открытие порта вам ничего не даст. Диапазон IP 100.xxx.xxx.xxx выдаваемый ByFly обычным пользователям не маршрутизитуется в интернете.
Для тех кто не хочет тратить своё дорогое время на изучение данного мануала предлагаем нашу платную помощь.
Инструкция подходит и для: Huawei HG8245H5, HG8245Hv5, HG8245H, HG8245A
Проброс одного порта TCP или диапазона.
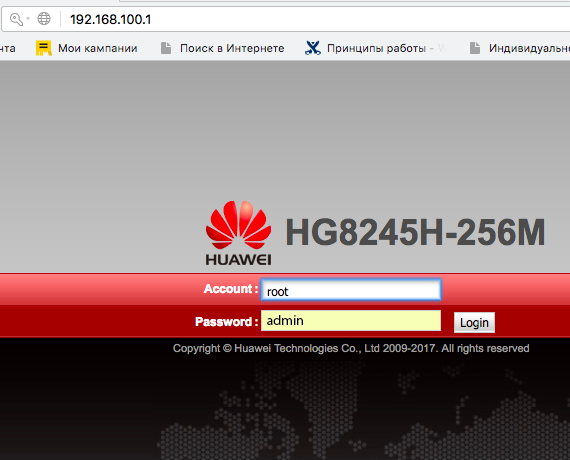
Логин root пароль admin если никто не поменял конечно.
Далее идём Forward Rules/Port Mapping Configuration:
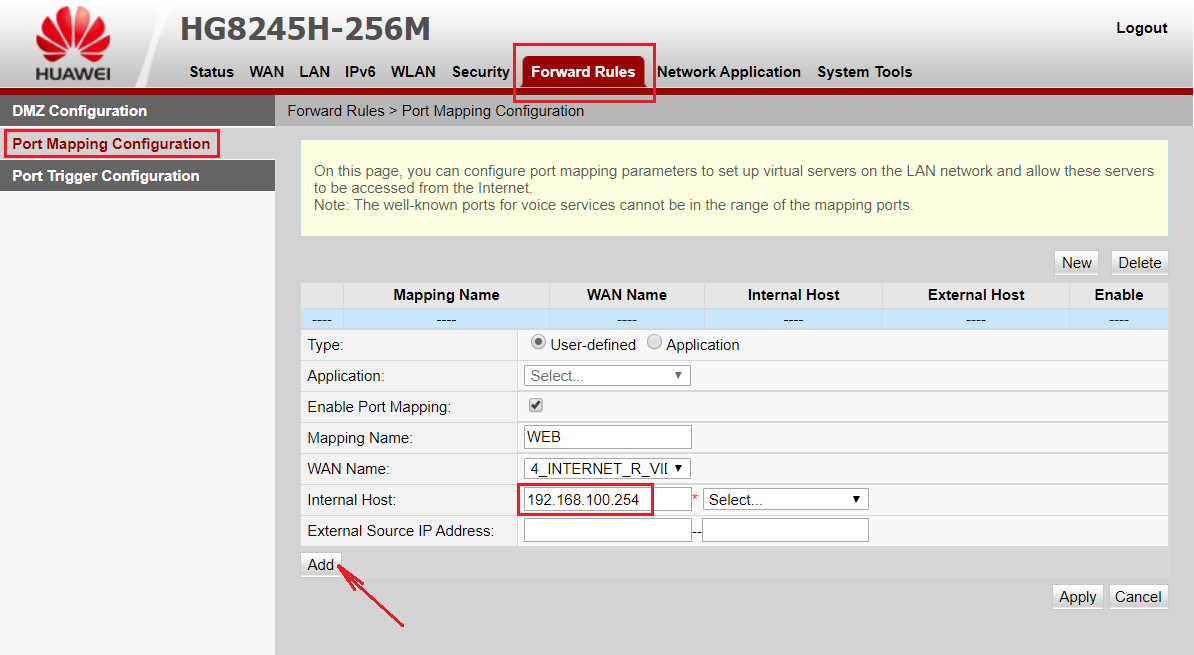
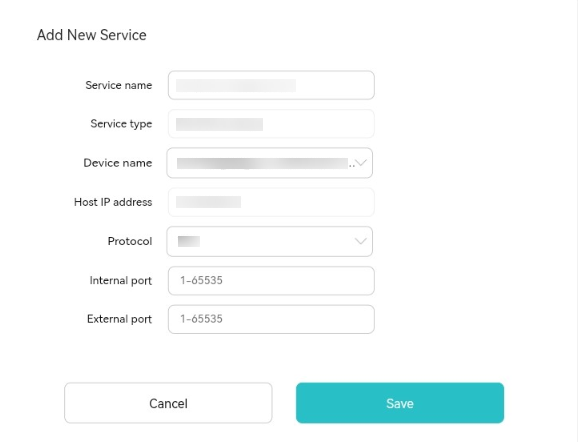
Нажимаем кнопочку Add для добавления диапазона портов.
Указываем сам диапазон портов. Для Web сервера например:
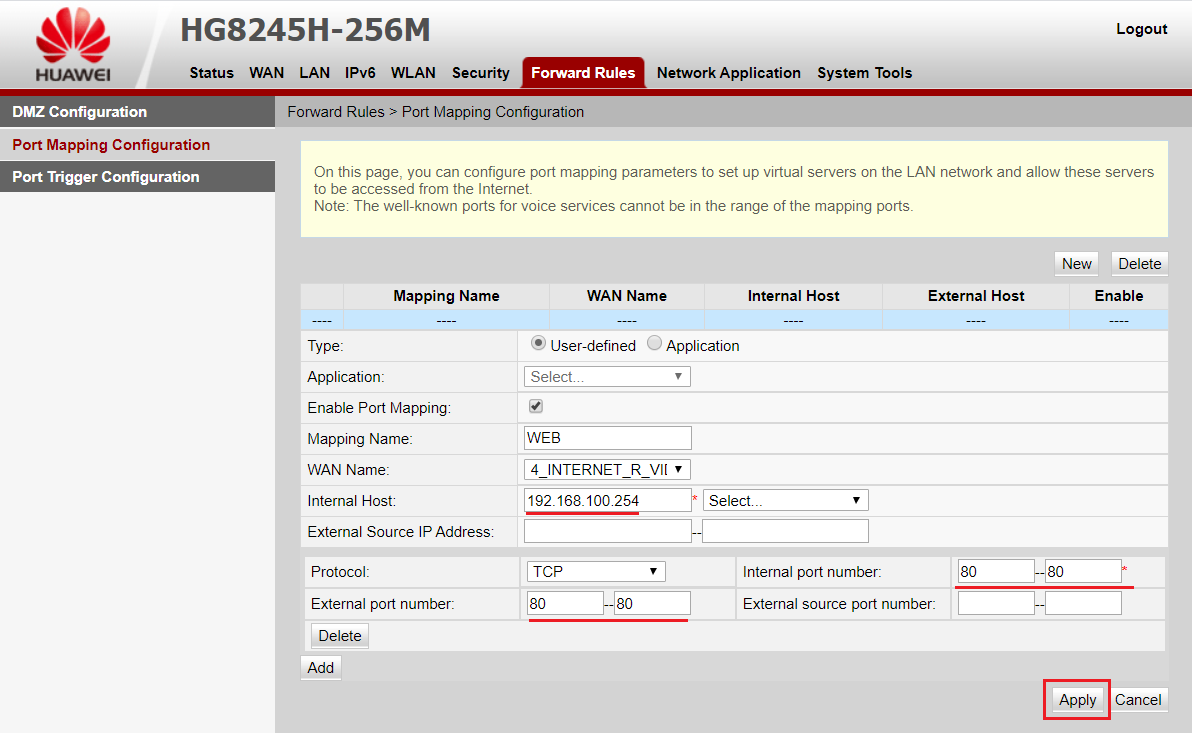
P.S. Если протокол не очень надёжен (RDP), лучше менять внешний порт (External port namber) на нестандартный больший 10 000.
Не знаете на каком порту висит ваш сервис? Для тех кому интересно на каких портах вешают протоколы.
Проброс всех портов (крайний случай). Добавление серевера в DMZ.
Иногда проброс портов не работает, хотя всё вроди правильно. Тогда остаётся лишь добавить ваш сервер в DMZ, что не очень безопасно. Возможно он имеет уязвимые сервисы и протоколы (RDP например), которые сразу же рекомендуется отключить или зафаерволить на строне сервера.
Forward Rules/DMZ Configuration
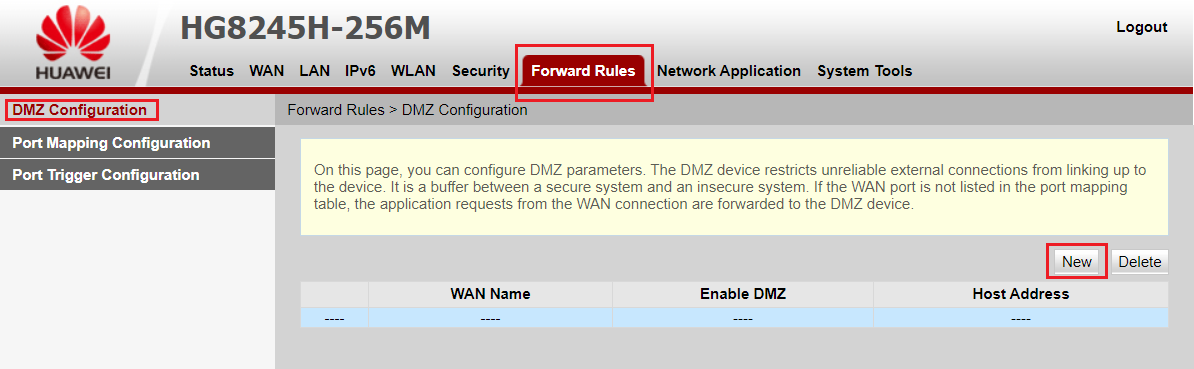
Ставим галочку Enable DMZ и пишем IP вашего сервера:
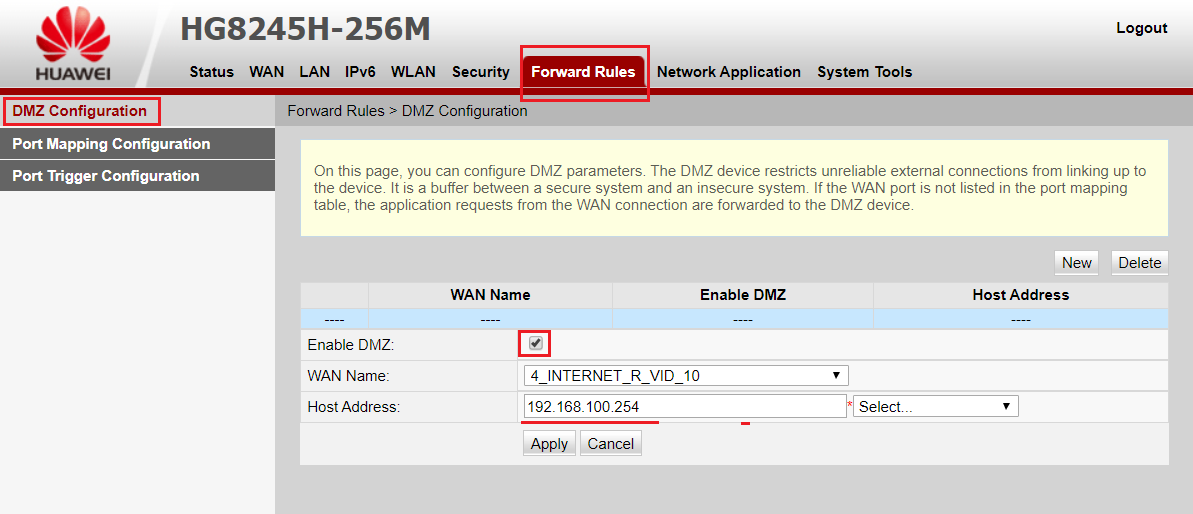
Проброс порта выполнен. Для тех кто не смог настроить предлагаем нашу платную помощь.