- Tutorial: How to mount raw images (.img) images on Linux
- Incoming search terms:
- How to Mount IMG Files in Linux
- Method 1: Mount With Graphical Menus
- Method 2: Via the Loopback Device
- How can I open binary Android ROM image files? (.img)
- 5 Answers 5
- How would I extract a .img file
- 5 Answers 5
- You can use kpartx — create device maps from partition tables
- You can clone from the image file to a drive
Tutorial: How to mount raw images (.img) images on Linux
If you have a few .img files coming as disk images from devices like floppies, CDs, DVDs, SD cards, etc, you will realize that you cannot mount the in Linux, because they contain a file system that has to be mounted.
In linux you would need to use the mount command as for any physical device, however you need to know the correct syntax that is based on understanding the information related to the partition(s) available in the image.
First step is to read the partition Start point using fdisk:
You will see an output similar to the one below:
Device boot Start End Blocks Id System
imgfile.img1 * 63 266544 722233 C W95 FAT32 (LBA)
imgfile.img2 25679 25367890 245667890+ 83 Linux
As you can see there are two partitions, one that is FAT32 and the other one that it’s ExtFS. This means that to mount the first partition we have to tell Linux that we need to start at the sector 63. The standard sector size is 512 bytes, however there are other possibilities like 128 or 1024. Assuming that the place from where you are downloading the image doesn’t specify any sector size, we can type in the terminal:
sudo mount -t vfat -o loop,offset=$((63 * 512)) imgfile.img /mnt/disk
To mount the second partition, as you can imagine:
mount -t ext4 -o loop,offset=$((25679 * 512)) imgfile.img /mnt/disk1
It’s important to copy the “Start” sector number correctly, otherwise you’ll get an error message like:
mount : wrong fs type, bad option, band superblock on /dev/loop,
missing codepage or helper proggram, or other error
In some cases useful info is found in syslog – try
dmesg | tail or so
One last thing, the standard sector size for CDs and DVDs is 2352 instead of 512. If you are opening such image, you’ll have to use this value instead of 512.
Incoming search terms:
- https://stefanoprenna com/blog/2014/09/22/tutorial-how-to-mount-raw-images-img-images-on-linux/
- how to mount raw img disk linux
How to Mount IMG Files in Linux
ISO images are often used to contain CD-ROM or DVD data, but Linux users will occasionally find themselves working with IMG files instead. These contain direct disk images, which can be worked with in a similar way. At one point these were generally used for writing an entire file system directly to a discrete diskette, but few people would ever wish to do that in today’s world. There are two major reasons modern Linux users would need to work with them, however. One is if an IMG file was used to distribute a driver or other piece of an operating system that needed to be restored. The IMG file can be mounted and the individual file from inside of it’s contained system could then be copied over to a booted file structure. The other reason, which is becoming extremely popular, is for working with virtual machines and other forms of hardware virtualization.
Linux provides several different ways to work with these contained structures. Depending on your distribution, you might be able to work with them in a purely graphical environment. The same CLI tools that mount ISO images could also mount IMG if this isn’t possible for you, however.
Method 1: Mount With Graphical Menus
If you’re using PCManFM or another file manager that supports mounting an image directly via the /media folder with a menu driven system such as some versions of Nautilus, then you should hold launch your manager to start. You’ll either need to launch this from the Panel Menu in LXDE or from the Applications menu in GNOME. Once you’re open, navigate to the Downloads folder by clicking the link in the left panel and then right click on the disk image you downloaded. It’s generally smart to have ensured that your browser didn’t detect any malware before proceeding.
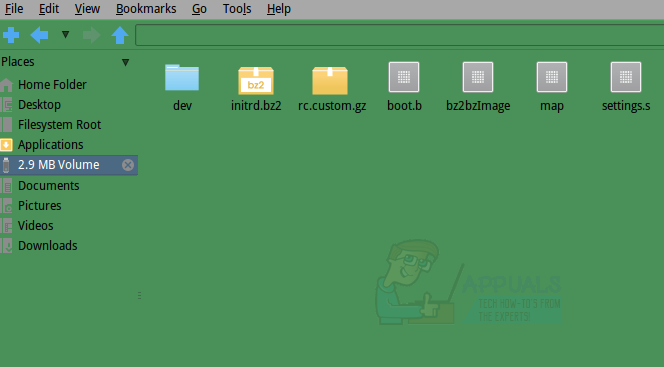
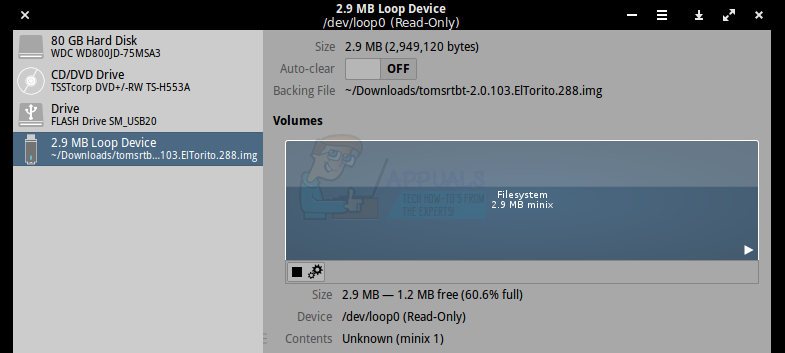
Once the context menu appears, select the “mount disk image” option. The label for this command will change depending on your particular distribution. The image will automatically mount at /media/USERNAME/disk, with USERNAME being replaced with your actual user name. Click on the left panel of the file manager where it reads the size of the image in question. In our example we used an image of an older Linux distribution called tomsrtbt (pronounced Tom’s Root Boot), which fit an entire operating system in less than three megabytes. Hence the “2.9 MB Volume” label refers to the image in question.
You may now drag or right click and copy any of these files to any other section of your file system for safekeeping. When you’re done you can click on the X logo next to the label to close it. If you’re using a file manager that doesn’t support this method of unmounting an image, then start the GNOME Disks utility from the Panel Menu or the Applications tab. Click on the device that has the same name as the label from the file manager and then click on the square stop button to close down the file system.
Method 2: Via the Loopback Device
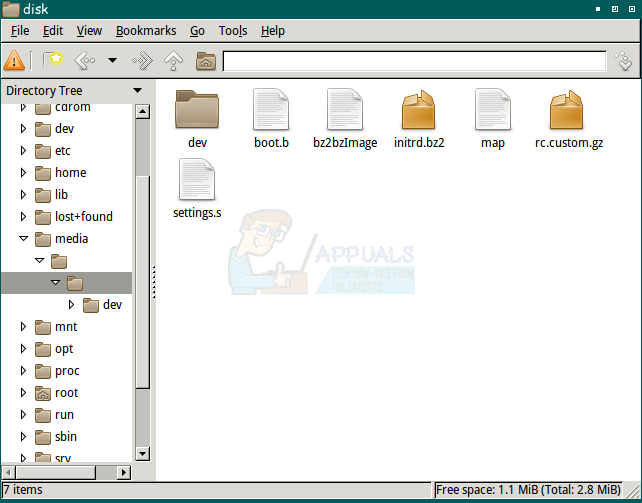
Disk images could be mounted via the loopback device as well, in much the same way as ISO images can be. This technique will be necessary if you use Thunar, Konqueror or any other file manager that doesn’t support direct mounting via graphical techniques. If you haven’t been able to mount an image graphically, then hold down CTRL, ALT and T at the same time. Type ls /mnt to make sure your /mnt directory is empty. If it’s not or if you don’t feel comfortable using it directly, then you can use sudo mkdir /mnt/toms to create a mountable directory. You could theoretically call the directory whatever you’d like. Type sudo mount -o loop tomsrtbt-2.0.103.ElTorito.288.img /mnt and press enter. You will be prompted to enter your password, which you will be required to do. The /mnt directory can then be explored via the CLI or the file manager you prefer. Naturally you’ll need to replace tomsrtbt-2.0.103.ElTorito.288.img with the image you’re using and /mnt with the directory tree segment you’re using.
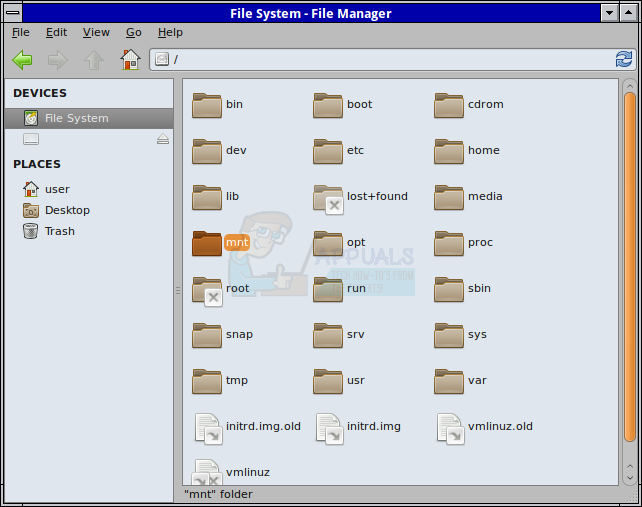
Hold down CTRL and E to open your graphical manager or start it from the Applications or Whisker menu depending on which desktop environment you are using. Select the File System option from the left pain, navigate to /mnt and then select the /mnt folder. You’ll now be able to examine the contents of the image file.
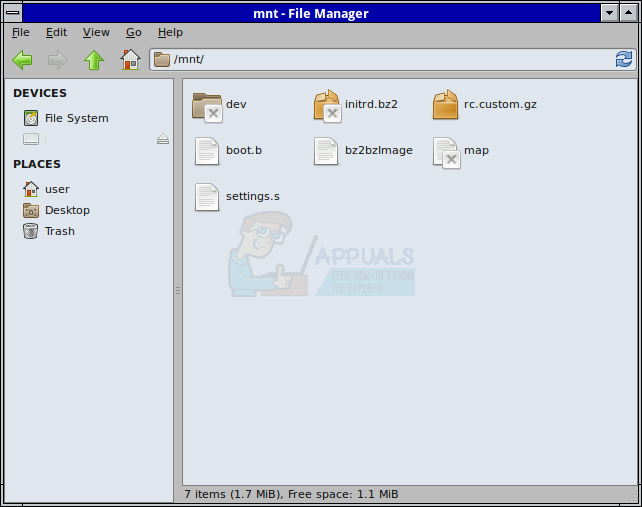
At the CLI type sudo umount /mnt and press enter to umount the image. You would need to substitute whatever mount point you used for /mnt when you do so.
How can I open binary Android ROM image files? (.img)
I’m a Windows/Mac/Ubuntu and Android user, so I know what I’m talking about, when I say: How do I open binary image files? (.img) They just won’t open, on any OS… I’m an Android dev… I’m currently working on a ROM, (I also program, using Windows) but I need to extract files, from .img files. I’ve converted them to .ext4.img but they just aren’t recognized by Linux (Definitly not by Android), by Mac OS or Windows. In other words, I can’t open, extract or mount them. Can anyone help me? I’m kinda confused…
the fact that the person with the most useful answer has to first guess what your question really is about, says it all. Please try to ask a more specific and detailed question than ‘How do I open binary image files’.
5 Answers 5
Short Answer is, there are 3 types:
- Regular filesystem images, that can be mounted with -o loop option
- YAFFS2 filesystem images, which currently cannot be mounted in Ubuntu and have to be unpacked
- EXT4 filesystem images that have been further processed by the Android toolchain and need to be converted to regular images with simg2img from the Android toolchain.
So, you have a binary image extracted from an Android device, is that correct?
What does the file command say about the file? Something like this?
$ file system.img system.img: VMS Alpha executable That system image is extracted via nandroid from a Samsung Galaxy i7500. Most of those old Android devices used yaffs as a file system. Knowing what you are dealing with greatly helps. (i.e. Which device are we talking about? Where is that image from?)
Converting images into other file systems will only produce garbage at best if you do not have installed support for the file system in question. Unfortunately there is no package for Ubuntu. But that question has already been asked and answered: Create yaffs2 file system on Ubuntu Server 11.10
There is also the possibility that this image is encrypted. But why would someone give you an encrypted image?
Since this is mostly about Android and you call yourself an Android Developer, please read the Android documentation, again. It’s supposed to be all in there. If not ask your question at android.stackexchange.com, XDA-Developers, RootzWiki and the like. And please do not put a ROM on the net for hundreds of people to use unless you REALLY know what you are doing and you read the documentation. Doing it for fame is dangerous and bad for the users!
How would I extract a .img file
I am trying to extract a .img file (hard disk image with with Chromium OS on it). I have not been able to find any way to do this other than mounting it but that is not usable because it shows up as multiple drives so I cannot repack it.
5 Answers 5
You do not extract an .img ; you mount it. Example:
mkdir /mnt/ChromeOS mount -o loop image.img /mnt/ChromeOS/ and this will list the contents:
Mind that .img can also be zipped. If that is the case (unlikely though) you also need to gunzip it.
This does not work if the img contains multiple partitions, at least it fails for me. Using kpartx works instead.
You can use kpartx — create device maps from partition tables
Install the package kpartx and run
kpartx [-a | -d | -l] [-v] wholedisk DESCRIPTION
This tool, derived from util-linux’ partx, reads partition tables on specified device and creates device maps over partitions segments detected. It is called from hotplug upon device maps creation and deletion.
EXAMPLE
To mount all the partitions in a raw disk image:
You can clone from the image file to a drive
You can clone from the .img [image] file to a drive, for example a USB pendrive, that is big enough. This is the basic intention of the file.
You can use mkusb for that purpose. It works with compressed image files too (when compressed with gzip and xz ), .img.gz and .img.xz files.
After the cloning you will see the partitions for example with
sudo lsblk -f sudo lsblk -m sudo parted -ls After cloning you can mount and unmount the partition(s) on the drive ‘as usual’.