- How-To: Import/Export GPG key pair
- 1. Export the GPG key
- 2. Import the GPG key
- How do I import a public key?
- How to Encrypt and Decrypt Files Using GPG in Linux
- Install GnuPG (GNU Privacy Guard) on Linux
- Generating New GPG Key Pairs in Linux
- List GPG Key Pairs in Linux
- Export Keys with GPG in Linux
- Import Keys with GPG in Linux
- Encrypting Files Using GPG in Linux
- Decrypting Files Using GPG in Linux
How-To: Import/Export GPG key pair
This tutorial will show how you can export and import a set of GPG keys from one computer to another.
This way, you can sign/encrypt the same way one different computer.
A simple way of doing it would be to:
but this would import all your keyring.
If you want to import only one set of key, you first have to get the listing of your keys and find the one you want to export:
1. Export the GPG key
$ gpg --list-keys /home/user/.gnupg/pubring.gpg -------------------------------- pub 1024D/ABCDFE01 2008-04-13 uid firstname lastname (description) [email protected]> sub 2048g/DEFABC01 2008-04-13 In this case, I am going to import key ABCDFE01.
$ gpg --output mygpgkey_pub.gpg --armor --export ABCDFE01 $ gpg --output mygpgkey_sec.gpg --armor --export-secret-key ABCDFE01 Then copy thos files over to the remote host:
2. Import the GPG key
Now, log in the remote host:
[email protected]:~$ gpg --import ~/mygpgkey_pub.gpg [email protected]:~$ gpg --allow-secret-key-import --import ~/mygpgkey_sec.gpg [email protected]:~$ gpg --list-keys /home/user/.gnupg/pubring.gpg -------------------------------- pub 1024D/ABCDFE01 2008-04-13 uid firstname lastname (description) [email protected]> sub 2048g/DEFABC01 2008-04-13 [email protected]:~$ rm ~/mygpgkey_sec.gpg ~/mygpgkey_pub.gpg That’s it
Updated: April 15, 2008
How do I import a public key?
2) If «1» doesn’t work (you’re not alone) then you can use this:
«Some people have reported difficulties using [the first approach]. The issue was usually related to a firewall blocking port 11371. An alternative approach is to search for the key at http://keyserver.ubuntu.com:11371/ and copy the key to a plain text file, say key.txt. Then, feed the key to apt-key with
To make it easy for this specific case:
Searching for Michael Rutter lead us to:
Public Key Server -- Get ``0x51716619e084dab9 '' -----BEGIN PGP PUBLIC KEY BLOCK----- Version: SKS 1.0.10 mQENBEy9tcUBCACnWQfqdrcz7tQL/iCeWDYSYPwXpPMUMLE721HfFH7d8ErunPKPIwq1v4Cr NmMjcainofbu/BfuZESSK1hBAItOk/5VTkzCJlzkrHY9g5v+XlBMPDQC9u4AE/myw3p52+0N XsnBz+a35mxJKMl+9v9ztvueA6EmLr2xaLf/nx4XwXUMSi1Lp8i8XpAOz/Xg1fspPMRhuDAG YDnOh4uH1jADGoqYaPMty0yVEmzx74qvdIOvfgj16A/9LYXk67td6/JQ5LFCZmFsbahAsqi9 inNgBZmnfXO4m4lhzeqNjJAgaw7Fz2zqUmvpEheKKClgTQMWWNI9Rx1L8IKnJkuKnpzHABEB AAG0I01pY2hhZWwgUnV0dGVyIDxtYXJ1dHRlckBnbWFpbC5jb20+iQE+BBMBAgAoBQJMvbXF AhsjBQkJZgGABgsJCAcDAgYVCAIJCgsEFgIDAQIeAQIXgAAKCRBRcWYZ4ITauTy9B/4hmPQ7 CSqw5OS5t8U5y38BlqHflqFev3llX68sDtzYfxQuQVS3fxOBoGmFQ/LSfXQYhDG6BZa4nDuD ZEgb81Mvj0DJDl4lmyMdBoIvXhvdEPDd/rrOG+1t2+S429W9NIObKaZCs9abv2fnIhrtyAWx c/iNR5rJmNXozvJVGAgAeNhBSrvZqFaPJ//BklbJhfVgNwt4GgtFl1vaU7LMaMrOWA9Hyd8d WAGuIhbYXOOFj1WZ/OhUlYXnsIe8XzaJ1y6LyVkCLhaJ+MVtGwTXrFXRhBLQlhCYBfO25i/P GUWSvRhI8n/r+RMNOuy1HlFbexRYrtPXOLbiO8AlFuIsX9nRuQENBEy9tcUBCADYcCgQCCF1 WUSn7c/VXNvgmXzvv3lVX9WkV4QdpcJXitXglXdTZwVxGv3AxDuaLEwxW7rbqKRPzWNjj4xT Hxt2YtUjE+mLV58AFaQQU3aldYG8JPr2eohMNZqp2BG2odczw5eaO5l5ETjC1nHUjDUm8us3 TV3AXOajAjguGvpG3DKnx/gmudrMBVSAEE64kefyBmSR683zkXhw+NgbTID9XW1OSqE+fLQf 0ZzQEojMdfYIeV8Q5sMAmU3J9AdlpyDrZaYRmiphgw8PZTMahhz/o6Bz7p6VqA4Ncmr225nn tIsjUUz0iK6TsaOi9KrF23Rw+IDUJeYkdVbwGqavgJG1ABEBAAGJASUEGAECAA8FAky9tcUC GwwFCQlmAYAACgkQUXFmGeCE2rlB9Qf+JKMUzM0KVdTFWocGP+v4xTJsnKjYfjPjOkFYAdxh jkiIq7h7ws0s+UKqmzSG4vX5Qz46GZcB7x0hVrN0gqCcfpruPZOjXNkRwtsXbLfiurrZQ6dS PsNIE9L4DZdSTggwC3i7jiDlK6TtIMXD55VoVvVAvmzt6/f7y4qsVxhZ/N3jMqq1vLUESw8e Vq2ryZRU9OIUufb5JjGNJ1Zz0Zp8hV/IPLoIv1OIocWov27YLcr6EnXuvXvU/MSm97YifdG9 UYCE99nHTioSM0Q3cgpu5EppVNrc232gyG2vlHzhsstNBx55cUmAX2fEzxuRipLS0iq4L0zU Gdgdjn4noGDzGA== =BF1w -----END PGP PUBLIC KEY BLOCK-----
I) Copy this to a txt file:
sudo apt-key add ~/Michael.txt && rm ~/Michel.txt Also EvilPhoenix has «got a script that you can install which can allow you to execute the functions described here in a much easier one-line command, its part of a Launchpad project [he] started, the PPA for it is located here.
Its written in Bash, but that is more than enough of a requirement for it to qualify.
Its compatible with all versions of Ubuntu Lucid and later.»
How to Encrypt and Decrypt Files Using GPG in Linux
In computing, encryption is a popular and most times the recommended technique of hiding information in a secretive format. GnuPG is one of the useful tools for encrypting information (files) on Linux systems.
GnuPG (also known as GNU Privacy Guard or simply GPG) is GNU’s tool used to encrypt data and create digital signatures that contribute to overall information security. It is a complete and free implementation of the OpenPGP Internet standard that provides an advanced key management solution.
There are two versions of GPG available:
- gpg – a standalone version that is more suited for servers and embedded platforms.
- gpg2 – a version intended for desktops and requires several other modules to be installed.
In some popular Linux distributions such as Debian, the gnupg2 package is a dummy transitional package that provides symlinks from gpg2 to gpg.
This guide shows how to generate a GPG key pair, export and share public keys, encrypt a file, and share and decrypt a file using GPG in Linux systems.
It demonstrates information sharing between two parties:
- Kili Aaron ([email protected]) whose command prompt is [email protected]
- Test Admin ([email protected]) whose command prompt is [email protected]
The file shared between the two parties is called secret.txt, which contains a highly sensitive password that the Test Admin wants to share with user Kili Aaron.
You can view the contents of the secret.txt file that contains the password and other remote access details using the following cat command as shown. It exists on the Test Admin’s server:
Install GnuPG (GNU Privacy Guard) on Linux
To install the GnuPG package, run the appropriate command for your Linux distribution as shown. Note that the gnupg package must be installed on the two systems sharing data.
$ sudo apt install gnupg [On Debian, Ubuntu and Mint] $ sudo yum install gnupg [On RHEL/CentOS/Fedora and Rocky/AlmaLinux] $ sudo emerge -a app-crypt/gnupg [On Gentoo Linux] $ sudo apk add gnupg [On Alpine Linux] $ sudo pacman -S gnupg [On Arch Linux] $ sudo zypper install gnupg [On OpenSUSE]
Generating New GPG Key Pairs in Linux
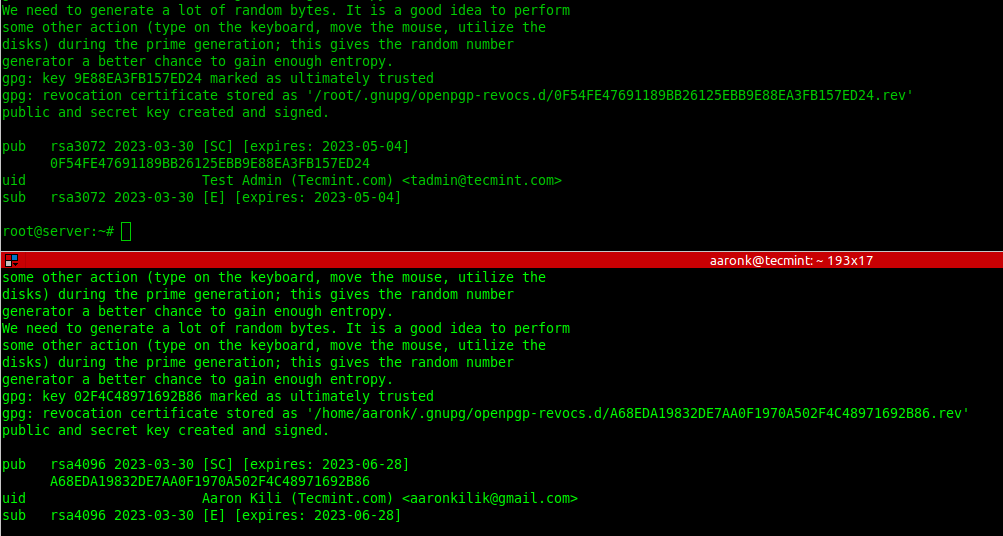
To generate new key pairs (public and private), run the gpg command with the —full-generate-key flag on both systems and follow the prompts to define the kind of key, the key size, how long the key should be valid, a user ID to identify your key, and a secure passphrase for the key as shown in the screenshot that follows.
List GPG Key Pairs in Linux
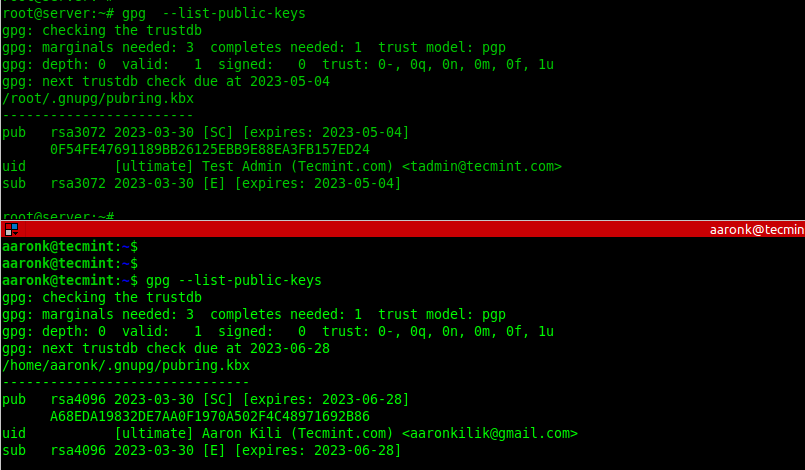
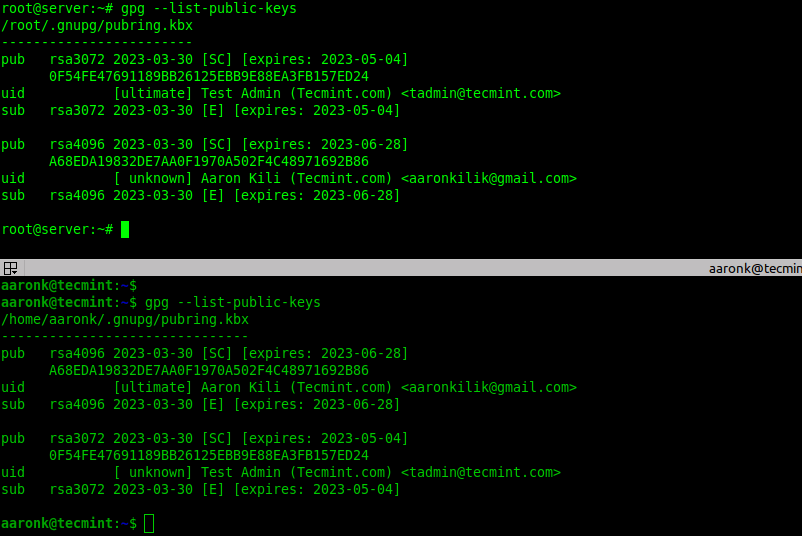
To list the public GPG key you have just created together with other existing keys, run the gpg command with the —list-public-keys flag. To perform a long listing, add the —keyid-format=long flag.
$ gpg --list-public-keys OR $ gpg --list-public-keys --keyid-format=long
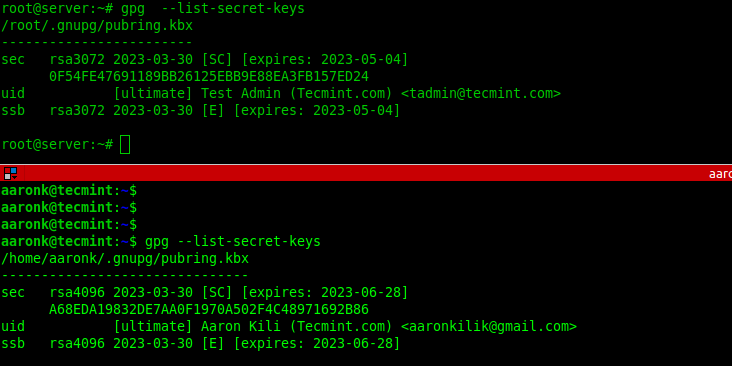
To list the secret GPG key you have just created together with other existing keys, run the gpg command with the —list-secret-keys flag. To perform a long listing, add the —keyid-format=long flag.
$ gpg --list-secret-keys OR $ gpg --list-secret-keys --keyid-format=long
Export Keys with GPG in Linux
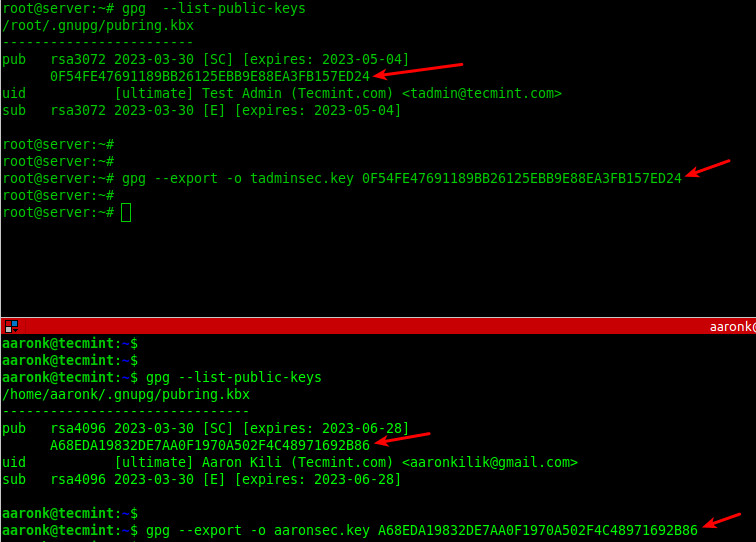
Once the GPG key pairs have been generated on both sides, the two parties can export their public keys into a file and share via email or other means.
--------- On Kili Aaron Server --------- $ gpg --list-public-keys $ gpg --export -o aaronsec.key 15B4814FB0F21208FB5076E7A937C15009BAC996 --------- On Test Admin Server --------- # gpg --list-public-keys # gpg --export -o tadminsec.key BC39679E5FF48D4A6AEF6F3437211F0B4D6D8A61
Import Keys with GPG in Linux
Next, exchange the public keys either via email or secure other means such as using the scp command as shown:
$ scp aaronsec.key [email protected]:/root/ $ scp [email protected]:/root/tadminsec.key ./
Next, import the public key from the opposite end into the local system public keyring by adding the —import flag as shown.
# gpg --import aaronsec.key # gpg --import tadminsec.key
To check if the imported public key exists in the local system keyring, list the available public keys as shown.
Encrypting Files Using GPG in Linux
Now let’s look at how to encrypt the secret file using gpg keys. For this section, we will run the commands on the Test Admin’s server.
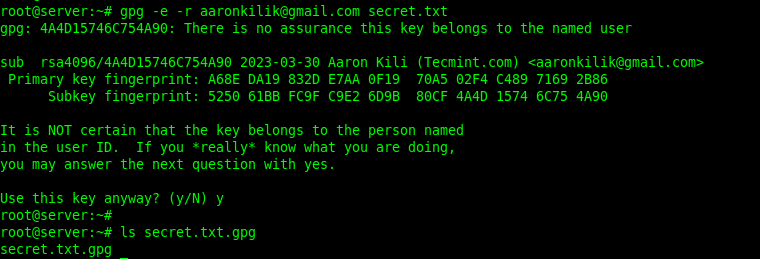
To encrypt a plain text file using the just created GPG key pair, run the following command. The -e or —encrypt flag enables encryption and the -r or —recipient flag is used to specify the recipient ID and secret.txt is the plain text file to be encrypted.
The following command encrypts the file secret.txt using the recipient [email protected]’s public key:
#gpg -e -r [email protected] secret.txt OR # gpg --encrypt --recipient [email protected] secret.txt
If the previous command run successfully, a new file (the original filename ending with .gpg extension) will be generated in the current directory:
To store the encrypted information in a different file, use the -o or —output option followed by a filename. In this example, the preferred filename is node_configs:
# gpg -e -r [email protected] -o node_configs secret.txt OR # gpg --encrypt --recipient [email protected] --output node_configs secret.txt
Now share the encrypted file with your partner via email or other secure means.
Decrypting Files Using GPG in Linux
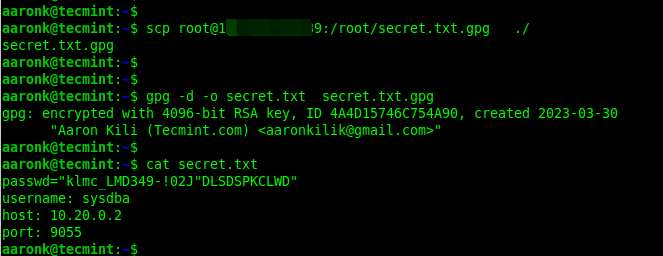
To decrypt a file encrypted using gpg, add the -d or —decrypt flag and specify the encrypted filename. By default, the decrypted information will be displayed in standard output. You can store it in a file using the -o flag as shown.
$ gpg -d -o secrets.txt secrets.txt.gpg $ ls secrets.txt
You might also like:
For more information, see the gpg/gpg2 man page as shown.
That’s it for the scope of this guide. GPG is a commonly used tool for encrypting and decrypting information or files in Linux. If you have any comments to share about this guide, use the feedback form below.

