Pamblam / Initial Setup.md
The steps I took to dual boot Arch Linux alongside the preinstalled Windows 10 that came with my new Lenovo Ideapad. I used Ubuntu exclusively for the last 6 years so I’m Window’s illiterate. I don’t know a whole lot about the inner workings of Linux either.
Prepare the preinstalled Windows to share the system.
- Boot into Windows
- Press Win key and ‘R’ to start the Run dialog
- In the Run dialog type «msinfo32» and press Enter
- In the System Information windows, select System Summary on the left and check the value of BIOS mode item on the right.
- Make sure the value is UEFI, which means Windows boots in UEFI/GPT mode
- Open Settings (The gear icon in the start menu)
- Click «Updates & Security»
- In the «Recovery» menu, click «Restart now» under the «Advanced startup» header
- After restart, choose the «Troubleshoot» option.
- Choose «Advanced Options»
- Choose «UEFI Firmware Settings»
- Press the restart button to load the UEFI firmware
- In the Security settings find and disable Secure Boot
- In the Boot settings also find and disable Fast Boot
- Open Control Panel (Press Windows key, Type «Control Panel» and press enter)
- In the «View by» menu, choose «Small Icons» and click on «Power Options».
- Open «Choose what power buttons do» on the left side menu.
- Click «Change settings that are currently unavailable»
- Uncheck «Turn on Fast Startup» and save changes.
Shrink the Windows partition
- Press Windows Key + R and type diskmgmt.msc — hit enter
- Right click the C drive and choose «Shrink Volume»
- Enter the amount of space to shrink the partition (I shrunk mine by 200000mb — 200 gigs)
- Click «Shrink»
- Choose a mirror from www.archlinux.org/download — I used the American pair.com mirror because it’s the first reputable domain I recognised.
- Download the .iso file.
- Download Rufus from https://rufus.akeo.ie/
- Plug in a new USB stick and open Rufus
- Select the USB drive and the downloaded Linux iso.
- Choose the GPT partition scheme, FAT32 file system
- Press start
We’re ready to boot and install Arch.
- Plug in the USB
- Hold down the shift key while clicking Restart
- Choose «Troubleshoot» then «Advanced Options» then «UEFI Firmware Settings» then restart.
- In the Boot menu, find your bootable USB and move it up above the Windows boot manager so it will boot the USB first.
- Save and exit
Load keyboard layout & locale
- Type loadkeys us at the command line and press enter
- Type locale-gen at the command line and press enter
- At the command line type rfkill unblock wifi and press enter
- Type iw dev and press enter. It will tell you the name of the Wifi interface.
- Type wifi-menu (using your actual interface name) and press enter.
- A UI will show allowing you to choose a network and log into it.
- After logging in, ping google.com to verify the internets work. After a few packets are sent, CTRL+C to stop pinging — if it says no packets were lost then we’re good.
- First type free -m , hit enter. Take note of the amount of total memory available.
- Type gdisk /dev/sda and hit enter to start the GPT partitioning program
- Create SWAP partition
- At the prompt, type n , press enter to create a new partition
- It will prompt for a partition number. Just hit enter to use the default.
- It asks where to start the first sector. Press enter to accept the default which is automatically the start of unallocated space.
- It asks for the last sector. Type +12GB (I have 12 gigs of memory — if you have more or less you should adjust accordingly) and press enter.
- If it says anything other than «Linux Filesystem» type 8200 at the next prompt. Hit enter.
- At the prompt, type n , press enter to create a new partition
- It will prompt for a partition number. Just hit enter to use the default.
- It asks where to start the first sector. Press enter to accept the default which is automatically the start of unallocated space.
- It asks for the last sector. Press Enter to accept the default and use all of remaining unallocated space.
- If it says anything other than «Linux Filesystem» type 8300 at the next prompt. Hit enter.
- Type gdisk -l /dev/sda , press enter and take note of the partition number of the Swap part.
- Type mkswap -L «Linux Swap» /dev/sda7 (My swap partition was number 7 — if yours is 5 use /dev/sda5 instead). Hit enter.
- Type swapon /dev/sda7 (again, using the apprpriate swap partition number). Hit enter.
- Verify status of swap space by typing free -m and press enter. If the last line starts with «Swap:» we’re good.
Format and mount the root partition
- Type gdisk -l /dev/sda , press enter and take note of the partition number of the Root part.
- Type mkfs.ext4 -L /dev/sda8 (My root partition was number 7 — if yours is 6 use /dev/sda6 instead). Hit enter.
- Type mount /dev/sda8 /mnt (again, using the apprpriate swap partition number). Hit enter.
- Type gdisk -l /dev/sda , press enter and take note of the partition number of the EFI part.
- Type mount /dev/sda1 /mnt/boot/efi (My efi partition was number 1 — if yours is 2 use /dev/sda2 instead). Hit enter.
- Type genfstab -U /mnt >> /mnt/etc/fstab . Hit enter.
- Type cat /mnt/etc/fstab , press enter, to verify the file was created correctly.
- Change root into the new installation: type arch-chroot /mnt and press enter.
- Type cd /usr/share/zoneinfo && ls press enter. Take note of the appropriate region and use it as follows.
- Type cd && ls (replacing with the most appropriate region.) press enter. Take note of the most appropraite city.
- Type ln -sf /usr/share/zoneinfo// /etc/localtime (replacing and with the most appropriate region and city.)
- Type hwclock —systohc . Hit enter.
- Create the file /etc/hostname and write your hostnme in it with nano or vim
- Create the file etc/hosts and populate it like this (replacing myhostname with whatever you put in your hostname file.)
127.0.0.1 localhost ::1 localhost 127.0.1.1 myhostname.localdomain myhostnameCreate the root user’s password
- Type passwd and press enter
- Enter a new root password and press enter. verify it and press enter.
Create new initramfs image
- Type pacman -Syu grub efibootmgr and hit enter.
- Type pacman -Syu efibootmgr and hit enter.
- Type grub-mkconfig -o /boot/grub/grub.cfg . Hit enter.
- Type grub-install /dev/sda . Hit enter.
- Verify the install. Type ls -l /boot/efi/EFI/arch/ . Hit Enter. If you see a file called grubx64.efi then all is well.
- Type useradd -s /bin/bash -m username (replace «username» with the new user’s name). Hit enter.
- Type passwd username (replace «username» with the new user’s name). Hit enter.
- Enter and verify the password.
Install a desktop environment and some important packages
- Type pacman -Syu gnome-desktop . Hit enter.
- Type pacman -Syu gdm . Hit enter.
- Type systemctl enable gdm . Hit enter.
- Type pacman -Syu xterm . Hit enter.
- Type pacman -Syu iw . Hit enter.
- Type pacman -Syu dialog . Hit enter.
- Type pacman -Syu vim . Hit enter.
- Type pacman -Syu wpa_supplicant . Hit enter.
- Type pacman -Syu os-prober . Hit enter.
- Type grub-mkconfig -o /boot/grub/grub.cfg . Hit enter.
- Remove USB
- Type exit . Hit enter.
- Type umount -R /mnt . Hit enter.
- Type reboot . Hit enter.
- After a moment it will load back into Arch, this time with a desktop GUI.
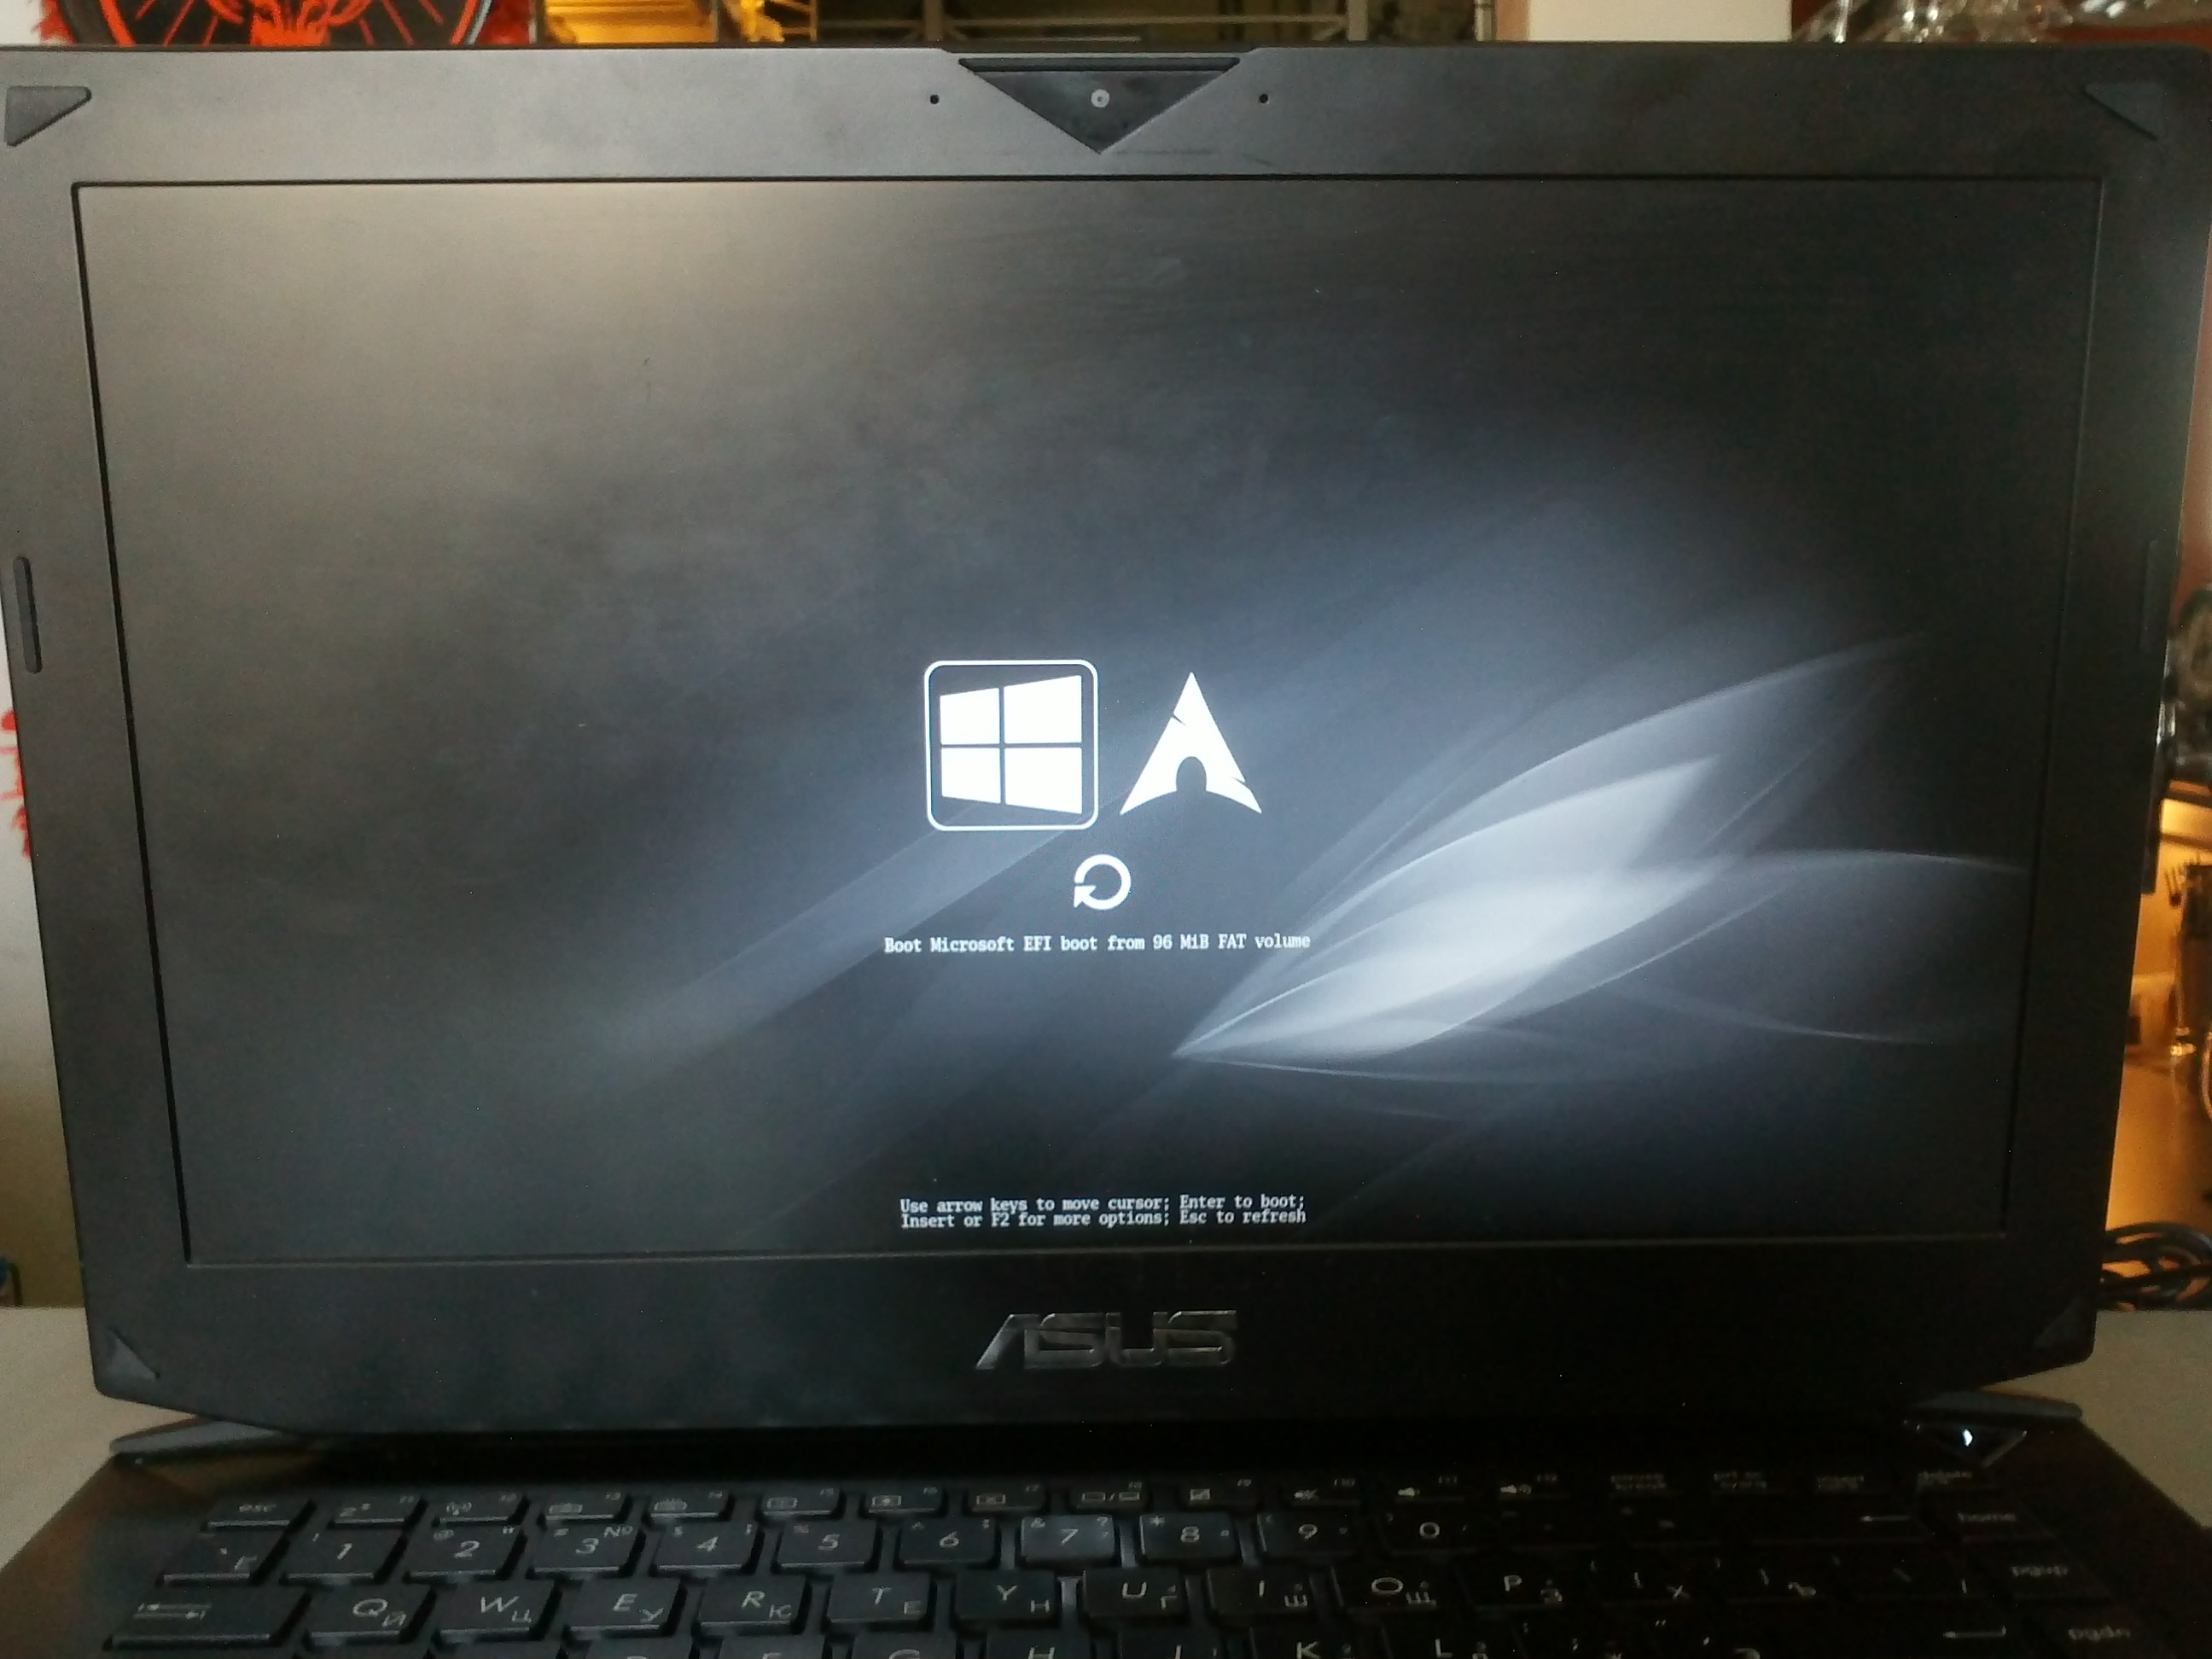
Dual boot ArchLinux и Windows 8 на UEFI без GRUB c помощью rEFInd
Инструкция для новичков, о том, как сделать красивый dualboot windows и archlinux (и других ОС) через efi без grub и лишних заморочек.
Фото для привлечения внимания:

Можете посмотерть в google как это ещё может выглядеть.
Сразу оговорюсь.
Предполагается, что вы уже поставили windows и archlinux, понимаете как размечать диски и что куда монтировать и осталось вам только разобраться с загрузчиком. Если нет, то рекомендую посмотреть для начала вот это видео.Я пробовал различные варианты, как описано тут, тут и тут и прочие выкрутасы с efibootmgr. Пытался добавлять опции прямо в «BIOSе» — ничего хорошего у меня не получилось, то рут раздел не находит то ещё что-то. Да и сам подход к переключению систем (жать Esc при включении ПК для выбора системы) меня не очень радовал.
Провозившись весь выходной, нашёл для себя простое и элегантное решение — пакет refind-efi (ArchWiki).
Если коротко, — достаточно установить этот пакет (pacman -S refind-efi) и выполнить refind-install, — всё.
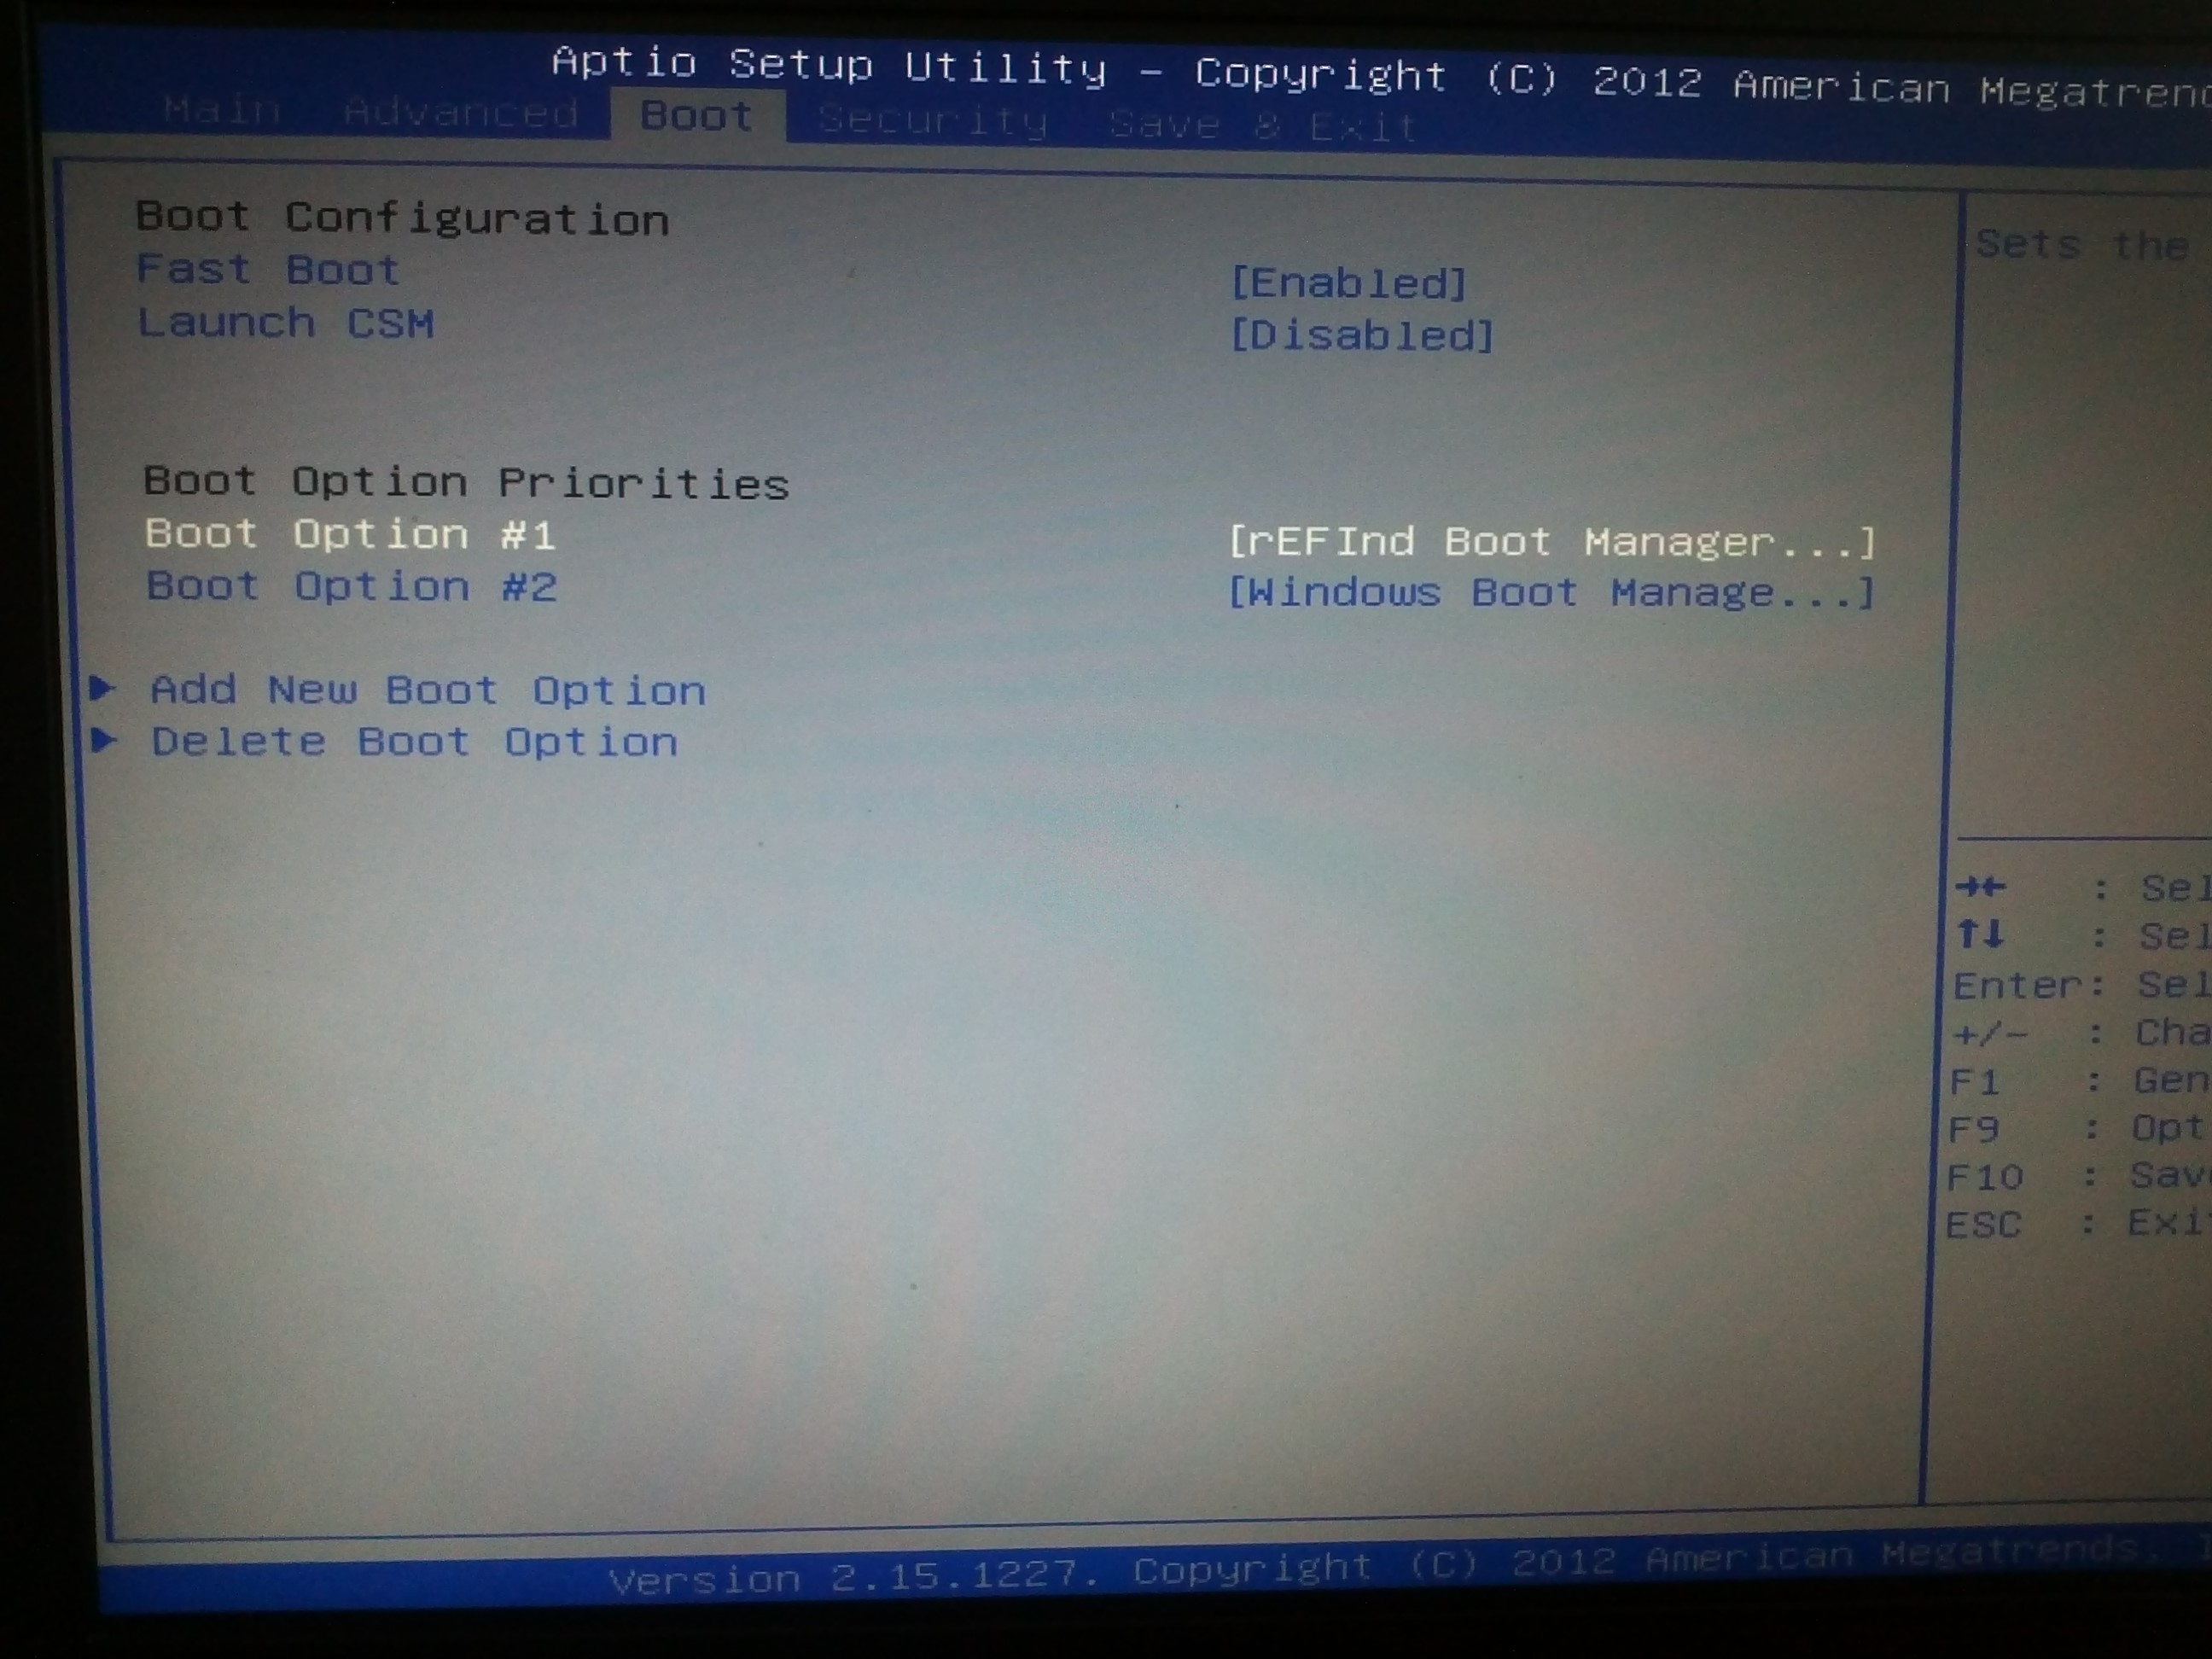
В /boot/efi/EFI/ будет создан каталог refind и в опции загрузки добавлен новый пунк «rEFInd boot manager ».Предупреждение
Добавлю к этой статье предупреждение: запись в NVRAM из ОС — достаточно опасная операция, которая может приводить к «кирпичу» на некоторых моделях ноутбуков с BIOSами на платформе Phoenix SCT. У автора BIOS на платформе AMI Aptio, с ним таких проблем нет.
Именно поэтому я настоятельно не рекомендую использовать на ноутбуках как саму efibootmgr, так и все, что ее вызывает, и устанавливать любые загрузчики вручную, либо заменяя имеющийся загрузчик по умолчанию (fs0:/EFI/BOOT/bootx64.efi), либо прописывая новый загрузчик из UEFI Shell командой bсfg boot add 0 fs0:/path/to/bootloader.efi «My Fancy Bootloader» — это намного безопаснее.Всё что вы делаете, вы делаете на свой страх и риск!
Теперь подробнее об установке и конфигурировании
NAME MAJ:MIN RM SIZE RO TYPE MOUNTPOINT sda 8:0 0 119.2G 0 disk ├─sda1 8:1 0 300M 0 part ├─sda2 8:2 0 100M 0 part /boot/efi ├─sda3 8:3 0 128M 0 part ├─sda4 8:4 0 59.1G 0 part ├─sda5 8:5 0 9G 0 part / └─sda6 8:6 0 50G 0 part /homeDevice Start End Size Type /dev/sda1 2048 616447 300M Windows recovery environment /dev/sda2 616448 821247 100M EFI System /dev/sda3 821248 1083391 128M Microsoft reserved /dev/sda4 1083392 125036543 59.1G Microsoft basic data /dev/sda5 125036544 143910911 9G Linux filesystem /dev/sda6 143910912 248768511 50G Linux filesystemРаздел с типом «EFI System» созданный инсталятором windows, монтируем в /boot/efi/ ( /mnt/boot/efi/ ведь мы загрузились с liveiso верно?)
mkdir -p /mnt/boot/efi mount /dev/sdaX /mnt/boot/efiгде X это номер вашего EFI раздела ( например mount /dev/sda2 /mnt/boot/efi ).
Далее перейдя в уже установленный arch ( arch-chroot /mnt/ ) устанавливаем сам refind:
Если вдруг такой пакет не найден, поищите в yaourt:
yaourt refind 1 extra/refind-efi 0.7.9-1 [installed] Rod Smith's fork of rEFIt UEFI Boot Manager - built with Tianocore UDK libsПосле перезагрузки можно поставить в «биосе» в настройках приоритета загрузки «rEFInd boot manager » на первое место.
И не забудьте отключить «Secure Boot».
В каталоге /boot/efi/EFI создана дирректория refind. В ней есть refind.conf в котором можно установить время отображения списка ОС и настроить внешний вид.
Refind сам находит установленные ОС и определяет параметры их загрузки. Так же мне очень понравилось что если вставлена загрузочная флешка или диск они тоже появляются в списке.
Мне понравилась тема Next-Theme (вы можете подобрать что-то на свой вкус), положил её в /boot/efi/EFI/refind/next-theme и прописал в конфиге:
icons_dir next-theme/icons banner next-theme/background_1200.pngКонфиг хорошо документирован и вопросов вызывать не должен.
Буду благодарен за замечания и дополнения.