- Как установить Arduino IDE на linux
- Мои неудачные попытки установки Arduino IDE на linux
- Как я поставил Arduino IDE на linux
- Install the Arduino IDE
- What you’ll learn
- What you’ll need
- 2. Installing via a tarball
- 3. First Launch
- Permissions checker
- The editor
- 4. The dialout group
- Permissions
- Adding yourself to the dialout group
- 5. That’s all folks!
- Next Steps
- Further readings
- Install the Arduino Software (IDE) on Linux
- Download the Arduino Software (IDE)
- Extract the package
- Run the install script
- Proceed with board-specific instructions
- Please Read.
- Install the Arduino Software (IDE) on Linux
- Download the Arduino Software (IDE)
- Extract the package
- Run the install script
- Proceed with board-specific instructions
- Please Read.
Как установить Arduino IDE на linux
На данный момент у меня стоит Linux 20.04 и Arduino IDE у меня получилось поставить только версии 1.8.15 — почему? — расскажу далее.
Мои неудачные попытки установки Arduino IDE на linux
На официальном сайте https://www.arduino.cc/en/software имеется дистрибутив. Всё отлично, скачал его, распаковал. Но вот беда: исполнительный фаил не открывается.
Начал разбираться — совет был переустановить Java JDK — но ходил по кругу, т.к. Java JDK у меня устанавливается с ошибкой.
Хорошо, следующая мысль — надо обновить Linux до версии 21.XX или даже 22.XX — нашел «Мурзилку» по обновлению, сделал все подготовительные операции: судо апэтэ апдейт, апргрейд и т.п., но смутила фраза «сделать бекап» . Читаю комменты — у многих ничего не получилось — и такой вариант меня вообще не устраивает.
Теперь пришла мысль: так, линукс версия у меня старая, почему бы не поставить старую версию Arduino IDE?
Как я поставил Arduino IDE на linux
- Выполняем все подготовительные операции Апдейт и Апгрейд:
sudo apt update && sudo apt upgrade - Скачиваем пакет с Arduino IDE версии 1.8.15:
wget https://downloads.arduino.cc/arduino-1.8.15-linux64.tar.xz - Находим наш скачанный архив и распаковываем его:
Тут я действовал просто: правой кнопкой мыши — распаковать «тут» - Проваливаемся в распакованные папки:
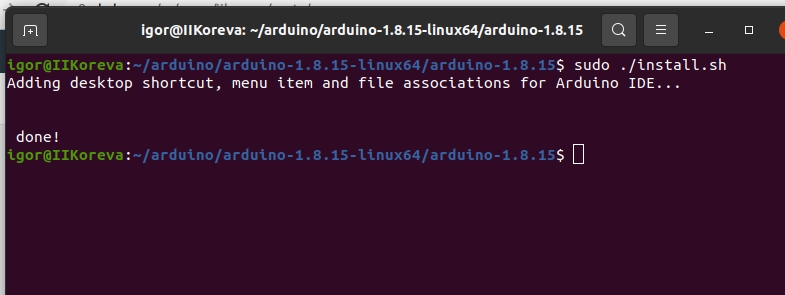
arduino-1.8.15-linux64 / arduino-1.8.15 / install.sh - Видим фаил install.sh но не торопимся его кликать. Несколько попыток прокликать его не увенчались успехом — в левом верхнем углу крутилось колесико «Загрузка» несколько секунд, затем пропадало и просто ничего не происходило. Ну всё. накипело до предела. тут же (в этой же папке) открываю консоль (правой кнопкой / терминал) и ввожу команду
sudo ./install.sh
- Заходим в «Приложения» — сразу заметил по последней странице, что что-то прибавилось, что-то тут новенькое появилось — ищу — да . вот она .

Install the Arduino IDE
To get us up and running with Arduino, we are going to install the Arduino IDE, a program that will help us write code for the Arduino, and run our code on the board.
What you’ll learn
- How to install the Arduino package from a tarball
- How to add a user to a group (here, the dialout group)
What you’ll need
- Ubuntu 16.04 (and above) Desktop
- An Arduino board, and included mini-USB cable
- Some basic command-line knowledge (including how to use cd to change directories)
2. Installing via a tarball
We can download the latest version of the Arduino IDE from the Arduino website (here) as a tarball. A tarball is a type of compressed folder, like a .zip file, commonly used to distrubute software in Linux; its file extension is usually .tar.xz (or .tar.gz , if it uses Z compression. We’ll get to this later).
In order to extract the files we need from the tarball, we can open a terminal, cd to where the downloaded tarball is, then run
where FILENAME is the name of the download (typically arduino-(version number)-linux64.tar.xz).
The command can be read as * eXtract from an archive… * Verbosely (meaning it prints the name of every file it finds)… * from a file given by FILENAME .
When the command finishes, run ls again; tar should have created a new folder named arduino-(version number).
cd into the folder; there will be a file named install.sh in the folder. To install the IDE, execute install.sh with
If the script executes correctly and outputs done! at the end of its output, the IDE was installed correctly! Let’s try to launch it in the next step.
Installing via apt
While there is a package for the Arduino IDE on current APT repositories, it has not been updated for a while. As such, while it is still possible to install the IDE by running sudo apt install arduino , it is not recommended to do so, as asking for support when using outdated software is more difficult.
3. First Launch
Before launching the IDE, connect your Arduino board to your computer with a USB cable.
Arduino should be available in the (Unity menu?); if not, it can be launched from the command line by running arduino .
Permissions checker
The first time we launch Arduino, a window will pop up asking to add us to the dialout group:

We will get back to what this means later, but for now just click on Add .
The editor
After that, we should see the IDE’s main editor window.

The IDE comes with example files that we can use to test if everything works. Let’s try open one such file: Under File > Examples > 01.Basics, choose Blink.
Try running the code on your Arduino by clicking Upload (the right arrow along the top).
Binary sketch size: 1,054 bytes (of a 32,256 byte maximum) processing.app.SerialNotFoundException: Serial port 'COM1' not found. Did you select the right one from the Tools > Serial Port menu? (. ) But if we try following the suggestion in the error above, the Serial Port menu is greyed out and can’t be entered.

4. The dialout group
This is happening because the IDE doesn’t have sufficient permissions to access the Arduino device.
Permissions
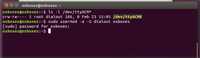
We can look at the Arduino device by running
in a terminal. The output looks mostly like this:
crw-rw---- 1 root dialout 166, 0 Des 14 09:47 /dev/ttyACM0 The ‘0’ at the end of ‘ACM’ might be different, and multiple entries might be listed, but the parts we need to focus on are the string of letters and dashes in front, and the two names root and dialout .
The first name root is the owner of the device, and dialout is the owner group of the device.
The letters and dashes in front, starting after ‘c’, represent the permissions for the device by user: — The first triplet rw- mean that the owner ( root ) can read and write to this device — The second triplet rw- mean that members of the owner group ( dialout ) can read and write to this device — The third triplet — means that other users have no permissions at all (meaning that nobody else can read and write to the device)
In short, nobody except root and members of dialout can do anything with the Arduino; since we aren’t running the IDE as root or as a member of dialout , the IDE can’t access the Arduino due to insufficient permissions.
Adding yourself to the dialout group
But wait! Earlier, when we were launching the IDE, we did add ourselves to the dialout group!
So why does the IDE still not have permission to access the Arduino?
The changes that the prompt makes don’t apply until we log out and log back in again, so we have to save our work, log out, and log back in again.
After you log back in and launch the Arduino IDE, the Serial Port option should be available; change that, and we should be able to upload code to the Arduino.

5. That’s all folks!
Congratulations, you made it!
You’ve just installed the Arduino IDE on your computer; you’ve also learned how permissions and groups work in Linux!
Next Steps
- Try your hand at making smart things with projects at the Arduino Project Hub
- Learn more about how the Arduino language works with Arduino’s tutorial
Further readings
Install the Arduino Software (IDE) on Linux
The Linux build of the Arduino Software (IDE) comes in different packages depending on your system architecture. There are no specific instructions needed for the different distributions of Linux (e.g. Ubuntu).
Download the Arduino Software (IDE)
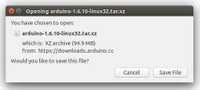
Get the latest version from the download page. You can choose between the 32, 64 and ARM versions. It is very important that you choose the right version for your Linux distro. Clicking on the chosen version brings you to the donation page and then you can either open or save the file. Please save it on your computer.
Extract the package
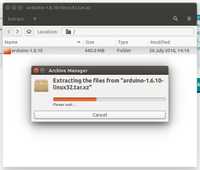
The file is compressed and you have to extract it in a suitable folder, remembering that it will be executed from there.
Run the install script
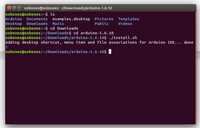
Open the arduino-1.6.x folder just created by the extraction process and spot the install.sh file. Right click on it and choose Run in Terminal from the contextual menu. The installation process will quickly end and you should find a new icon on your desktop.
If you don’t find the option to run the script from the contextual menu, you have to open a Terminal window and move into the arduino-1.6.x folder. Type the command ./install.sh and wait for the process to finish. You should find a new icon on your desktop.
Proceed with board-specific instructions
When the Arduino Software (IDE) is properly installed you can go back to the Getting Started Home and choose your board from the list on the right of the page.
Please Read.
It might happen that when you upload a sketch — after you have selected your board and the serial port -, you get an error Error opening serial port . If you get this error, you need to set serial port permission.
you will get something like:
crw-rw—- 1 root dialout 188, 0 5 apr 23.01 ttyACM0
The «0» at the end of ACM might be a different number, or multiple entries might be returned. The data we need is «dialout» (is the group owner of the file).
Now we just need to add our user to the group:
where is your Linux user name. You will need to log out and log in again for this change to take effect.

This is the procedure to access the serial port from the Arduino Software (IDE) if you get an error
After this procedure, you should be able to proceed normally and upload the sketch to your board or use the Serial Monitor.
The text of the Arduino getting started guide is licensed under a Creative Commons Attribution-ShareAlike 3.0 License. Code samples in the guide are released into the public domain.
Install the Arduino Software (IDE) on Linux
The Linux build of the Arduino Software (IDE) comes in different packages depending on your system architecture. There are no specific instructions needed for the different distributions of Linux (e.g. Ubuntu).
Download the Arduino Software (IDE)
Get the latest version from the download page. You can choose between the 32, 64 and ARM versions. It is very important that you choose the right version for your Linux distro. Clicking on the chosen version brings you to the donation page and then you can either open or save the file. Please save it on your computer.

Extract the package
The file is compressed and you have to extract it in a suitable folder, remembering that it will be executed from there.

Run the install script
Open the arduino-1.6.x folder just created by the extraction process and spot the install.sh file. Right click on it and choose Run in Terminal from the contextual menu. The installation process will quickly end and you should find a new icon on your desktop.
If you don’t find the option to run the script from the contextual menu, you have to open a Terminal window and move into the arduino-1.6.x folder. Type the command ./install.sh and wait for the process to finish. You should find a new icon on your desktop.

Proceed with board-specific instructions
When the Arduino Software (IDE) is properly installed you can go back to the Getting Started Home and choose your board from the list on the right of the page.
Please Read.
It might happen that when you upload a sketch — after you have selected your board and the serial port -, you get an error Error opening serial port . If you get this error, you need to set serial port permission.
you will get something like:
crw-rw—- 1 root dialout 188, 0 5 apr 23.01 ttyACM0
The «0» at the end of ACM might be a different number, or multiple entries might be returned. The data we need is «dialout» (is the group owner of the file).
Now we just need to add our user to the group:
where is your Linux user name. You will need to log out and log in again for this change to take effect.
This is the procedure to access the serial port from the Arduino Software (IDE) if you get an error
After this procedure, you should be able to proceed normally and upload the sketch to your board or use the Serial Monitor.
The text of the Arduino getting started guide is licensed under a Creative Commons Attribution-ShareAlike 3.0 License. Code samples in the guide are released into the public domain.