- How to Install Additional Drivers in Ubuntu
- Installing additional drivers in Ubuntu
- Step 1: Go to Software Settings
- Step 2: Check available additional drivers
- Step 3: Install the additional drivers
- Install Nvidia Proprietary Drivers in Ubuntu
- How to install a device driver on Linux
- Two approaches to finding drivers
- 1. User interfaces
- 2. Command line
- Check if a driver is already installed
- Add the repository and install
- For more information
How to Install Additional Drivers in Ubuntu
How do you install drivers in Ubuntu? The simple answer is that Ubuntu itself identifies and installs drivers on your system. Unlike older versions of Windows, you don’ have to manually search for and install drivers here.
But there is a catch. Some hardware components have several drivers available: open source ones and the proprietary ones.
By default, Ubuntu installs the open source drivers and in some cases, that causes problems in your Ubuntu install.
You might face some issues with the wireless or the graphics card. Sometimes it’s because the open source version provided by the Linux distribution doesn’t work as good as the proprietary drivers provided by the hardware manufacturers.
The good thing is that Ubuntu is aware of these issues and this is why it provides an easy way to install additional proprietary drivers.
You may use these additional drivers to get better performance on your system. If you find them not working, you can revert easily .
In this tutorial, you’ll learn how to install additional drivers on Ubuntu. I’ll also show you how to install Nvidia proprietary drivers on Ubuntu.
Installing additional drivers in Ubuntu
Since a few versions now, Ubuntu doesn’t have Additional Drivers listed as a separate application. Instead, it now resides in the ‘Software & Updates’ app. From here, you can install drivers which are not installed by default during installation.
Let me show the exact steps for installing additional drivers.
Step 1: Go to Software Settings
Go to the menu by pressing the Windows key. In the search bar, type ‘drivers’. Click on ‘Software & Updates’ in the results.

Step 2: Check available additional drivers
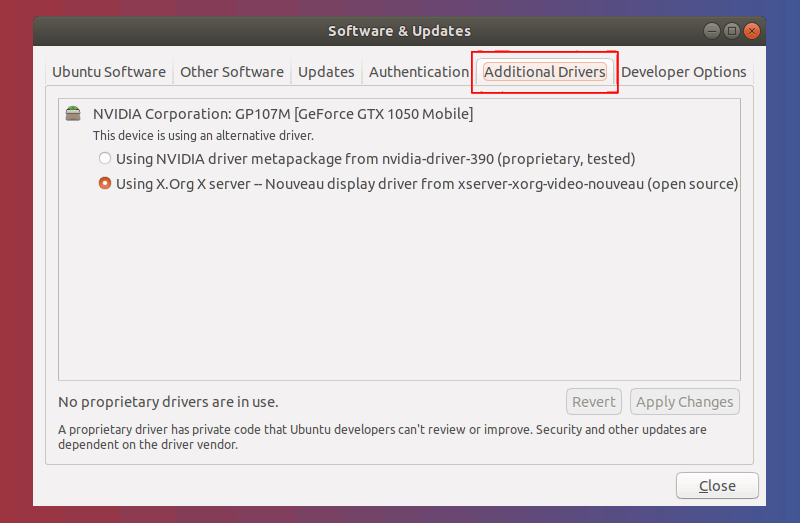
Open the ‘Additional Drivers’ tab. Here you will be able to see all the devices you can install drivers for.
As shown in the image below, in case of other drivers like wireless drivers, you will get the option to either use the driver or to not use the device at all.
To use the install the drivers, select it and click on Apply Changes.

Step 3: Install the additional drivers
After the installation is complete, you will get a restart option. Click on it to restart your system and finish driver installation. The driver will be in use after the reboot.
If you ever want to go back to using the open source driver or disabling the device, you can open ‘Additional Drivers’ and select the corresponding option for that.
If you want to use the default driver instead of the proprietary one that you just installed, just select the option “Do not use the device” under that.
Install Nvidia Proprietary Drivers in Ubuntu
Let’s see how to use Nvidia proprietary drivers on Ubuntu.
The question is, why would you do that in the first place? This is because the free and open source ‘nouveau’ driver may not properly support the graphics card’s functionality.
In a few cases, the system would not boot at all and gets stuck at journalctl . If you are facing the boot problem because of Nvidia drivers, you can expand the next section to fix that problem.
To work around this issue, you have to disable the ‘nouveau’ driver. You can do this using modprobe . modprobe is the kernel utility that allows us to enable or disable kernel drivers and modules during boot up.
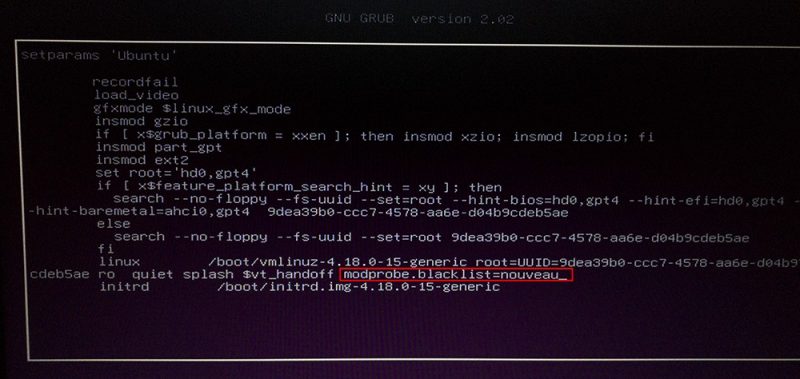
On the grub screen, press ‘e’ to edit the command line.
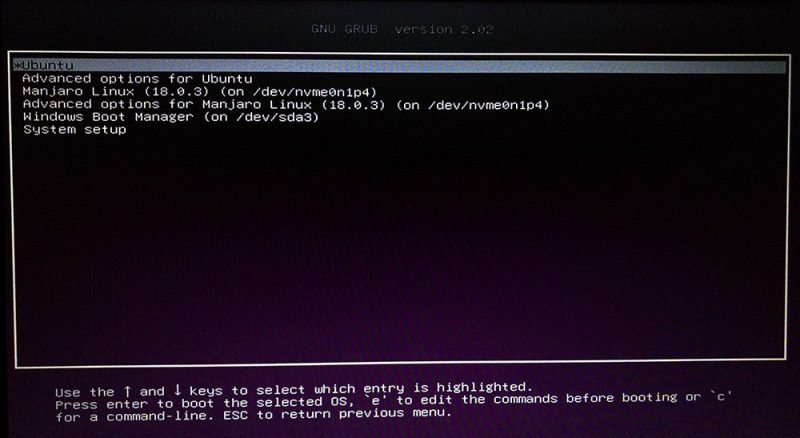
Navigate to the line starting with ‘ linux ‘ and add the following to the end of that line as shown in the image below. You can use the arrow keys to move the cursor.
After this, press F10 to boot and follow the rest of the simple steps. If your system still fails to boot (most probably systems with 900 series or 1000 series GPUs), you may need to add some more kernel parameters. Check this link for more information.
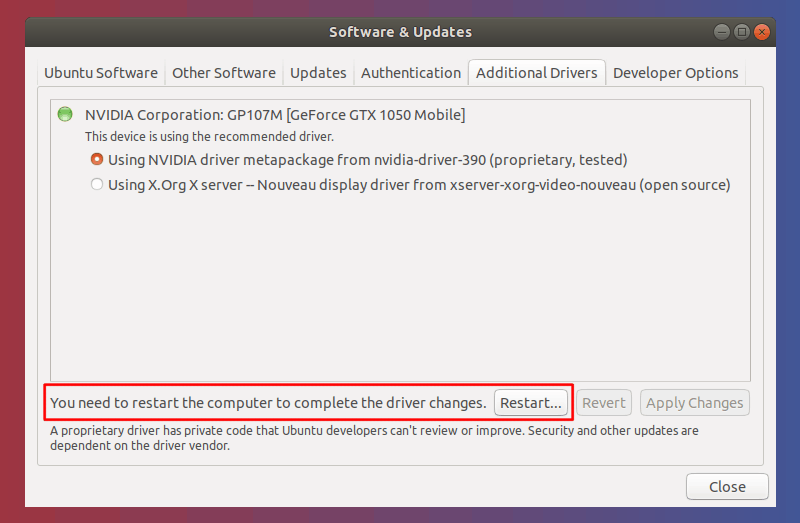
In the previous section, you have already learned how to see the additional drivers available for your system.
In this particular case, you can see the NVIDIA discrete graphics card has two driver options available. The open-source one and the proprietary one.
Click ‘Using NVIDIA driver metapackage ‘ to select the proprietary driver. Then click on the ‘ Apply Changes’ button to install the driver.
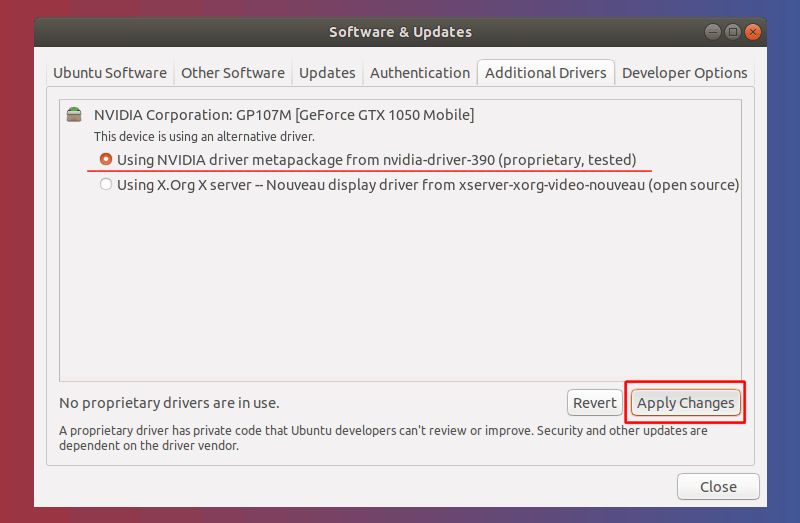
After installation is complete, you will get a restart button. Click on it to restart your PC and finish driver installation.
That’s it. You restart your PC and you should see Nvidia Graphics in action.
I hope this quick tutorial helped you with Nvidia drivers and additional drivers in Ubuntu. If you have questions or suggestions, please let us know.
How to install a device driver on Linux

One of the most daunting challenges for people switching from a familiar Windows or MacOS system to Linux is installing and configuring a driver. This is understandable, as Windows and MacOS have mechanisms that make this process user-friendly. For example, when you plug in a new piece of hardware, Windows automatically detects it and shows a pop-up window asking if you want to continue with the driver’s installation. You can also download a driver from the internet, then just double-click it to run a wizard or import the driver through Device Manager.
This process isn’t as easy on a Linux operating system. For one reason, Linux is an open source operating system, so there are hundreds of Linux distribution variations. This means it’s impossible to create one how-to guide that works for all Linux distros. Each Linux operating system handles the driver installation process a different way.
Second, most default Linux drivers are open source and integrated into the system, which makes installing any drivers that are not included quite complicated, even though most hardware devices can be automatically detected. Third, license policies vary among the different Linux distributions. For example, Fedora prohibits including drivers that are proprietary, legally encumbered, or that violate US laws. And Ubuntu asks users to avoid using proprietary or closed hardware.
To learn more about how Linux drivers work, I recommend reading An Introduction to Device Drivers in the book Linux Device Drivers.
Two approaches to finding drivers
1. User interfaces
If you are new to Linux and coming from the Windows or MacOS world, you’ll be glad to know that Linux offers ways to see whether a driver is available through wizard-like programs. Ubuntu offers the Additional Drivers option. Other Linux distributions provide helper programs, like Package Manager for GNOME, that you can check for available drivers.
2. Command line
What if you can’t find a driver through your nice user interface application? Or you only have access through the shell with no graphic interface whatsoever? Maybe you’ve even decided to expand your skills by using a console. You have two options:
- Use a repository
This is similar to the homebrew command in MacOS. By using yum, dnf, apt-get, etc., you’re basically adding a repository and updating the package cache.
- Download, compile, and build it yourself
This usually involves downloading a package directly from a website or using the wget command and running the configuration file and Makefile to install it. This is beyond the scope of this article, but you should be able to find online guides if you choose to go this route.
Check if a driver is already installed
Before jumping further into installing a driver in Linux, let’s look at some commands that will determine whether the driver is already available on your system.
The lspci command shows detailed information about all PCI buses and devices on the system:
Or with grep:
$ lscpci | grep SOME_DRIVER_KEYWORDFor example, you can type lspci | grep SAMSUNG if you want to know if a Samsung driver is installed.
The dmesg command shows all device drivers recognized by the kernel:
Or with grep:
$ dmesg | grep SOME_DRIVER_KEYWORDAny driver that’s recognized will show in the results.
If nothing is recognized by the dmesg or lscpi commands, try these two commands to see if the driver is at least loaded on the disk:
Tip: As with lspci or dmesg, append | grep to either command above to filter the results.
If a driver is recognized by those commands but not by lscpi or dmesg, it means the driver is on the disk but not in the kernel. In this case, load the module with the modprobe command:
$ sudo modprobe MODULE_NAMERun as this command as sudo since this module must be installed as a root user.
Add the repository and install
There are different ways to add the repository through yum, dnf, and apt-get; describing them all is beyond the scope of this article. To make it simple, this example will use apt-get, but the idea is similar for the other options.
1. Delete the existing repository, if it exists.
$ sudo apt-get purge NAME_OF_DRIVER*where NAME_OF_DRIVER is the probable name of your driver. You can also add pattern match to your regular expression to filter further.
2. Add the repository to the repolist, which should be specified in the driver guide.
$ sudo add-apt-repository REPOLIST_OF_DRIVERwhere REPOLIST_OF_DRIVER should be specified from the driver documentation (e.g., epel-list).
3. Update the repository list.
4. Install the package.
$ sudo apt-get install NAME_OF_DRIVER5. Check the installation.
Run the lscpi command (as above) to check that the driver was installed successfully.
For more information
This article was originally published on Opensource.com.