Installing full Linux on android
I want to get full Linux with GUI and desktop on my android tab (rooted). I heard about apps called » Linux deploy» and «Complete Linux installer». However I have a few doubts : 1) Is it possible to get full Linux with gnome or unity or other on android ? I already have terminal emulator installed but I need full Linux. 2) Do these apps install Linux with gui etc on tablet or does this only install terminal kind of environment and uses remote login (like splashtop) to access a pc with linux and then display screen on our tablet ( I dont want this) ? If they dont, then is there a way to get full Linux with vi, libreoffice etc on android ? Thanks.
Complete Linux Installer: This project’s aim is to bring a range of Linux distros to your Android device through a method known as ‘chroot’, see it has running a Linux distro within a virtual machine on your phone. Why might you want this? Well, my apps are designed to make the install and setup process as easy as possible (more so in the paid apps) while still giving you some flexibility. Once you have the distro up and running then you can pretty much run and install any Linux software you like (so long as there is a ARM port or it is not architecturally dependent).
Linux Deploy: This application is open source software for quick and easy installation of the operating system (OS) GNU/Linux on your Android device. The application creates a disk image on the flash card, mount it and install there OS distribution. Applications of the new system are run in a chroot environment and working in parallel with platform Android. All changes made on the device are reversible, i.e. the application and components can be removed completely. Installation of a distribution kit is carried out on a network from the official mirrors online.
@karel Yes. But one doubt. Do these apps in general install full Linux( with desktop and gui) or only allow access to a Linux pc through remote login ? I am asking this because all of them mention VNC. I am not fully aware what it is, but as far as I can understand from Wikipedia and Google, it’s a remote login service allowing you to control linux pc from remote location. Please clarify on this issue (Please be sure about it). I don’t need a remote login as mentioned, but a full Linux (with gui like gnome etc).
Regarding the use of chroot without VNC: How to Install Ubuntu Linux on Your Chromebook with Crouton Crouton which is used to install Ubuntu on Chromebooks does that. Regarding whether your question would be on topic at Android Enthusiasts Q&A, even if it is off topic here: What should we do about questions involving other operating systems on Android hardware?.
1 Answer 1
The answer’s a bit delayed, but still:
The tools karel mentioned above are a local installations of Linux on the android device, though it might be technically incorrect to call them «full» installations.
Both tools install a chrooted environment on the android device which in which the a common desktop Linux distro can be run «on top» of the Android OS.
You could certainly make the case that this is not a «full» installation, as it makes use of the kernel elements of the android OS it runs on top of: that distinction, however, is a very fine one and would not be particularly salient to even most IT professionals.
For both tools, you would end up accessing the Desktop GUI through a VNC: this VNC, however, would be pointed at the Android device itself. Because the desktop distro will be running in the chrooted environment «on top» of the android OS (which controls the screen), it doesn’t have a way a way to access the screen directly.
You’re using VNC not because you need to access a screen remotely, but because you need to create a virtual screen.
AnLinux: простой способ установить Linux-окружение на Android-телефон без рута
Любой телефон или планшет, работающий на Android, — это устройство, которое управляется ОС Linux. Да, очень модифицированной ОС, но все же основа Android — ядро Linux. Но, к сожалению, для большинства телефонов опция «снести Android и поставить дистрибутив по своему вкусу» недоступна.
Поэтому, если хочется Linux на телефоне, приходится покупать специализированные гаджеты вроде PinePhone, о котором мы уже писали в одной из статей. Но есть еще один способ получить Linux-окружение практически на любом смартфоне, причем без root-доступа. Поможет в этом инсталлятор, который называется AnLinux.
Что такое AnLinux?
Это специализированное ПО, которое дает возможность использовать Linux на телефоне при помощи монтирования образа, содержащего root-файловую систему любого из дистрибутивов, включая Ubuntu, Kali, Fedora, CentOS, OpenSuse, Arch, Alpine и многих других. Инсталлятор использует PRoot для эмуляции root-доступа.
PRoot перехватывает все выполняемые пользователем вызовы, которые требуют в обычной ситуации root-доступа, и обеспечивает их работоспособность в обычных условиях. В PRoot используется системный вызов ptrace для отладки ПО, который помогает достичь цели. С PRoot все это можно сделать как с chroot, но без root-прав. Кроме того, PRoot предоставляет фейковый доступ пользователю для пседвофайловой системы.
AnLinux — небольшая программа. Но этого достаточно, ведь единственное ее предназначение — установка образов систем и запуск скриптов, поднимающих пользовательское окружение. Когда все сделано, пользователь получает вместо смартфона Linux-ПК, причем Android продолжает работать на фоне. Подключаемся к устройству при помощи VNC-вьювера или терминала, и можно работать.
Конечно, это не идеальный вариант «завести» Linux на смартфоне, но он вполне рабочий.
С чего начать?
Основное — Android-смартфон с версией ОС не ниже Lollipop. Кроме того, пойдет и 32-битное или 64-битное ARM или x86-устройство. Кроме того, потребуется солидный объем свободного файлового пространства. Для этого можно использовать карту памяти или просто устройство с большим объемом внутренней памяти.
- AnLinux (вот ссылка на Google Play).
- Termux (снова понадобится Google Play).
- VNC Client (VNC Viewer — хороший вариант).
- Bluetooth-клавиатура (опционально).
- Bluetooth-мышь (опционально).
- HDMI кабель для мобильного телефона (опционально).
Что же, приступим

Как только установлен Termux, получаем полноценную консоль. Да, рута нет (если телефон не рутован), но ничего страшного. Следующий шаг — установка образа для дистрибутива Linux.
Теперь нужно открыть AnLinux и затем — выбрать Dashboard из меню. Всего есть три кнопки, но выбрать можно лишь одну, первую. После этого появляется меню выбора дистрибутива. Можно выбрать даже не один, а несколько, но в этом случае понадобится большой объем свободного файлового пространства.
После выбора дистрибутива активируются две другие кнопки. Вторая позволяет загрузить в буфер обмена команды, необходимые для загрузки и установки Linux. Обычно это pkg, wget команды и скрипт для их выполнения.
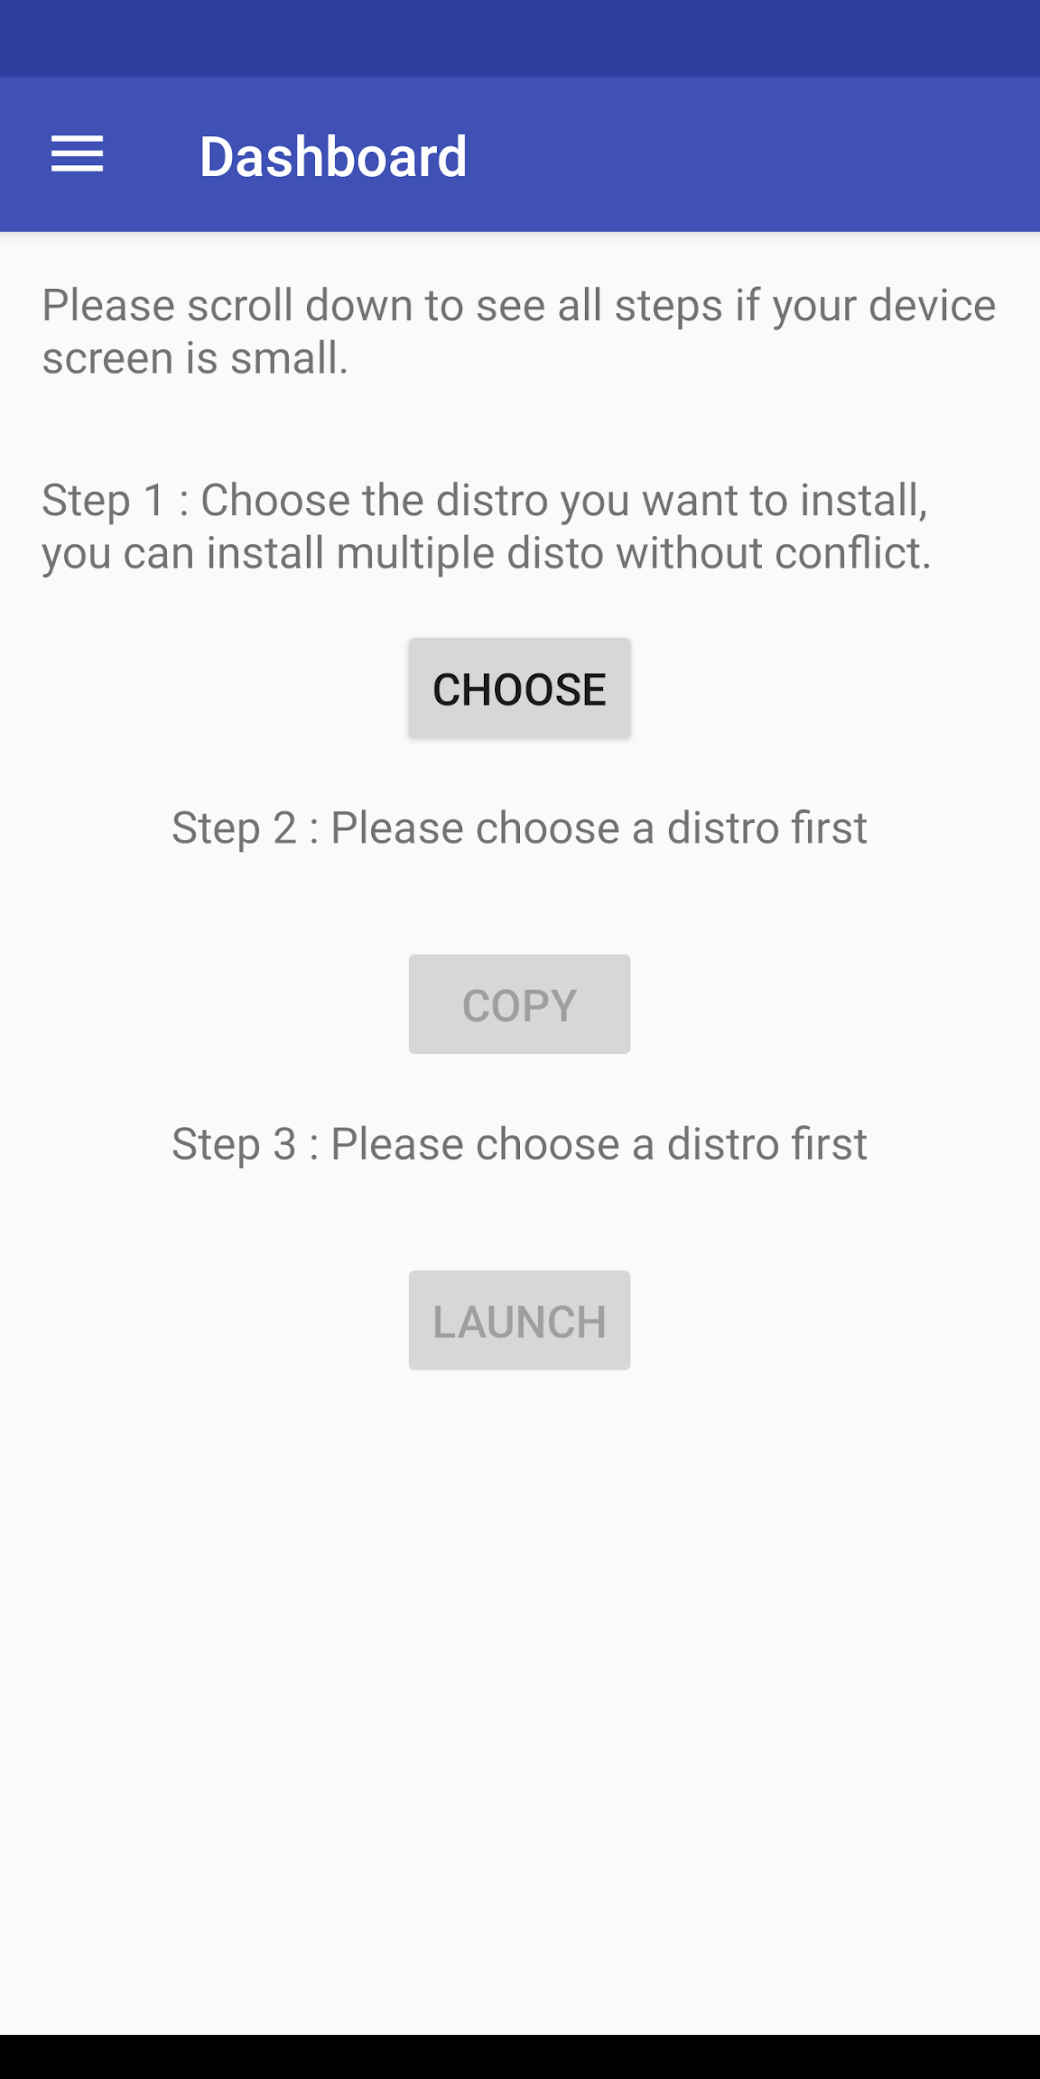
Третья кнопка запускает Termux, так что команды можно вставлять в консоль. Как только все сделано, запускается скрипт, позволяющий загрузить окружение дистрибутива. Для вызова дистрибутива нужно каждый раз запускать скрипт, но установку проводим только один раз.
А что с графической оболочкой?
Если она нужна, то следует лишь выбрать меню для десктопного окружения и использовать больше кнопок — появится не три, а больше. Кроме самого дистрибутива, нужно выбрать еще и оболочку, например, Xfce4, Mate, LXQt или LXDE. В целом, ничего сложного.
Потом кроме скрипта, который запускает дистрибутив, потребуется еще один — он активирует сервер VNC. В целом, весь процесс простой и понятный, он вряд ли способен вызвать затруднения.
После запуска сервера VNC подключаемся со стороны клиента, воспользовавшись вьювером. Требуется знать порт и localhost. Все это сообщает скрипт. Если все сделано правильно, то пользователь получает доступ к своей виртуальной Linux-системе. Производительность современных телефонов на высоте, так что особых проблем не будет. Конечно, вряд ли смартфон сможет полностью заменить десктоп, но, в целом, все это работает.
Этот способ может пригодиться, если вдруг нужно срочно подключиться к серверу, а вы в машине, без ноутбука (конечно, в этом случае все описанные выше операции с AnLinux уже должны быть выполнены). Виртуальная Linux-машина позволяет подключиться к рабочему или домашнему серверу. А если в автомобиле по какой-то причине оказался дисплей и беспроводная клавиатура, то за считанные секунды в салоне можно организовать рабочий кабинет.
How to Install a Complete Linux Distro on Android
For users who want to experience a complete desktop OS on their Android phone, especially tech-savvy people who don’t want to carry around a laptop or tablet, it’s entirely possible to install a fully-functional Linux OS on your Android phone.
You will need a rooted phone for this operation – you can search Appuals for a root guide for your device if you aren’t already rooted. Once you’re rooted though, the process is fairly simple.
Requirements
The first thing you’ll want to do is install BusyBox – either directly from Google Play store, or the Magisk BusyBox module if you’re rooted with MagiskSU.
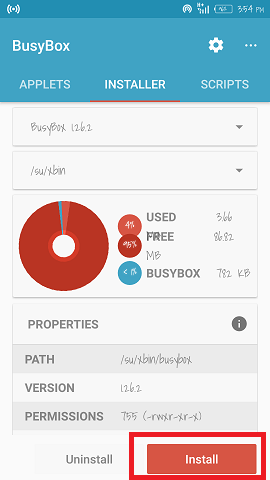
If you install BusyBox from the Google Play store, you just need to download the app, launch it, and hit the “Install” button from inside the app.
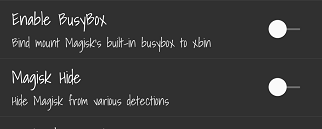
If you’re rooted with MagiskSU, you need to launch Magisk Manager and go to Settings, then enable the “Enable Busybox” button, which will utilize Magisk’s built-in BusyBox for your device.
What BusyBox does is allow your Android system to use Linux commands normally not accessible to you – many root apps depend on this. With BusyBox installed, you’re now going to launch Linux Deploy on your device.
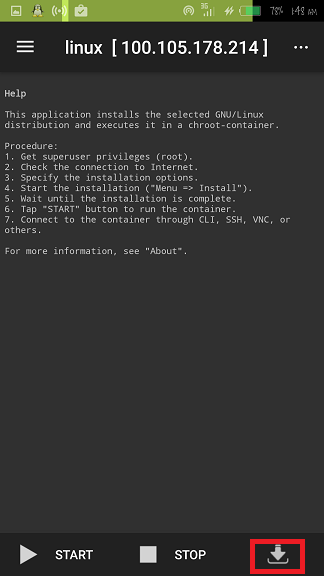
In the Linux Deploy menu, choose “Download”, and then you’ll be presented with an options menu. Here is where you’ll configure your Linux distro before it’s installed, and I’ll explain the important settings:
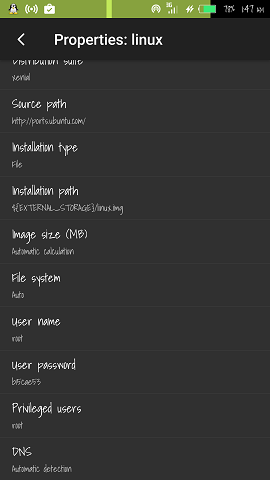
- Distribution – Choose your Linux distro to install. There’s quite a large list, but the most user-friendly would be Ubuntu.
- Distribution suite – Choose a version of the Linux distro you selected above.
- Architecture – Do not change this, it is automatically selected based on your device.
- Image size (MB) – The default is 512, but you should change this to a higher available number. Just don’t enter a number greater than 4095mb.
- SSH Settings – You’ll need to change the default port of 22 here, but Android devices can only use ports about 1024. Most users would opt for port 2222.
- Custom mounts – If you want to access your Android filesystem from within the Linux distro, go to “Mount points” and choose the ones you need. If you cannot enable the internal storage, change the default storage mount /storage/emulated/0 to /data/media/0.
You should set your username to “root” – this will give you permanent super-user access inside the Linux distro. When everything has been configured, press the Install button, and after it’s finished, you may launch the Linux distro with the Start button – but this will launch it in chroot, which is like a command-line terminal. So we need to access the GUI using the VNC Viewer tool.
Launch VNC and set the address to “localhost:5900” and enter your password. You now have a fully-functioning Linux desktop OS on your Android phone. You may want to begin installing Linux apps, which is done through the Linux terminal. Here are a few worth grabbing:
- LibreOffice – apt-get install libreoffice
- Firefox – apt-get install iceweasel
- Python Idle – apt-get install idle
- GIMP – apt-get install gimp
- DropBox – apt-get install nautilus-dropbox
Also check out our guide on installing kali linux on android.