- Install GNS3 (Graphical Network Simulator) On Linux
- Install GNS3 On Linux
- On Arch Linux:
- On Ubuntu (64-bit only):
- Debian (64-bit only):
- Fedora:
- GNS3 usage
- GNS3 Linux Install
- Debian-based distributions (64-bit only)#
- Install GNS3 on ArchLinux Based :#
- Install YAY package manager:#
- Как установить GNS3 в Ubuntu 18.04 | 16.04 | 20.04
- Особенности GNS3
- Установите последнюю версию сетевого симулятора GNS3 в Ubuntu 20.04 | 18.04 | 16.04
- Установите GNS3 на Ubuntu 20.04 | 18.04 | 16.04 из репозитория apt
- GNS3 — Добавить поддержку долговых расписок (необязательно)
- GNS3 — Добавить поддержку Docker (необязательно)
- Запустите GNS3 в Ubuntu 20.04 | 18.04 | 16.04
Install GNS3 (Graphical Network Simulator) On Linux
Are you preparing for any Network certification exams? I’ve got a good news for you. Meet GNS3, a free, cross-platform, and open source graphical network simulator. It is one of the best simulator for those who are preparing for exams like Cisco CCNA, CCNP, CCIE, Juniper JNCIA, JNCIS and JNCIE. If you are a student, and can’t afford to buy a real routers and switches to test commands, GNS3 is your asylum. Using GNS3, you can easily simulate and use various types of virtual network switches and routers regardless of the operating systems you use.
It is not only for students, but also can be used for Network professionals to test and build complex networks before implementing them in the production environment. GNS3 has various exciting features, including support for VirtualBox and QEMU, so that you can import and test various virtual machines to test along with virtual networks. If you are a Network certification trainer, you can also use GNS3 in your Lab to teach your students as the way you teach using the real network devices. GNS3 supports Linux, Microsoft Windows, and Mac OS X.
In this tutorial, we will see how to install, configure, and use GNS3 in Ubuntu 16.04 LTS desktop.
Install GNS3 On Linux
GNS3 is available in the default repositories of many Linux distributions. Also, GNS team offers separate repository to provide up-to-date packages. You can install it either from the official repositories or from GNS repositories.
On Arch Linux:
GNS3 is available in AUR. To install packages from AUR, you should install packer or yaourt tools. You don’t have to install both. Just install any one of them.
After installing Packer or Yaourt, run the following command to install GNS3 in Arch Linux and its derivatives such as Antergos and Manjaro Linux.
packer -S gns3-gui gns3-server
yaourt -S gns3-gui gns3-server
On Ubuntu (64-bit only):
Like I said, GNS3 is available in the default repositories of Ubuntu. Alternatively, you can add GNS repository and install the latest version as shown below.
sudo add-apt-repository ppa:gns3/ppa sudo apt-get update sudo apt-get install gns3-gui
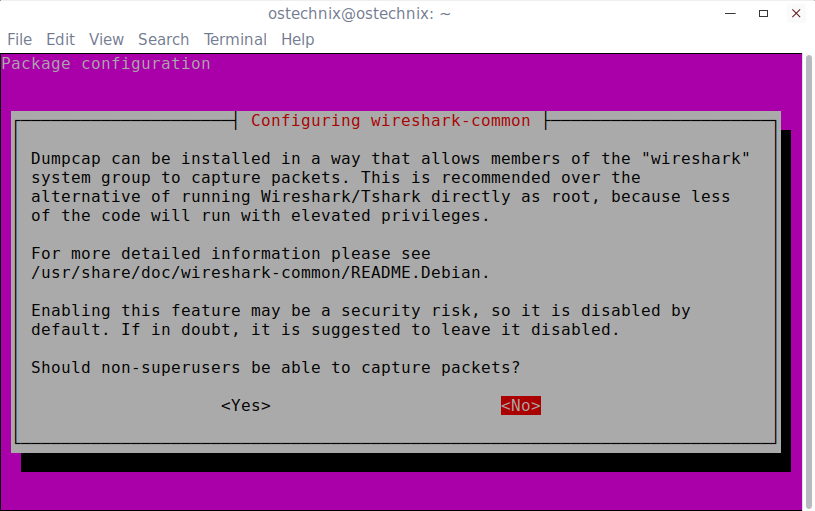
During installation, you will be asked to configure wireshark for non-superusers.
Enabling non-superusers to capture pockets is a security.
So just Click No.
If you want IOU support, then run:
sudo dpkg --add-architecture i386 sudo apt-get update sudo apt-get install gns3-iou
Debian (64-bit only):
For Debian Jessie:
Open /etc/apt/sources.list file:
sudo nano /etc/apt/sources.list
deb http://ppa.launchpad.net/gns3/ppa/ubuntu trusty main deb-src http://ppa.launchpad.net/gns3/ppa/ubuntu trusty main
Debian Stretch:
Add the following lines to the /etc/apt/sources.list file:
deb http://ppa.launchpad.net/gns3/ppa/ubuntu xenial main deb-src http://ppa.launchpad.net/gns3/ppa/ubuntu xenial main
F inally, run the following commands in a terminal to install GNS3:
sudo apt-key adv --keyserver keyserver.ubuntu.com --recv-keys A2E3EF7B sudo apt-get update sudo apt-get install gns3-gui
Fedora:
In RPM distributions like Fedora, CentOS, we can install GNS3 using pip.
To install GNS3, run the following commands one by one in a Terminal:
sudo yum install python3-devel sudo yum install python3-qt5 sudo pip3 install gns3-server sudo pip3 install gns3-gui
GNS3 usage
Once you installed GNS3 on your preferred distro, launch it using the following command from a Terminal:
I have tested this on Ubuntu 16.04 LTS desktop.
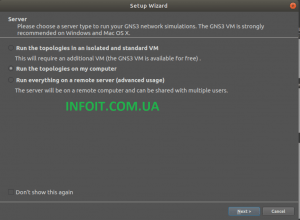
At the first launch, you should see the following screen.
Choose a server type to run your network simulations. I would like to run them from my local system, so I selected «Local Server» option.
![Ubuntu 16.04 LTS Desktop [Running] - Oracle VM VirtualBox_004](https://ostechnix.com/wp-content/uploads/2016/08/Ubuntu-16.04-LTS-Desktop-Running-Oracle-VM-VirtualBox_004.png)
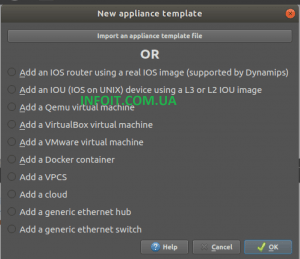
Next, you need to add the virtual network devices or virtual machines.
I’d like to add a virtual Cisco router, so I selected the first option.
![Ubuntu 16.04 LTS Desktop [Running] - Oracle VM VirtualBox_005](https://ostechnix.com/wp-content/uploads/2016/08/Ubuntu-16.04-LTS-Desktop-Running-Oracle-VM-VirtualBox_005.png)
Click Browse button to choose the IOS image for the virtual router.
![Ubuntu 16.04 LTS Desktop [Running] - Oracle VM VirtualBox_006](https://ostechnix.com/wp-content/uploads/2016/08/Ubuntu-16.04-LTS-Desktop-Running-Oracle-VM-VirtualBox_006.png)
I already have downloaded Cisco 3745 router’s IOS image in my home folder. You can download the IOS images of your choice from the Cisco or any other sites if available.
![Ubuntu 16.04 LTS Desktop [Running] - Oracle VM VirtualBox_007](https://ostechnix.com/wp-content/uploads/2016/08/Ubuntu-16.04-LTS-Desktop-Running-Oracle-VM-VirtualBox_007.png)
I do not want to decompress the IOS image, so I selected the option — «No».
![Ubuntu 16.04 LTS Desktop [Running] - Oracle VM VirtualBox_008](https://ostechnix.com/wp-content/uploads/2016/08/Ubuntu-16.04-LTS-Desktop-Running-Oracle-VM-VirtualBox_008.png)
Click «Yes» to save the selected image in the default images directory.
![Ubuntu 16.04 LTS Desktop [Running] - Oracle VM VirtualBox_009](https://ostechnix.com/wp-content/uploads/2016/08/Ubuntu-16.04-LTS-Desktop-Running-Oracle-VM-VirtualBox_009.png)
Once you selected the image of your choice, click Next.
![Ubuntu 16.04 LTS Desktop [Running] - Oracle VM VirtualBox_010](https://ostechnix.com/wp-content/uploads/2016/08/Ubuntu-16.04-LTS-Desktop-Running-Oracle-VM-VirtualBox_010.png)
Choose the name and platform and chassis of your network device (Router in our case).
![Ubuntu 16.04 LTS Desktop [Running] - Oracle VM VirtualBox_011](https://ostechnix.com/wp-content/uploads/2016/08/Ubuntu-16.04-LTS-Desktop-Running-Oracle-VM-VirtualBox_011.png)
Enter the RAM size for your virtual network device.
![Ubuntu 16.04 LTS Desktop [Running] - Oracle VM VirtualBox_012](https://ostechnix.com/wp-content/uploads/2016/08/Ubuntu-16.04-LTS-Desktop-Running-Oracle-VM-VirtualBox_012.png)
Choose the default network adapters that should be inserted into your device.
![Ubuntu 16.04 LTS Desktop [Running] - Oracle VM VirtualBox_013](https://ostechnix.com/wp-content/uploads/2016/08/Ubuntu-16.04-LTS-Desktop-Running-Oracle-VM-VirtualBox_013.png)
Select the default WIC (WAN interface cards) modules that should be inserted into your router.
![Ubuntu 16.04 LTS Desktop [Running] - Oracle VM VirtualBox_015](https://ostechnix.com/wp-content/uploads/2016/08/Ubuntu-16.04-LTS-Desktop-Running-Oracle-VM-VirtualBox_015.png)
Enter the Idle-PC value. It is necessary to prevent IOS to use 100% of your processor or one of its cores. Since it is just demo purpose I left it blank.
![Ubuntu 16.04 LTS Desktop [Running] - Oracle VM VirtualBox_016](https://ostechnix.com/wp-content/uploads/2016/08/Ubuntu-16.04-LTS-Desktop-Running-Oracle-VM-VirtualBox_016.png)
Review the network device template, and click apply and OK.
![Ubuntu 16.04 LTS Desktop [Running] - Oracle VM VirtualBox_017](https://ostechnix.com/wp-content/uploads/2016/08/Ubuntu-16.04-LTS-Desktop-Running-Oracle-VM-VirtualBox_017.png)
Finally, Enter the project name and click OK.
![Ubuntu 16.04 LTS Desktop [Running] - Oracle VM VirtualBox_018](https://ostechnix.com/wp-content/uploads/2016/08/Ubuntu-16.04-LTS-Desktop-Running-Oracle-VM-VirtualBox_018.png)
Congratulations! You have successfully created a new project with a new virtual network device (Router).
This is how GNS3 workspace looks like. From here, you can create various virtual network devices and virtual machines, and interconnect them with other and start testing.
![Ubuntu 16.04 LTS Desktop [Running] - Oracle VM VirtualBox_019](https://ostechnix.com/wp-content/uploads/2016/08/Ubuntu-16.04-LTS-Desktop-Running-Oracle-VM-VirtualBox_019.png)
We already have added a virtual network router, right?
To start it, click on the Routers icon on the left bar. The list of added network devices will be found. Just click and drag it to the workplace.
![Ubuntu 16.04 LTS Desktop [Running] - Oracle VM VirtualBox_020](https://ostechnix.com/wp-content/uploads/2016/08/Ubuntu-16.04-LTS-Desktop-Running-Oracle-VM-VirtualBox_020.png)
As you in the above screen, we have added c3745 model Cisco router. To power on this device, drag it to the workplace, and right click on the device icon. Finally, click Start.
![Ubuntu 16.04 LTS Desktop [Running] - Oracle VM VirtualBox_021](https://ostechnix.com/wp-content/uploads/2016/08/Ubuntu-16.04-LTS-Desktop-Running-Oracle-VM-VirtualBox_021.png)
The network device will start now. Again, right click on it and click Console to connect with that device via Terminal.
![Ubuntu 16.04 LTS Desktop [Running] - Oracle VM VirtualBox_022](https://ostechnix.com/wp-content/uploads/2016/08/Ubuntu-16.04-LTS-Desktop-Running-Oracle-VM-VirtualBox_022.png)
The console of the selected network device will be opened in a new Terminal window.
![Ubuntu 16.04 LTS Desktop [Running] - Oracle VM VirtualBox_023](https://ostechnix.com/wp-content/uploads/2016/08/Ubuntu-16.04-LTS-Desktop-Running-Oracle-VM-VirtualBox_023.png)
Start configuring your network environment.
![Ubuntu 16.04 LTS Desktop [Running] - Oracle VM VirtualBox_025](https://ostechnix.com/wp-content/uploads/2016/08/Ubuntu-16.04-LTS-Desktop-Running-Oracle-VM-VirtualBox_025.png)
That’s it. You can add additional virtual routers from Edit -> Preferences -> IOS routers link.
![Ubuntu 16.04 LTS Desktop [Running] - Oracle VM VirtualBox_026](https://ostechnix.com/wp-content/uploads/2016/08/Ubuntu-16.04-LTS-Desktop-Running-Oracle-VM-VirtualBox_026.png)
Not just Network devices, you can also add, configure and test Virtual machines (from Oracle VirtualBox or VMWare), Docker containers etc,. in GNS3 application.
In short, GNS3 has everything you to need to setup either a simple or complex network environment, including a switch, a router, a virtual machine etc. What do you need more? Go get it and improve your networking skills.
You might want to download the following free resources related to networking and Virtualization.
GNS3 Linux Install
These instructions are for Ubuntu and all distributions based on it (like Linux Mint).
(when prompted whether non-root users should be allowed to use wireshark and ubridge, select ‘Yes’ both times)
If you want IOU support
To install Docker CE (Xenial_and_newer)
Install the following packages:
Import the official Docker GPG key:
Finally, add your user to the following groups:
(use “sudo usermod -aG group user_name” to add your user to each of those groups) Restart your user session by logging out and back in, or restarting the system.
Debian-based distributions (64-bit only)#
For Debian Jessie Add the following lines to your /etc/apt/sources.list:
For Debian Stretch Add the following lines to your /etc/apt/sources.list:
For Debian Buster Refresh your metadata, and install the following packages:
Install GNS3 on ArchLinux Based :#
Install GNS3 on Archlinux based distros ( Arch — EndeavourOS — Garuda — ArcoLinux )
Install YAY package manager:#
To install GNS3 on Archlinux you will need yay to install from Arch Users Repository ( AUR ), thats if it’s not already installed, to install yay type below command in terminal:
and follow the setup process choosing the package source and confirm installation .
Install Prerequesits + docker:
Next we will install pre-requesit packages from the same AUR source. Please note that mixing installation source may lead to unfuncional application or unstability:
Install GNS3 Server and GUI
Как установить GNS3 в Ubuntu 18.04 | 16.04 | 20.04

В этом сообщении блога мы рассмотрим, как установить последнюю версию GNS3 на Ubuntu 20.04 | 18.04 | 16.04. GNS3 — это бесплатный сетевой симулятор с открытым исходным кодом, используемый сотнями тысяч сетевых инженеров по всему миру для имитации, настройки, тестирования и устранения неполадок виртуальных и реальных сетей. В виртуализации реальных аппаратных устройств и подготовке к сертификационным экзаменам, таким как Cisco CCNA, CCNP, CCIE, сертификаты Juniper
GNS3 начался с эмуляции устройств Cisco с использованием программного обеспечения Dynamips. Но теперь он эволюционировал для поддержки многих устройств от различных сетевых поставщиков, включая виртуальные коммутаторы Cisco, Cisco ASA, Brocade vRouters, коммутаторы Cumulus Linux, экземпляры Docker, HPE VSR, несколько устройств Linux и многие другие. С GNS3 вы можете тестировать совместимость между многими поставщиками и даже опробовать эзотерические установки с использованием сетевых технологий с SDN, NFV, Linux и Docker.
GNS3 состоит из двух программных компонентов:
Особенности GNS3
Ниже приведены некоторые полезные функции программного обеспечения GNS3 Network Emulation.
- Полностью бесплатный и открытый исходный код — без ежемесячных или годовых лицензионных сборов
- Нет ограничений на количество поддерживаемых устройств — ваше единственное ограничение — это оборудование ЦП и ОЗУ.
- GNS3 поддерживает все образы VIRL (IOSv, IOSvL2, IOS-XRv, CSR1000v, NX-OSv, ASAv)
- GNS3 может работать с гипервизорами или без них в мультивендорных средах.
- Он поддерживает несколько вариантов коммутации (ESW16 Etherswitch, образы IOU / IOL Layer 2, VIRL IOSvL2)
- GNS3 поддерживает как бесплатные, так и платные гипервизоры — Virtualbox, VMware Workstation, VMware Player, ESXi, Fusion.
- GNS3 имеет встроенную поддержку Linux без необходимости в дополнительном программном обеспечении для виртуализации.
Установите последнюю версию сетевого симулятора GNS3 в Ubuntu 20.04 | 18.04 | 16.04
Есть два способа установить последнюю версию GNS3 в Ubuntu 20.04 | 18.04 | 16.0416.04
В этом руководстве основное внимание будет уделено установке GNS3 на Ubuntu 20.04 | 18.04 | 16.04 из репозитория apt. Это рекомендуемый метод, так как пакеты GNS3 легко обновить до последней версии.
Установите GNS3 на Ubuntu 20.04 | 18.04 | 16.04 из репозитория apt
Пакеты GNS3 доступны в ppa репозитории GNS3 , сначала добавьте репозиторий, выполнив следующие команды:
sudo apt-get update sudo apt-get upgrade sudo add-apt-repository ppa:gns3/ppaОбновите список пакетов системы и установите GNS3:
sudo apt-get update sudo apt-get install gns3-server gns3-guiЭто может занять некоторое время в зависимости от скорости вашего интернета. Будет установлено множество пакетов и зависимостей GNS3.
Когда будет предложено разрешить пользователю без полномочий root запускать Wireshark и GNS3, ответьте да:
vpcs, который является симулятором виртуального ПК, также будет установлен. Он позволяет моделировать ПК, поддерживающий DHCP и ping, при моделировании сетей с помощью GNS3.
GNS3 — Добавить поддержку долговых расписок (необязательно)
Если вы хотите разрешить поддержку GNS3 для IOS в Unix (IOU), вам необходимо разрешить запуск пакетов x86 в 64-битной системе.
sudo dpkg --add-architecture i386 sudo apt-get updateКак только он будет включен, установите package. gns3-iou
sudo apt-get install gns3-iouGNS3 — Добавить поддержку Docker (необязательно)
По умолчанию GNS3 позволяет использовать контейнеры Docker при создании сетевых лабораторий. Но сначала вам нужно установить и запустить движок докеров, чтобы вы могли создавать контейнеры Docker. Используйте наше официальное руководство по установке Docker в вашей системе:
Не забудьте добавить своего пользователя в группу докеров:
sudo usermod -a -G docker $USERКроме того, добавьте своего пользователя в следующие группы, чтобы избежать проблем с разрешениями:
sudo usermod -aG ubridge libvirt kvm wireshark $USERЗапустите GNS3 в Ubuntu 20.04 | 18.04 | 16.04
В средстве запуска рабочего стола найдите GNS3, чтобы начать начальную настройку. На первой странице выберите « Запустить типологии на моем компьютере» .
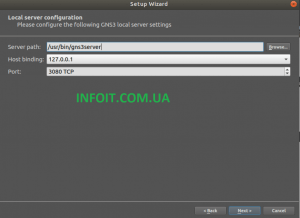
Вторая странице подтвердите расположение конфигурации локального сервера.
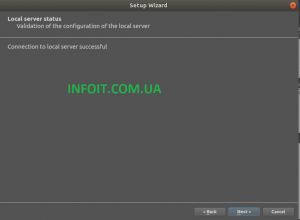
На третьей странице должно отображаться сообщение об успешной установке.
Если вы хотите добавить свои виртуальные машины, контейнеры Docker, виртуальные компьютеры или образы сетевых устройств, сделайте это на следующем шаге. Это также можно сделать позже, после установки.
После настройки у вас должен быть установлен готовый GNS3 на вашем сервере Ubuntu 18.04 или Ubuntu 16.04.
Чтобы иметь возможность захватывать пакеты GNS3 для анализа, вам потребуется Wireshark. Вы можете установить его, используя наше руководство по ссылке ниже.
Вот и все. Наслаждайтесь использованием GNS3. Если вы готовитесь к экзаменам с помощью этого инструмента, желаю вам удачной учебы и успехов на сертификационных экзаменах.