- Windows Subsystem for Linux (WSL2) on Windows 10 (Step-by-Step)
- Step-1: Enable Windows Subsystem for Linux Feature
- Ste-2: Enable Virtual Machine Platform
- Step-3: Enable Windows Subsystem for Linux 2 (WSL 2)
- Step-4: Install a Linux Distribution
- Conclusion
- Further Readings
- How to Install Windows Subsystem for Linux
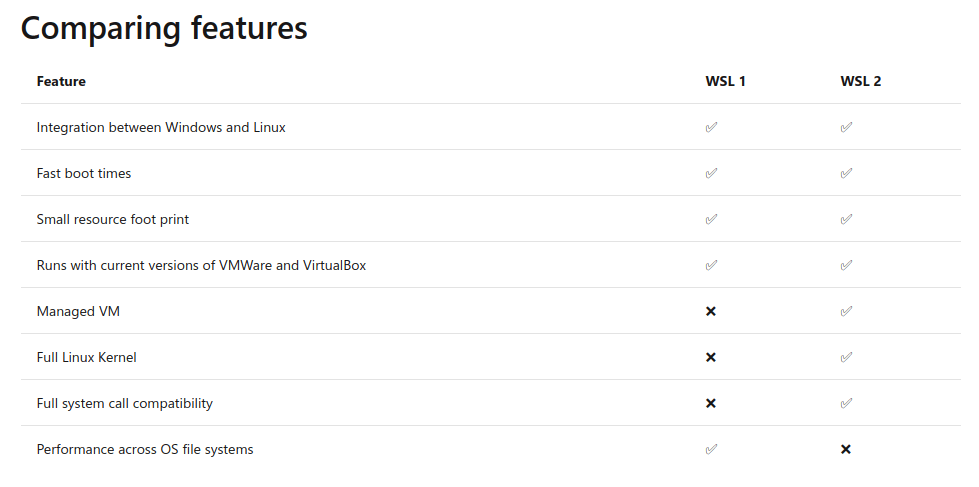
- Comparisons Between WSL 1 and WSL 2
- Enable the Windows Subsystem and Virtual Machine for Linux
- Enable Windows Subsystem for Linux
- Enable Virtual Machine for Linux
- Install Your Linux Distribution of Choice on Windows
- Learn Windows Subsystem Commands for Linux Distro
Windows Subsystem for Linux (WSL2) on Windows 10 (Step-by-Step)
Windows Subsystem for Linux (WSL) is a compatibility layer available for Windows 10, Windows 11, and Windows Server 2019 that enables users to run GNU/Linux environments natively on their system. That includes some of the most popular Linux command-line tools, utilities, and applications. With WSL, you can:
- Select a Linux distribution to install on Microsoft Store (E.g., Kali Linux, Ubuntu, Debian, etc.)
- Use command-line tools like grep, sed, awk, and other ELF-64 binaries.
- Create and run bash shell scripts with languages like:
- NodeJS, Javascript, Python, Ruby, C/C++, C# & F#, Rust, Go, etc
- Tools: vim, emacs, tmux
- Services: SSHD, MySQL, Apache, lighttpd, MongoDB, PostgreSQL.
The first version of Windows Subsystem for Linux (WSL1) was first released on August 2, 2016. On June 12, 2019, the second version, now called Windows Subsystem for Linux 2, was released. This second release introduced major changes, such as emulating a real Linux channel through the Hyper-V feature and increase file system performance.
In this post, we will give you a detailed guide on installing WSL2 on Windows.
Step-1: Enable Windows Subsystem for Linux Feature
If you are not already running WSL1, then you need to enable Windows Subsystem for Linux on your System. Follow the steps below.
Open the Windows Search bar (Win key + S) and enter «Turn Windows features On or Off.»

That will open the Windows Features window. Scroll down and search for the option, Windows Subsystem for Linux. Click on the checkbox to enable the feature. The system will search and install the required packages before prompting you to Reboot your system.

Ste-2: Enable Virtual Machine Platform
This step wasn’t necessary for WSL 1; however, with WSL 2, we will need to use the Hyper-V feature.
Not all computers support virtualization. Therefore, before executing the commands below, you might first need to confirm your PC supports virtualization and the feature is enabled in the BIOS or UEFI settings.
- On the Windows Search bar (Win key + S), type PowerShell. Right-click on it and select the option «Run as administrator«
- Enter the command below and hit enter.
Enable-WindowsOptionalFeature -Online -FeatureName VirtualMachinePlatform

If the command executes successfully without any errors, as shown in the image above, Reboot your PC to apply the changes.
Step-3: Enable Windows Subsystem for Linux 2 (WSL 2)
Up to this point, we have everything set up for WSL2. We can now proceed and enable Windows Subsystem for Linux 2 on our Windows system. Follow the steps below.
Download the WSL2 Kernel update. Once the download completes, navigate to the Downloads folder and install the .msi file.
Open the Windows Search bar (Win key + S) and search Powershell. Right-click on it and select the «Run as administrator» option. Execute the command below to set WSL2 as the default architecture for all your Linux distributions.

If you have distributions that you installed with WSL1, you will need to convert them to WSL2. For example, if you installed Ubuntu, use the command below to convert it to WSL2.
It would be best if you used the exact name of the distribution. If you are not sure, use the command below to list your installed distros.
After completing all the steps above, all your new distributions will use the WSL2 architecture.
Step-4: Install a Linux Distribution
Up to this point, we have successfully installed and enabled WSL2 on Windows. To install and start using Linux, follow the steps below.
Open the Microsoft Store application and Sign In with your Microsoft account.
On the search bar, enter «Linux.» That will list all the distributions available for you to install. For this tutorial, we will install Ubuntu 20.04 LTS.

Select your distribution of choice and click Get or Install. The installation might take some time as it will need to download the package.
Once done, click Launch to start your Linux OS.

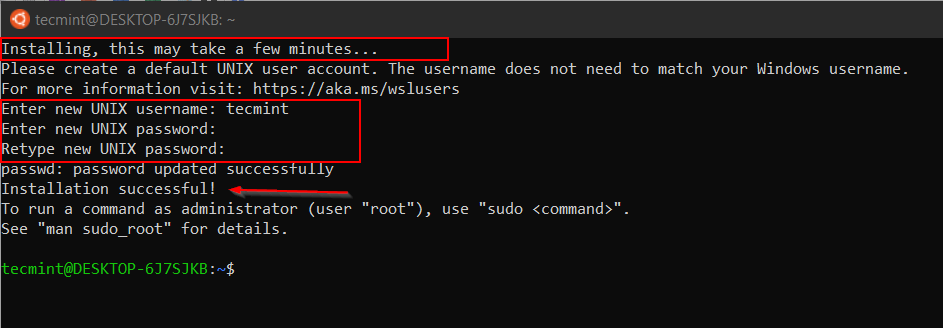
That will open the Linux command-line window. The distribution will install some packages before prompting you to enter a new username and password.
For security reasons, most Linux systems will not display anything as you type the password. Therefore, don’t panic if you don’t see anything in the password field. Just type the password and hit Enter.

That’s it! You have successfully enabled Windows Subsystem for Linux 2 and even installed your first distribution.
Conclusion
I believe this post has given you a clear guide on installing WSL2 on your Windows system. Please feel free to leave a comment and share your experience using WSL2 with our readers.
Further Readings
Related Searches: Enable windows subsystem for Linux, install WSL, how to get Linux on windows 10, install Linux on windows 10, enable WSL
Didn’t find what you were looking for? Perform a quick search across GoLinuxCloud
If my articles on GoLinuxCloud has helped you, kindly consider buying me a coffee as a token of appreciation.

For any other feedbacks or questions you can either use the comments section or contact me form.
Thank You for your support!!
How to Install Windows Subsystem for Linux
The Windows Subsystem for Linux (WSL) runs a GNU/Linux Environment which includes most of the command-line utilities and applications on top of Windows OS. Traditionally there are many ways we can set up Linux OS to work with. Either it can be a dual boot, running through VMWare or VirtualBox, or installing it as our main OS.
Now with Windows Subsystem for Linux, adds a new capability eliminating the overhead of setting up the OS from scratch. It is easy to set up with WSL and Install Linux and get going. To know more about the architecture of WSL refer to “Microsoft Build 2019 – BRK3068”.
Here we will be setting up WSL 2 which is the latest release. WSL 2 is part of Windows 10, version 2004 released in May 2020. WSL 1 used a translation or compatibility layer between Linux and Windows while WSL 2 uses virtual machine technology to allow you to run a real Linux kernel directly on Windows 10.
Comparisons Between WSL 1 and WSL 2

Before Installing WSL 2 you need Windows 10, Version 1903, Build 18362, or higher.
Enable the Windows Subsystem and Virtual Machine for Linux
You must first enable the “Windows Subsystem for Linux” and Virtual Machine Platform optional features before installing any Linux distributions on the Windows system. The WSL 2 uses Virtual Machine technology instead of a translation layer to communicate between Windows and Linux.
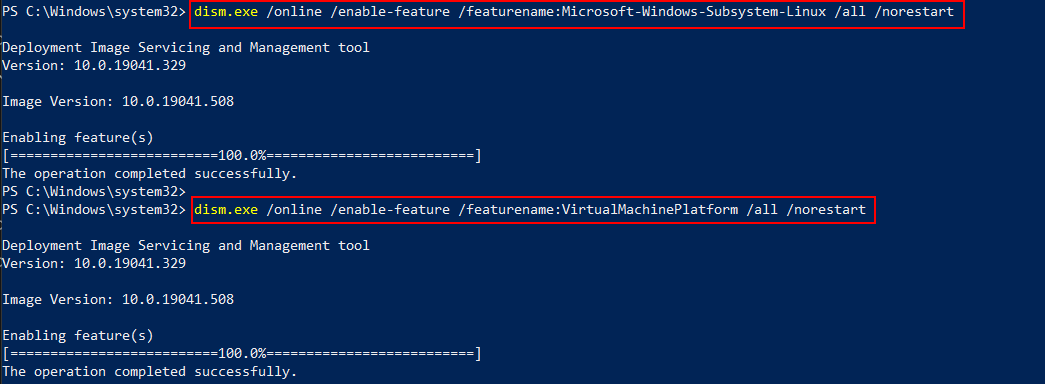
Open PowerShell as Administrator and run the following commands to turn on WSL and VM feature and reboot the system once.
Enable Windows Subsystem for Linux
dism.exe /online /enable-feature /featurename:Microsoft-Windows-Subsystem-Linux /all /norestart
Enable Virtual Machine for Linux
dism.exe /online /enable-feature /featurename:VirtualMachinePlatform /all /norestart

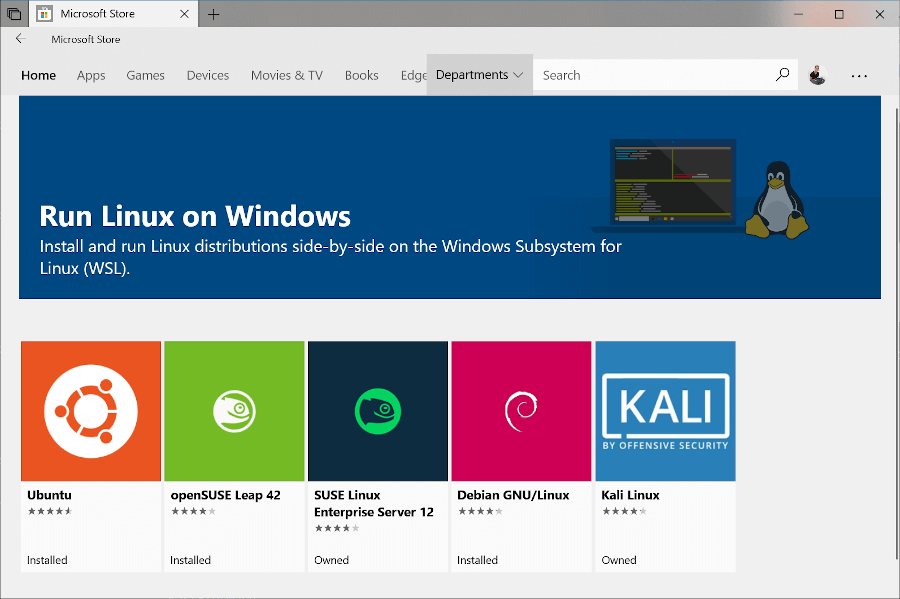
Install Your Linux Distribution of Choice on Windows
Open the Microsoft Store and select your favorite Linux distribution.

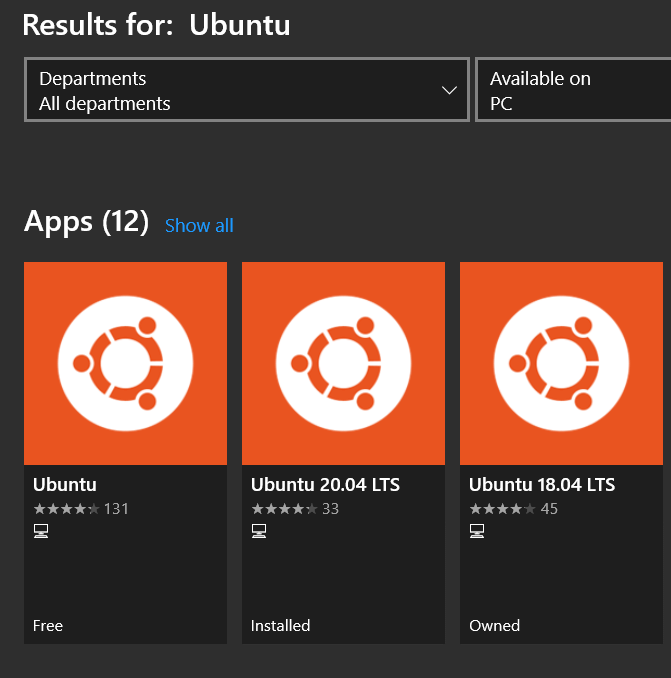
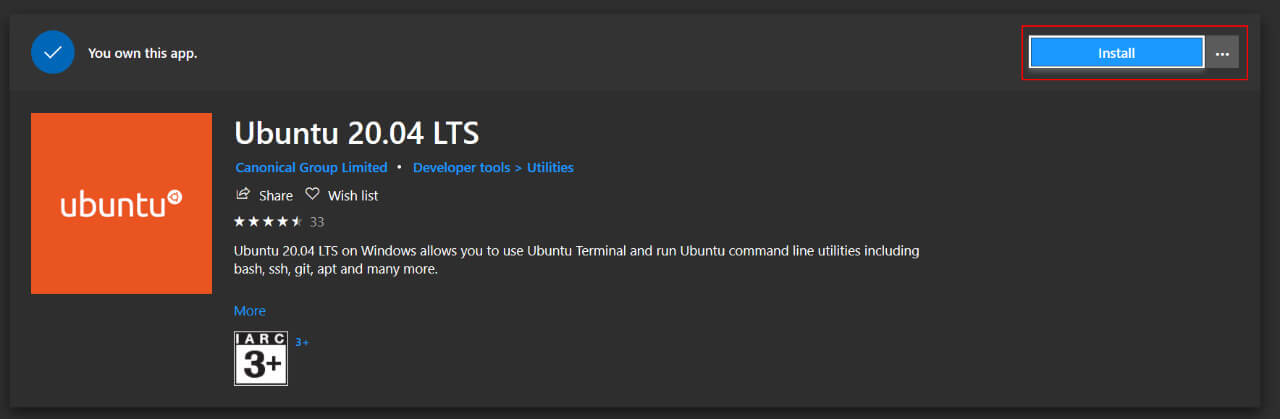
For demonstration purposes, we will install Ubuntu, go to Microsoft store, and in the search bar type Ubuntu.

Open Ubuntu 20.04 LTS and click Install.

Launching Ubuntu is pretty easy in Windows. Just go to search and type Ubuntu, it will show all the installed versions of Ubuntu.
You can also pin that in the Windows Taskbar or if you are using a new Windows Terminal you can configure in it. Now we will launch Ubuntu 20.04. If you are launching it for the first time it will take some time to set up a few things at the backend then it will prompt us to set username and password.

At this stage, you may receive an error to install the kernel component. To fix this error you have to manually download and install WSL2 Linux Kernel.
0x1bc WSL 2 requires an update to its kernel component.
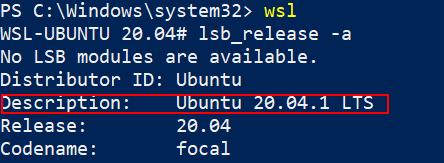
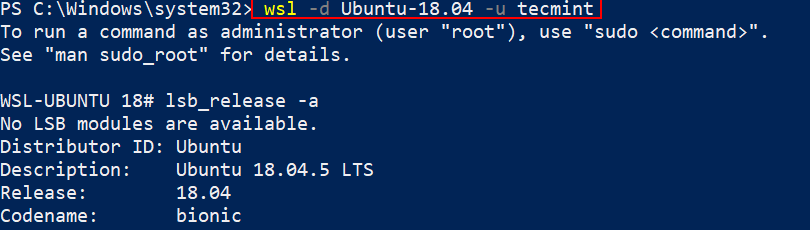
Now I have configured both 18.04 and 20.04 in the same way as shown in the previous section. Open the shell and type the following command to check the Distribution and Release of your Ubuntu.

Now we are done with installing Ubuntu on Windows. Within less time we can have a functional distro where we can start installing tools and packages like docker, ansible, git, python, etc. as per our requirement.
Learn Windows Subsystem Commands for Linux Distro
There are few options we can use to launch our Linux Distribution directly from PowerShell or CMD prompt.
1. Type the following command, which will show the list of options we can use along with wsl.
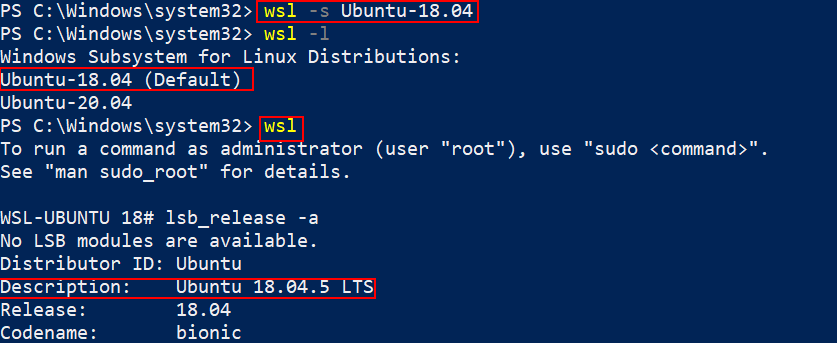
2. Check the installed version of distribution by running the command the following command.

From the output of this command, you can see two versions of Ubuntu is installed and Ubuntu 20.04 is set to be launched as default.
3. Default Distribution (Ubuntu 20.04) can be launched by simply typing.

4. Change the default Linux distribution by running the command.

5. Connect to specific distribution with a specific user by running the command.
wsl -d Ubuntu-18.04 -u tecmint

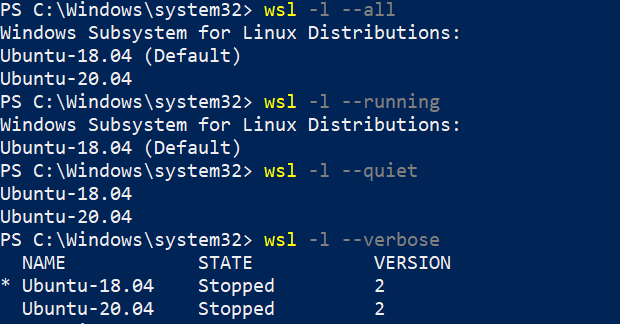
6. We can pass a few flags along with the «wsl -l» command to check the status of the distribution.

- wsl -l —all – List all distributions.
- wsl -l —running – List only distributions that are currently running.
- wsl -l —quiet – Only show distribution names.
- wsl -l —verbose – show detailed information about all distributions.
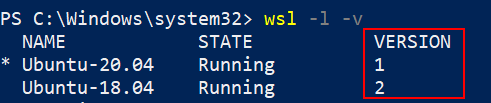
7. By running the following command, we can check what WSL version my Linux Distribution is running with.

My Ubuntu 20.04 is running with version WSL 1 since it is configured long back. I can convert that to WSL 2 by running the command.
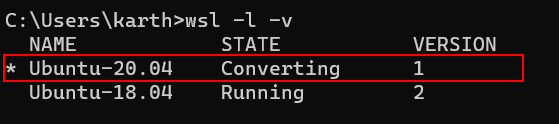
wsl --set-version Ubuntu-20.04 2
This will take some time to complete and you can see “Conversion Complete” when WSL 1 is converted to WSL 2.

When running the —set-version command, open another PowerShell window and run wsl -l -v to check the current state. It will show as “Converting”.

You can run the following command again to check the current WSL version. Both my Distribution will now be running with WSL2.

We can also set WSL2 as the default version so when we install new distribution it will run with WSL2. You can set the default version by running.

In this article, we have seen how to configure WSL 2 to install Ubuntu Linux on Windows and learned a few command-line options that we can use from PowerShell or cmd prompt.
During Installation, you may encounter different errors which I have not encountered, in that case, the official troubleshooting document will be a good place to start. Also, take a look at the official FAQ section from Microsoft documentation to get more insight about WSL.