- Install and use Greenbone Vulnerability Manager with the Kali Linux distribution
- Install GVM
- Install
- Change listening interface (Optional)
- Useful commands
- Using GVM
- Create target
- Create task
- How To Install gvm on Kali Linux
- What is gvm
- Install gvm Using apt-get
- Install gvm Using apt
- Install gvm Using aptitude
- How To Uninstall gvm on Kali Linux
- Uninstall gvm And Its Dependencies
- Remove gvm Configurations and Data
- Remove gvm configuration, data, and all of its dependencies
- References
- Summary
Install and use Greenbone Vulnerability Manager with the Kali Linux distribution
- Last updated: Aug 5, 2022
Greenbone Vulnerability Manager is a software framework that includes several tools (OpenVas, WebUI, …) to perform vulnerability scans.
Indeed, with this software framework we will be able to scan a complete network or a single host to see if it is prone to known vulnerabilities.
Historically Greenbone Vulnerability Manager is a fork of the Nessus scanning tool which is now a proprietary software.
- Key features :
- Vulnerability scan
- Nessus fork
- Able to track security holes in a computer network
- Kali Linux Release : 2022.2
Install GVM
Install
kali@kali:~$ sudo apt install gvm postgresql nsis
- Run setup script :
- Which will :
- Start services and create PostgreSQL database
- Create GVM certificate files
- Apply needed permissions
- Update vulnerabilities databases
- Create and set admin account
[…] [*] Please note the password for the admin user [*] User created with password 'xxxxxxxx-xxxx-xxxx-xxxx-xxxxxxxxxx'. [>] You can now run gvm-check-setup to make sure everything is correctly configuredkali@kali:~$ sudo systemctl start gvmd.service && sudo systemctl start gsad.service
kali@kali:~$ sudo gvm-check-setup
kali@kali:~$ sudo systemctl status gvmd.service
kali@kali:~$ sudo ss -ltn4p State Recv-Q Send-Q Local Address:Port Peer Address:Port Process LISTEN 0 4096 127.0.0.1:9392 0.0.0.0:* users:(("gsad",pid=2243,fd=10))kali@kali:~$ sudo gvmd --modify-setting 78eceaec-3385-11ea-b237-28d24461215b --value admin
- Now you should be able to connect to the https://127.0.0.1:9392 address with admin login :
Change listening interface (Optional)
In its default configuration Greenbone Security Assistant (GSA) (WebUI) is only reachable through local address (127.0.0.1). To be able to connect to the WebUI interface from others hosts we need to modify systemctl configuration.
[Unit] Description=Greenbone Vulnerability Manager daemon (gvmd) After=network.target networking.service postgresql.service ospd-openvas.service Wants=postgresql.service ospd-openvas.service Documentation=man:gvmd(8) ConditionKernelCommandLine=!recovery [Service] Type=forking User=_gvm Group=_gvm PIDFile=/run/gvmd/gvmd.pid RuntimeDirectory=gvmd RuntimeDirectoryMode=2775 #ExecStart=/usr/sbin/gvmd --osp-vt-update=/run/ospd/ospd.sock --listen-group=_gvm ExecStart=/usr/sbin/gvmd --osp-vt-update=/run/ospd/ospd.sock -a 0.0.0.0 Restart=always TimeoutStopSec=10 [Install] WantedBy=multi-user.target[Unit] Description=Greenbone Security Assistant daemon (gsad) Documentation=man:gsad(8) https://www.greenbone.net After=network.target gvmd.service Wants=gvmd.service [Service] Type=forking User=_gvm Group=_gvm RuntimeDirectory=gsad RuntimeDirectoryMode=2775 PIDFile=/run/gsad/gsad.pid #ExecStart=/usr/sbin/gsad --listen 127.0.0.1 --port 9392 ExecStart=/usr/sbin/gsad --mlisten=KALI_IP_ADDRESS --listen 0.0.0.0 --port 9392 Restart=always TimeoutStopSec=10 [Install] WantedBy=multi-user.target Alias=greenbone-security-assistant.service
kali@kali:~$ sudo systemctl daemon-reload
kali@kali:~$ sudo systemctl restart gvmd.service
kali@kali:~$ sudo systemctl restart gsad.service
Useful commands
kali@kali:~$ sudo -u _gvm greenbone-nvt-sync
kali@kali:~$ sudo greenbone-feed-sync --type CERT kali@kali:~$ sudo greenbone-feed-sync --type SCAP kali@kali:~$ sudo greenbone-feed-sync --type GVMD_DATA
kali@kali:~$ sudo runuser -u _gvm -- gvmd --create-user=gvadmin --password=stPassw0rd --disable-password-policykali@kali:~$ sudo runuser -u _gvm -- gvmd --get-users
kali@kali:~$ sudo runuser -u _gvm -- gvmd --user=gvadmin --new-password=gvadmin
Using GVM
We will see here how to perform our first vulnerability scan of a predetermined host.
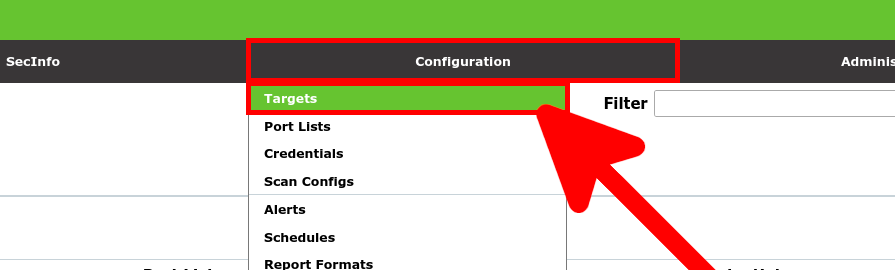
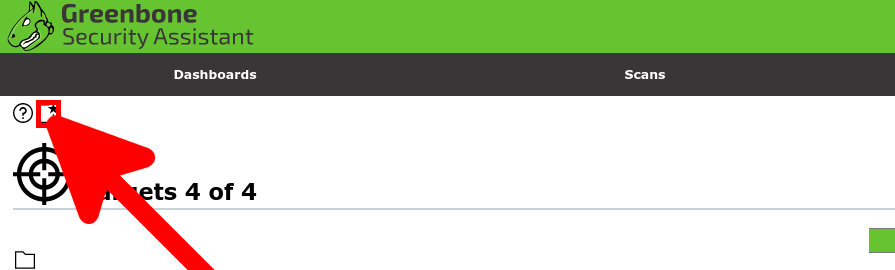
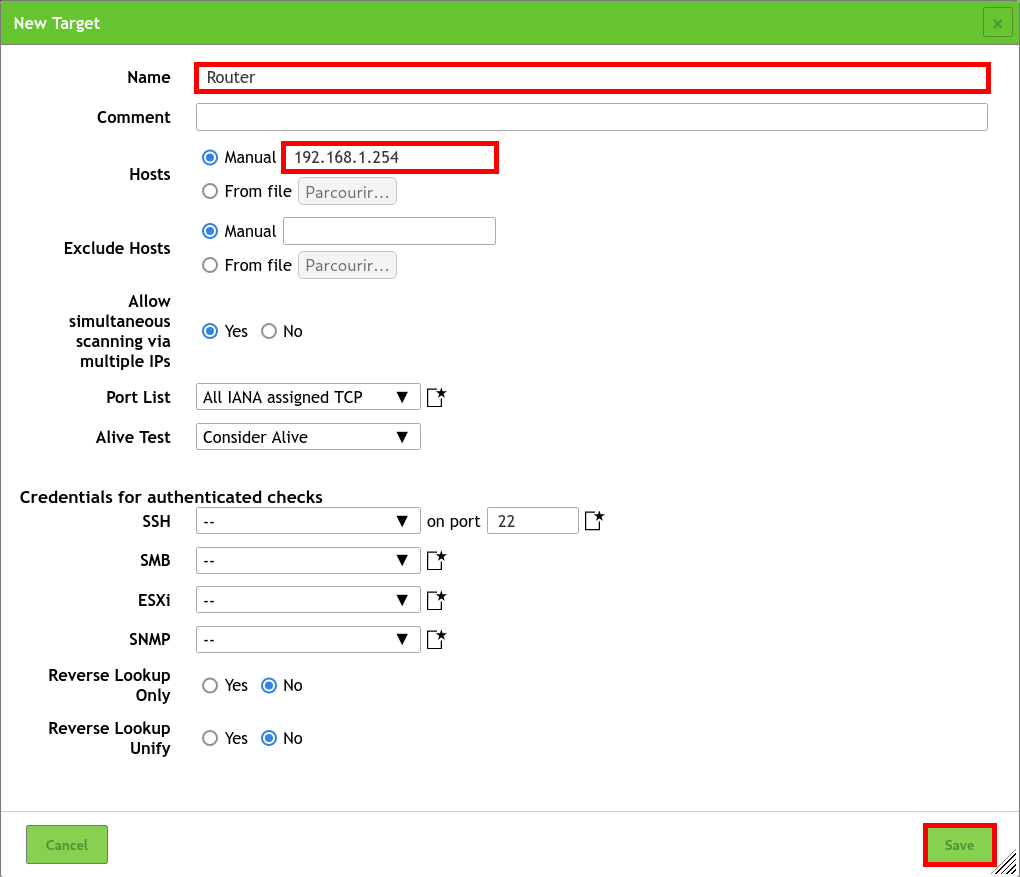
Create target
- Go to Targets :
- Click New Target link :

- Define the Target to scan by setting the ip address and giving it a Name :

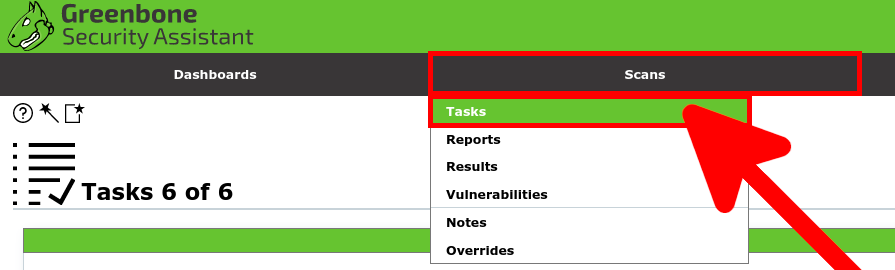
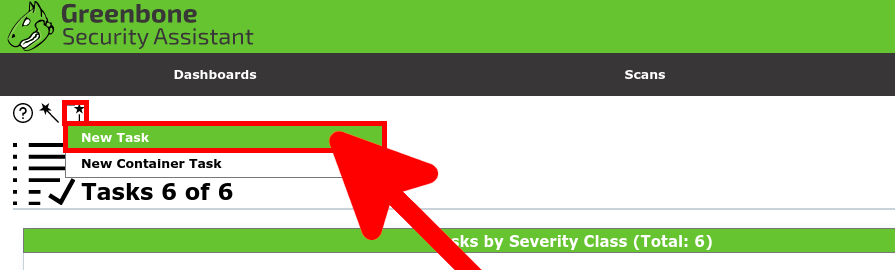
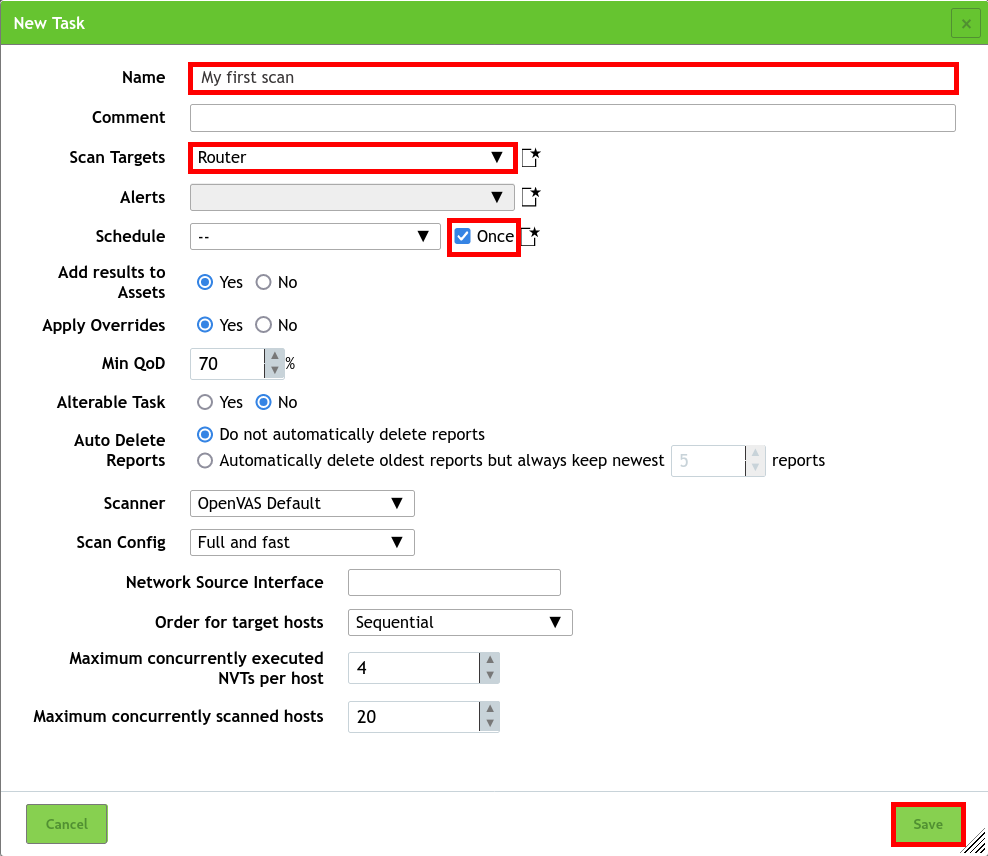
Create task
- Open Tasks :
- Click New Task icon :
- Define the New Task by setting the Name, associate the Target and by checking Schedule Once :
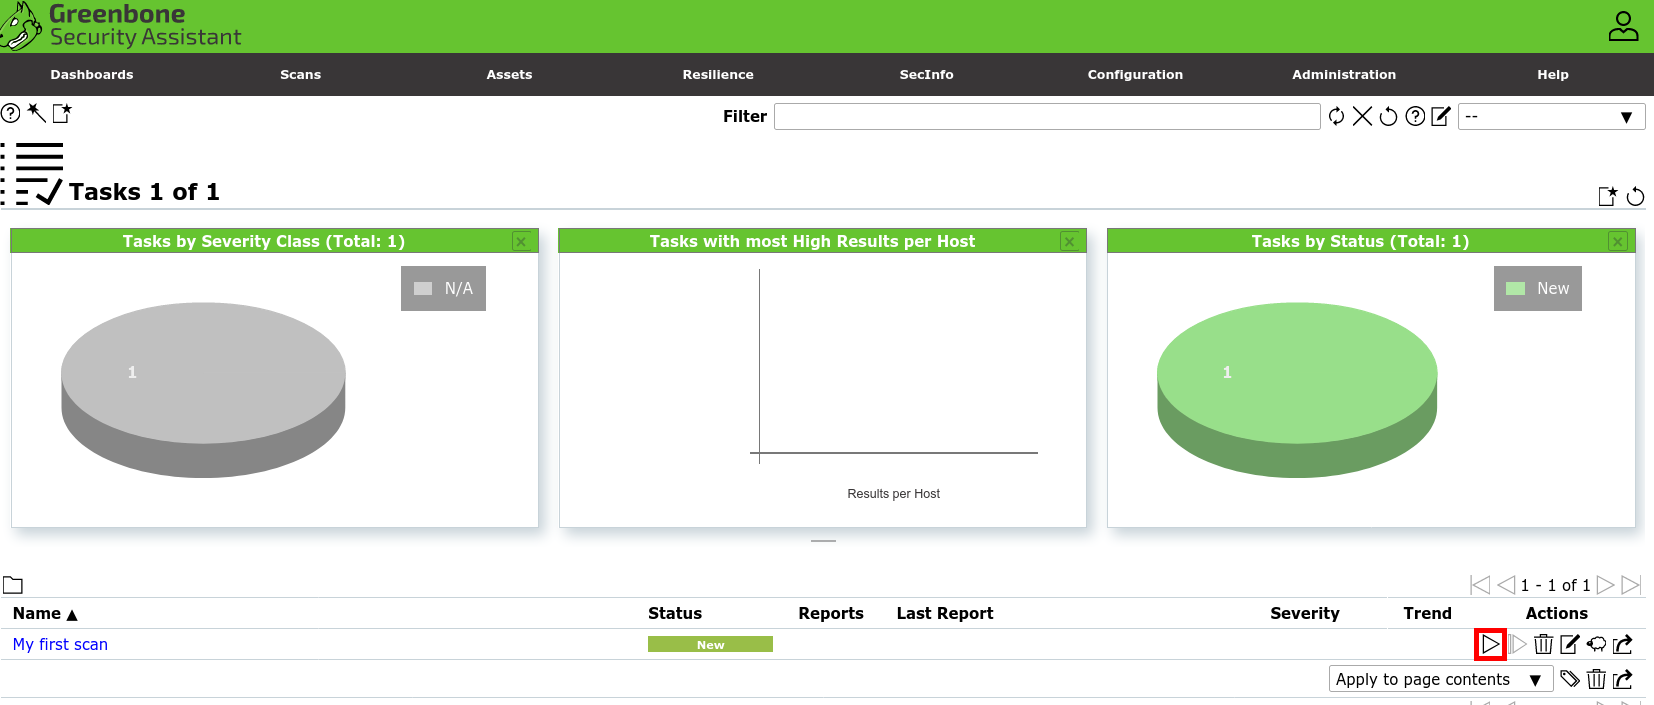
- Click Play button to Start the task :

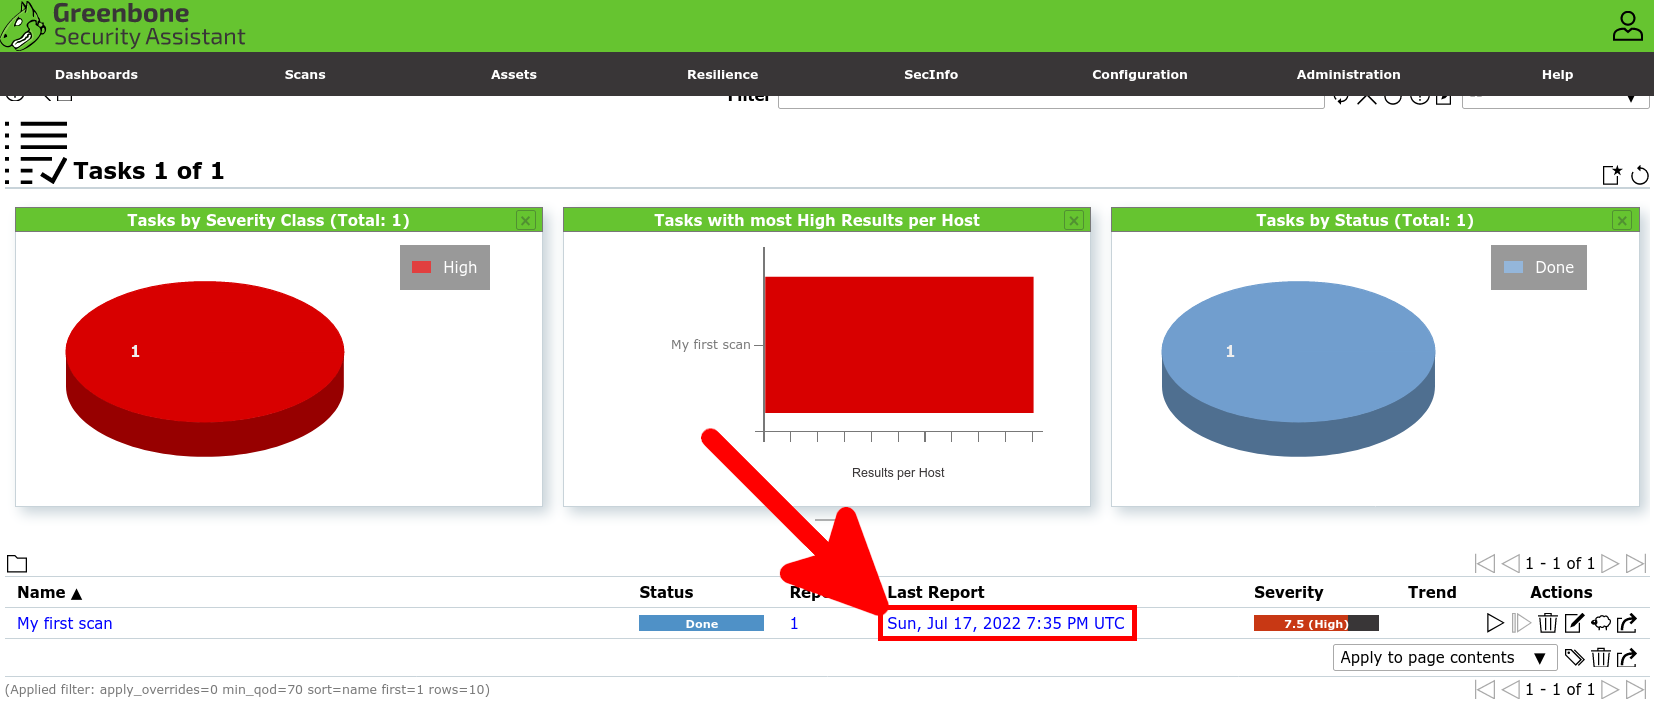
- After some minutes the task end, click to the Last Report link to access scan vulnerabilities report :
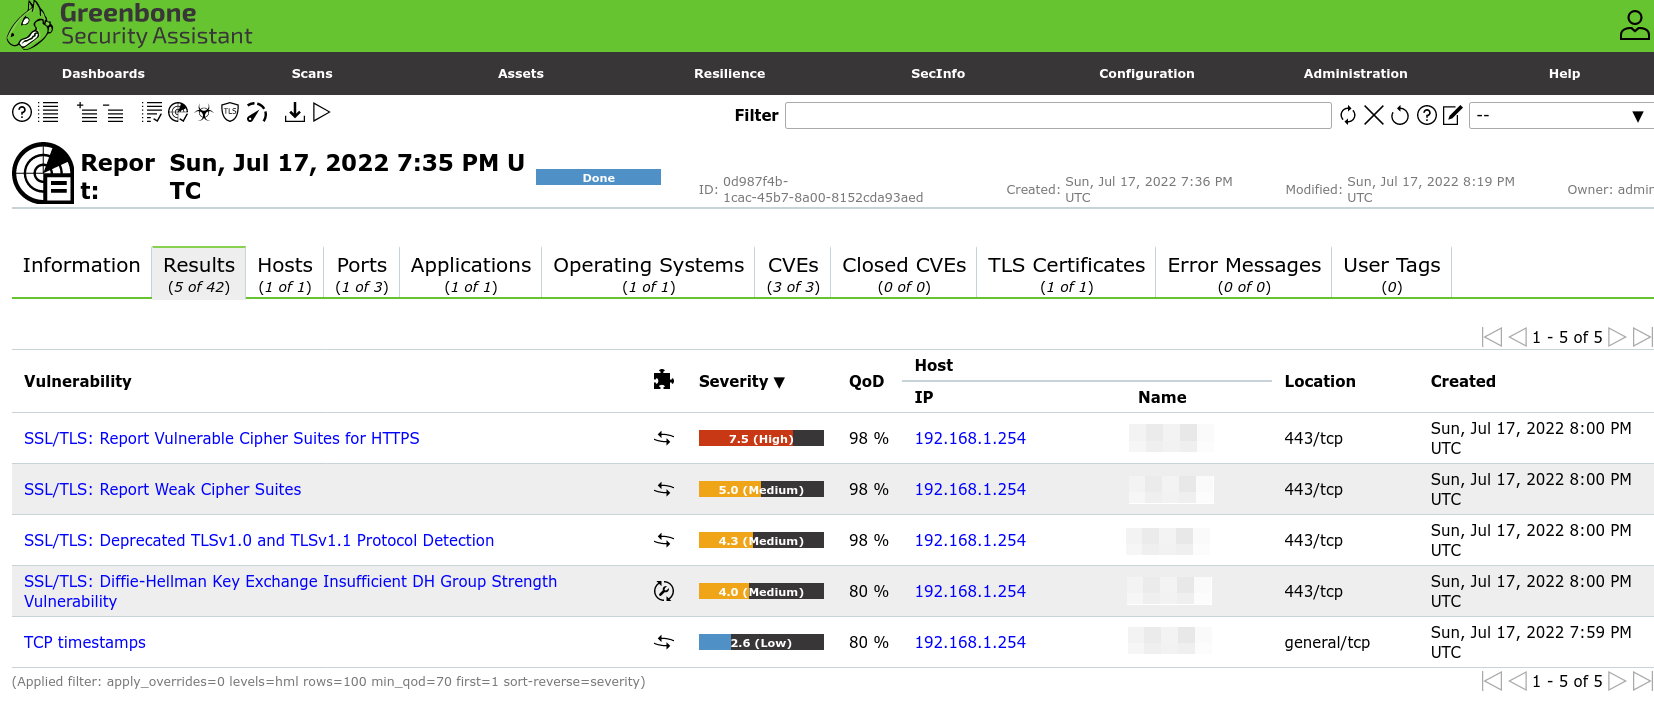
- You will have a complete report :
This work is licensed under a Creative Commons Attribution-NonCommercial-ShareAlike 4.0 International License.
This work is licensed under a Creative Commons Attribution-NonCommercial-ShareAlike 4.0 International License.
How To Install gvm on Kali Linux
In this tutorial we learn how to install gvm on Kali Linux.
What is gvm
The Greenbone Vulnerability Manager is a modular security auditing tool, used for testing remote systems for vulnerabilities that should be fixed.
This package installs all the required packages. It provides scripts to setup, start and stop the GVM services.
The tool was previously named OpenVAS.
There are three ways to install gvm on Kali Linux . We can use apt-get , apt and aptitude . In the following sections we will describe each method. You can choose one of them.
Install gvm Using apt-get
Update apt database with apt-get using the following command.
After updating apt database, We can install gvm using apt-get by running the following command:
sudo apt-get -y install gvmInstall gvm Using apt
Update apt database with apt using the following command.
After updating apt database, We can install gvm using apt by running the following command:
Install gvm Using aptitude
If you want to follow this method, you might need to install aptitude first since aptitude is usually not installed by default on Kali Linux. Update apt database with aptitude using the following command.
After updating apt database, We can install gvm using aptitude by running the following command:
sudo aptitude -y install gvmHow To Uninstall gvm on Kali Linux
To uninstall only the gvm package we can use the following command:
Uninstall gvm And Its Dependencies
To uninstall gvm and its dependencies that are no longer needed by Kali Linux, we can use the command below:
sudo apt-get -y autoremove gvmRemove gvm Configurations and Data
To remove gvm configuration and data from Kali Linux we can use the following command:
Remove gvm configuration, data, and all of its dependencies
We can use the following command to remove gvm configurations, data and all of its dependencies, we can use the following command:
sudo apt-get -y autoremove --purge gvmReferences
Summary
In this tutorial we learn how to install gvm using different package management tools like apt, apt-get and aptitude.
- Which will :