Renee Marsland — Brain Catalogue
Obviously installing software onto a linux computer is different to the quick and easy installation process on a Windows PC. So here are the steps I took to get it up and running on Ubuntu:
1. Download the installation file from the SideFX website.
2. Run the following on the .tar file you just downloaded
tar xvzf houdini-16.5.378-linux_x86_64_gcc4.8.tar.gz
sudo ./houdini-16.5.378-linux_x86_64_gcc4.8/houdini.installer
4. Once you have run through the installation, in order to get the ‘houdini’ command to work in terminal you need to setup the houdini environment variables, such as the path to the Houdini binaries (as stated in the houdini readme).
In order to do this you must cd into the following directory (/opt is the default install location on Ubuntu, so if you are running on a different OS, yours may be different) :
which initializes your current shell’s environment to run Houdini. Now if you run the command ‘houdini’ it will launch Houdini.
Now if you don’t want to have to cd into your install location and run the source command every time you start up terminal you will need to the source command to your ‘.login’ file.
Now this file for Ubuntu is called ‘.bashrc’ and is located here:
I find it easiest to edit files like this using nano which is similar to vi except is has it’s commands for editting, saving, etc down the bottom.
I wasn’t certain on the best method for adding this command as I don’t have a whole lot of expierience with messing with these things, so I kind of just hacked something together that works easily enough for me (and comments regarding a better way to do this would be awesome).
So I just added the following to the bottom of the .bashrc file:
# setup Houdini env cd /opt/hfs16.5.378 source houdini_setup cd ~
Now if you open up a new shell you will see ‘The Houdini 16.5.378 environment has been initialized» and you will be able to run the houdini command from anywhere in the terminal.
However once I did the installation, when I would start up houdini, it would not load correctly. It appeared to be an issue with the graphics card (an Nvidia 1050ti low profile).
Apparently this is a common issue and after a quick google I found THIS post that fixed my woes.
All I had to do was add: HOUDINI_OGL_SOFTWARE = 1
To the following file : ~/houdini16.5/houdini.env
And now my Houdini is up and running on my linux machine 😀
Install houdini on linux
The installer must be run using sudo.
- Make sure that the install file is not located in root’s home folder (/root) as this will give you permission errors during the install process.
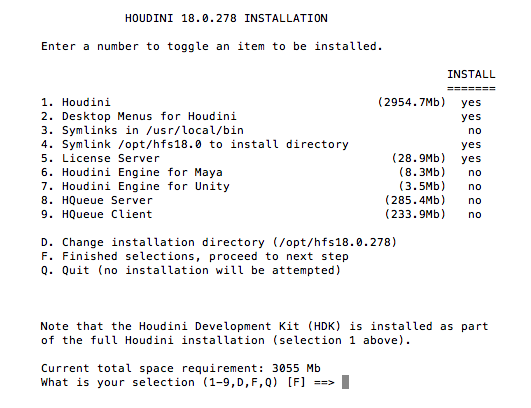
- Install the License Server component if:
- installing for Houdini Indie or Houdini Apprentice.
- the computer is a license server to serve licenses to client machines, or
- a Workstation (nodelock, not using a remote license server) is installed.

- Open a Terminal.
- Unpack the downloaded tar.gz archive.
$ tar -xvf houdini-18.0.287-linux_x86_64_gcc6.3.tar.gz
// This should create a directory called houdini-18.0.287-linux_x86_64_gcc6.3 - Go into the unpacked directory and run the houdini.install script using sudo.
$ cd houdini-18.0.287-linux_x86_64_gcc6.3
$ sudo ./houdini.install
Alternatively, you can also double click on the houdini.install file with your mouse. It will run the installer in a terminal. - If installing for a license server, or Houdini Apprentice or Houdini Indie, make sure to install the License Server component (5 in the image above) in the installer.
- The licensing menu may appear during the installation process if no installed licenses can be detected.
- If you are installing Apprentice, choose «Install Houdini Apprentice license.
- If you are installing a commercial product, choose I have a paid license for Houdini.
For more information about licensing Houdini please refer to Licensing a Houdini product
To launch Houdini from the Terminal, type the following:
- $ cd /opt/hfs18.0
- $ source houdini_setup
// This should setup the Houdini environment for you. - $ houdini
IN ADDITION: HOUDINI RENDERING VIA TERMINAL(works with WIN, MAC TOO)
Here is a small tip on rendering, It’s not that it is very fast, but it’s faster than rendering to mplay. And if you are crazy enough to render a bunch of frames, even you get that 0.005% of performance gain, I recommend to definitely use it. Every second counts!
With Houdini comes «Houdini terminal» you can run that on Windows and Mac, but on Linux you have to go into Houdini folder and run it from there.
Houdini by default installs in /opt. my version is 17.5.173 so command in terminal will be:
QUICK TIP: there are plenty of directories everywhere and TAB key is very handy, if you don’t know how folders or files are called you just can type h TAB and it will list all options that starts with h:
And there bunch files, but we interested in houdini_setup. It is a shell script that initializes Houdini environment. To make it happen we need to type:
if everything correctly there should be a message:
The Houdini 17.5.173 environment has been initialized.
Now you can open your Houdini files. I have an amazing scene in my Documents folder.. so I need to navigate there and change my current directory to that location.
let’s list files that available:
to open that scene in terminal there is a command hbatch.
To navigate it is the same as you do in terminal and if you list what is available, there will be familiar content /obj, /out, /shop, etc etc. To navigate to /out context just type:
there will be all output ROPS if you saved your file.. (happens to me all the time..)
To render file it is a simple command ‘render’. You can read more in Houdini documentation, but with -V argument it goes verbose mode, which gives some info about rendering. (usually just a frame number its on)
render -V And_Your_Rop_Node_Name
And that’s it, files are rendering now!
Yaaayyyy.