- How to Install Debian with WSL on Windows 11
- Enable WSL in Windows
- Enable Virtual Machine Platform
- Install Debian in Windows 10
- Dual Boot Debian and Windows
- Part 1: Preparing Windows to add Debian Linux installation with dual boot
- Step 2: Installing Debian for dual boot with Windows:
- Conclusion:
- About the author
- David Adams
How to Install Debian with WSL on Windows 11
This brief tutorial shows students and new users how to install and run Debian Linux on Windows Subsystem for Linux 2 (WSL2).
In 2017, Windows released Windows Subsystem for Linux that lets developers run a GNU/Linux environment, including most command-line tools, utilities, and applications directly in Windows without setting up a virtual machine or dual-boot.
WSL2 has since been released, an improvement over version 1. The new and improved version has a performance boost and complete system call compatibility. It is built with a new architecture that delivers features that make WSL a fantastic way to run a Linux environment in Windows.
To install WSL 2 on Windows 10, these two requirements must be met:
- Windows 10 May 2020 (2004), Windows 10 May 2019 (1903), or Windows 10 November 2019 (1909) or later
- A computer with Hyper-V Virtualization support
Since you can now install Linux systems, including Debian, directly in Windows, let’s go ahead and install Debian. Before you can do that, you must enable WSL or WSL2 in Windows.
When you’re ready to enable WSL 2 on Windows 10, follow the steps below:
Enable WSL in Windows
To enable WSL in Windows, you will want to open the PowerShell terminal as administrator. Click on Start, then begin typing PowerShell.
Next, right-click the Windows PowerShell app and choose to run as administrator.
When the console opens, run the commands below:
dism.exe /online /enable-feature /featurename:Microsoft-Windows-Subsystem-Linux /all /norestart
After installing, you should get a success message similar to the lines below:
Deployment Image Servicing and Management tool Version: 10.0.19041.844 Image Version: 10.0.19042.844 Enabling feature(s) [==========================100.0%==========================] The operation completed successfully.
Enable Virtual Machine Platform
WSL 2 requires Windows 10 Virtual Machine Platform to be enabled. This is not Hyper-V. To enable the VM platform feature in Windows, run the commands below from the same PowerShell administrator’s console.
dism.exe /online /enable-feature /featurename:VirtualMachinePlatform /all /norestart
If you’re using Windows 10 version lower than 2004, then use the commands below:
Enable-WindowsOptionalFeature -Online -FeatureName VirtualMachinePlatform -NoRestart
When you’re done running the commands above, restart your computer for all the configuration changes to apply. If you don’t restart, the below command might not be recognized.
After restarting your computer, login back in and launch PowerShell as administrator. Then run the commands below to configure WSL 2 as the default version of WSL.
If you get an error about not having Linux kernel installed, get it from the link below and run it in Windows, then try the command above again.
Install Debian in Windows 10
Now that WSL 2 is installed and ready to be used, open the link below to download and install a copy of Debian from the Windows store.
Debian on Windows allows you to use Debian Terminal and run Debian command line utilities, including bash, ssh, git, apt, and many more.
Click the Get button and install. After installing Debian, you’ll want the option to launch Debian from the Windows WSL environment.
After downloading and installing, you will get a Launch button.
After launching Debian, it should install and prompt you to create your account.
Installing, this may take a few minutes… Please create a default UNIX user account. The username does not need to match your Windows username. For more information visit: https://aka.ms/wslusers Enter new UNIX username: richard New password: Retype new password: passwd: password updated successfully Installation successful! richard@DESKTOP-M1235UB:~$ Some troubleshooting commands to run when you run into issues.
wsl --set-default-version 1 bcdedit /set hypervisorlaunchtype auto start
Now simply launch Debian from Windows and start by searching for it. You can also pin it to the taskbar and always have it launch from there.
This post showed you how to install WSL 2 on Windows 10 and install Debian. If you find any error, please report it in the comment form below.
Richard W
I love computers; maybe way too much. What I learned I try to share at geekrewind.com.
Dual Boot Debian and Windows
![]()
This article is useful for Windows users or a clean disk to install both systems.
The tutorial gives optional instructions to prepare a Windows disk space to add Debian Linux and covers the Linux posterior installation to support dual boot. It does not cover the Windows installation process but instructions to make your Windows support adding Debian if you do not have an additional free disk for Linux.
All steps described in this tutorial include real scenario screenshots, making it easy for any user to follow them.
Important Note: If you have an additional empty hard disk you want to dedicate to Linux, you can skip the first section of this tutorial and go straight to Linux instructions.
Part 1: Preparing Windows to add Debian Linux installation with dual boot
As said in the introduction of this article, I assume you already have Windows installed; if you don’t, install it first and follow the instructions below.
Important Note: If you use a dedicated hard drive for Linux, you can skip the following Windows instructions (Part 1 of this tutorial) and go straight to Linux instructions. Otherwise, keep reading below.
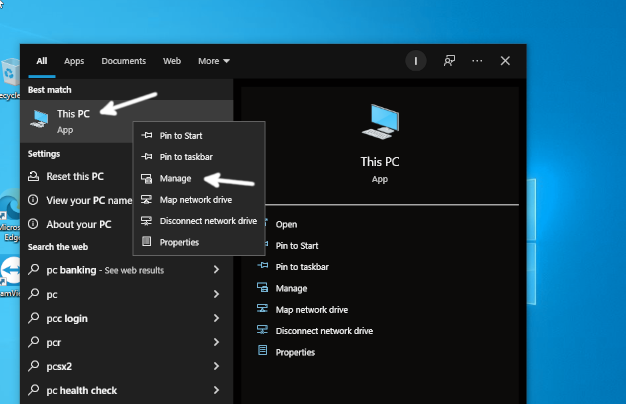
From Windows, find This PC icon, right-click it and press the Manage option as shown in the screenshot below.
In the Computer Management window, double click Storage as shown below.
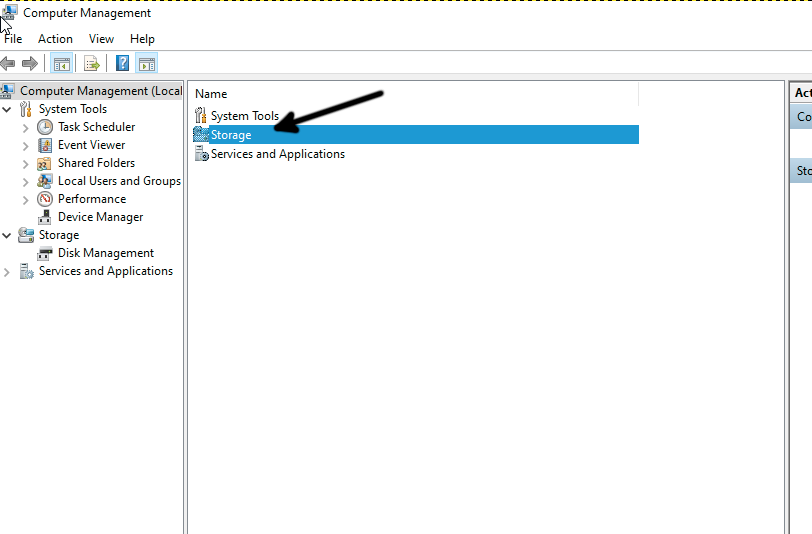
Double click Disk Management.

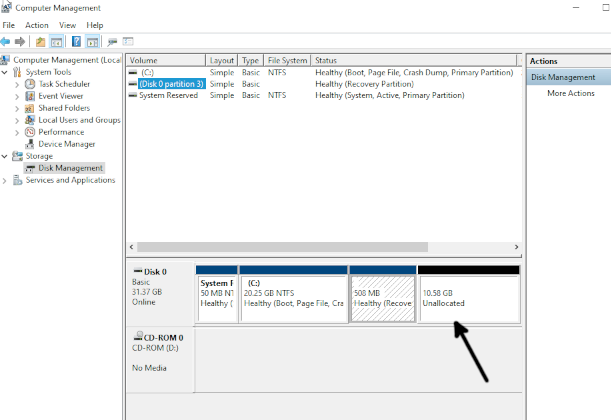
There you will see your Windows partitions; in my case, my disk already has enough free disk space without partitions, so I can reboot the computer and start installing Linux. If your disk has no free space without partitioning, keep reading the next steps described below.
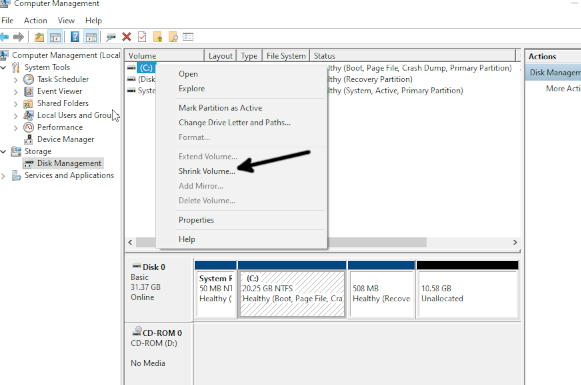
If your disk has no space without a partition, let’s free space from an existing partition. Right-click your C: unit and press the Shrink Volume option.
In the “Enter the amount of space shrink in MB”, define the space you want to take from Windows and use for Linux, then press the Shrink button. When asked for confirmation, confirm the operation.

After confirming and shrinking your disk, freeing space without partitions, reboot your computer and put the Debian DVD/CD/USB booteable device.
Step 2: Installing Debian for dual boot with Windows:
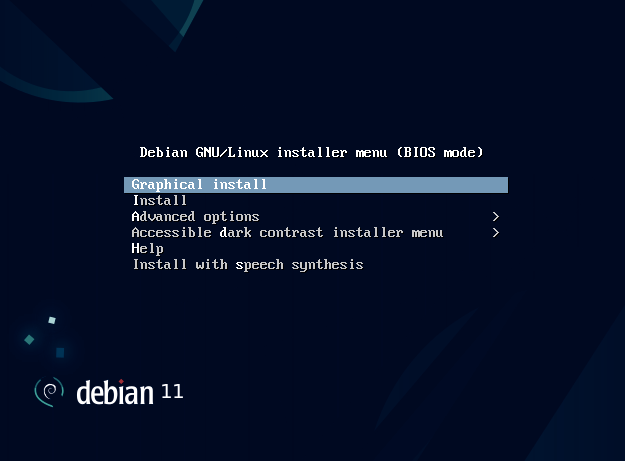
When booting the Debian Linux installer, select Graphical Install and press ENTER on the first screen.
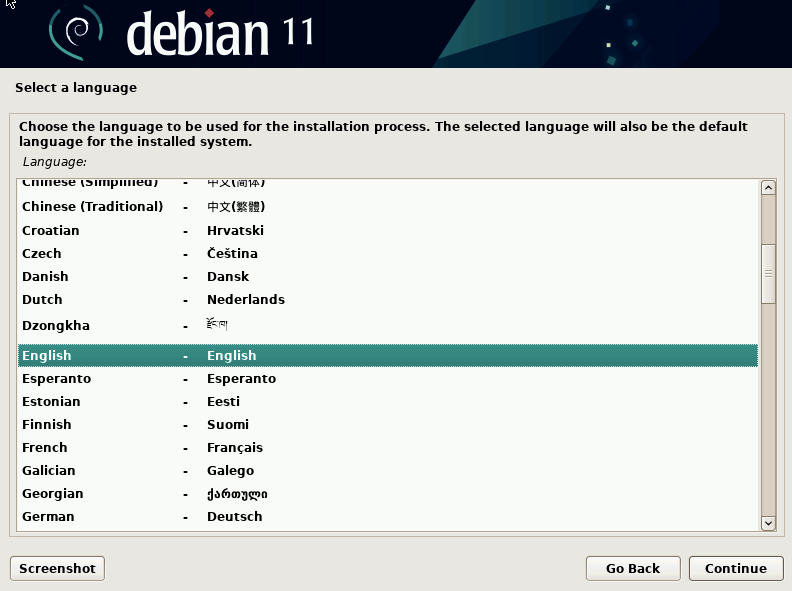
In the second step of Debian installation, choose your language and press the Continue button located at the right bottom of the screen.
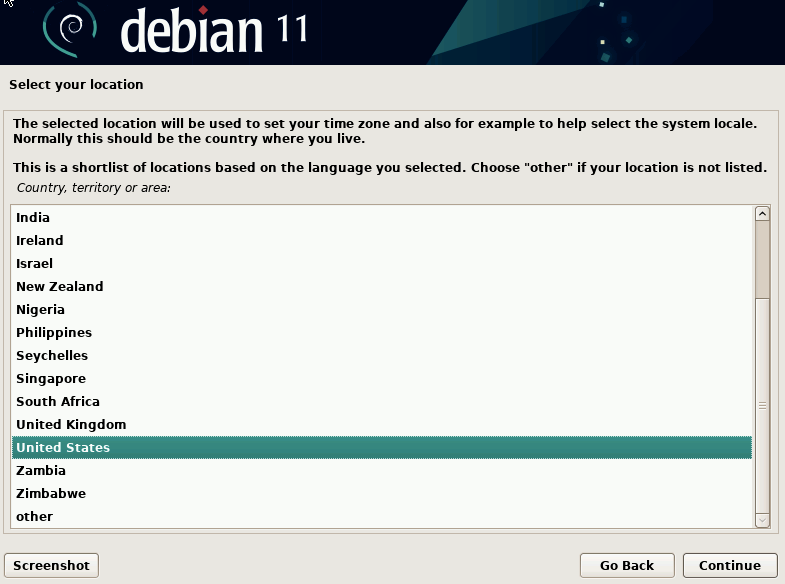
In the third step of Debian installation, select your country and press Continue.
Select your keyboard according to your language dialect in the fourth step, then press Continue.

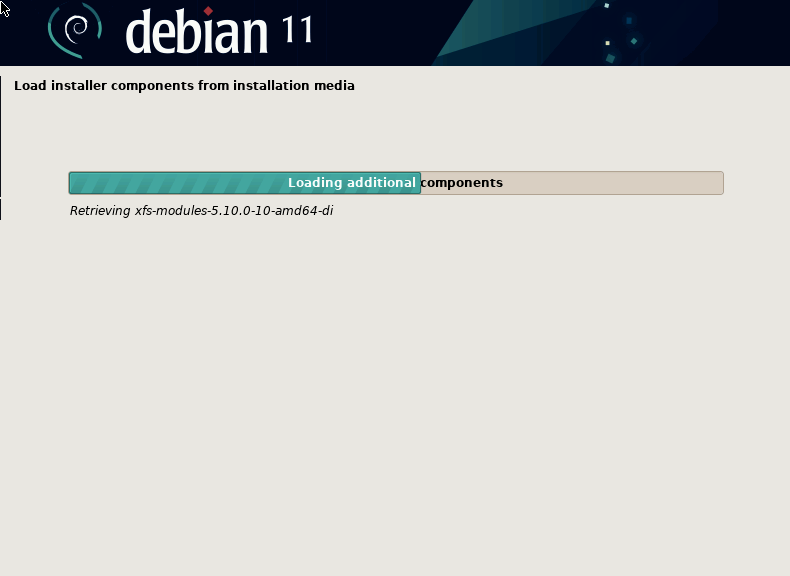
You will see the installer start loading components; wait for a few seconds or minutes for this process to end.
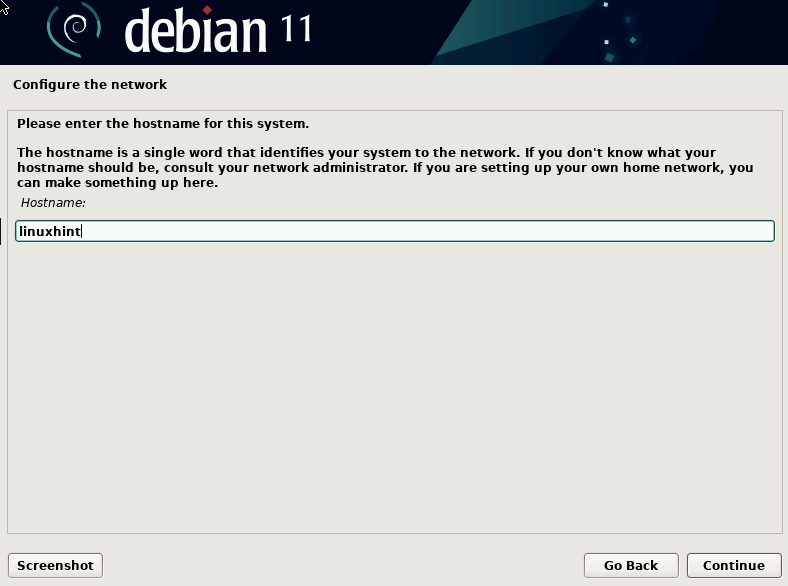
You will be asked to define a hostname for your Linux machine. If you are a Windows user, you can think about the hostname as the Computer name. This field is arbitrary; the hostname is your computer ID within a network. After typing the hostname, press Continue.
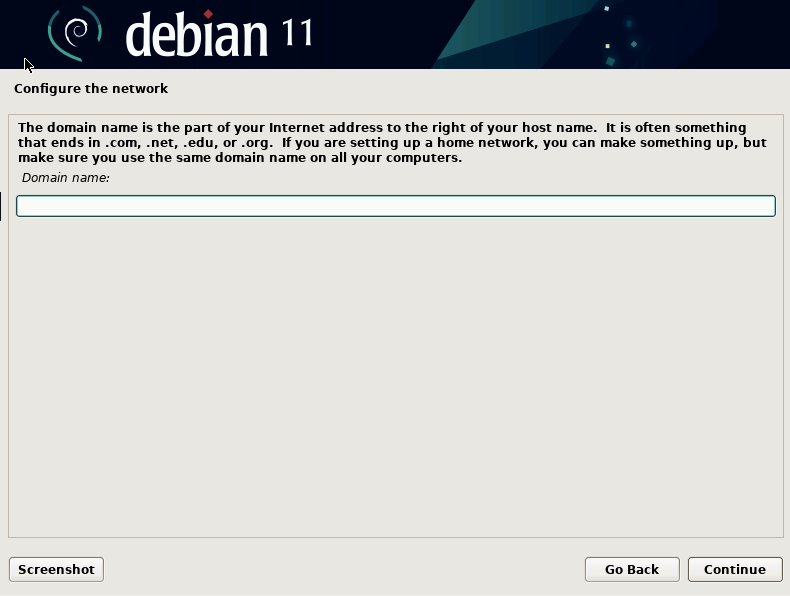
The next steps will ask you for a domain name, another arbitrary field that must be shared with other computers within your network. This is not mandatory. You can leave it empty, and press Continue.
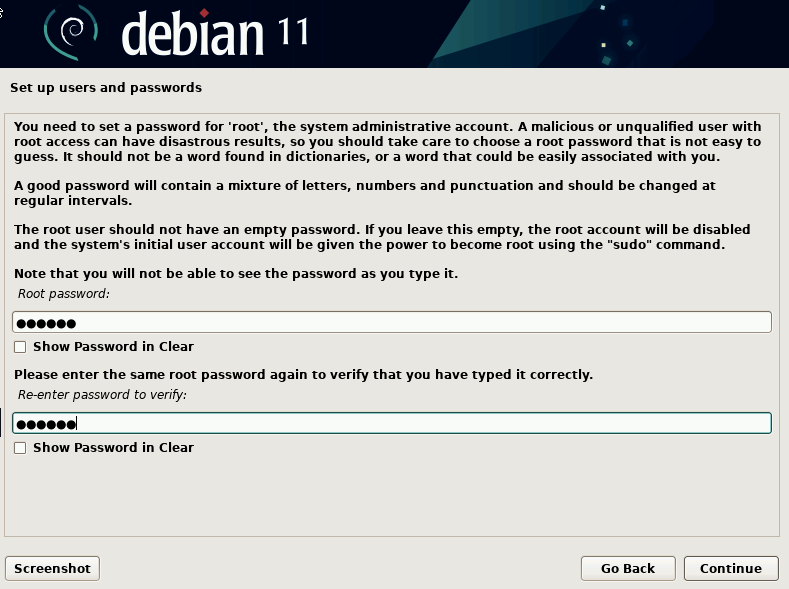
Now you will be required to define a password for the user root. If you are a Windows user, you can consider the root user as the Administrator user. You must remember this password.
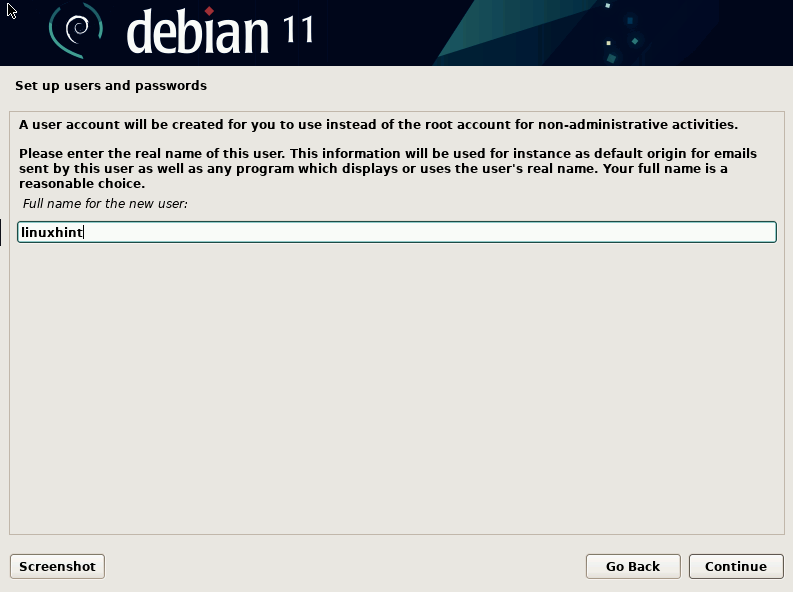
In the two steps below, you will be required to add a non-privileged user (A user without administrator permissions). But in this step, you are required to type the user’s real name (Or how you want him to be named). This is not the username!
After typing it, press Continue.
You will be required to add a non-privileged user (A user without administrator permissions). This is the name you want your user to be named. Another arbitrary field. After typing it press the Continue button.

Define a password for the non-privileged user you created in the previous step and press Continue.

Select your location for your system clock to work properly, and press Continue.

This tutorial assumes you are new to Linux. Therefore, in the following step, we will select the recommended option for new users: “Guided – use the largest continuous free space“. If you are an experienced Linux user, you can manually partition your disk.
After selecting your desired option, press Continue.

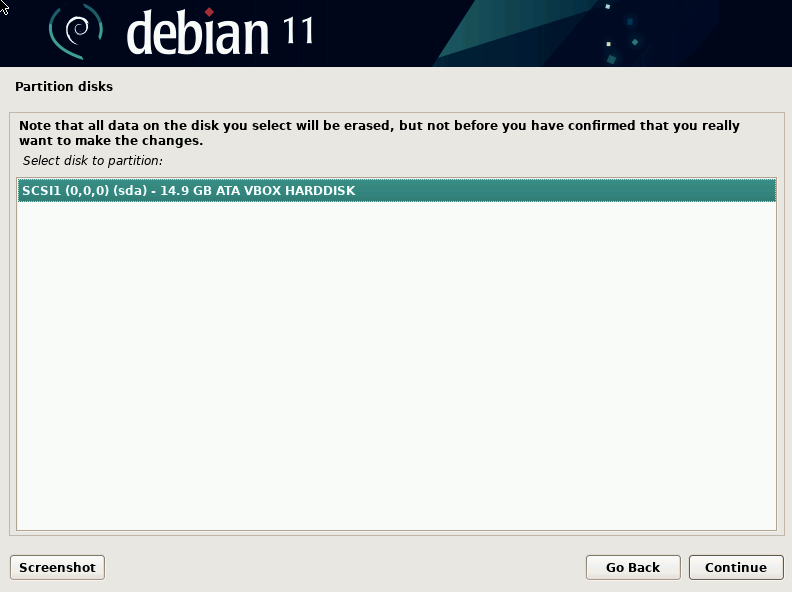
At this step, you need to select the hard drive where you want to install Linux, then press Continue.
In the following step, we will also choose the option “All files in one partition (recommended for new users)”. If you are an experienced Linux user, feel free to choose another option.
Select your preference and press Continue to go ahead.

You need to select the free space you previously created in Windows, as instructed in the first section of this tutorial.
Pay special attention NO TO SELECT NTFS PARTITIONS! Only select the FREE SPACE option and press Continue.

This tutorial assumes you are new to Linux; therefore, select the “Automatically partition the free space” and press Continue.

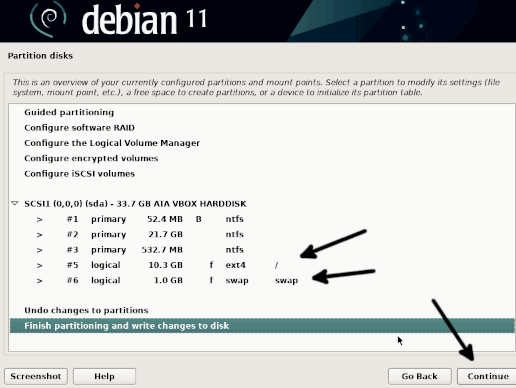
You will see two new partitions identified as “/” and as “swap” on the next screen. The partition identified with a slash will contain all your system files, while the swap partition is the virtual memory partition.
Select the “Finish partitioning and write changes to disk” option and press Continue.
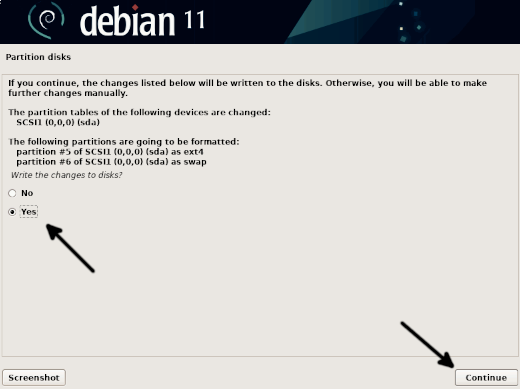
Confirm the operation by ticking the “Yes” option and press Continue.
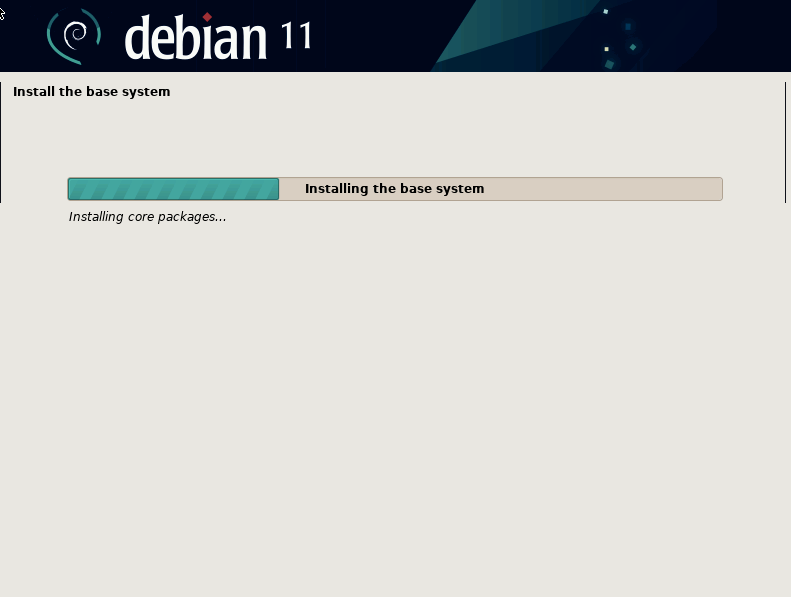
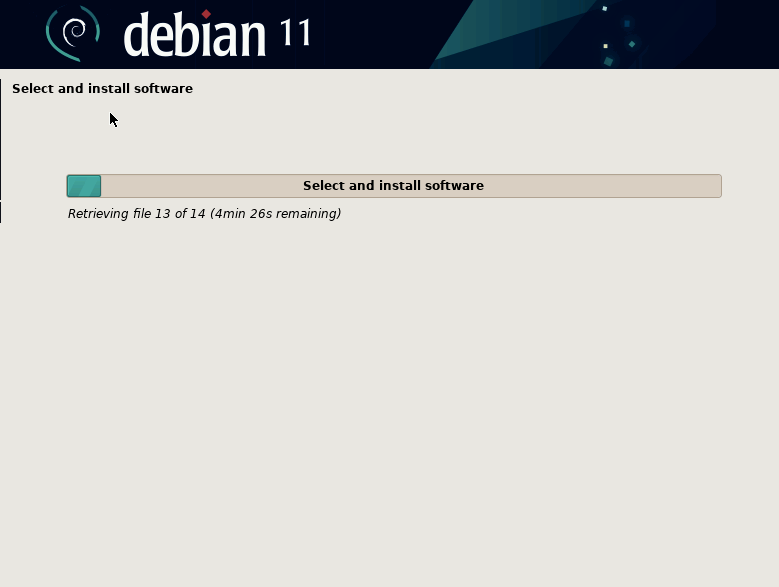
The installer will write changes to your disk and start installing the system base files. This process may last a few minutes.
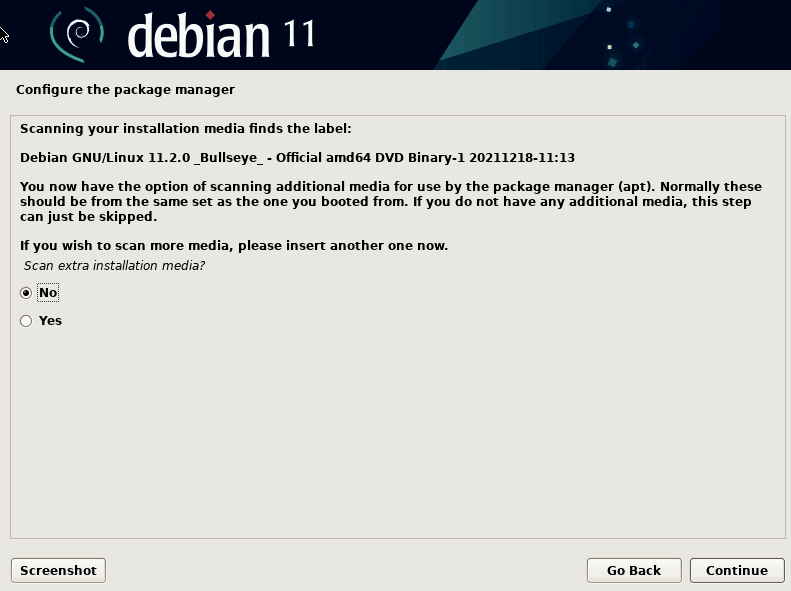
During the packages installation process, you will be asked if you want to add another installation media. Normally “No” is the correct answer. Select “No”, and press Continue.
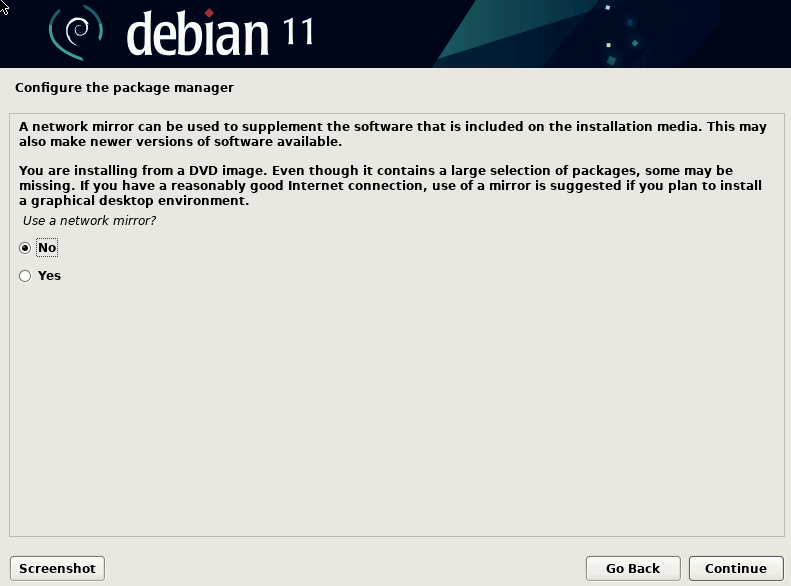
In the next step, you will be asked if you want to download up to date packages from a mirro instead of installing them from your CD/DVD/USB. I recommend you not to do it because upgrading your system packages once the system is installed is a simple task you can execute with just a command (sudo apt upgrade). If you want to install up to date packages from the installation, select the affirmative option and select a mirror.
For this tutorial, I select “No”, choose your option, and press Continue.
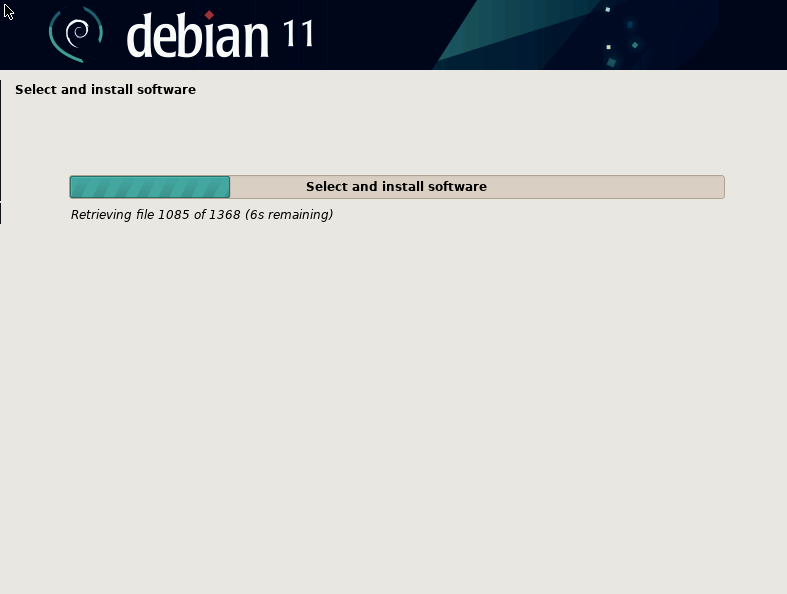
As you can see, package installation will keep running. Wait until you are required to select the packages you want to install manually.
While installing system base files, you will be asked if you want to share information with the Debian developers community.
Choose the option you want, and press Continue.

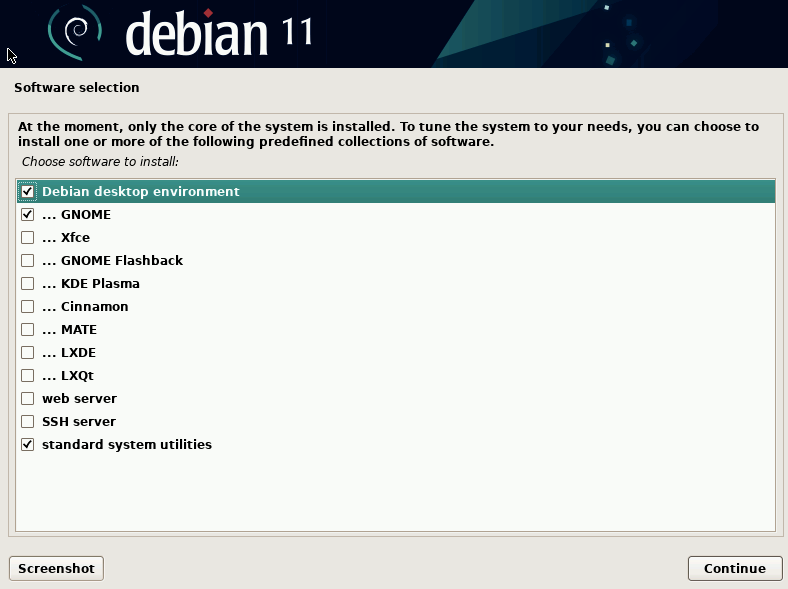
Now you can select additional packages manually. If you don’t know what additional packages to install, don’t worry. Just press Continue; you will always be able to add these packages by executing a simple command.
The installation process will continue. Keep waiting until it ends.
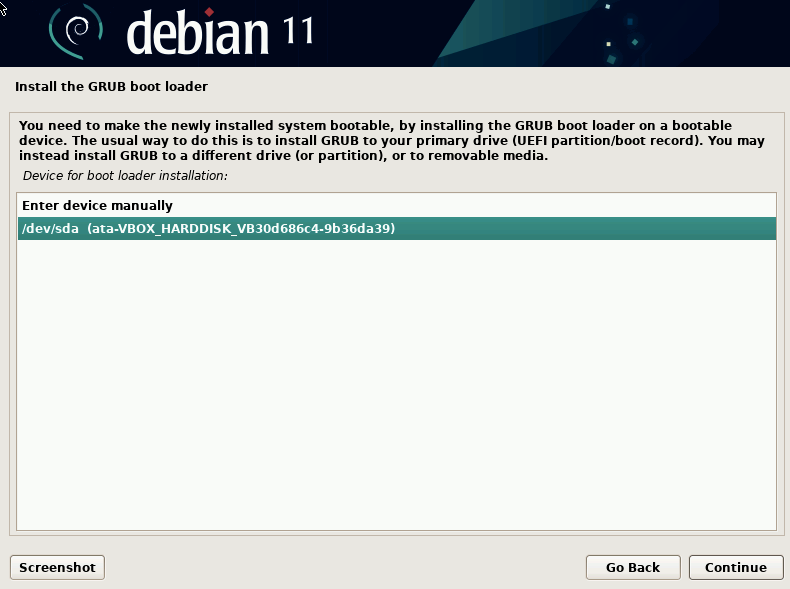
After installing packages, you will be asked if you want to install the GRUB bootloader. This step is very important because GRUB makes the dual boot possible.
Tick the “Yes” option and press Continue.

You will be required to select the disk where you want to install GRUB; it is recommended to install it on the same disk you are installing Linux. Select the disk and press Continue.
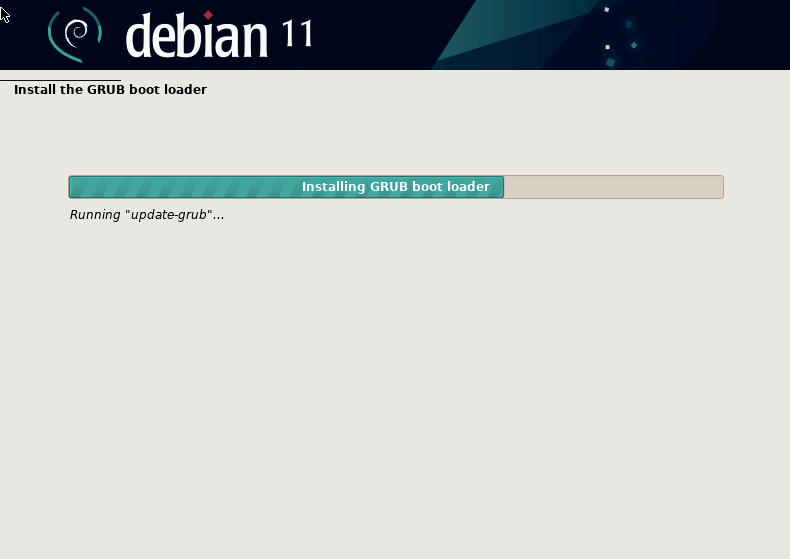
GRUB will start being installed; it may last from a few seconds to a few minutes; just wait for it to end the process.
And the installation process ended. Press the Continue button to boot GRUB, where you can select to start Windows or Linux.
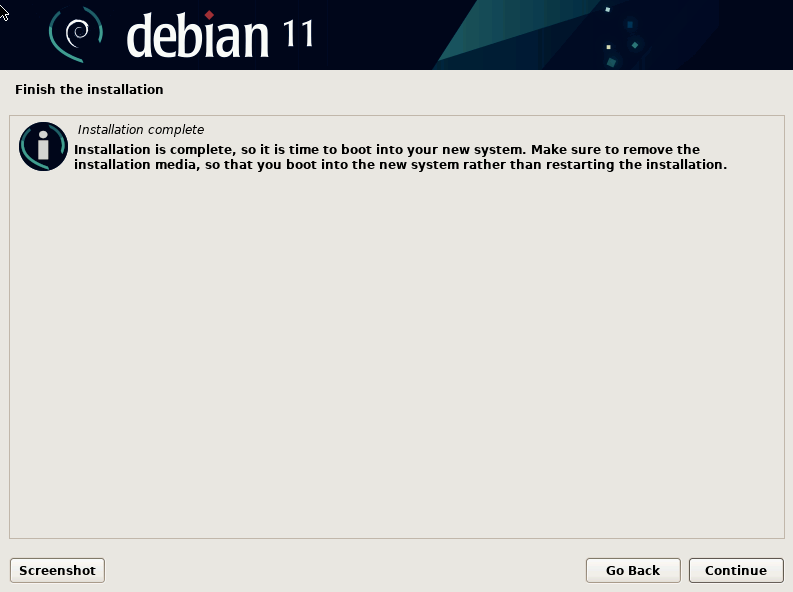
As you can see, when booting the system now, you can choose between both operating systems.
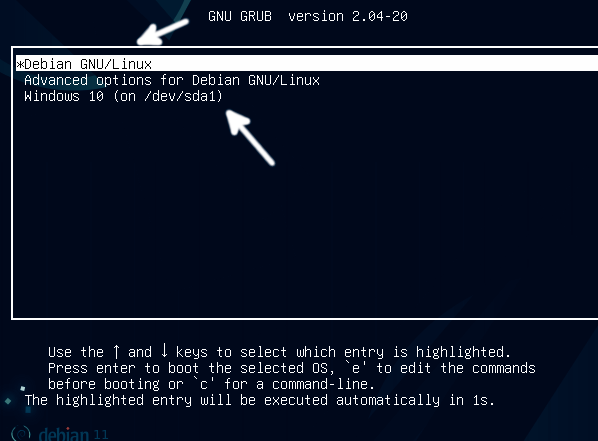
That’s all; now you have both systems installed.
Conclusion:
As you can see, installing Debian Linux and Windows with the dual boot is a long but easy process. Any user can achieve it by following the instructions explained above. Keeping both systems is a good option for users who want both a professional operating system (Linux) and a second system for gaming (Windows). It is also a great opportunity for Windows users to learn Linux without leaving Windows if they feel comfortable with it. I’m sure after trying both systems; the user will choose Linux, which is open source, free, stable and safe.
Thank you for reading this tutorial explaining how to install Debian and Windows with dual boot.
About the author
David Adams
David Adams is a System Admin and writer that is focused on open source technologies, security software, and computer systems.