- Quick Guide: Installing Ubuntu from a USB memory stick
- This guide will assume that you are running Windows
- What do I need to get started?
- Get a copy of the Ubuntu installer
- Put the installer on a memory stick
- Start the Ubuntu installer
- Install Ubuntu
- What next?
- What if things go wrong?
- I can’t boot from USB even though I have USB Disk (or similar) as the first option in my boot list
- Is it safer to resize my partition in Windows?
- References and further help
- Пошаговое руководство по установке Линукс с флешки
- Установка Линукс с флешки
- Шаг 1: Загрузка дистрибутива
- Шаг 2: Создание загрузочной флешки
- Шаг 3: Настройка BIOS
- Шаг 4: Подготовка к установке
- Шаг 5: Распределение места на диске
- Шаг 6: Завершение установки
Quick Guide: Installing Ubuntu from a USB memory stick
This guide will help you install Ubuntu on your computer by using a USB memory stick. USB memory sticks are sometimes known as flash drives, memory pens or USB Mass Storage devices.
Installing from a memory stick is useful if you have a computer without a CD drive (such as a netbook), or prefer the convenience of a memory stick. Alternative methods are available.
It should take around 30 minutes to complete this process, plus the time it takes to download the 700MB installer file. Downloading from a torrent is by far the fastest way of getting it.
This guide will assume that you are running Windows
This guide will assume that you are running Windows. More comprehensive documentation which covers other operating systems is available at Installation/FromUSBStick.
What do I need to get started?
- A memory stick with a capacity of at least 2GB. It will be formatted (erased) during this process, so copy any files that you want to keep to another location. They will all be permanently deleted from the memory stick.
- A computer that can boot (start-up) from a USB memory stick. Many older computers can’t boot from USB – check the boot options in your BIOS (see Start the Ubuntu installer) to see if yours can.
- A computer with
- at least 384MB of system memory (RAM) for Lubuntu Alternate 32-bit. Other flavours of Ubuntu need at least 1 GB RAM, standard Ubuntu and Kubuntu need 2 GB RAM to work well.
- 6GB of available hard disk space and
- a 700MHz or faster x86 processor for Lubuntu. Other flavours of Ubuntu need a more powerful processor, at least a Pentium 4 or similar processor (made around 2004 or later). Most Intel and AMD processors are x86 processors. 32-bit and 64-bit processors are supported.
Get a copy of the Ubuntu installer
- Go to www.ubuntu.com/getubuntu/download.
- The version 16.04.1 LTS of standard Ubuntu or one of the community flavours (Kubuntu, Lubuntu . Xubuntu) is a good choice.
- Choose your country (or one nearby) from the Download location drop-down list.
- Click Begin download to download the .iso image file needed to install Ubuntu. This will be about 700MB in size.
You can choose other options, like a 64-bit CD image or a BitTorrent download, by clicking Alternative download options.
Put the installer on a memory stick
- Extract the iso file
- Plug-in your USB memory stick.
- Go to https://rufus.akeo.ie/ and download the Rufus USB installer. Put it on your Desktop or somewhere convenient.
- See the detailed instructions at the Rufus website or at https://www.ubuntu.com/download/desktop/create-a-usb-stick-on-windows
Start the Ubuntu installer
To start your computer from a memory stick, you might need to change the order of boot devices:
- Plug-in the memory stick and restart your computer.
- BIOS mode: You should see a purple Ubuntu boot screen with white icons at the bottom (Figure 1).
- UEFI mode: You should see a black screen with a GNU GRUB menu.
- If your computer boots back into Windows, it is not yet set-up to boot from USB, so continue following these steps. Otherwise your computer has successfully booted from the memory stick. Skip to the Install Ubuntu section.
- If your computer boots back into Windows, restart the computer again. As soon as the first text appears on the screen, press the button to enter your BIOS/system setup. There should be a message telling you how to do this. You normally need to press one of the following keys: F1, F2, Del, Esc, F10, F11, or F12.
- A BIOS screen should appear. Find the option to change the Boot Order and change the first item in the boot order list to be USB Disk, or similar.
- The USB Disk option may have a different name on your computer, for example: Removable Drive; USB-HDD; USB Mass Storage; or USB.
- If there is no option to boot from USB Disk, your computer may not be able to boot from USB. See the http://www.pendrivelinux.com/testing-your-system-for-usb-boot-compatibility/ for a tool to test if your computer can boot from USB.
- After you have changed the boot order, save your changes and restart the computer. It should now start from the memory stick.
Install Ubuntu
- In BIOS mode: Wait a few seconds and Ubuntu will start loading. Otherwise, you can press a key and a boot menu with more options will appear.
- Press the F5 key to access universal access options like the screen reader and magnifier.
- After a few second or a minute or two (depending on your hardware), an Install window will appear. Select your language from the list to the left of the screen and select
- Try Ubuntu or
- Install Ubuntu
- If you want to keep Windows installed and choose whether to start Windows or Ubuntu each time you start the computer, choose Install Ubuntu alongside Windows. This is called a dual-boot setup. Use the slider in the next window to choose how to share disk space between Windows and Ubuntu (Ubuntu should have at least 8 GB of space. It works better with 16 GB or more, which should be possible in a not too old computer).
- If you want to remove Windows and replace it with Ubuntu, choose Erase disk and install Ubuntu. All of the files on the disk will be deleted before Ubuntu is put on it, so make sure you have backup copies of anything you wanted to keep.
- For more complicated disk layouts, choose Something Else. You can manually add, modify and delete disk partitions using this option.
What next?
- Click the Applications menu at the top of the screen to start a program.
- Click the Network Manager icon (near to the speaker icon) at the top right of the screen to connect to the Internet.
- Use the System menu to change settings.
- You can find help by clicking System -> Help and Support.
What if things go wrong?
I can’t boot from USB even though I have USB Disk (or similar) as the first option in my boot list
Sometimes the memory stick will not be recognized when you boot. Leave it plugged in for 30 seconds or so, then restart with it left plugged-in. Or, unplug the memory stick, restart the computer and then plug it in as soon as anything appears on the screen (i.e. as early in the boot process as possible).
Also, some BIOS options could interfere with USB booting. Go into the BIOS and try enabling or disabling options like Fast Boot, USB keyboard support and USB 2.0 support. Finally, make sure you haven’t selected a USB-FDD or USB-ZIP boot option. These will not work.
Is it safer to resize my partition in Windows?
Some people experience problems when booting into Windows, after they have resized the Windows partition using the Ubuntu installer. See HowtoResizeWindowsPartitions for a guide on an alternative method of resizing a Windows partition which is less likely to cause problems.
References and further help
Installation/FromUSBStickQuick (последним исправлял пользователь h196n2 2017-02-04 14:16:21)
The material on this wiki is available under a free license, see Copyright / License for details
You can contribute to this wiki, see Wiki Guide for detailsПошаговое руководство по установке Линукс с флешки

Диски для установки Линукса на ПК или ноутбук уже практически никто не использует. Гораздо проще записать образ на флешку и быстро установить новую ОС. При этом не нужно возиться с дисководом, которого вообще может не быть, и насчет поцарапанного диска тоже беспокоиться не придется. Следуя простой инструкции, Вы без проблем установите Линукс со съемного накопителя.
Установка Линукс с флешки
Прежде всего, понадобится накопитель, отформатированный в FAT32. Его объем должен быть не менее 4 Гб. Также, если у вас еще нет образа Линукс, то будет кстати интернет с хорошей скоростью.
Отформатировать носитель в FAT32 Вам поможет наша инструкция. В ней речь идет о форматировании в NTFS, но процедуры будут те же самые, только везде нужно выбирать вариант «FAT32»
Обратите внимание, что при установке Линукс на ноутбук или планшет, это устройство должно быть подключено к питанию (в розетку).
Шаг 1: Загрузка дистрибутива
Скачивать образ с Ubuntu лучше с официального сайта. Там всегда можно найти актуальную версию ОС, не беспокоясь насчет вирусов. ISO-файл весит около 1,5 Гб.
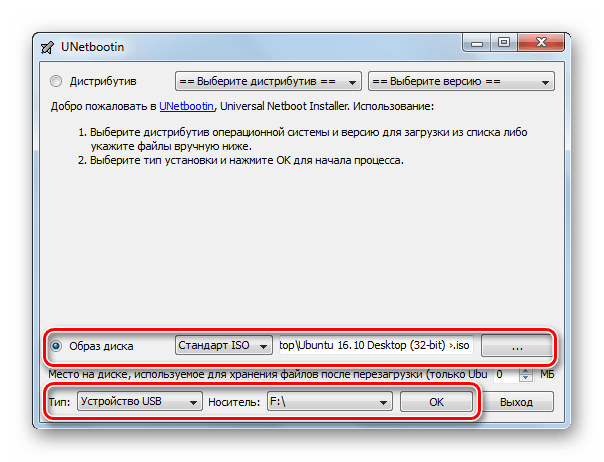
Шаг 2: Создание загрузочной флешки
Недостаточно просто скинуть скачанный образ на флешку, его нужно правильно записать. Для этих целей можно использовать одну из специальных утилит. В качестве примера возьмем программу Unetbootin. Чтобы выполнить поставленную задачу, сделайте вот что:
- Вставьте флешку и запустите программу. Отметьте «Образ диска», выберите «Стандарт ISO» и найдите образ на компьютере. После этого укажите флешку и нажмите «Ок».

- Появится окно со статусом записи. По окончанию нажмите «Выход». Теперь на флешке появятся файлы дистрибутива.
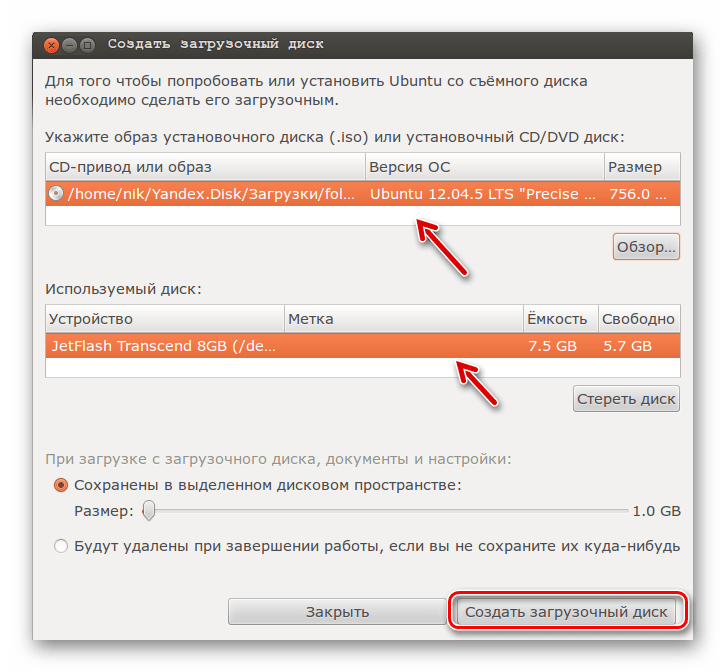
- Если загрузочная флешка создается на Линуксе, то можно воспользоваться встроенной утилитой. Для этого вбейте в поиск приложений запрос «Создание загрузочного диска» – в результатах будет нужная утилита.
- В ней нужно указать образ, используемую флешку и нажать кнопку «Создать загрузочный диск».

Более подробно о создании загрузочного носителя с Ubuntu читайте в нашей инструкции.
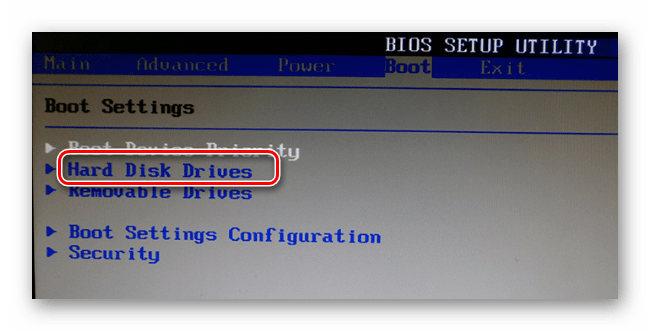
Шаг 3: Настройка BIOS
Чтобы компьютер при включении загружал флешку, понадобится кое-что настроить в BIOS. В него можно попасть, нажав «F2», «F10», «Delete» или «Esc». Дальше выполните ряд простых действий:
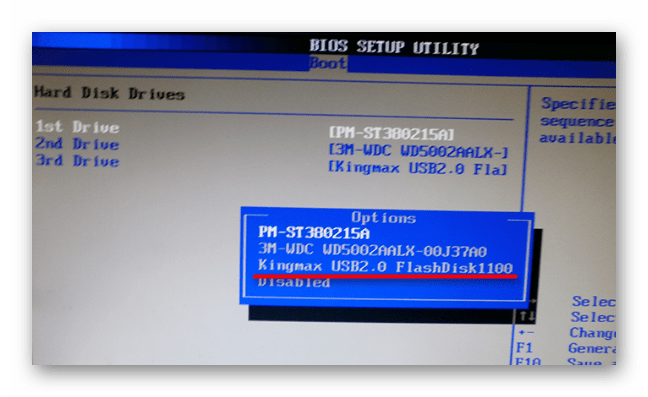
- Откройте вкладку «Boot» и перейдите в «Hard Disk Drives».

- Здесь установите флешку в качестве первого носителя.

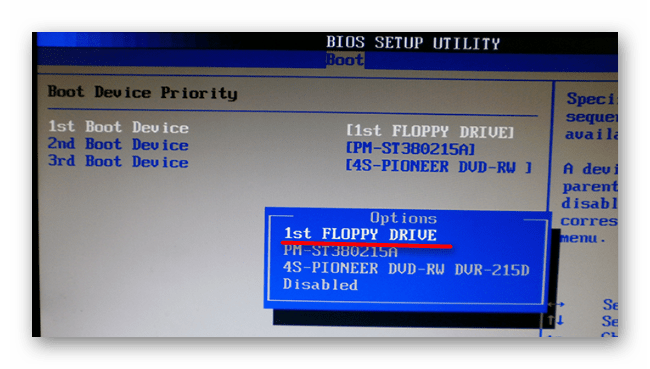
- Теперь перейдите в «Boot device priority» и назначьте приоритет первого носителя.

- Сохраните все изменения.
Этот порядок действий подходит для AMI BIOS, на других версиях он может отличаться, но принцип такой же. Более подробно о данной процедуре читайте в нашей статье по настройке БИОС.
Шаг 4: Подготовка к установке
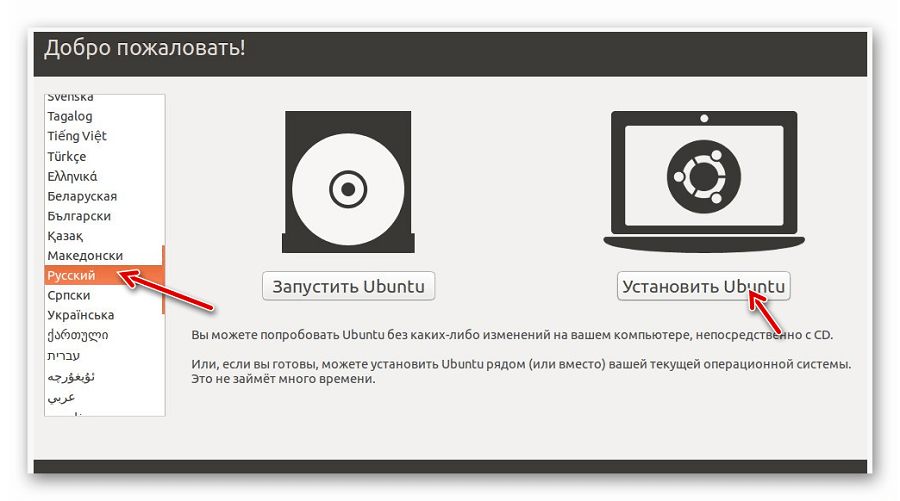
При следующей перезагрузке ПК запустится загрузочная флешка и Вы увидите окно с выбором языка и режима загрузки ОС. Дальше сделайте следующее:
- Выберите «Установка Ubuntu».

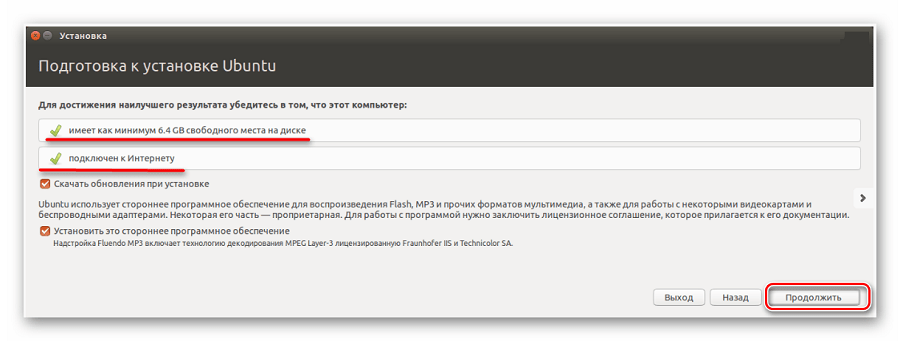
- В следующем окне отобразится оценка свободного места на диске и есть ли подключение к Интернету. Можно также отметить скачивание обновлений и установку программного обеспечения, но это можно сделать и после установки Ubuntu. Нажмите «Продолжить».

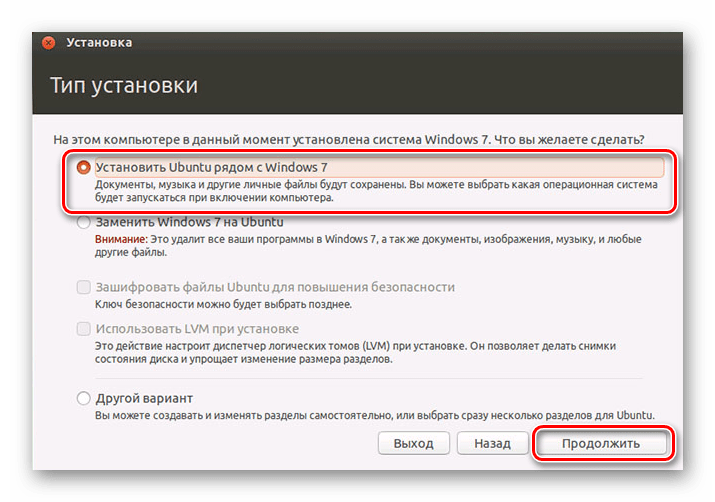
- Далее выбирается тип установки:
- установить новую ОС, оставив старую;
- установить новую ОС, заменив старую;
- произвести разметку жесткого диска вручную (для опытных).

Отметьте приемлемый вариант. Мы же рассмотрим установку Ubuntu без удаления с Windows. Нажмите «Продолжить».
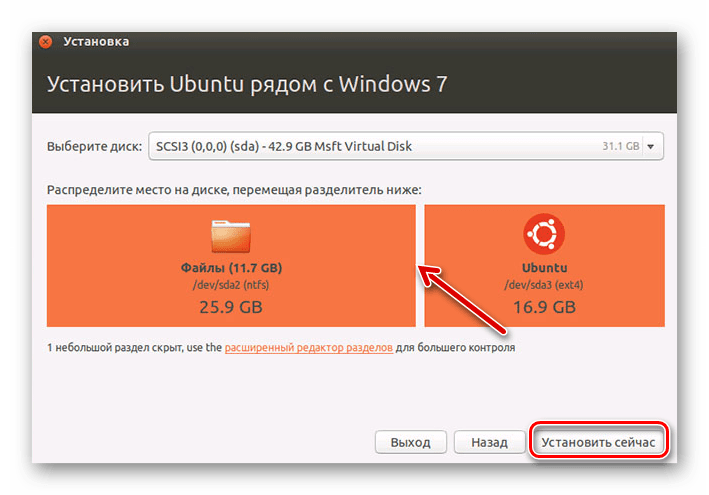
Шаг 5: Распределение места на диске

Появится окно, где необходимо распределить разделы жесткого диска. Делается это посредством передвижения разделителя. Слева находится пространство, отведенное под Windows, справа – Ubuntu. Нажмите «Установить сейчас».
Обратите внимание, для Ubuntu необходимо минимум 10 Гб дискового пространства.Шаг 6: Завершение установки
Вам необходимо будет выбрать часовой пояс, раскладку клавиатуры и создать учетную запись пользователя. Также установщик может предложить импортировать данные учетных записей Windows.
По окончании установки потребуется перезагрузка системы. При этом появится предложение вытащить флешку, чтобы снова не запустилась автозагрузка (при необходимости верните прежние значения в BIOS).
В заключении хочется сказать, что придерживаясь этой инструкции, Вы без проблем запишете и установите Линукс Ubuntu с флешки.