- How to install Linux on an Android device, with Debian Noroot
- Install Linux on Android without root
- Linux on Android advantages
- Linux on Android disadvantages
- Downloading Linux for Android APK
- Downloading & Installation of Debian Linux on Android
- AnLinux: простой способ установить Linux-окружение на Android-телефон без рута
- Что такое AnLinux?
- С чего начать?
- Что же, приступим
- А что с графической оболочкой?
How to install Linux on an Android device, with Debian Noroot
Step by step guide cum tutorial to install Linux on Android with a help of third party app known as Debian Noroot. Now you can experience and enjoy the Debian Linux on your Android smartphone in few minutes.
There is no doubt about the fact, Linux is one of the mightiest operating systems, capable of offering a plethora of functionalities, for a different class of users. If you really want to do something productive with your computer, with some free operating system, Linux is the ultimate destination for you. Even our most loved Android operating system, is also based on the Linux kernel, which means, Linux is capable of powering almost all kinds of devices, may it be a pocket-sized smartphone, a personal computer, a server computer, or even an embedded device. Linux powered Android on our smartphone is capable of doing a number of things, thanks to the 3 GB, 4 GB or more RAM, along with a mighty SoC, which handles everything.
But the biggest hindrance in case of smartphones is the small screen. Due to the small screen, true multitasking with multiple apps is not possible due to system limitations. Even if you connect your Android phone to the TV, or a big screen, with Chromecast or something else, the limitation persists, and true multitasking is not enjoyed in that case, as well. But, you can install Linux on Android without root. Yes, you heard it right. Rooting an Android smartphone not only ends the warranty, but also make the phone vulnerable to a number of exploits, or in the worst case, it can also brick your device. It is easy to install Linux on Android with root, but here, I will show you how to install Linux on Android without root.
Isn’t that cool! But how! Let’s find out.
Install Linux on Android without root
Before proceeding with the steps of installation, there are some facts, which you should know, about the trick, and the limitations of it, as well.
Linux on Android advantages
Let’s first find out the advantages.
- You can get almost a complete experience of using Debian Linux, on your Android.
- You can get almost all the features of Linux on a PC, with it. You can use your mouse, keyboard, and can even minimize, maximize, and resize the windows with it. You can do almost everything as you can do on a Linux PC.
- If you are using Android on a tablet, you can even install Linux on Android tablet, with this tutorial, and the same goes for Linux on Android TV box. It can help you enjoy the features of Linux, on a bigger screen, and thus, you can convert Android TV box to a Linux computer, with this trick.
- Comes with a number of basic pre-installed packages, and you can even install additional packages like LibreOffice, GIMP, and others, which can help you fulfill some basic tasks if you do not have a computer, or it is temporarily unavailable to you. You can install all the necessary applications, directly from the Terminal, just like you can do, in Linux.
- The installation will just require 600 MB, though the size will increase if you start downloading different packages. You don’t even need any expert knowledge to start using it.
- Just like using Linux on the computer, with the help of the Linux APK, you can even change the screen resolution or font size. But that should be done during startup.
Linux on Android disadvantages
That’s cool, but what are the problems, you might face. Let’s find out.
- The Debian Linux is not going to replace Android with Linux, and you might face problems if you are not having sufficient resources to run a virtual operating system on your smartphone.
- It is not going to be a perfect replacement for your existing computer, as your smartphone does not have an efficient SoC like that of your computer.
- I am not sure about the stability of the operating system, and thus, I will not recommend to keep important data within the virtual Linux or encrypt it, as you might lose them if there isn’t any backup.
If you think, this trick is not for you, after seeing the limitations, I am sorry, but I will recommend you to try it at least once.
Now let’s move on to the process of downloading and installation.
Downloading Linux for Android APK
The first task would be to get the Linux for Android APK, and to do that, open Google Play Store, and search for ‘Debian Noroot ’ app, and you should download and install the one, shown in the screenshot below. This app can also be considered to be the complete Linux installer APK. You can even download it here.
I don’t think, I need to elaborate the process of downloading an Android app from the Play Store.

The process of downloading will take some time, due to its size, and once it is done, you will have to open the app, in order to carry on with the other steps.
Downloading & Installation of Debian Linux on Android
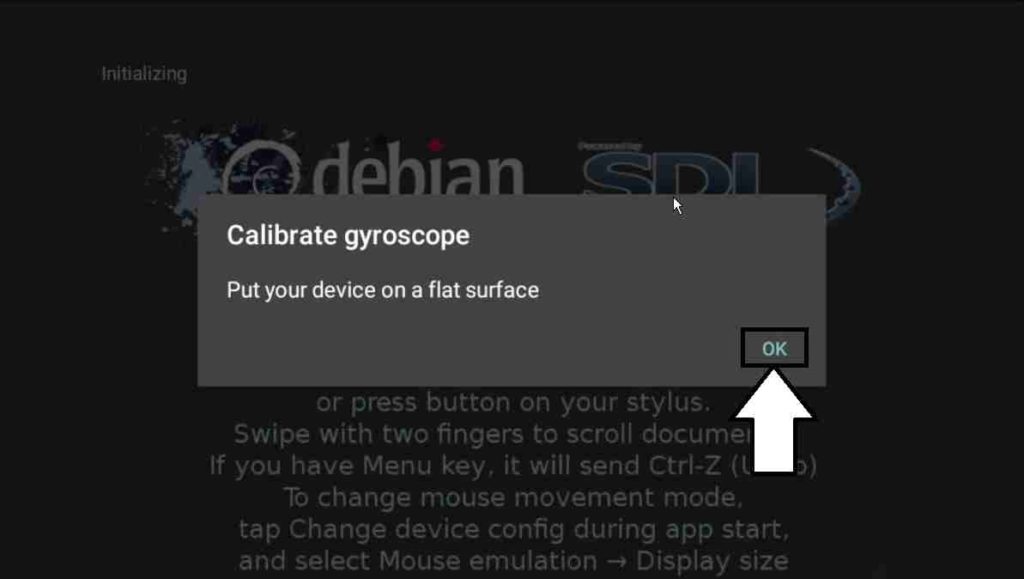
Step 1: Just open the app, and at the beginning, you will be asked to calibrate the gyroscope. Just put your smartphone on a surface, and tap on ‘OK’. It will take some time, and the process of downloading and installation will start.
Step 2: Once that is done, the process of downloading will start. This will take pretty long time, as it will download almost 191 MB, and unpack the installation files, as well, in this step. You will see the following screen, while the process is on. You can get back to your home screen, and do your important tasks, as the downloading and installation will carry on in the background.

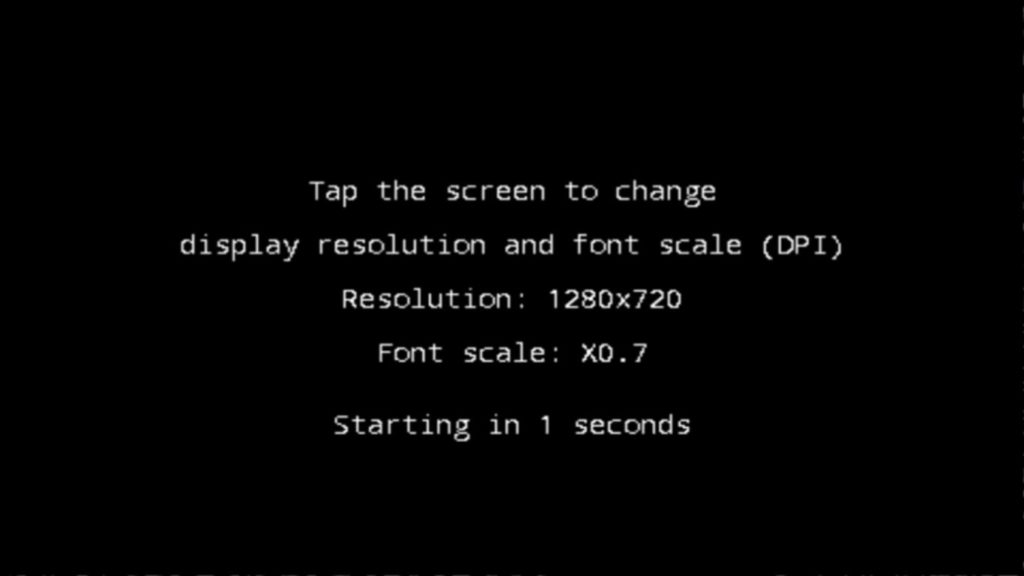
Step 3: Once the installation will be complete, Debian will start on Android, and the default screen resolution will be 1280×720, and the default font size will be X0.7. You can even change the screen resolution, be depending upon the screen resolution of your smartphone, and the font size, by tapping on the following screen.
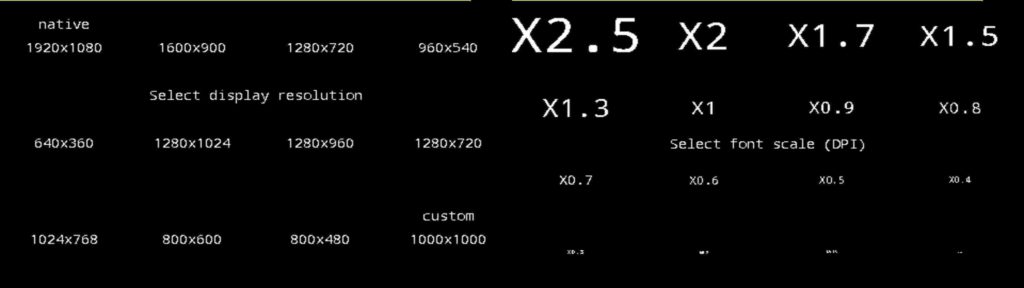
Step 4: You can select your desired screen resolution, by tapping on the resolution, which you want, and the same is applicable for changing the font size.
Step 5: Once that is done, you will get the following screen, which shows, you will have to wait for some time. I will recommend you not to get out of it, or go back the home screen, as it might make the app stop responding. This will hardly take 3 or 4 minutes, though it is dependent on the device, which you are having.

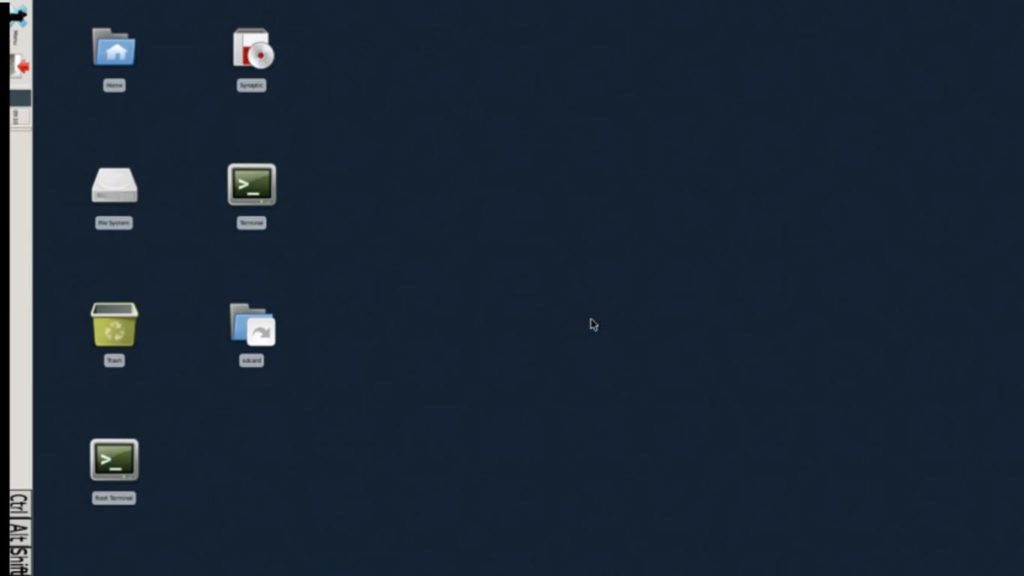
Step 6: Once everything is fine, you can get the Debian no root desktop on Android smartphone, which is just like running Linux on the computer.
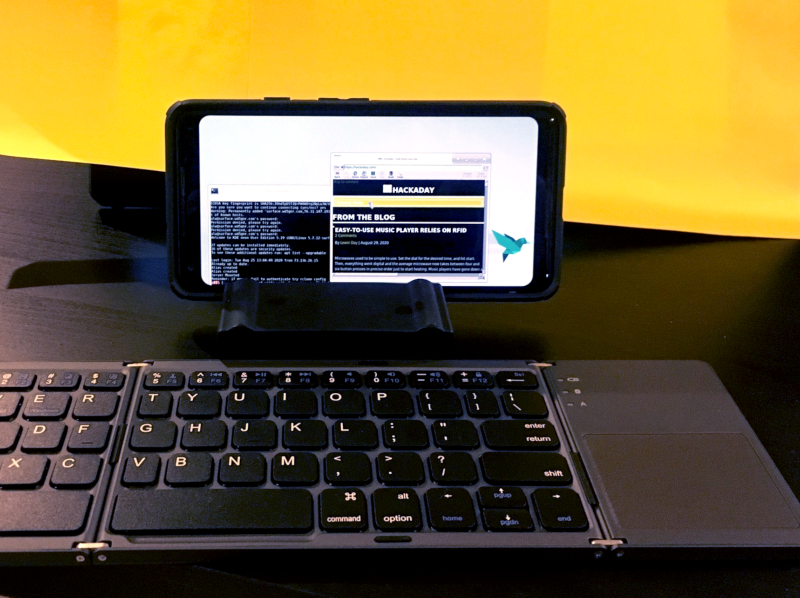
If you want to get the best experience of using it, I will recommend you to connect a keyboard and mouse, as input devices. Mirroring the small screen of your smartphone, to a big screen will also improve your experience of using this trick. You can always change a number of settings, by going to the settings page within the Debian no root Linux. I am not explaining them, as the complete app is GUI based, and you will not face any kinds of problems, changing the settings, and playing around with the app. You can use the Ubuntu commands on it also becuase the Ubuntu is based on Debian.
Hope the small tutorial on how to install Linux on Android, was helpful to you! Have suggestions or queries! Feel free to comment it down below.
AnLinux: простой способ установить Linux-окружение на Android-телефон без рута
Любой телефон или планшет, работающий на Android, — это устройство, которое управляется ОС Linux. Да, очень модифицированной ОС, но все же основа Android — ядро Linux. Но, к сожалению, для большинства телефонов опция «снести Android и поставить дистрибутив по своему вкусу» недоступна.
Поэтому, если хочется Linux на телефоне, приходится покупать специализированные гаджеты вроде PinePhone, о котором мы уже писали в одной из статей. Но есть еще один способ получить Linux-окружение практически на любом смартфоне, причем без root-доступа. Поможет в этом инсталлятор, который называется AnLinux.
Что такое AnLinux?
Это специализированное ПО, которое дает возможность использовать Linux на телефоне при помощи монтирования образа, содержащего root-файловую систему любого из дистрибутивов, включая Ubuntu, Kali, Fedora, CentOS, OpenSuse, Arch, Alpine и многих других. Инсталлятор использует PRoot для эмуляции root-доступа.
PRoot перехватывает все выполняемые пользователем вызовы, которые требуют в обычной ситуации root-доступа, и обеспечивает их работоспособность в обычных условиях. В PRoot используется системный вызов ptrace для отладки ПО, который помогает достичь цели. С PRoot все это можно сделать как с chroot, но без root-прав. Кроме того, PRoot предоставляет фейковый доступ пользователю для пседвофайловой системы.
AnLinux — небольшая программа. Но этого достаточно, ведь единственное ее предназначение — установка образов систем и запуск скриптов, поднимающих пользовательское окружение. Когда все сделано, пользователь получает вместо смартфона Linux-ПК, причем Android продолжает работать на фоне. Подключаемся к устройству при помощи VNC-вьювера или терминала, и можно работать.
Конечно, это не идеальный вариант «завести» Linux на смартфоне, но он вполне рабочий.
С чего начать?
Основное — Android-смартфон с версией ОС не ниже Lollipop. Кроме того, пойдет и 32-битное или 64-битное ARM или x86-устройство. Кроме того, потребуется солидный объем свободного файлового пространства. Для этого можно использовать карту памяти или просто устройство с большим объемом внутренней памяти.
- AnLinux (вот ссылка на Google Play).
- Termux (снова понадобится Google Play).
- VNC Client (VNC Viewer — хороший вариант).
- Bluetooth-клавиатура (опционально).
- Bluetooth-мышь (опционально).
- HDMI кабель для мобильного телефона (опционально).
Что же, приступим

Как только установлен Termux, получаем полноценную консоль. Да, рута нет (если телефон не рутован), но ничего страшного. Следующий шаг — установка образа для дистрибутива Linux.
Теперь нужно открыть AnLinux и затем — выбрать Dashboard из меню. Всего есть три кнопки, но выбрать можно лишь одну, первую. После этого появляется меню выбора дистрибутива. Можно выбрать даже не один, а несколько, но в этом случае понадобится большой объем свободного файлового пространства.
После выбора дистрибутива активируются две другие кнопки. Вторая позволяет загрузить в буфер обмена команды, необходимые для загрузки и установки Linux. Обычно это pkg, wget команды и скрипт для их выполнения.
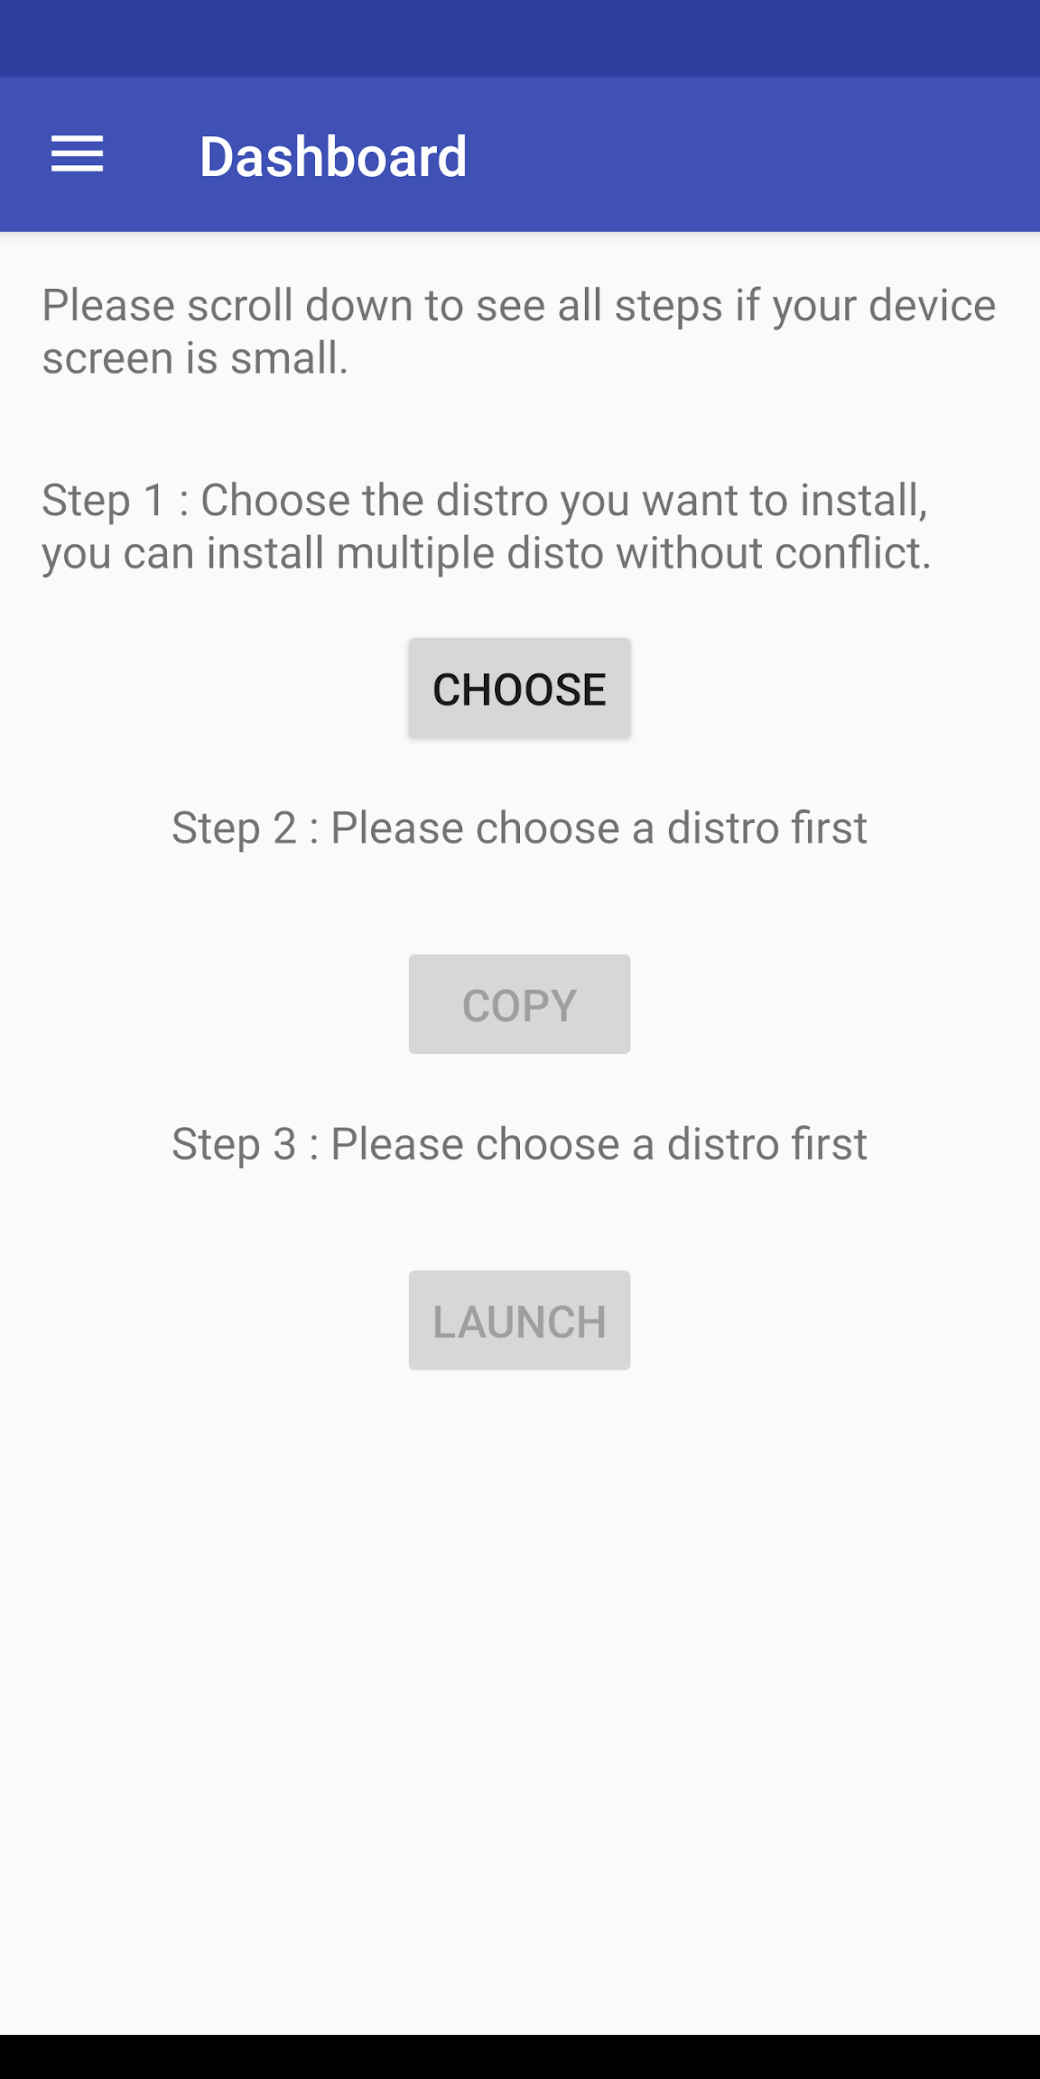
Третья кнопка запускает Termux, так что команды можно вставлять в консоль. Как только все сделано, запускается скрипт, позволяющий загрузить окружение дистрибутива. Для вызова дистрибутива нужно каждый раз запускать скрипт, но установку проводим только один раз.
А что с графической оболочкой?
Если она нужна, то следует лишь выбрать меню для десктопного окружения и использовать больше кнопок — появится не три, а больше. Кроме самого дистрибутива, нужно выбрать еще и оболочку, например, Xfce4, Mate, LXQt или LXDE. В целом, ничего сложного.
Потом кроме скрипта, который запускает дистрибутив, потребуется еще один — он активирует сервер VNC. В целом, весь процесс простой и понятный, он вряд ли способен вызвать затруднения.
После запуска сервера VNC подключаемся со стороны клиента, воспользовавшись вьювером. Требуется знать порт и localhost. Все это сообщает скрипт. Если все сделано правильно, то пользователь получает доступ к своей виртуальной Linux-системе. Производительность современных телефонов на высоте, так что особых проблем не будет. Конечно, вряд ли смартфон сможет полностью заменить десктоп, но, в целом, все это работает.
Этот способ может пригодиться, если вдруг нужно срочно подключиться к серверу, а вы в машине, без ноутбука (конечно, в этом случае все описанные выше операции с AnLinux уже должны быть выполнены). Виртуальная Linux-машина позволяет подключиться к рабочему или домашнему серверу. А если в автомобиле по какой-то причине оказался дисплей и беспроводная клавиатура, то за считанные секунды в салоне можно организовать рабочий кабинет.