- How to install Ubuntu on ASUS Vivobook from USB
- About Ubuntu
- Advantages of installing Ubuntu
- instructions to install Ubuntu on ASUS Vivobook
- 1. Create a Bootable Disk
- Tips to Boot a USB Device
- 2. Change boot-order to boot from USB in ASUS Vivobook
- 3. Boot from the Drive USB/DVD
- 4. Installing Ubuntu 18.04
- 1. Choosing Keyboard
- 2. Selecting the installation type
- 3. Creating Partitions for Something Else Option
- 5. Selecting Time Zone
- 6. Providing user credentials
- 7. Start installation
- 8. Restart and Login
- Welcome to ASUS Vivobook Ubuntu
- [Chromebook] Как установить Linux на Chromebook
- [Chromebook] How to set up Linux on your Chromebook
How to install Ubuntu on ASUS Vivobook from USB
Here is How to install Ubuntu 18.04 on ASUS Vivobook by just following a few steps you can try or install this operating system. So without wasting time lets discuss the whole procedure to install this OS on your ASUS Vivobook.
About Ubuntu
- Ubuntu is a free and open-source Linux Debian operating system.
- Also, Ubuntu offers three editions Desktop, server, cloud, and Ubuntu core.
- It provides new releases every 6 months while LTS occurs every 2 years.
- Ubuntu is developed by Canonical which provides free security updates and support to its users.
- Furthermore, for installing Ubuntu 18.04 LTS on your ASUS Vivobook you meet minimum requirements such as 2GB RAM, Dual Core Processor (2 GH) and 25 GB free space.
Advantages of installing Ubuntu
- It is free of cost while the official Windows operating system is chargeable.
- Ubuntu is customizable while on Windows you can only customize some components.
- It is more secure.
- Runs without installing.
- Ubuntu is good for developers.
- It can be updated without restarting.
- Lastly, Ubuntu provides more resources.
instructions to install Ubuntu on ASUS Vivobook
Make sure you have the latest Ubuntu Operating system Downloaded from the official Site, if not then download it from the official website.
1. Create a Bootable Disk
The downloaded ISO file is to be burned into a USB/DVD or flash drive which will be used to boot the computer.
Tips to Boot a USB Device

- After installing Rufus simply select the ISO file from the file manager and accept all settings when the popup window appears.
- Select MBR partition scheme for BIOS or UEFI and If your laptop has UEFI bios then select the other two options.
- For the Filesystem select NTFS option and select if your PC has UEFI bios then select FAT32.
- The default Cluster size option should be selected.
- Make sure all three options including Quick Format, Create a Bootable disk using and Create extended labels and icon files are selected.
- Finally, start the process and this software will automatically format and create bootable USB flash drive.
2. Change boot-order to boot from USB in ASUS Vivobook
- Power on your Laptop
- Now Press F2 repeatedly as soon as ASUS logo appears to enter into BIOS
- Now press Tab to boot
- Make sure Secure Boot is turned off
- Under Boot tab, enable ‘Launch CSM‘ (Compatibility Support Module) and disable ‘Fast Boot’ option.
- Finally, Press F10 to save the configuration.
- To boot from USB Enter BIOS > Go to Save & Exit Tab> Select USB drive/CD-ROM from Boot Override.
3. Boot from the Drive USB/DVD
- After successfully booting your USB stick you need to turn off your ASUS Vivobook to install Ubuntu on it.
- Insert the USB in port and once you will restart your laptop the screen presenting “Try Ubuntu” and “Install Ubuntu” will be shown to you.
- You can either try ubuntu or install Ubuntu, Although Try option is for testing the operating system this process will also take some time.
- So if you are continuing with install Ubuntu then read the further guide.
4. Installing Ubuntu 18.04
There are many steps in the process of installing Ubuntu on your ASUS Vivobook which will be provided step-by-step below,
1. Choosing Keyboard
- Choose a keyboard layout and click Continue and by default English option is selected.
- Now you have to choose a type of installation as there are two types – Normal and Minimal installation. In our case, we have preferred the normal installation.
- Downloading updates while installing must be turned off for a faster installation.
- install third-party software for graphics and Wi-Fi hardware, MP3 and additional media formats should be selected only is internet connection is available while installation.
- Finally, click continue to proceed.
2. Selecting the installation type
- Erase the whole disk and install the Ubuntu: It is the easiest way to install Ubuntu on your ASUS Vivobook. A fresh copy will be installed on your Laptop by erasing all the stored data on your PC.
- For security Encrypting new Ubuntu installation for security: Not to worry about this option as this option will ensure the security of your drives.
- Using LVM: LVM or Logical Volume Management
- Something Else: Use this option if you want to install Ubuntu along with existing Operating system such as Windows 10. In addition, only select this option if you are familiar with such technical task.
3. Creating Partitions for Something Else Option
- To create the partition on your own you can click “New Partition Table”
- Click on Continue and create a /boot partition of size 1.5GB. Select free space and click on the “+” symbol for creating a new partition.
- Now click on OK
- Let’s create the /home partition of size more than 18GB.
- Next, create partitions / of 6GB and /var of 4GB by using the process we have discussed with you.
- Lastly, Create the swap area partition of 2GB.
- Check that all the partitions are made correctly or not. Once you have created the partitions successfully you can proceed to the further steps by clicking Install Now.
5. Selecting Time Zone
Choose the desired time zone and click on continue
6. Providing user credentials
Give your information to the page prompted to you. The page will ask your name, computers name, username, and the password. Finally, click on continue to begin the process of installing Ubuntu 18.04 LTS on your ASUS Vivobook.
7. Start installation
Installation may take around 5 to 10 minutes on your Microsoft Laptop which may depend on the speed of Laptop.
8. Restart and Login
Restart your computer and enter the login details you have provided previously in User credentials.
Welcome to ASUS Vivobook Ubuntu
[Chromebook] Как установить Linux на Chromebook
[Chromebook] Как установить Linux на Chromebook Переключитесь на Linux По умолчанию Linux выключен. Вы можете переключиться на эту систему через Настройки.
- Нажмите на [Строка состояния] ① в правом нижнем углу экрана, а затем нажмите [Настройки]
 ② .
② . - После открытия настроек выберите [Дополнительно] ③ .
- Выберите [для Разработчиков] ④ , и нажмите [Включить] ⑤ рядом с элементом среды разработки Linux.
- Следуйте инструкциям на экране. Настройка может занять 10 минут и более.
- Откроется окно терминала. У вас есть среда Debian 10 (Buster). Вы можете запускать команды Linux, устанавливать дополнительные инструменты с помощью менеджера пакетов APT и настраивать свою оболочку.
 ② .
② . 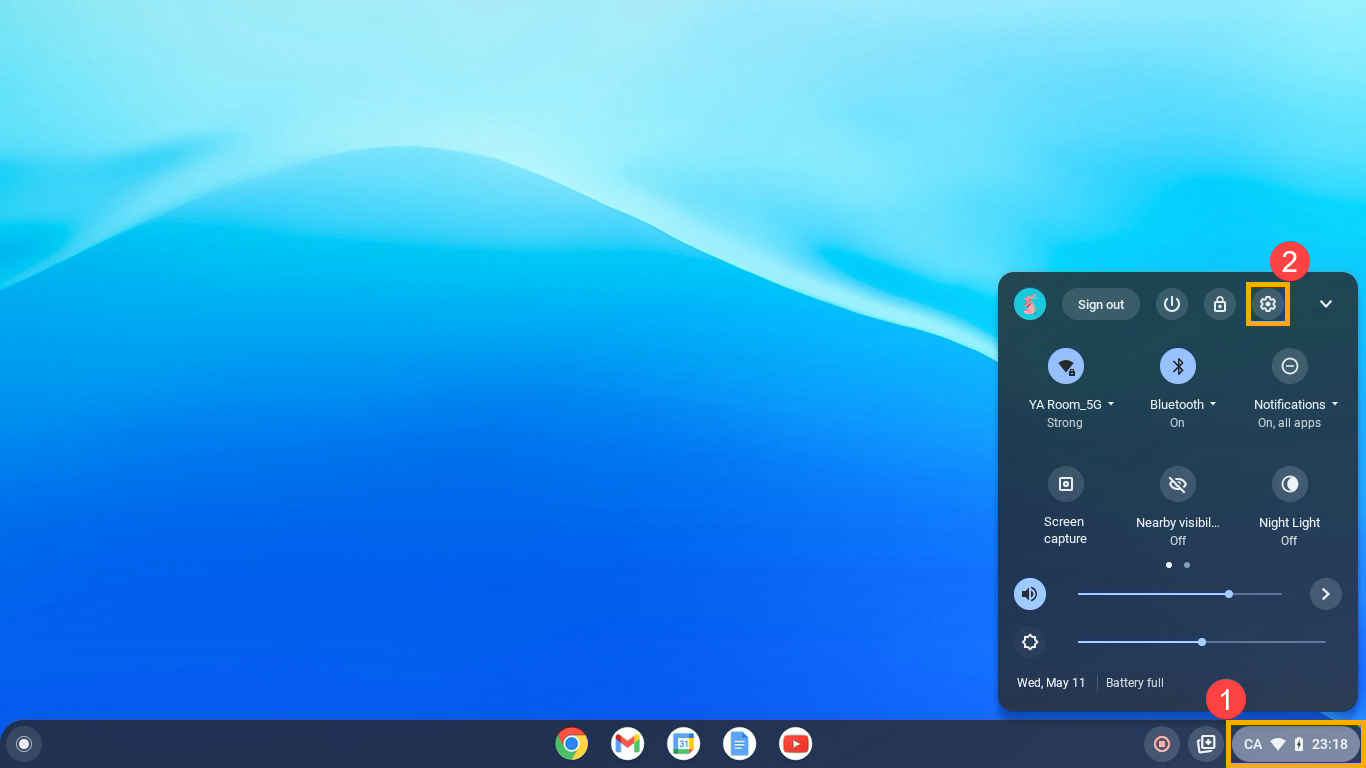
Отключить Linux
- Нажмите на [Строка состояния] ① в правом нижнем углу экрана, а затем нажмите [Настройки] ② .
- После открытия настроек выберите [Дополнительно] ③ .
- Выберите [для Разработчиков] ④ , а затем выберите [Среда разработки Linux] ⑤ .
- Нажмите [Удалить] ⑥ в разделе «Удалить среду разработки Linux».

Доступ к микрофону в Linux
Вы можете использовать микрофон, когда Linux включен.
- Нажмите [Строка состояния] ① в правом нижнем углу экрана, а затем нажмите [Настройки] ② .
- После открытия настроек выберите [Дополнительно] ③ .
- Выберите [Разработчики] ④ , а затем выберите [Среда разработки Linux] ⑤ .
- Включите [Разрешить Linux доступ к вашему микрофону] ⑥ .

Безопасность и разрешения
Чтобы защитить ваш компьютер, Chromebook обычно запускает каждое приложение в «песочнице». Однако все приложения Linux работают в одной песочнице. Это означает, что вредоносное приложение Linux может повлиять на другие приложения Linux, но не на остальную часть вашего Chromebook.
Разрешения и файлы, совместно используемые с Linux, доступны для всех приложений Linux.
Резервное восстановление
Если у вас возникли проблемы с резервным копированием и восстановлением, изучите как восстановить файлы Linux и приложения.
Устранение проблем с Linux
Если у вас возникли проблемы с Linux или приложениями Linux, попробуйте выполнить следующие действия:
- Перезагрузите Chromebook.
- Убедитесь, что ваша виртуальная машина обновлена. В браузере перейдите на chrome://components. В разделе «Cros-termina» выберите «Проверить наличие обновлений». Если вы загрузите обновление, вам может потребоваться перезагрузить Chromebook.
- Обновите свои пакеты. Откройте приложение «Терминал» и выполните следующую команду: sudo apt-get update && sudo apt-get dist-upgrade.
- Совет. Возможно, вам придется перезагрузить Chromebook, чтобы изменения вступили в силу. Linux автоматически проверяет наличие новых пакетов после первоначальной установки и каждые 24 часа во время работы.
Проверьте, что еще не поддерживается
- Камеры пока не поддерживаются.
- Устройства Android поддерживаются через USB, но другие устройства пока не поддерживаются.
- Эмуляторы Android пока не поддерживаются.
- Аппаратное ускорение пока не поддерживается, включая GPU и декодирование видео.
- ChromeVox поддерживается для приложения Terminal по умолчанию, но пока не поддерживается для других приложений Linux.
Вышеупомянутое содержимое взято с официального сайта Google, вы также можете обратиться к Chromebook Help для получения дополнительной информации.
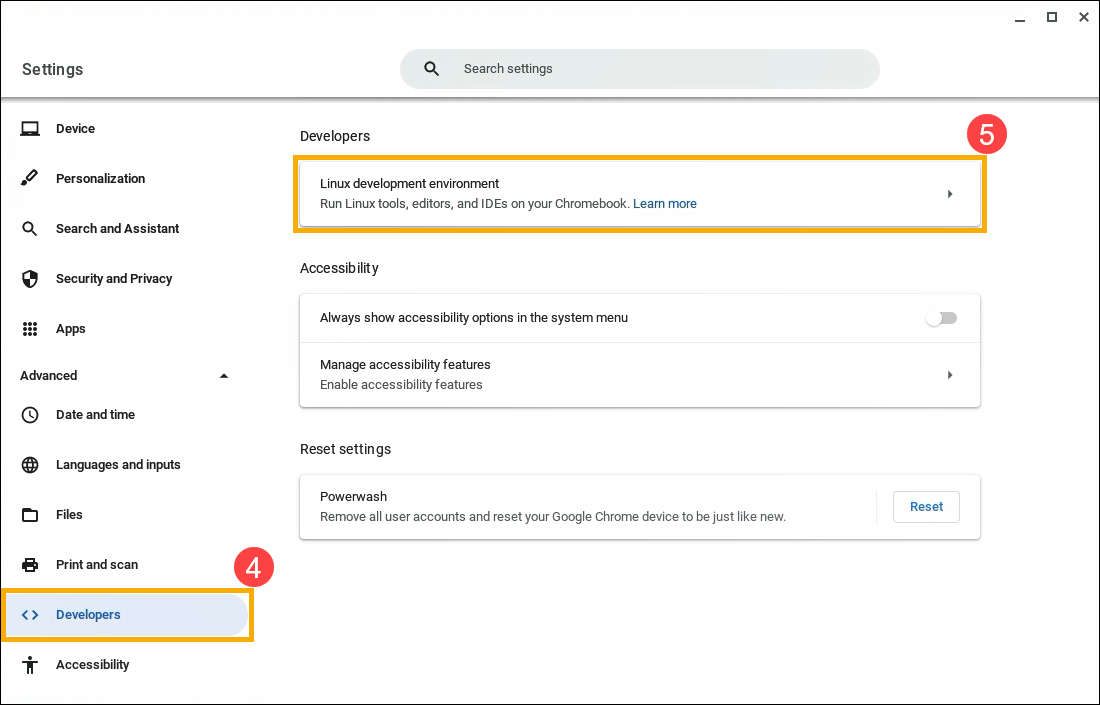
[Chromebook] How to set up Linux on your Chromebook
[Chromebook] How to set up Linux on your Chromebook Turn on Linux Linux is off by default. You can turn it on any time from Settings.
- Click [Status Bar] ① at the bottom-right of the screen, and then click [Settings] ② .
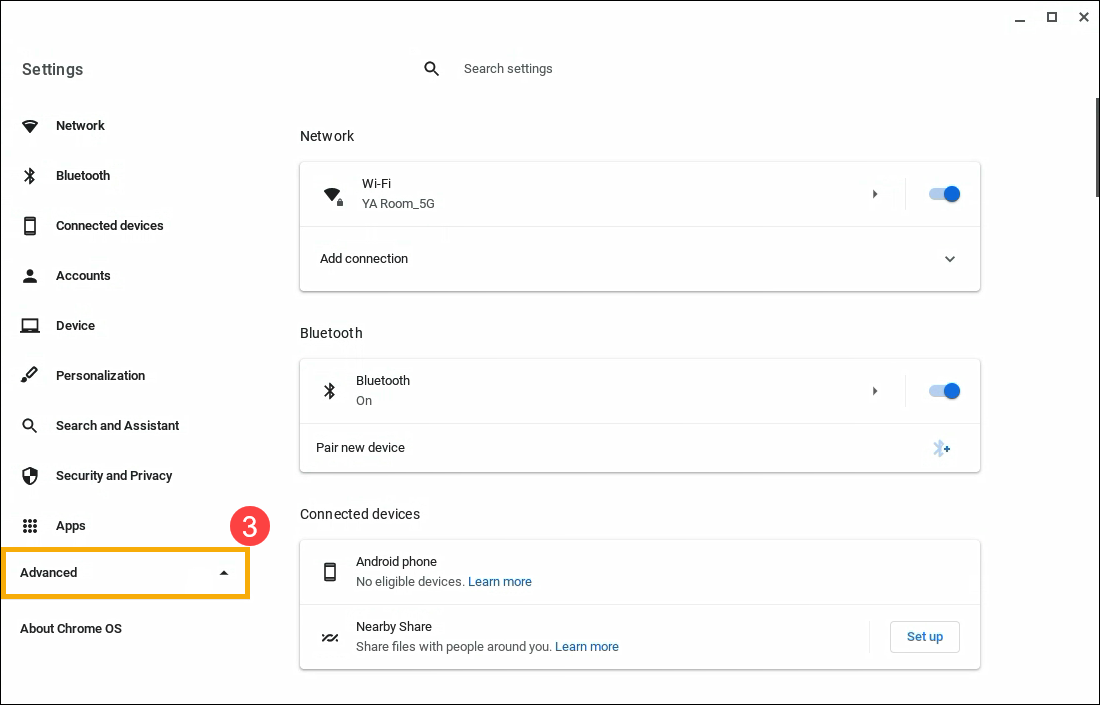
- After opening Settings, select [Advanced] ③ .
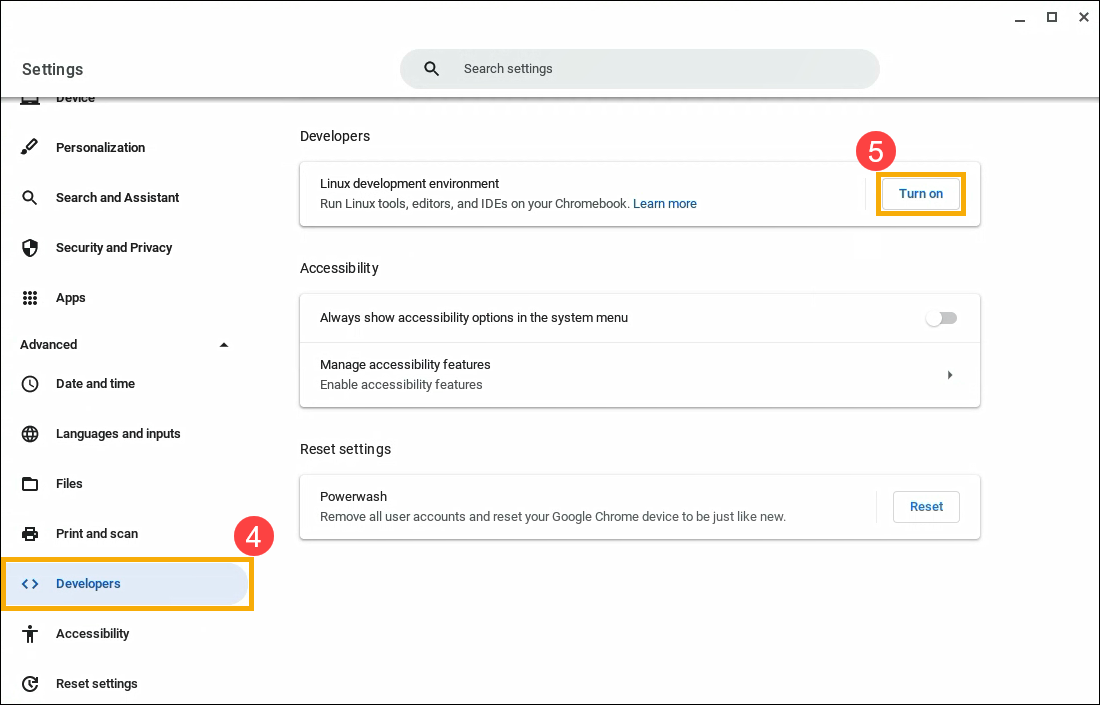
- Select [Developers] ④ , and then click [Turn on] ⑤ next to the Linux development environment item.
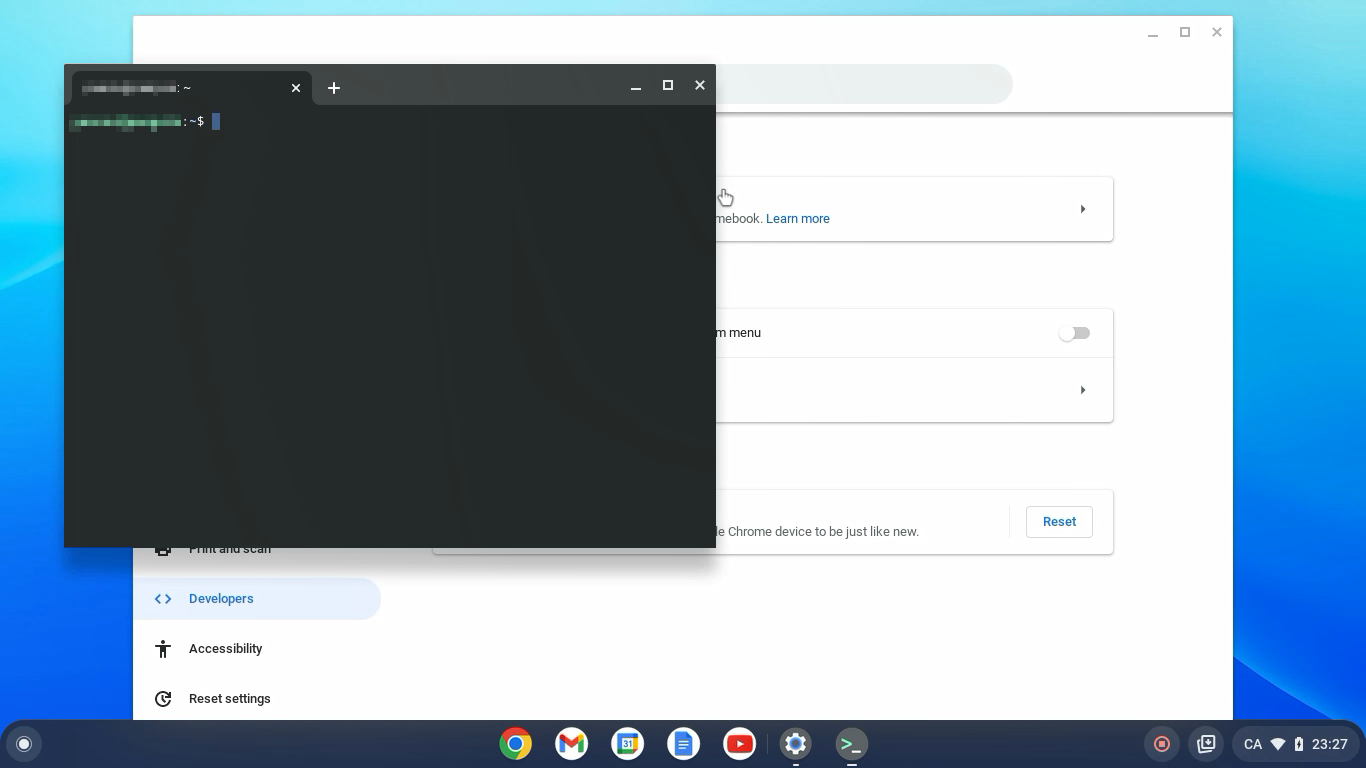
- Follow the on-screen instructions. Setup can take 10 minutes or more.
- A terminal window opens. You have a Debian 10 (Buster) environment. You can run Linux commands, install more tools using the APT package manager, and customize your shell.
Turn off Linux
- Click [Status Bar] ① at the bottom-right of the screen, and then click [Settings] ② .
- After opening Settings, select [Advanced] ③ .
- Select [Developers] ④ , and then select [Linux development environment] ⑤ .
- Click [Remove] ⑥ under Remove Linux development environment.
Access your microphone on Linux
You can use your microphone when Linux is turned on.
- Click [Status Bar] ① at the bottom-right of the screen, and then click [Settings] ② .
- After opening Settings, select [Advanced] ③ .
- Select [Developers] ④ , and then select [Linux development environment] ⑤ .
- Turn on [Allow Linux to access your microphone] ⑥ .
Security & permissions
To protect your computer, your Chromebook typically runs each app in a «sandbox.» However, all Linux apps run inside the same sandbox. This means a harmful Linux app can affect other Linux apps, but not the rest of your Chromebook.
Permissions and files shared with Linux are available to all Linux apps.
Back up & restore
If you have trouble with back up and restore, learn how to back up and replace your Linux files and apps.
Fix problems with Linux
If you experience issues with Linux or Linux apps, try the following steps:

- Restart your Chromebook.
- Check that your virtual machine is up-to-date. In your browser, go to chrome://components. Under «cros-termina,» select Check for update. If you download an update, you might need to restart your Chromebook.
- Update your packages. Open the Terminal app, and then run this command: sudo apt-get update && sudo apt-get dist-upgrade.
Tip: You might need to restart your Chromebook for changes to take effect. Linux automatically checks for new packages after initial setup and every 24 hours when it is running.
Check what’s not supported yet
- Cameras aren’t yet supported.
- Android devices are supported over USB, but other devices aren’t yet supported.
- Android Emulators aren’t yet supported.
- Hardware acceleration isn’t yet supported, including GPU and video decode.
- ChromeVox is supported for the default Terminal app, but not yet for other Linux apps.
Above contents are from Google official website, you also can refer to Chromebook Help for more details.
If your problem is not worked out with above solution and information, please contact ASUS customer service center for further information.