Chapter 1. Installation methods
Depending on your requirements, you can install Red Hat Enterprise Linux using several methods. Review the following sections to determine the best installation method for your requirements.
1.1. Available installation methods
You can install Red Hat Enterprise Linux using any of the following methods:
- GUI-based installations
- System or cloud image-based installations
- Advanced installations
GUI-based installations
You can choose from the following GUI-based installation methods:
- Install RHEL using an ISO image from the Customer Portal: Install Red Hat Enterprise Linux by downloading the DVD ISO image file from the Customer Portal. Registration is performed after the installation completes. This installation method is supported by the GUI and Kickstart.
- Register and install RHEL from the Content Delivery Network: Register your system, attach subscriptions, and install Red Hat Enterprise Linux from the Content Delivery Network (CDN). This installation method supports Boot ISO and DVD ISO image files; however, the Boot ISO image file is recommended as the installation source defaults to CDN for the Boot ISO image file. After registering the system, the installer downloads and installs packages from the CDN. This installation method is also supported by Kickstart.
- Perform a remote RHEL installation using VNC: The RHEL installation program offers two Virtual Network Computing (VNC) installation modes: Direct and Connect. After a connection is established, the two modes do not differ. The mode you select depends on your environment.
- Install RHEL from the network using PXE : With a network installation using preboot execution environment (PXE), you can install Red Hat Enterprise Linux to a system that has access to an installation server. At a minimum, two systems are required for a network installation.
System or cloud image-based installations
You can use system or cloud image-based installation methods only in virtual and cloud environments. To perform a system or cloud image-based installation, use Red Hat Image Builder. Image builder creates customized system images of Red Hat Enterprise Linux, including the system images for cloud deployment.
For more information about installing RHEL using Image builder, see Composing a customized RHEL system image.
Advanced installations
You can choose from the following advanced installation methods:
- Perform an automated RHEL installation using Kickstart: Kickstart is an automated process that helps you install the operating system by specifying all your requirements and configurations in a file. The Kickstart file contains RHEL installation options, for example, the time zone, drive partitions, or packages to be installed. Providing a prepared Kickstart file completes installation without the need for any user intervention. This is useful when deploying Red Hat Enterprise Linux on a large number of systems at once.
- Register and install RHEL from the Content Delivery Network: Register and install Red Hat Enterprise Linux on all architectures from the Content Delivery Network (CDN). Registration is performed before the installation packages are downloaded and installed from CDN. This installation method is supported by the graphical user interface and Kickstart.
Red Hat Enterprise Linux 8 installation tips and tricks

Depending on how long you’ve used Linux, you know that installation is easy but it hasn’t always been. Remember the first thing you did right after installing? If you said, «Recompile the kernel,» you’re correct. It was a necessary part of the installation. Then, if you wanted a graphical user interface (GUI), you’d have to edit the XF86Config file and spend at least an hour tweaking video. Linux has come a long way since those dark days, but we’re not quite to a forehead install yet. (A forehead install is one where if you fell asleep and your forehead hit the keyboard, the installation would begin, proceed, and finish without further interaction.) There are a few things you still need to know to optimize your installation.
One of those things is your filesystem configuration. How large do you want your base filesystem to be? How many partitions do you want? Do you want separate mount points for certain directories? Are you going to configure a swap space? Do you want to use LVM vs. a standard filesystem? Others are static vs. dynamic IP address, base environment, environment add-ons, and security policies.
Note: This article covers Red Hat Enterprise Linux (RHEL) 8.
Installing Red Hat Enterprise Linux 8
Start by downloading the latest RHEL 8 ISO from the customer portal or from Red Hat Developer, then begin the installation and follow along with the screenshots to explore your options.
As soon as you boot to the ISO, USB, or DVD containing RHEL 8, you’ll see the following screen:
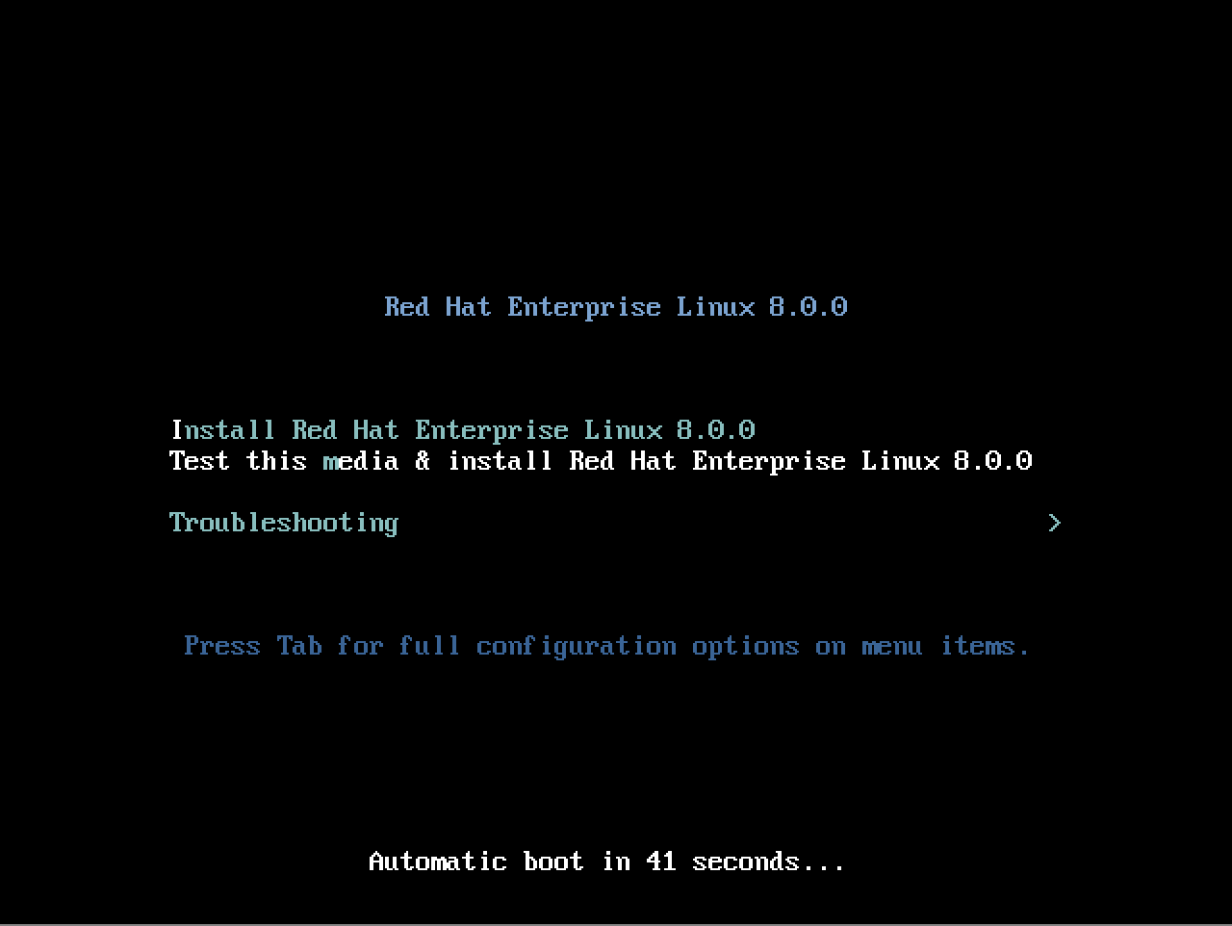
Select Install Red Hat Enterprise Linux 8.0.0 and press Enter. On the next screen, select your language and click Continue:

On the Installation Summary screen (below), you have your system customization options:

This screen gives you the opportunity to change any or all of the options shown. At a minimum, I suggest that you change the timezone to the one that matches your system’s location.
Notice that the default for Software Selection is Server with a GUI, so you’ll need to change that to Server, Workstation, Virtualization host, or Minimal installation. My standard choice for RHEL is Server—for CentOS, I choose a minimal install and then customize with individual packages later.
Note: I don’t install a GUI on servers because the graphical interface and all of its components are not necessarily something I want on a server system. They take up a lot of space and introduce potential vulnerabilities associated with the extra software.
What you select in the right-hand window depends on your needs. I suggest that you install everything that you want now rather than waiting until the system is installed and online. The reason for this is that you can take a snapshot of your base installed system as a reference point before installing more packages for disaster recovery purposes. Typically, I select Hardware Monitoring Tools and Performance Tools as a baseline system. I prefer not to install some of the other tools here because I might not want all of the included tools and their dependencies on my system. Make all of your selections and then click the Done button in the upper left of the screen to complete this stage.
The next two screenshots show you all available options in this section: