- How To Install nas on Ubuntu 20.04
- What is nas
- Install nas Using apt-get
- Install nas Using apt
- Install nas Using aptitude
- How To Uninstall nas on Ubuntu 20.04
- Uninstall nas And Its Dependencies
- Remove nas Configurations and Data
- Remove nas configuration, data, and all of its dependencies
- References
- Summary
- How I install my NAS system based on Ubuntu 22.04 lts
- Install Ubuntu
- Install Cockpit
- Install Webmin
- Home Directory
- FTP server proftpd
- SAMBA service
- NFS service
- BT service
- EMBY server
- Conclusion
How To Install nas on Ubuntu 20.04
In this tutorial we learn how to install nas on Ubuntu 20.04.
What is nas
The Network Audio System (NAS) was developed by NCD for playing, recording, and manipulating audio data over a network. Like the X Window System, it uses the client/server model to separate applications from the specific drivers that control audio input and output devices.
This package contains the NAS daemon (nasd), needed for local output from NAS. Description-md5: 250afd943a8f2f6e0200b6b91bfc6955
There are three ways to install nas on Ubuntu 20.04. We can use apt-get , apt and aptitude . In the following sections we will describe each method. You can choose one of them.
Install nas Using apt-get
Update apt database with apt-get using the following command.
After updating apt database, We can install nas using apt-get by running the following command:
sudo apt-get -y install nas Install nas Using apt
Update apt database with apt using the following command.
After updating apt database, We can install nas using apt by running the following command:
Install nas Using aptitude
If you want to follow this method, you might need to install aptitude first since aptitude is usually not installed by default on Ubuntu. Update apt database with aptitude using the following command.
After updating apt database, We can install nas using aptitude by running the following command:
sudo aptitude -y install nas How To Uninstall nas on Ubuntu 20.04
To uninstall only the nas package we can use the following command:
Uninstall nas And Its Dependencies
To uninstall nas and its dependencies that are no longer needed by Ubuntu 20.04, we can use the command below:
sudo apt-get -y autoremove nas Remove nas Configurations and Data
To remove nas configuration and data from Ubuntu 20.04 we can use the following command:
Remove nas configuration, data, and all of its dependencies
We can use the following command to remove nas configurations, data and all of its dependencies, we can use the following command:
sudo apt-get -y autoremove --purge nas References
Summary
In this tutorial we learn how to install nas package on Ubuntu 20.04 using different package management tools: apt, apt-get and aptitude.
How I install my NAS system based on Ubuntu 22.04 lts
My current NAS system was based on the U-NAS system. U-NAS 4.0.6 is based on Debian 9. When I add the 2.5Gbe Pcie adapter, I found it is not supported by it. So I am going to install a new system with this setup.
Here is the list of what I need for the NAS system.
- Everything on it is restricted in the LAN
- File sharing with Windows Users
- FTP server
- NFS service
- BT service
- Emby server
Install Ubuntu
Pulled out four hard drives, fresh install of Ubuntu 22.04 lts, minimal installation, ssh server only.
Add an initial user for future use.
Testing speed with iperf3, can reach 2.33Gbits/sec
Install Cockpit
It is mainly used for mounting hard disks and can be easily managed.
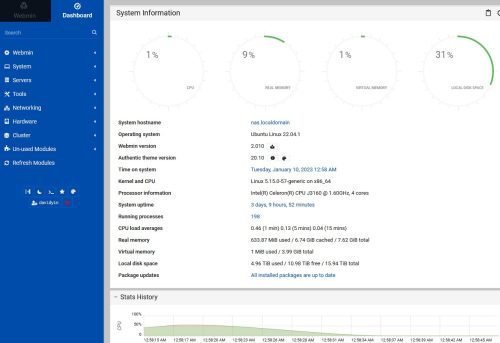
The web portal is https://192.168.100.191:9090
The IP address of this NAS is 192.168.100.191

After the hard disk is inserted, it looks like this.
All four hard drives are in xfs format.
| source | mount | size |
|---|---|---|
| /dev/n1/smallone | /mnt/nas1 | 1.5T |
| /dev/n2/pt | /mnt/nas2 | 4T |
| /dev/n3/4tb | /mnt/nas3 | 4T |
| /dev/n4/8tb | /mnt/nas4 | 8T |
Install Webmin
This is the server administration panel I’m used to using. It should be installed as well. Later I will use it to manage a lot of things.
Home Directory
In Webmin’s System / Users and Groups, add new users, each family member gets one individual account, all under the user home directory /mnt/nas2/homes/.
The following I need three file services, SAMBA, FTP, NFS, and also BT, Emby.
FTP server proftpd
On Webmin panel, add the user serverbackup, whose homedir is /mnt/mas4/vpsbackup
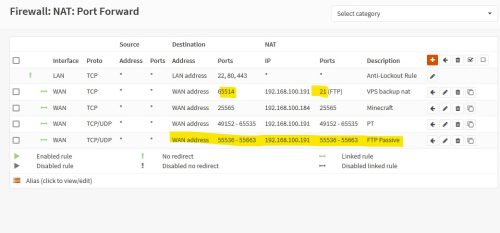
After starting the FTP service, I can connect to NAS from VPS which on DigitalOcean or any other VPS provider, but I can’t transfer data.
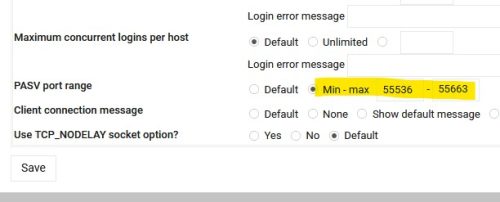
In Webmin/ Servers/ ProFTPD Server/, Networking Options page, modify the PASV port range 55536 – 55663
Then, in the Firewall/NAT/PortForward of the soft route opnSense, add a new rule. There is already a rule to forward from 65514 of the Wan port to port 21 of FTP.
After that, I tested the scripts from VPS hemlock backups and only changed the directory name of the backup file in backup2.sh.
SAMBA service
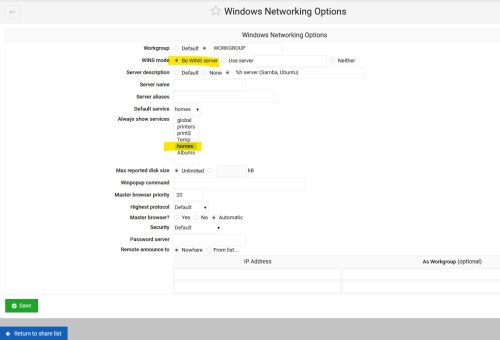
Add sharing to the Webmin control panel. Servers / Samba Windows file Sharing
First, convert users, (because Unix user passwords are encrypted) and re-enter the password in samba users.
The first step is to set up the sharing for the home directory. As a WINS server, and always show Homes home directory.
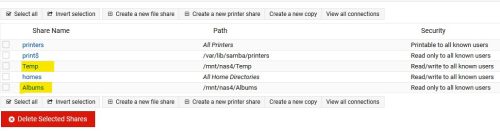
You need to pay attention to the settings here for permissions and allowed users.
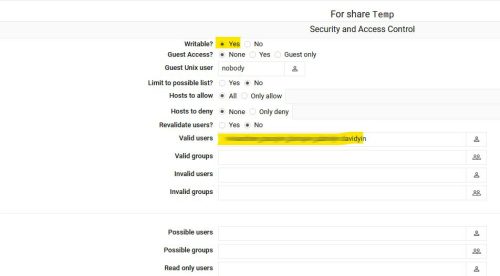
Temp sharing, allow reading and writing for every user.
Albums sharing, allow read-only. The albums folder is to store all pictures taken on Cameras, Smartphones.
NFS service
sudo apt install nfs-kernel-server
Find it in the Webmin panel under Networking / NFS Exports.
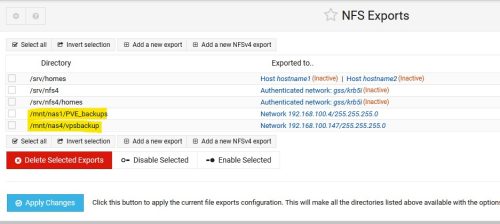
Do not check the read-only box for permission settings.
It is used to back up all VMs from the PVE system to this folder. NFS is much faster than SAMBA sharing.
BT service
First, I need to install the program or transmission.
sudo apt install transmission-daemon
Then, install Transmission Web Control. Its official site is https://github.com/ronggang/transmission-web-control
Use the following command to install it.
wget https://github.com/ronggang/transmission-web-control/raw/master/release/install-tr-control-cn.sh bash install-tr-control-cn.sh
When trying to access this panel, there is a 403 Error, http://192.168.100.191:9091
Do the following to fix it.
sudo service transmission-daemon stop
Edit two files, /etc/transmission-daemon/settings.json , and /var/lib/transmission-daemon/.config/transmission-daemon/settings.json
"rpc-whitelist-enabled": false, "rpc-username":"davidyin", "rpc-password":"The password should be replaced with sha1 encrypted content, do not miss the brackets.
sudo service transmission-daemon startThe download home directory is /mnt/nas2/Downloads/
and is divided into Movies, TV, Others.
EMBY server
Go to the official website to download and install the latest version.
- ownload emby-server-deb_4.7.11.0_amd64.deb
- dpkg -i emby-server-deb_4.7.11.0_amd64.deb
- Open a web browser to http://localhost:8096
Visit the panel at http://192.168.100.191:8096

Conclusion
Up to now, the system meet all my needs for now.
The SAMBA sharing is simply file sharing in my home LAN network. Every Windows PC used by my daughters and son can access it.
NFS sharing is provided for access from Linux servers in the LAN.
I can use BT to download files. EMBY server is used to watch Movies on LG TV and Browser.
To backup all my VPS running outside of my house, I setup a script to backup them and transfer back to home bay schedule.