How to Boot into an Older Kernel By Default in Ubuntu and Other Linux
Want to boot into an older available Linux kernel version by default? Here’s how to downgrade the Linux kernel.
Here’s a possible scenario. Your system received a kernel update, but somehow things are not working as smoothly as previously. You realized that if you boot into the older kernel (yes, you can downgrade kernel), things are back to normal. That makes you happy with a little inconvenience. You have to manually select the older kernel at each boot. This problem was faced by an elderly It’s FOSS reader. The new kernel update in Linux Mint wasn’t working as expected. Booting into the older kernel ‘fixed’ the issues, but choosing the older kernel at each boot was a problem. Removing the new kernel (while using the older kernel) is not a good idea because the new kernel will be installed and used with the next system updates. So, I suggested booting into the older Linux kernel by default. How to do that? That’s what I am going to show you in this tutorial.
Booting into the older Linux kernel
If you are not already familiar with it, your Linux distribution keeps more than one Linux kernel installed on your system. Don’t believe me? List the installed kernels in Ubuntu with this command:
apt list --installed | grep linux-image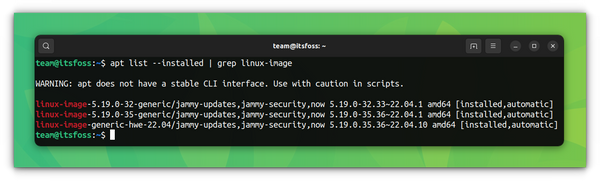 When you get a new kernel version with the system updates, your system automatically chooses to boot into the latest available kernel. From the grub screen, you can go to the Advanced options (or older Linux versions):
 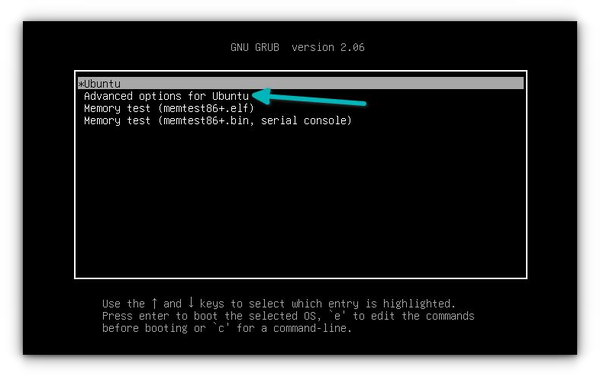 Here, you can see the available kernels to boot into. Choose the older one (without recovery option):
 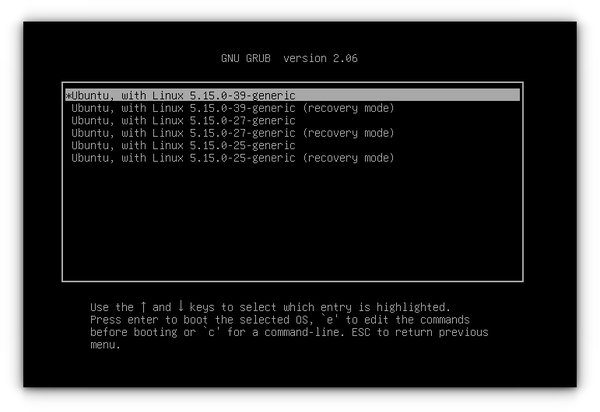 You won’t notice any visual difference. Your files and applications remain the same. Suggested Read 📖 Now that you have booted into the older kernel, it’s time to make your system boot into it automatically.
Making older kernel the default
If you are comfortable with Linux terminal and commands, you can modify the /etc/default/grub file and add the following lines to it:
GRUB_DEFAULT=saved GRUB_SAVEDEFAULT=trueWhat you did here is to tell your system to save the currently used entry as the default entry for the future runs of GRUB. However, not everyone is okay with the command line, and hence I’ll focus on a GUI tool called Grub Customizer.
Installing Grub Customizer
sudo add-apt-repository ppa:danielrichter2007/grub-customizer sudo apt update sudo apt install grub-customizerUsing Grub Customizer to change the default boot entry
When you run Grub Customizer, it shows the available boot entries. 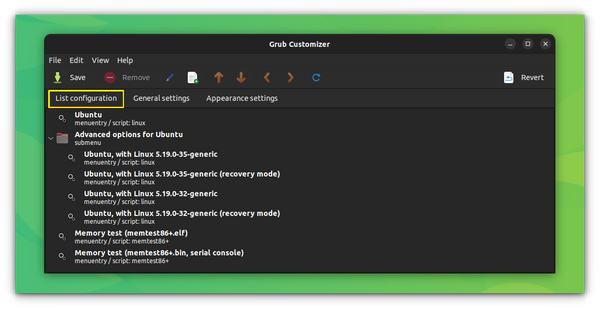 You have two options here. Option 1: Select the desired kernel entry and use the arrow (displayed on the top menu) to move it up the order.
 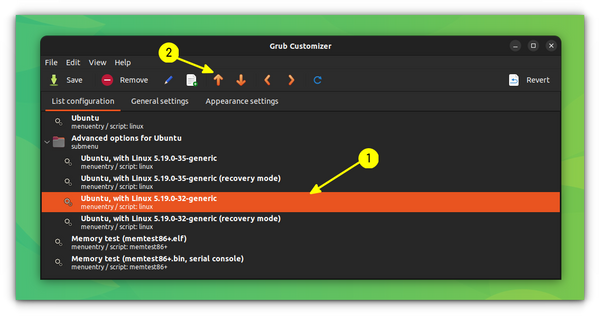 Option 2: Make the ‘previously booted entry’ the ‘default entry’.
 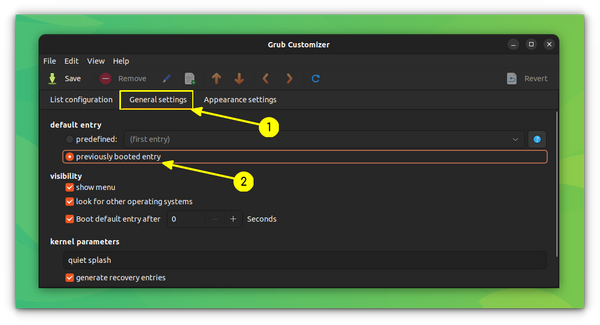 I would suggest going with option 2 because it will work even when there are new kernel updates. This way, you downgrade the kernel in Ubuntu or other distributions without removing the older version. Note that most distributions like Ubuntu only keep two kernel versions simultaneously. So eventually, your preferred older kernel will be removed with the newer kernel versions. This neat trick helped me when I installed the latest Linux kernel in Ubuntu, and it had issues with my audio system for some reason. Whatever may be the reason, you now know how to boot into an older kernel automatically. Grub Customizer is an excellent tool. It can do several more things to change your boot experience. You can read more about its capabilities here: Questions? Suggestions? The comment section is all yours.
Загрузка старого ядра Linux

К несчастью обновления ядра Linux могут приводить к регрессии системы (появлению ошибок). Поэтому полезно уметь загружать систему со старым ядром. Это можно сделать двумя способами: путем ручного выбора нужного ядра из списка при загрузке системы, или путем изменения настроек GRUB. Кратко опишу оба этих способа.
При ручном выборе нужно в меню загрузки (появляется при включении компьютера до начала загрузки операционной системы) перейти в раздел «Дополнительные параметры» и в появившемся списке выбрать нужную версию ядра.
Ручной способ прост как топор. Однако выбирать ядро при каждой загрузке утомительно. Желательно этот процесс как-то автоматизировать. Для этого можно использовать настройки GRUB. Они хранятся в файле /etc/default/grub. Нас интересует параметр GRUB_DEFAULT. Именно в нем указывается система, загружаемая по умолчанию. Согласно документации пункт меню по умолчанию можно задать тремя способами: по его порядковому номеру, заголовку или с помощью строки «saved». Я опишу только первый способ. Ниже приводится пример его использования:
В этом случае по умолчанию будет выбираться второй пункт меню (нумерация с нуля). Но как быть если вам нужно выбрать подпункт. В этом случае синтаксис имеет вид:
В этом случае будет выбран 5 подпункт 3 пункта исходного списка.
После изменения файла /etc/default/grub нужно выполнить команду:
Она нужна для обновления конфигурационного файла GRUB (/boot/grub/grub.cfg).
Теперь при следующей загрузке по умолчанию будет выбираться указанный вами пункт меню.
Недостаток этого подхода в том, что при изменении списка (например, добавлении в него еще одного ядра) придется менять и настройку. К счастью необходимость ее изменения возникает не часто. А при выпуске ближайшего патча, исправляющего регрессию, ее можно смело вернуть в значение по умолчанию (ноль), и не возвращаться к ней до очередной поломки.
P.S. Для того чтобы узнать текущую версию ядра Linux, выполните команду: