- 📑 Установка OpenVPN в Debian/Ubuntu/Mint из стандартных репозиториев проекта OpenVPN
- Вступление
- Подключение стандартных репозиториев проекта OpenVPN
- Установка OpenVpn
- Install OpenVPN on Linux Mint 20
- Method of Installing OpenVPN on Linux Mint 20:
- Step # 1: Install OpenVPN on Linux Mint 20:
- Step # 2: Start the OpenVPN Service:
- Step # 3: Enable the OpenVPN Service:
- Step # 4: Check the Status of the OpenVPN Service:
- Method of Removing OpenVPN from Linux Mint 20:
- Conclusion:
- How to Install OpenVPN on Linux Mint 21?
📑 Установка OpenVPN в Debian/Ubuntu/Mint из стандартных репозиториев проекта OpenVPN
Установка OpenVPN в Debian/Ubuntu/Mint из стандартных репозиториев проекта OpenVPN.
Внимание! OpenVPN в Debian/Ubuntu/Mint рекомендуется устанавливать из стандартных репозиториев проекта OpenVPN, так как в стандартных репозиториях Debian/Ubuntu/Mint присутствуют достаточно старые версии OpenVPN и обновляются они достаточно редко.
Вступление
Эта статья содержит инструкции по использованию собственных репозиториев программного обеспечения проекта OpenVPN. Список неофициальных репозиториев см. на странице «Неофициальные репозитории программного обеспечения OpenVPN».
Для OpenVPN 3 Linux см. специальную страницу OpenVPN 3 Linux.
Последние, свежие версии и релизы OpenVPN доступны в репозиториях проекта OpenVPN. Это позволяет использовать более свежую версию OpenVPN, чем та, которая обычно доступна в репозиториях вашего дистрибутива. Обратите внимание, что все перечисленные ниже команды должны запускаться от имени пользователя root, например используя sudo или su.
Готовые двоичные установочные (.deb) файлы Linux доступны только для Debian и Ubuntu. Это так по двум причинам:
- В официальных репозиториях Debian и Ubuntu, как правило, доступны довольно старые версии OpenVPN.
- Fedora и Fedora EPEL предоставляют достаточно свежие выпуски OpenVPN для поддерживаемых выпусков Fedora и Red Hat Enterprise Linux (включая клоны, такие как CentOS, Scientific Linux).
Все пакеты доступны в версиях i386 и amd64/x86_64. Даже если пакет создан для конкретной ОС, это не означает, что он не будет работать в более старых и/или новых версиях того же дистрибутива или даже в другой операционной системе. Если вы столкнулись с какими-либо проблемами с пакетом, отправьте новый отчет об ошибке в bug report.
Подключение стандартных репозиториев проекта OpenVPN
Проект OpenVPN поддерживает несколько репозиториев программного обеспечения OpenVPN (OSS). Для настройки репозиториев вам необходимо перейти к пользователю root. Обычно это делается с помощью sudo:
Затем импортируйте открытый ключ GPG, который используется для подписи пакетов:
$ wget -O - https://swupdate.openvpn.net/repos/repo-public.gpg|apt-key add -
Затем вам нужно создать фрагмент sources.list (как root), чтобы apt мог найти новые пакеты OpenVPN. Один из способов сделать это:
$ echo "deb http://build.openvpn.net/debian/openvpn/ main" > /etc/apt/sources.list.d/openvpn-aptrepo.list
Где может быть одной из:
stable: stable releases only - no alphas, betas or RCs testing: latest releases, including alphas/betas/RCs release/2.3: OpenVPN 2.3 releases release/2.4: OpenVPN 2.4 releases, including alphas/betas/RCs release/2.5: OpenVPN 2.5 releases, including alphas/betas/RCs
и зависит от вашего дистрибутива:
wheezy (Debian 7.x) jessie (Debian 8.x) stretch (Debian 9.x) buster (Debian 10.x) precise (Ubuntu 12.04) trusty (Ubuntu 14.04) xenial (Ubuntu 16.04) bionic (Ubuntu 18.04) focal (Ubuntu 20.04)
Этот список может быть неполным. Пожалуйста, проверьте веб-страницу репозитория для получения полного списка выпусков.
$ echo "deb http://build.openvpn.net/debian/openvpn/testing jessie main" > /etc/apt/sources.list.d/openvpn-aptrepo.list $ echo "deb http://build.openvpn.net/debian/openvpn/release/2.3 wheezy main" > /etc/apt/sources.list.d/openvpn-aptrepo.list
Установка OpenVpn
Теперь вы готовы к установке OpenVPN. Установка OpenVPN производится одинаково, что на клиенте, что на сервере. Отличаются только файлами конфигурации.
Обратите внимание, что пакеты, созданные для более старых выпусков операционной системы, могут нормально работать с более новыми выпусками той же операционной системы.
При использовании Debian/Ubuntu/Mint:
$ apt-get update && apt-get install openvpn
Примечания к просроченным ключам
Если срок действия ключа подписи apt истекает, apt будет жаловаться при обновлении кеша пакета (например, apt-get update). Чтобы исправить это, удалите просроченный ключ из цепочки ключей apt:
Затем добавьте новый ключ, используя wget и apt-key, как описано выше. Затем убедитесь, что новый ключ находится в цепочке для ключей:
$ apt-key list --- snip --- /etc/apt/trusted.gpg -------------------- pub rsa2048 2011-08-03 [SC] [expires: 2025-07-27] 30EB F4E7 3CCE 63EE E124 DD27 8E6D A8B4 E158 C569 uid [ unknown] Samuli Seppänen (OpenVPN Technologies, Inc) sub rsa2048 2011-08-03 [E] [expires: 2025-07-27]
Install OpenVPN on Linux Mint 20

OpenVPN is a tool using which you can create virtual private networks for securing your network communications. This tool also provides the facility of remotely accessing a system. Moreover, it can be used very easily with both the Linux and Windows operating systems. However, in this article, we will just talk about the installation method of OpenVPN on a Linux Mint 20 machine.
Method of Installing OpenVPN on Linux Mint 20:
To install the OpenVPN client on Linux Mint 20, you need to perform the following steps:
Step # 1: Install OpenVPN on Linux Mint 20:
First, you need to install the OpenVPN client on an updated system with the command shown below:
$ sudo apt-get install network-manager-openvpn

Step # 2: Start the OpenVPN Service:
After installing the OpenVPN client on your system, you need to start this service with the following command:
$ sudo systemctl start openvpn

Step # 3: Enable the OpenVPN Service:
Now, you can enable the OpenVPN client on your system with the execution of the command stated below:
$ sudo systemctl enable openvpn

Step # 4: Check the Status of the OpenVPN Service:
Finally, the active status of the OpenVPN client can be checked by running the following command:
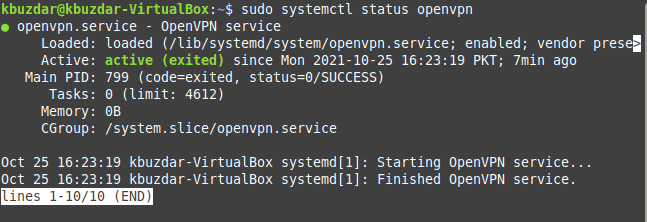
$ sudo systemctl status openvpn

The active status of the OpenVPN client installed on our Linux Mint 20 system is shown in the image below:
Method of Removing OpenVPN from Linux Mint 20:
You can easily remove the OpenVPN client from your system whenever you want by running the following command:
$ sudo apt-get purge --autoremove network-manager-openvpn

Conclusion:
This article elaborated the method of installing the OpenVPN client on a Linux Mint 20 system. After installing this tool on your system, it can be used effectively for enabling secure communications via the creation of virtual private networks.
Karim Buzdar holds a degree in telecommunication engineering and holds several sysadmin certifications including CCNA RS, SCP, and ACE. As an IT engineer and technical author, he writes for various websites.
How to Install OpenVPN on Linux Mint 21?

OpenVPN provides flexible VPN solutions to secure your data communications, whether it’s for Internet privacy, remote access for employees, securing IoT, or networking Cloud data centers.
We can deploy OpenVPN Server software solutions on-premises using standard servers or virtual appliances, or on the cloud.
A VPN reduces security risk by preventing unauthorized access to specific network resources and ensures privacy on untrusted Wi-Fi and other public access networks.
ParagraphPrivate companies, journalists, and individuals use VPN services to gain access to certain parts of the internet which are restricted by the Government.
Even though TOR is a better option for accessing restricted content, some people prefer VPN as it is usually faster than TOR.
VPN keeps you safe when you are connected to public wi-fi or an untrusted network. It encrypts your data and re-routes it through the VPN server to provide you with a secure experience.
The technology behind OpenVPN is open source, so it is accessible to everyone and can be hosted on a self-managed server by the VPN company.
Almost every VPN company supports OpenVPN and they provide you with manual configuration files to set up on your operating system.
Linux Mint provides built-in support for OpenVPN and so do many other Linux distros.
You can easily install OpenVPN on Linux Mint 21 and in older versions in just a few easy steps.

Follow these steps to configure OpenVPN on Linux Mint 21:
To set up OpenVPN, we first need to download its configuration files. Just check on the internet for VPN services that provide OpenVPN configuration.
For the sake of this tutorial, I am using vpnbook.com which provides open VPN access.
First, go to your VPN services’ website and download OpenVPN configuration files and note down your username and password. We will need them later.

I have downloaded my configuration files from vpnbook and have decompressed them as shown in the picture above.
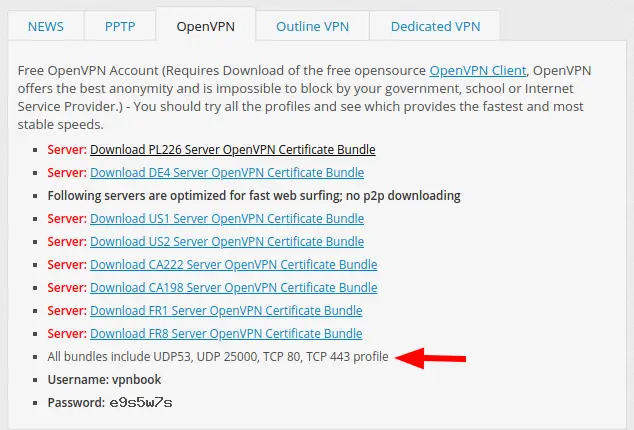
You may see more than one file after decompressing. This is because each one of these files is for a different protocol and you may choose whichever one you like or need.
After acquiring the necessary files, we will now set up OpenVPN.
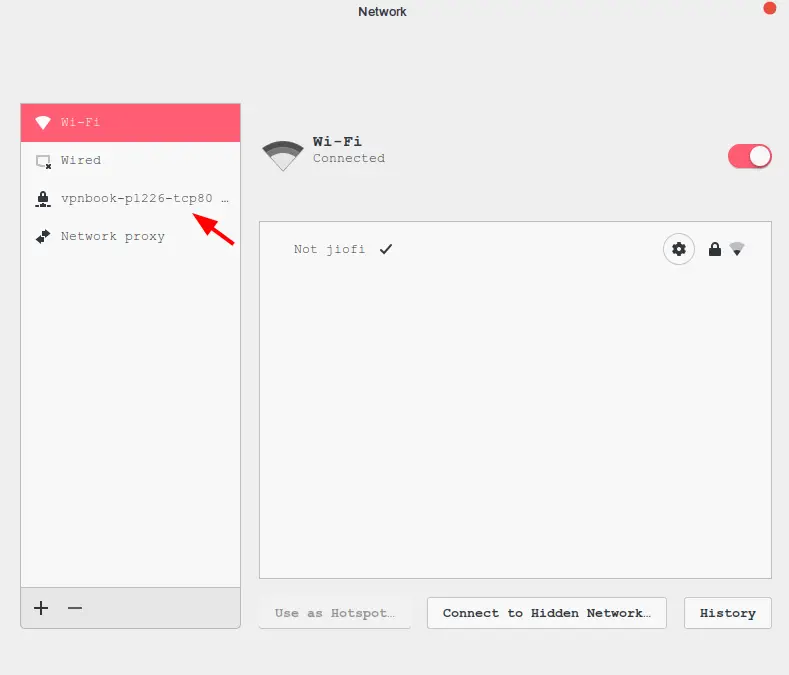
To set up OpenVPN, click on the network icon present on the default panel in the right bottom corner and choose “Network Settings”.
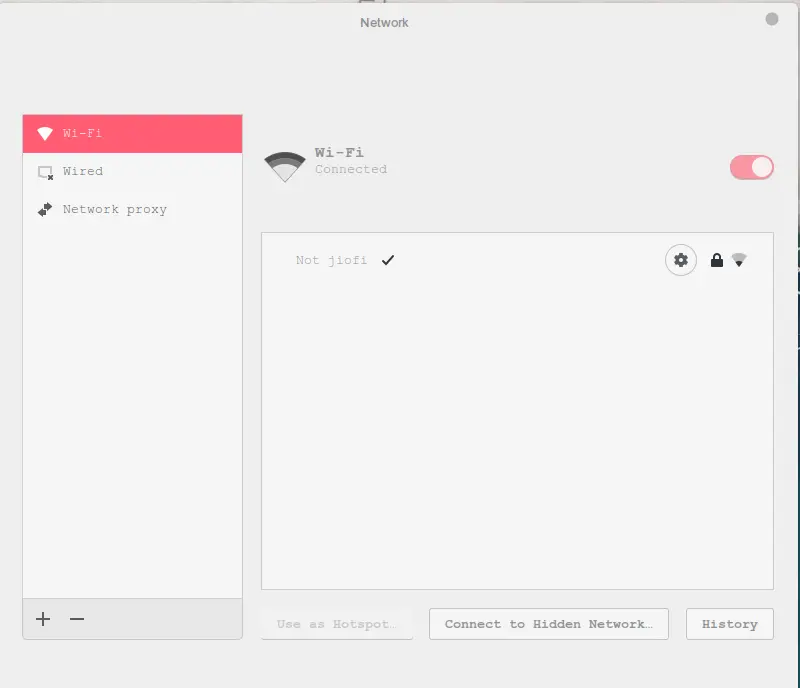
A pop-up will appear on your screen as shown in the picture above.
This is our network manager from where we can add or remove network connections. We will use it to set up our VPN connection.
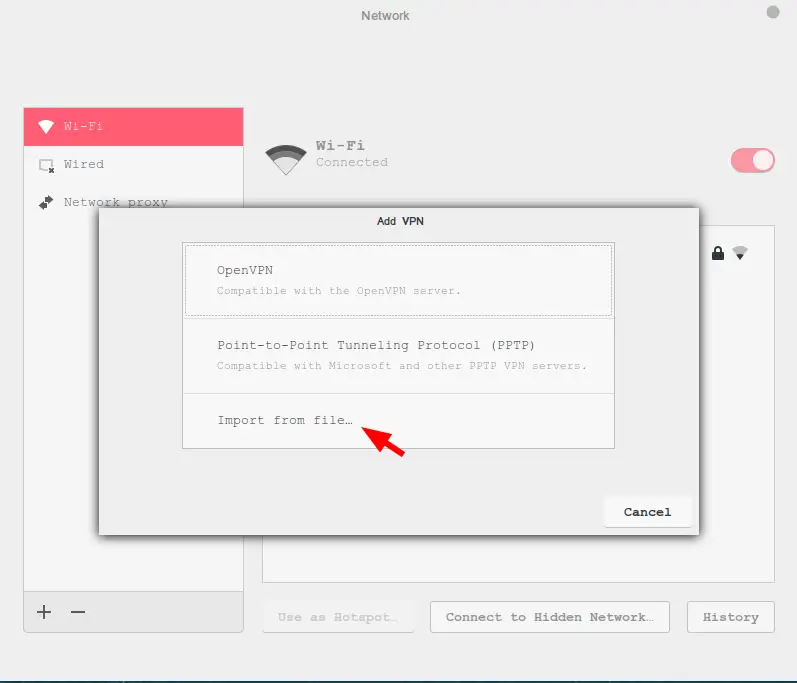
Now click on the plus icon in the bottom left of the window.
Now it will provide us with three options as shown in the picture above. Choose the “Import from File…” option as we have our configuration stored in a file.
It will open a file manager from where you can choose the file we downloaded in the first step. You can choose any of those four files; I have chosen the one with TCP protocol.
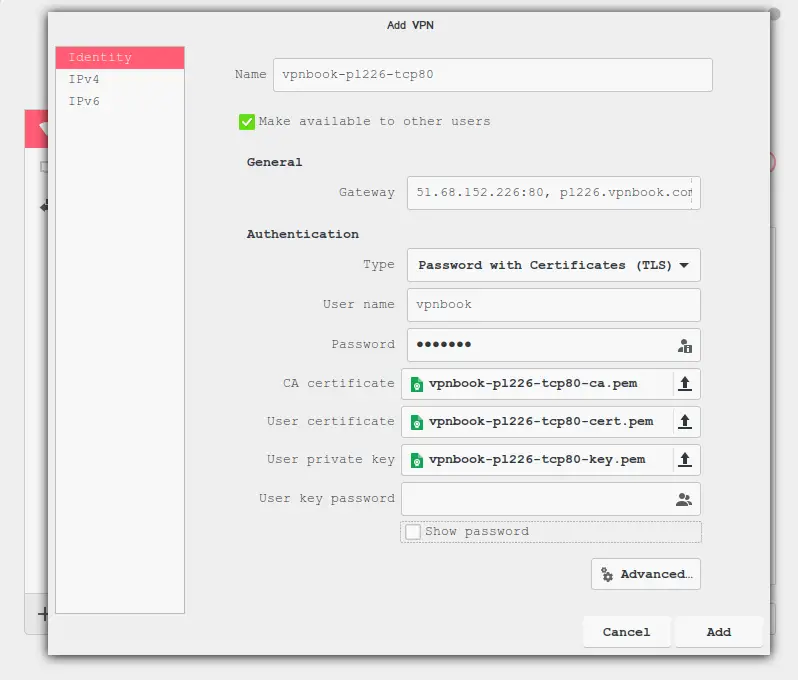
Now enter your username and password. If you are using VPNbook, then you can find the username and password on the same page from which you downloaded the configuration files.
I have entered all the information that we will need to set up our VPN client. We only have to input our username and password manually, and it automatically fills the rest of the stuff from the configuration file that we selected.
Our installation is now complete and now we can connect to VPN servers
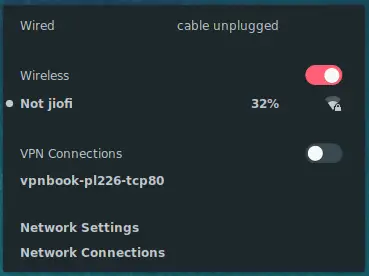
Click on the network icon again as shown in the picture above you will see your VPN connection name under VPN Connections section.
Now toggle the button next to “VPN Connections”.

It will take around 10 seconds for the connection to become active. You will receive a notification after the connection has been successfully set up or will receive an error message if something went wrong.
We have completed our setup. If you receive any error then cross-check your username, password, and configuration file.
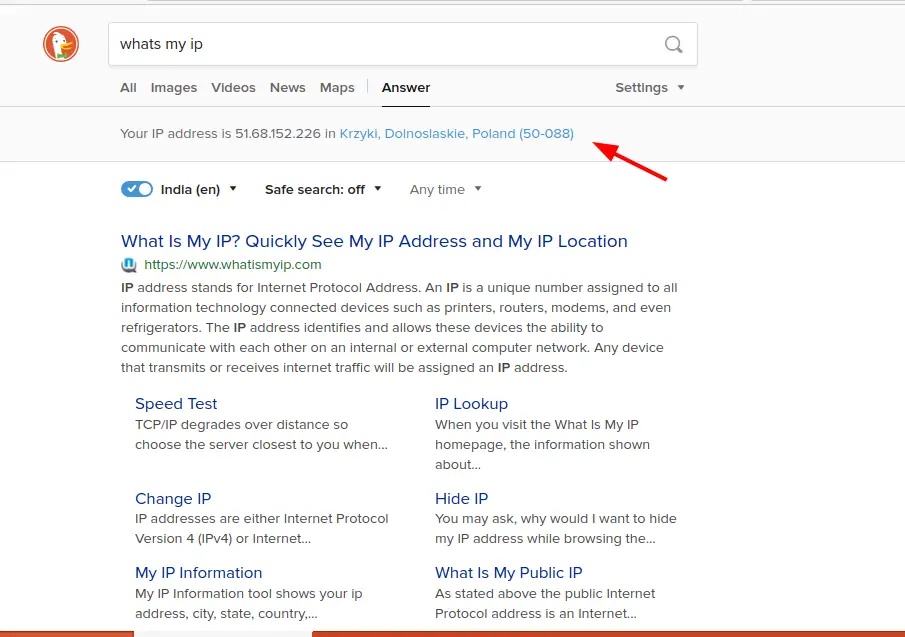
Now go to your web browser and search “what’s my IP” or visit Ipleak and check if your IP has been changed.
For me, it shows that I am in Poland and also shows a different IP address than my actual one.
This is it, and we have now successfully set up an OpenVPN connection in our Linux Mint machine.
Remember, if you are using a free VPN service like VPN then you should only use it for general purposes. For better and enhanced security, I recommend a premium VPN service.
This is the end of this article. I hope it helped you if so then share this article and drop your questions and doubts in the comments section.
Subscribe to our Newsletter for more interesting and fun Linux tutorials.