- Установка deb пакетов в Ubuntu
- Где взять deb пакеты?
- Установка deb пакетов Ubuntu
- Выводы
- Package management with APT
- Introduction
- Commands
- Installation commands
- auto-apt
- Maintenance commands
- Removal commands
- Search commands
- Typical usage example
- Setting up apt-get to use a http-proxy
- Temporary proxy session
- APT configuration file method
- BASH rc method
- How to login a proxy user
- Useful additional packages
- Additional links
- Troubleshooting
Установка deb пакетов в Ubuntu
Установка новых программ — один из самых важных моментов при работе с вашей системой. Раньше мы уже рассматривали добавление PPA в систему и установку программ из исходников. Но даже в PPA есть далеко не все пакеты, а установка из исходников слишком сложна для новичков.
Нередко возникает необходимость поставить программу, для которой уже есть собранные deb пакеты в интернете. Это может быть какая-нибудь не очень популярная программа или даже драйвера, которые вы скачали и хотите установить на компьютер где нет сети. На компьютере без сети установка программ с флешки ubuntu может стать единственным решением. В этой статье будет рассмотрена установка deb пакетов в ubuntu. Мы рассмотрим где их взять и как установить deb в ubuntu.
Где взять deb пакеты?
Ответ прост — на просторах интернета. Если это нужная вам программа, то вы уже знаете где взять для ее пакет. В случае с драйверами ситуация немного сложнее. Все программы и драйвера, которые находятся в официальных репозиториях Ubuntu вы можете найти на сайте launchpad.net, это очень удобно, если на машине, где они должны быть установлены нет интернета. Например, ищем linux-firmware и открываем ее страницу на Launchpad, внизу выбираем версию программы:
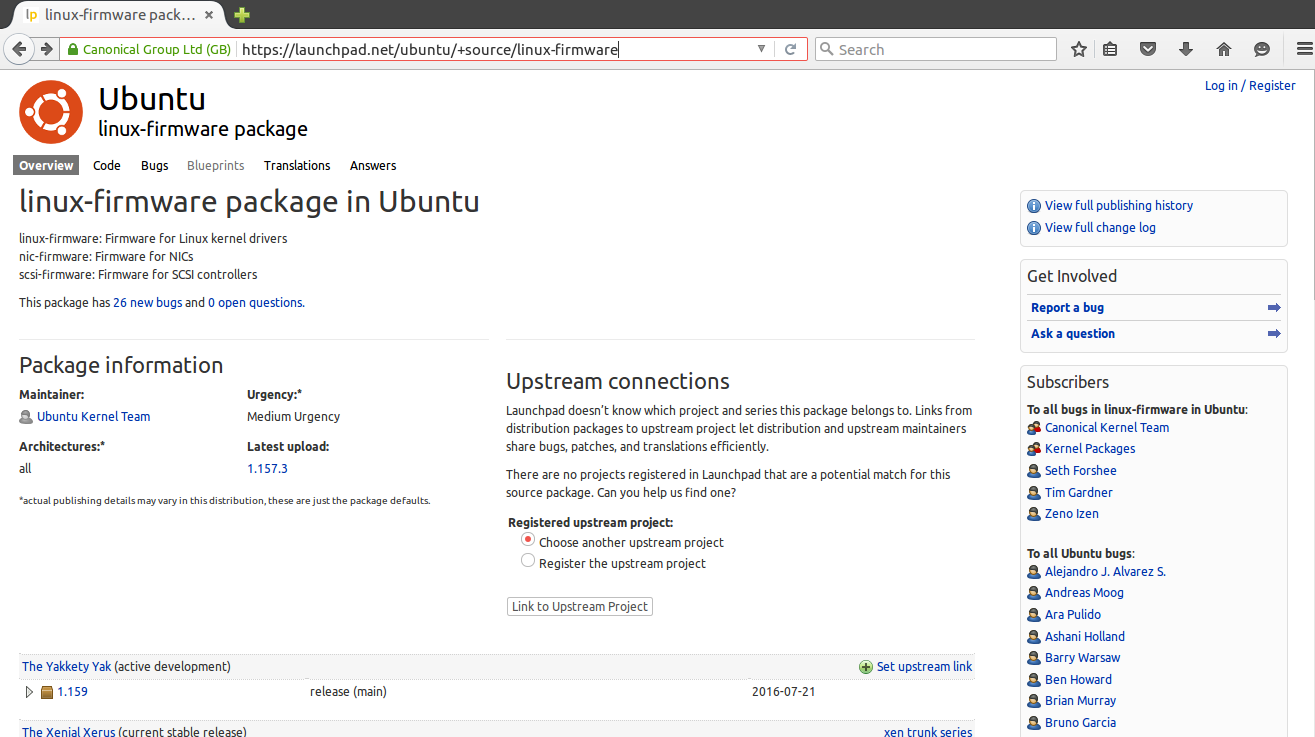
Дальше выбираем архитектуру:
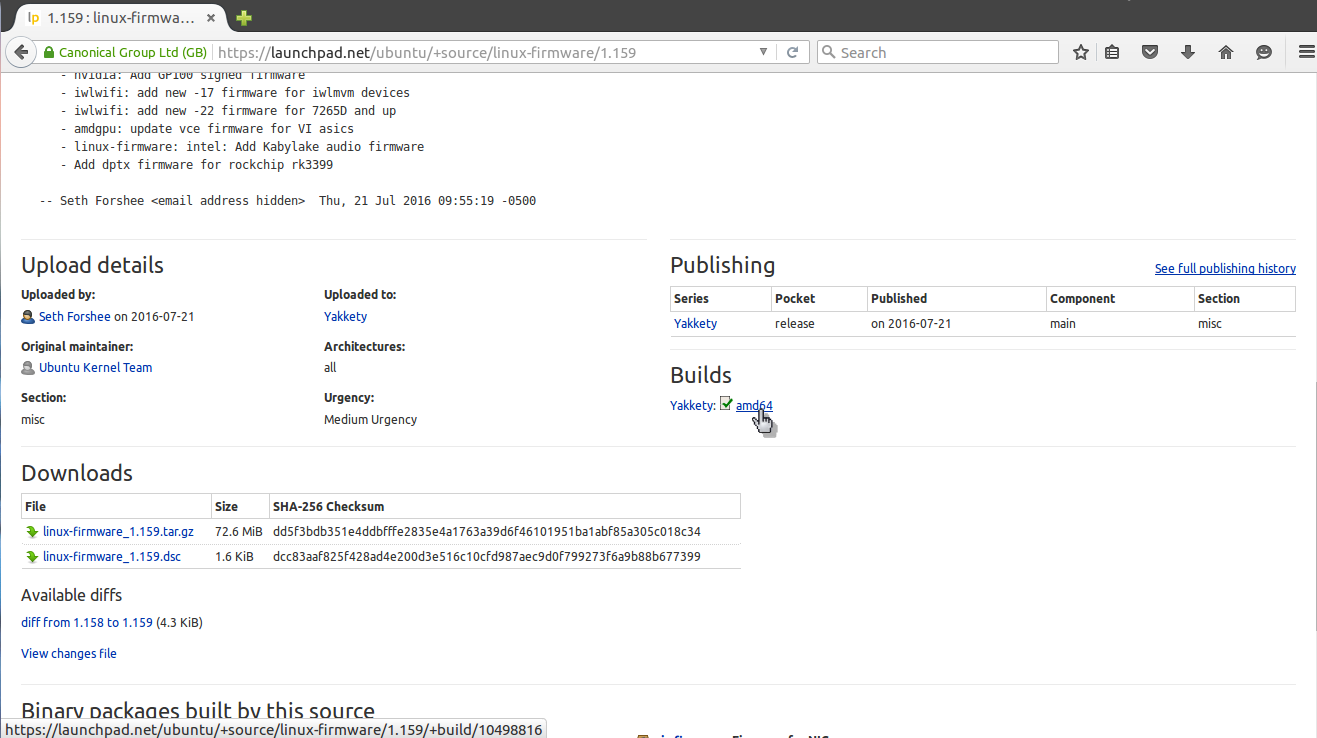
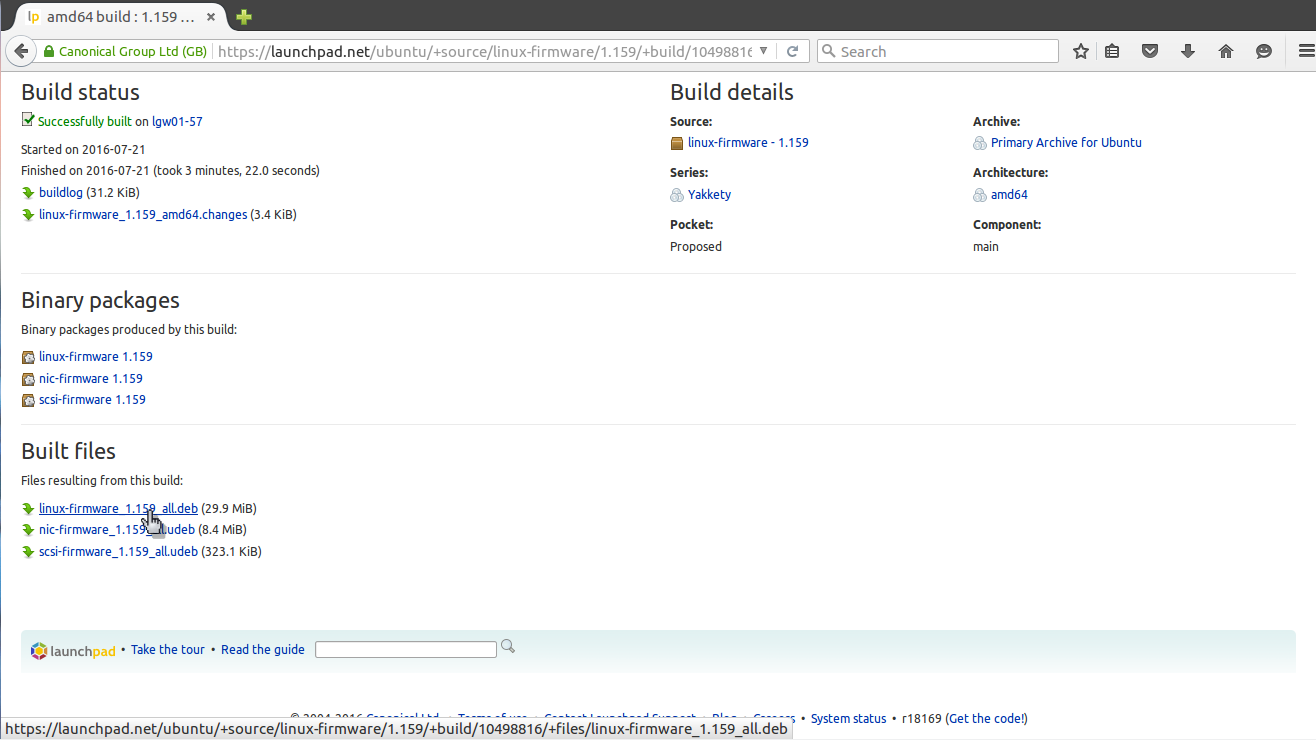
И осталось получить deb файл для нашей системы:
Если у вас есть другой компьютер с интернетом или вы планируете устанавливать программы потом, а сейчас нужно только скачать deb пакеты, то это можно сделать с помощью apt:

Пакет будет сохранен в текущей папке и дальше вы сможете все без проблем установить. Но будет скачан только сам пакет, без его зависимостей. Зависимости мы можем получить только в системе с интернетом используя команду apt-rdepends:
apt download имя_пакета $(apt-rdepends имя_пакета|grep -v «^ «)
Теперь у вас есть не только пакет, но и все его зависимости.
Установка deb пакетов Ubuntu
Установить Deb пакет Ubuntu не так уж сложно, для этого даже есть несколько утилит. Можно устанавливать как с помощью графического интерфейса, так и в терминале.
Самый простой способ установки — в графическом интерфейсе, с помощью центра приложений, с него и начнем. Откройте файловый менеджер в папке с пакетом:

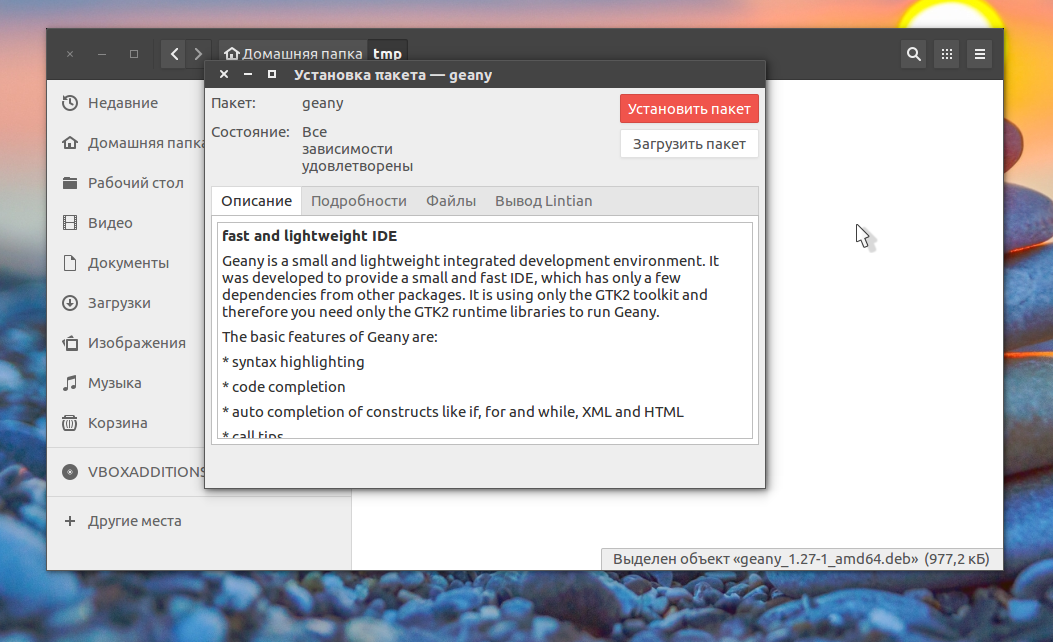
Выполните двойной клик по deb пакету, далее откроется центр приложений, где вы посмотреть информацию о пакете и запустить установку нажав кнопку установить.
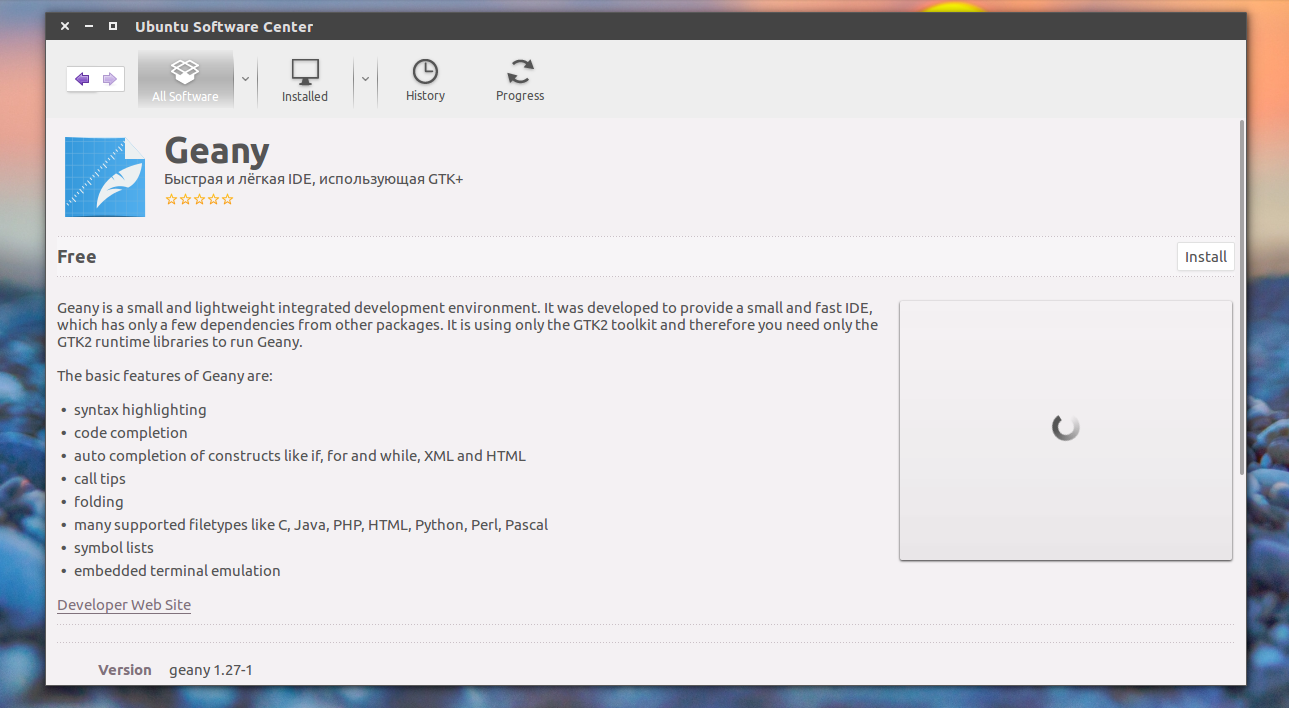
Установка программ Ubuntu с помощью центра приложений мне не очень нравится, он обычно очень долго думает и не всегда правильно открывает программу, но можно воспользоваться другой графической утилитой — gdebi. Сначала ее нужно установить:
sudo apt-get install gdebi
Теперь кликаем правой кнопкой мыши по файлу, выбираем открыть с помощью и gdebi:
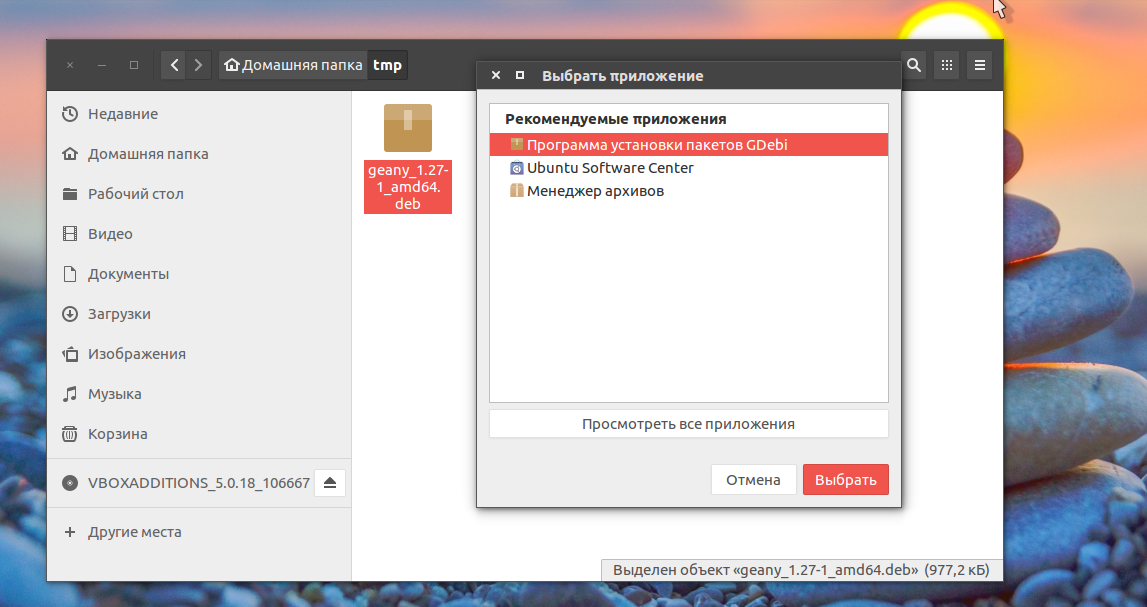
Дальше осталось нажать кнопку установить и дождаться завершения установки пакета ubuntu. Программа автоматически установит все зависимости, если есть доступ к сети.
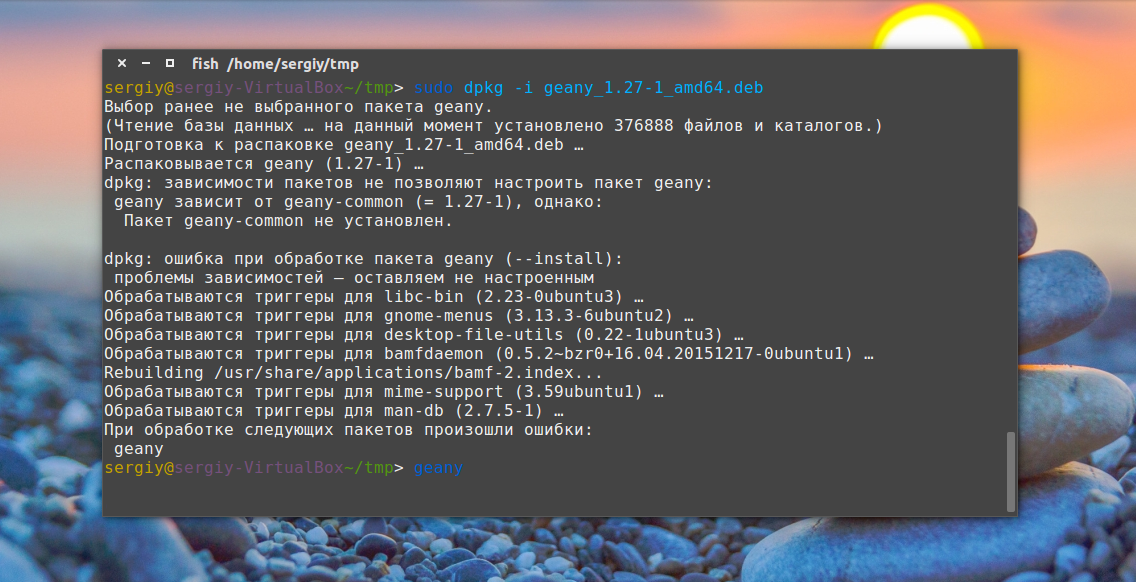
Установка deb из консоли Ubuntu выполняется не намного сложнее. Для этого используется утилита dpkg. Сначала переходим в папку куда был загружен deb пакет:
sudo dpkg -i имя_пакета.deb
Для этой команды доступны символы сокращений, например, можно написать вот так, чтобы установить все deb пакеты из этой директории:
Программа не умеет разрешать зависимости, даже если есть доступ к сети, она только устанавливает пакет, поэтому для установки зависимостей после установки deb ubuntu выполните:
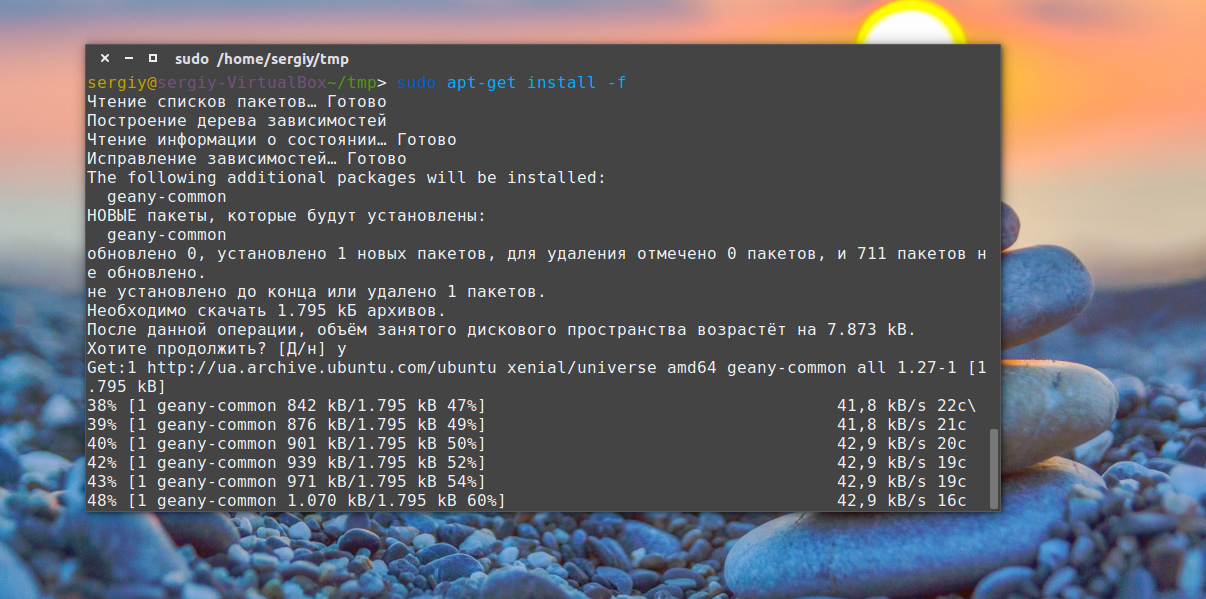
Теперь, когда зависимости были загружены, вы можете запускать и использовать программу.
Это не единственный способ установки пакетов ubuntu через терминал, утилиту gdebi тоже можно запустить таким способом:
Возможно, вы не знали, но apt тоже умеет устанавливать deb пакеты и даже более чем успешно разрешает зависимости. Только утилите нужно передать полный путь к файлу для установки. Если вы находитесь в папке с deb пакетом выполните:
sudo apt install ./имя_пакета.deb
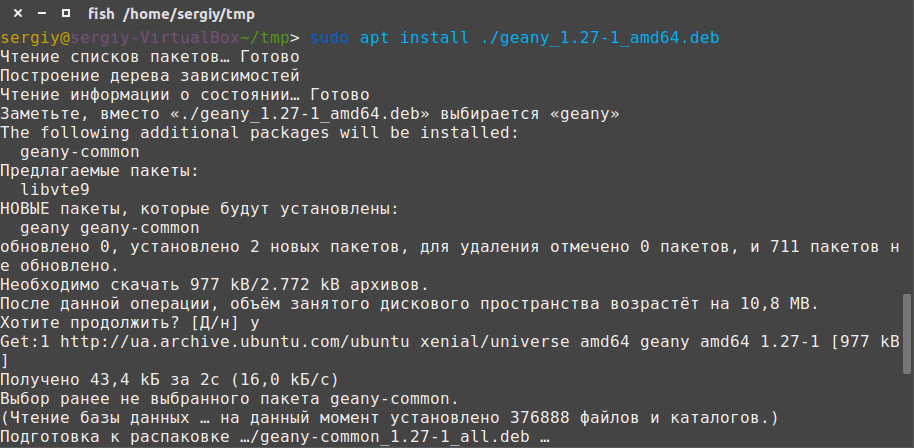
Программа автоматически установит все зависимости и больше ничего не придется выполнять.
Выводы
Вот и все. Теперь установка deb пакетов в Ubuntu не вызовет у вас проблем. Оказывается, есть несколько способов установки программ в ubuntu и все они имеют свои преимущества. Если у вас остались вопросы, спрашивайте в комментариях!
Обнаружили ошибку в тексте? Сообщите мне об этом. Выделите текст с ошибкой и нажмите Ctrl+Enter.
Package management with APT

Package management via apt-get runs hand-in-hand with the /etc/apt/sources.list file. For information on editing or updating your sources list see SourcesList.
Introduction
This page describes how to handle the packages on your system using apt-get and related commands. For example, you can install a new package, remove an installed package, or update all installed packages to the latest versions.
Commands

- Example:
sudo apt-get install ubuntu-desktop
Installation commands
 Use the -s flag to simulate an action. For example: «apt-get -s install » will simulate installing the package, showing you what packages will be installed and configured. Use the -s flag to simulate an action. For example: «apt-get -s install » will simulate installing the package, showing you what packages will be installed and configured. |
auto-apt
This command runs
- You’re compiling a program and, all of a sudden, there’s an error because it needs a file you don’t have. The program auto-apt asks you to install packages if they’re needed, stopping the relevant process and continuing once the package is installed.
Maintenance commands
The same as the above, except add the «smart upgrade» checkbox. It tells APT to use «smart» conflict resolution system, and it will attempt to upgrade the most important packages at the expense of less important ones if necessary.
| «apt-get dist-upgrade» does not upgrade from a previous version of Ubuntu. For more information of upgrading from a previous version of Ubuntu see http://www.ubuntu.com/getubuntu/upgrading . |
du -sh /var/cache/apt/archives
Reconfigure the named package. With many packages, you’ll be prompted with some configuration questions you may not have known were there.
- For example:
dpkg-reconfigure fontconfig-config
echo " hold" | dpkg --set-selections
 This command may have the unintended side effect of preventing upgrades to packages that depend on updated versions of the pinned package. apt-get dist-upgrade will override this, but will warn you first. If you want to use this command with sudo, you need to use echo " hold" | sudo dpkg --set-selections not sudo echo " hold" | dpkg --set-selections. This command may have the unintended side effect of preventing upgrades to packages that depend on updated versions of the pinned package. apt-get dist-upgrade will override this, but will warn you first. If you want to use this command with sudo, you need to use echo " hold" | sudo dpkg --set-selections not sudo echo " hold" | dpkg --set-selections. |
echo " install" | dpkg --set-selections
Removal commands
This command completely removes a package and the associated configuration files. Configuration files residing in ~ are not usually affected by this command.
- + operator
- If you want to remove package1 and install package2 in one step:
dpkg -l | grep '^rc' | awk '' | xargs dpkg --purge
Search commands
This command determines which installed package owns
. It shows files from installed packages that match , with the name of the package they came from. Consider this to be a «reverse lookup» utility.  In order to use this command, the package dlocate must be installed on your system.
dpkg -L package | grep /usr/bin
For more information on apt-get, apt-cache and dpkg consult their manual pages by using the man command. These manuals will provide a wider scope of information in addition to all of the options that you can use with each program.
- Example:
Typical usage example
I want to feel the wind in my hair, I want the adrenaline of speed. So let’s install a racing game. But what racing games are available?
apt-cache search racing game
It gives me a lot of answers. I see a game named «torcs». Let’s get some more information on this game.
Hmmm. it seems interesting. But is this game not already installed on my computer? And what is the available version? Which repository is it from (Universe or Main)?
Ok, so now, let’s install it!
What is the command I must type in the console to launch this game? In this example, it’s straightforward («torcs»), but that’s not always the case. One way of finding the name of the binary is to look at what files the package has installed in «/usr/bin». For games, the binary will be in «/usr/games». For administrative programs, it’s in «/usr/sbin».
dpkg -L torcs | grep /usr/games/
The first part of the command display all files installed by the package «torcs» (try it). With the second part, we ask to only display lines containing «/usr/games/».
Hmmm, that game is cool. Maybe there are some extra tracks?
But I’m running out of space. I will delete the apt cache!
Oh no, my mother asked me to remove all games from this computer. But I want to keep the configuration files so I can simply re-install it later.
If I want to also remove config files :
Setting up apt-get to use a http-proxy
These are three methods of using apt-get with a http-proxy.
Temporary proxy session
This is a temporary method that you can manually use each time you want to use apt-get through a http-proxy. This method is useful if you only want to temporarily use a http-proxy.
Enter this line in the terminal prior to using apt-get (substitute your details for yourproxyaddress and proxyport).
export http_proxy=http://yourproxyaddress:proxyport
If you normally use sudo to run apt-get you will need to login as root first for this to work unless you also add some explicit environment settings to /etc/sudoers, e.g.
Defaults env_keep = "http_proxy https_proxy ftp_proxy"
APT configuration file method
This method uses the apt.conf file which is found in your /etc/apt/ directory. This method is useful if you only want apt-get (and not other applications) to use a http-proxy permanently.
gksudo gedit /etc/apt/apt.conf
Add this line to your /etc/apt/apt.conf file (substitute your details for yourproxyaddress and proxyport).
Acquire::http::Proxy "http://yourproxyaddress:proxyport";
BASH rc method
This method adds a two lines to your .bashrc file in your $HOME directory. This method is useful if you would like apt-get and other applications for instance wget, to use a http-proxy.
Add these lines to the bottom of your ~/.bashrc file (substitute your details for yourproxyaddress and proxyport)
http_proxy=http://yourproxyaddress:proxyport export http_proxy
Save the file. Close your terminal window and then open another terminal window or source the ~/.bashrc file:
Test your proxy with sudo apt-get update and whatever networking tool you desire. You can use firestarter or conky to see active connections.
If you make a mistake and go back to edit the file again, you can close the terminal and reopen it or you can source ~/.bashrc as shown above.
How to login a proxy user
If you need to login to the Proxy server this can be achieved in most cases by using the following layout in specifying the proxy address in http-proxy. (substitute your details for username, password, yourproxyaddress and proxyport)
http_proxy=http://username:password@yourproxyaddress:proxyport
Useful additional packages
Additional links
Troubleshooting