- Change Install Theme in Kali Linux – GTK 3 themes
- Choice A: Manually install theme
- Step A.1: Install gnome-tweak-tool in Kali Linux
- Step A.2: Open Gnome Tweak Tool
- Change Themes in Kali Linux, Customization & Installation
- 1. Searching and Downloading Theme
- 2. Extracting and Copying Theme
- 3. Installing Theme
- Это самые лучшие 5 темы Kali Linux | Как сменить тему в Kali linux
- 1. Arc Red GTK & shell
- Зависимости
- 2. OSX-Arc-Collection
- Как установить
- 3. Gnome-OSX
- Как установить:
- 4. Ultra-Flat
- 5. reNIX (for Unity and GS)
Change Install Theme in Kali Linux – GTK 3 themes
Kali Linux default GNOME Theme is very boring and plain. The reason it is like that is because Kali Linux Dev team wanted to make a fast and reliable environment so that you can boot your system quickly and ge to work. But work (or hacking?) is just part of it. Like you, I sometimes get bored looking into the same old desktop over and over again and feel like having a new desktop or change color here and there. If you have a decent enough graphics card and processor (and RAM??) you might want to change or install theme in Kali Linux (this guide applies to any Kali version, so don’t worry which version you have). As Kali uses GNOME3 (GDM) Window Manager, so we will stick with GTK3 themes. The whole process takes only a few minutes and by the end of that, you should be able to:
- Install theme in Kali Linux
- Change default theme in Kali Linux
- Most importantly, roll back your changes and get same old Desktop back.
I’m a big fan of being able to roll back my changes so that if I mess up things, at least I will know where to go back and how to roll back. This saves a lot of trouble for later usage. Some themes are poorly made and throws errors all over my terminal. In that case, rolling back and using a different theme is the best idea. At the same time, I prefer to remove that erroneous theme or clean up theme directory. I guess that’s sound good, so let’s get on with it.
Before we start, there’s two different ways you can change theme.
I will show both because both got their own merits and the only way you learn enough is by trying every possible corners on anything.
Choice A: Manually install theme
A lot of people wants to manually install theme and there’s nothing wrong with it. Takes a few more minutes, but in this way you learn how theme works in Linux rather than just blindly typing in few commands and install themes.
Step A.1: Install gnome-tweak-tool in Kali Linux
To install themes manually, we need to install a tool called Gnome Tweak Tool . But before you do that, please ensure you have the correct Kali Repositories added. You can follow my guide on adding official repositories in Kali Linux.
At this point I would assume you have the correct repositories added. So just type in the following command to install gnome-tweak-tool.
root@kali:~# apt-get install gnome-tweak-tool

Step A.2: Open Gnome Tweak Tool
You can now go to Applications > System Tools > Preferences > Advanced Settings and select Theme TAB to inspect the current settings.
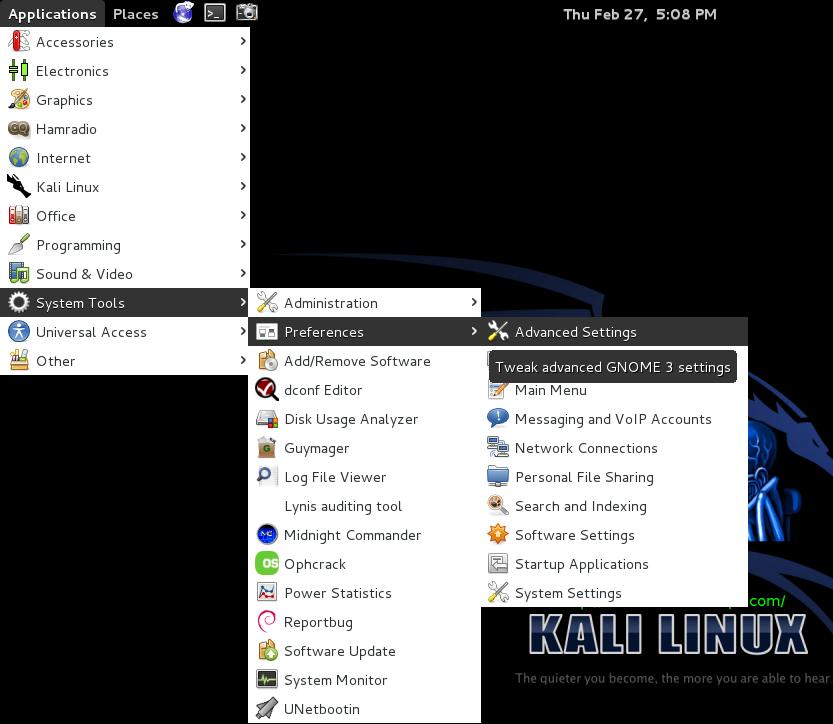
STOP : At this point I would like to take a screenshot of GNOME Tweak Tool. The reason I want it because I want to keep a copy of existing settings so that if I want, I can re-select the same settings to roll back my changes.
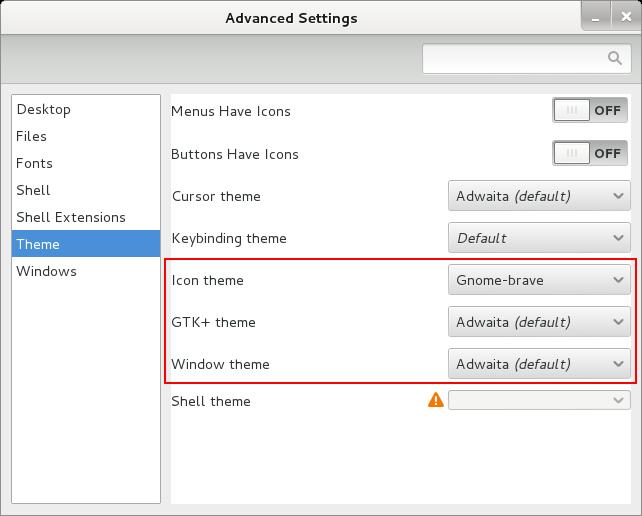
See the Tab Window Theme, Theme Icon and GTK + Theme I still use (the default) as my default settings.
Change Themes in Kali Linux, Customization & Installation
This article will teach you how to change and install themes in Kali Linux. You can simply install new themes if you’re bored with the current interface and looking for a fresh interface with awesome icons and graphics while doing pen-testing.
1. Searching and Downloading Theme
The first thing you can do is navigate to the GNOME-look website to search and download themes. There you can find shell themes, icons, add-ons, or whatever customization you want to do with your Kali Linux operating system.

You can download any theme that says GTK3/4 in tar.gz or zip format. So in the next step, we have to install our theme.

2. Extracting and Copying Theme
After you have downloaded your favorite theme for Kali Linux, we will extract the files and move the necessary files to the required directory.
Open up your terminal type: tar — zxvf mytheme.tar.gz or unzip mytheme.zip
When you are done with the extract, you have to move these files to this directory: /usr/share/themes/
3. Installing Theme
Now, you are in the installation step; this will require you to install a tool that can be used to apply themes. The tool is called “Gnome Tweak Tool” this tool comes pre-installed in the latest Kali Linux version, but in the older version, you can open up your terminal and install that tool.
Type in terminal: apt-get install gnome-tweak-tool
Open the tweak tool, and under the appearance tab, you will find the themes section. To change your appearance to the downloaded theme, you can change your GTK+, Icons, and Shell theme from the tweak tool.
Это самые лучшие 5 темы Kali Linux | Как сменить тему в Kali linux

Обзоры
1. Arc Red GTK & shell
Красная вариация Arc Horst3180.
Зависимости
Gnome/GTK 3.14, 3.16, 3.18 or 3.20
The gnome-themes-standard package
The murrine engine. This has different names depending on your distro.
gtk-engine-murrine (Arch Linux)
gtk2-engines-murrine (Debian, Ubuntu, elementary OS)
gtk-murrine-engine (Fedora)
gtk2-engine-murrine (openSUSE)
gtk-engines-murrine (Gentoo)
Main distributions that meet these requirements are
Arch Linux and Arch Linux based distros
Ubuntu 15.04, 15.10 and 16.04 (Ubuntu 14.04 and 14.10 are not supported)
elementary OS Freya
Debian 8, Testing or Unstable
Gentoo
Fedora 21 – 24
openSUSE 13.2, Leap 42.1 and Tumbleweed
2. OSX-Arc-Collection
Как установить
1А. Извлечь в / usr / share / themes
или ~ / .themes (при необходимости создайте его (в вашей домашней папке));
2. В качестве альтернативы нажмите кнопку установки рядом с темой
(следуйте инструкциям, нажав на вопросительный знак рядом с кнопкой установки)
3. Измените с помощью специального инструмента настройки.
Существуют темы firefox для тем Arc:
Чтобы установить тему Chrome / Chromium, перейдите в папку «Дополнительно» и перетащите файл arc-theme.crx или arc-dark-theme.crx или arc-darker-theme.crx в окно Chrome / Chromium. Источник тем Chrome находится в исходной папке «OSX-Arc-White & gt; Дополнительная папка & gt; Дуга-theme.crx
Чтобы установить тему Plank, скопируйте дополнительную / папку Arc-Plank в ~ / .local / share / plank / themes или в / usr / share / plank / themes для общесистемного использования. Теперь откройте окно предпочтений Plank, выполнив plank -preferences с терминала и выберите Arc-Plank в качестве темы.
Обои включены в дополнительную папку в папке OSX Arc White, есть несколько обоев, включая ту, что отображается на снимках экрана.
Рекомендуемые темы для иконок:
3. Gnome-OSX
Сделано paulxfce (псевдоним Manjarocinnamonfan, paulubuntu)
Новая дополнительная тема:
Gnome-OSX без прозрачной боковой панели (NT)
Последнее обновление:
новое обновление: 10/6/2017: исправления ошибок
Новое обновление 14/5/2017: совместимо с gnome 3.24; меньшая панель заголовка и кнопки; удаленный избыточный код; добавлена страница Github
Новое обновление 16.02.2012
Новое обновление 12/2/2017
Новое обновление: 11/2/2017
Новое обновление 9/2/2017
UPDATE: полностью новая версия.
Отдельная загрузка для Shell-тем:
– Тема Shell с белым доком и слегка темным верхним баром
– Тема корпуса с темной док-станцией и темным верхним баром
Эта тема разработана на gnome 3.20 и обновлена до 3.24
Это работает только на gnome-desktop, без поддержки других настольных сред.
Когда, как таковые, тематика не выглядит так, как должно быть: убедитесь, что вы установили необходимые темы – «engines»:
gtk-engine-murrine (Arch Linux)
gtk2-engines-murrine (Debian, Ubuntu, elementary OS)
gtk-murrine-engine (Fedora)
gtk2-engine-murrine (openSUSE)
gtk-engines-murrine (Gentoo)
Как установить:
Просто скопируйте извлеченный файл в папку «.themes», которую вы создаете в своем домашнем каталоге.
Затем используйте Tweak-tool для выбора темы GTK и оболочки.
Разлогиньтесь и вернитесь, чтобы изменения вступили в силу!
Чтобы поместить кнопки влево, откройте терминал:
# gsettings set org.gnome.desktop.wm.preferences button-layout “close,minimize,maximize:”
Чтобы вернуть кнопки вправо, если вы хотите вернуться:
# gsettings set org.gnome.desktop.wm.preferences button-layout “:minimize,maximize,close”
4. Ultra-Flat
Проверено только в Ubuntu.
Тема значка – сильно измененная версия темы иконки Flattr.
Иконки доступны здесь: http://gnome-look.org/content/show.php?content=167477
5. reNIX (for Unity and GS)

reNIX представляет собой квадратную вариацию тем единства и метафильтности GTKdroid и Nööp, в которую встраивается измененная версия темы GTK3 NIX.
– Обои 1: http://lassekongo83.deviantart.com/art/Derp-271379331
– Обои 2: http://simpledesktops.com/browse/desktops/2011/jul/23/blue-progression/
– Тема темы: http://gnome-look.org/content/show.php/?content=136508
– Шрифт: http://www.fontsquirrel.com/fonts/Aller/
Пожалуйста, не спамьте и никого не оскорбляйте. Это поле для комментариев, а не спамбокс. Рекламные ссылки не индексируются!

- Аудит ИБ (49)
- Вакансии (12)
- Закрытие уязвимостей (105)
- Книги (27)
- Мануал (2 306)
- Медиа (66)
- Мероприятия (39)
- Мошенники (23)
- Обзоры (820)
- Обход запретов (34)
- Опросы (3)
- Скрипты (114)
- Статьи (352)
- Философия (114)
- Юмор (18)

Anything in here will be replaced on browsers that support the canvas element
OpenVPN Community Edition (CE) – это проект виртуальной частной сети (VPN) с открытым исходным кодом. Он создает защищенные соединения через Интернет с помощью собственного протокола безопасности, использующего протокол SSL/TLS. Этот поддерживаемый сообществом проект OSS (Open Source Software), использующий лицензию GPL, поддерживается многими разработчиками и соавторами OpenVPN Inc. и расширенным сообществом OpenVPN. CE является бесплатным для […]
Что такое 404 Frame? Большинство инструментов для взлома веб-сайта находятся в 404 Frame. Итак, что же представляют собой команды? Вы можете отдавать команды, используя повседневный разговорный язык, поскольку разработчики не хотели выбирать очень сложную систему команд. Команды Команды “help” / “commands” показывают все команды и их назначение. Команда “set target” – это команда, которая должна […]
В этой заметке вы узнаете о блокировке IP-адресов в Nginx. Это позволяет контролировать доступ к серверу. Nginx является одним из лучших веб-сервисов на сегодняшний день. Скорость обработки запросов делает его очень популярным среди системных администраторов. Кроме того, он обладает завидной гибкостью, что позволяет использовать его во многих ситуациях. Наступает момент, когда необходимо ограничить доступ к […]
Знаете ли вы, что выполняется в ваших контейнерах? Проведите аудит своих образов, чтобы исключить пакеты, которые делают вас уязвимыми для эксплуатации Насколько хорошо вы знаете базовые образы контейнеров, в которых работают ваши службы и инструменты? Этот вопрос часто игнорируется, поскольку мы очень доверяем им. Однако для обеспечения безопасности рабочих нагрузок и базовой инфраструктуры необходимо ответить […]
Одной из важнейших задач администратора является обеспечение обновления системы и всех доступных пакетов до последних версий. Даже после добавления нод в кластер Kubernetes нам все равно необходимо управлять обновлениями. В большинстве случаев после получения обновлений (например, обновлений ядра, системного обслуживания или аппаратных изменений) необходимо перезагрузить хост, чтобы изменения были применены. Для Kubernetes это может быть […]