- Steps as follows
- WebSphere Application Server 8.5.5 ND Installation Guide
- Downloading IBM Installation Manager
- Installing IBM Installation Manager
- Downloading IBM WAS 8.5.5 ND
- Installing WAS 8.5.5 Network Deployment
- WAS 8.5.5 Installation guide RHEL 7
- Downloading IBM Installation Manager
- Installing IBM Installation Manager
- Downloading IBM WAS 8.5.5 ND
- Installing WAS 8.5.5 Network Deployment
Steps as follows
1) Download the necessary packages and the fixpacks from the Passport Advantage
2) Ensure the necessary access is available .. in our case its root ( Though we can install using a non-root user)
3) Create the necessary filesystems ( we will be installing in /apps )
4) Check for sufficient space in the filesystem to extract the zip files and the installation
Below are the files which we have downloaded and transferred in the server
Installation Manager 1.6
agent.installer.linux.gtk.x86_1.6.0.20120831_1216.zip
WAS ND Fixpack 8.5.5.3
8.5.5-WS-WAS-FP0000003-part1.zip
8.5.5-WS-WAS-FP0000003-part2.zip
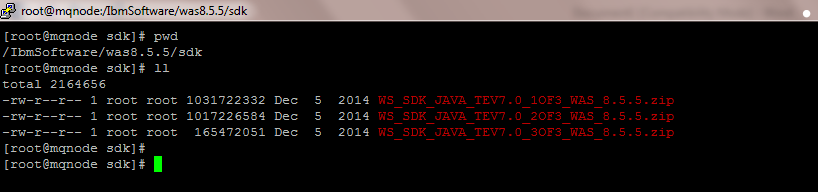
WASND 8.5.5 SDK
WS_SDK_JAVA_TEV7.0_1OF3_WAS_8.5.5.zip
WS_SDK_JAVA_TEV7.0_2OF3_WAS_8.5.5.zip
WS_SDK_JAVA_TEV7.0_3OF3_WAS_8.5.5.zip
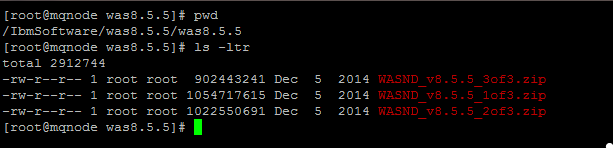
WASND 8.5.5
WASND_v8.5.5_1of3.zip
WASND_v8.5.5_2of3.zip
WASND_v8.5.5_3of3.zip
I have created few folders within /IbmSoftware/was8.5.5/ and saved the corresponding files in these folders
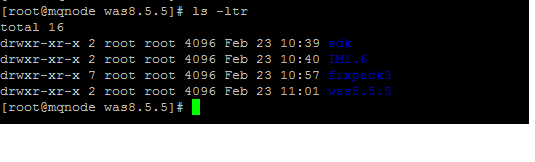
PATH
/IbmSoftware/was8.5.5/IM1.6
agent.installer.linux.gtk.x86_1.6.0.20120831_1216.zip
/IbmSoftware/was8.5.5/was8.5.5
WASND_v8.5.5_1of3.zip
WASND_v8.5.5_2of3.zip
WASND_v8.5.5_3of3.zip
/IbmSoftware/was8.5.5/sdk
WS_SDK_JAVA_TEV7.0_1OF3_WAS_8.5.5.zip
WS_SDK_JAVA_TEV7.0_2OF3_WAS_8.5.5.zip
WS_SDK_JAVA_TEV7.0_3OF3_WAS_8.5.5.zip
/IbmSoftware/was8.5.5/fixpack
8.5.5-WS-WAS-FP0000003-part1.zip
8.5.5-WS-WAS-FP0000003-part2.zip
5)Installation of Installation Manager
a) Unzip the Installation Manager setup agent.installer.linux.gtk.x86_1.6.0.20120831_1216.zip

#unzip agent.installer.linux.gtk.x86_1.6.0.20120831_1216.zip
![]()
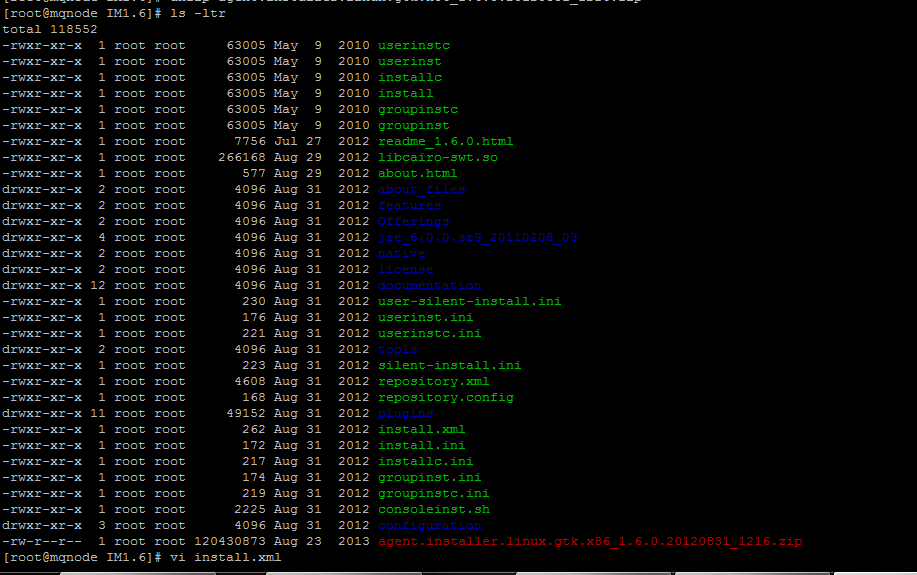
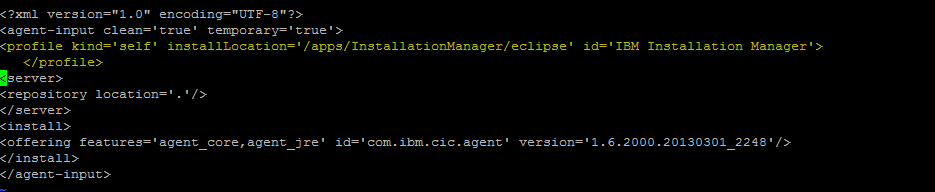
Edit install.xml to define the location for IM installation
b) #vi install.xml
Add the below entries in the install.xml file
Highlighted the entries in yellow where “/apps/InstallationManager/eclipse” is the location where I need to install the Installation Manager
c) Install IM1.6 silently
Execute #./installc –acceptLicense
This command reads the install.xml file and installed it in the location mentioned in it

Once the installation is completed the message “Installed to the directory is displayed
d) Verify the installation and the versions of Installation Manager
Navigate to /apps/InstallationManager/ folder


Execute ./imcl -version to check the version of IM fron /apps/InstallationManager/eclipese/tools/
THIS IS HOW WE INSTALL INSTALLATION MANAGER SILENTLY
6) CREATING THE Response xml files
a) Launching Xming to display the graphical interface of the commands
Note : you can use any other X11 utility for unix but I prefer Xming
CONFIGURING XMING
1) Download Xming and install it on ur local machine from where you want to connect
2) Execute the XLaunch icon
3) Select Multiple Windows and “Next”

Select “Start no Client”
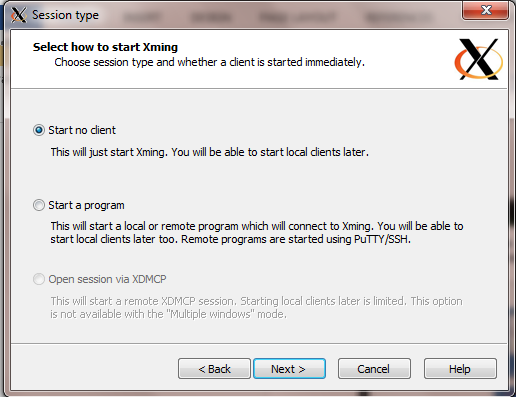
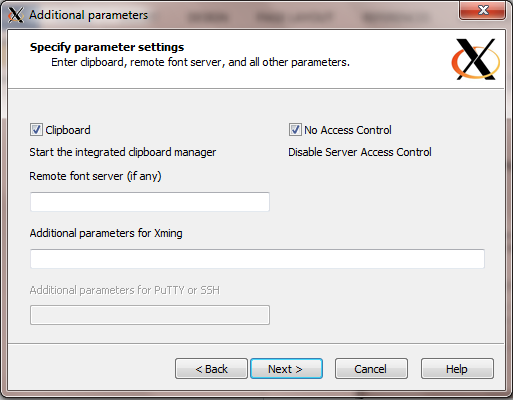
Select “No Access Control”
Lauch Putty
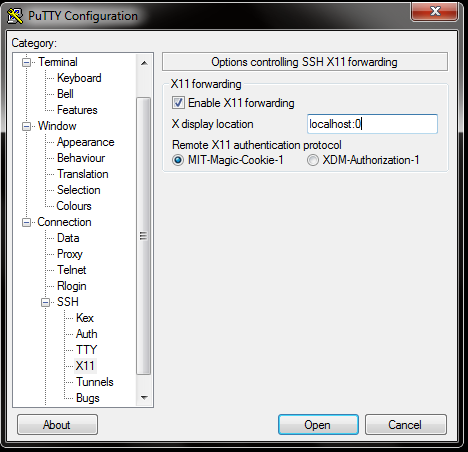
And expand the Putty Settings > Connections >> SSH >> X11
Enable “X11 Forwarding” and mention localhost:0
Now put the ip and login
Once logged in enter “w” to determine the ip you are connecting to the WAS server with .. Here its 10.0.0.2

Export the display variable using
#export=DISPLAY=10.0.0.2:0.0
Run xclock to check if it works

This confirms that ths X11 forwarding works
7) Generating the response.xml files
a) Generating the response.xml files using the record funciton of IM
-record : ensures we are using the record function
/apps/WAS8.8.8_Install.xml : is the response file which will be created ( any file name can be used)
-skipInstall : This is to skip the installation and only create the response
/tmp/was8.5.5 : is a temp location where the Installation Manager will extract the files ( this can be any location )
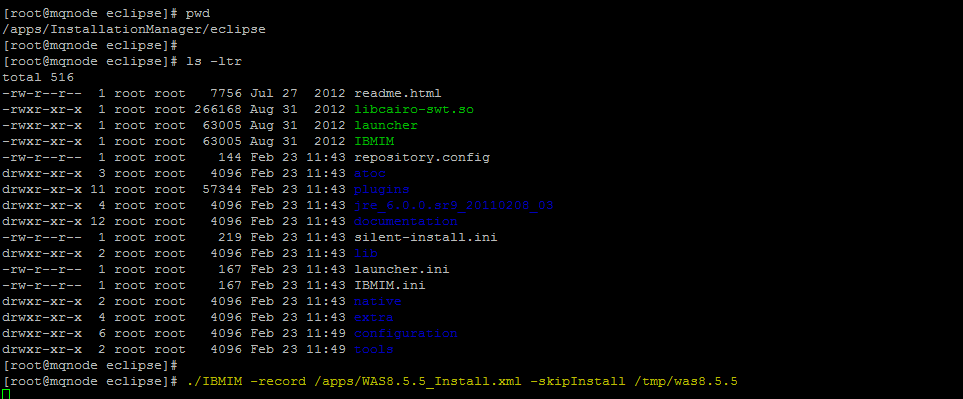
This will launch the Installation Manager in Skip Install Recording mode (Highlighted in Yellow)

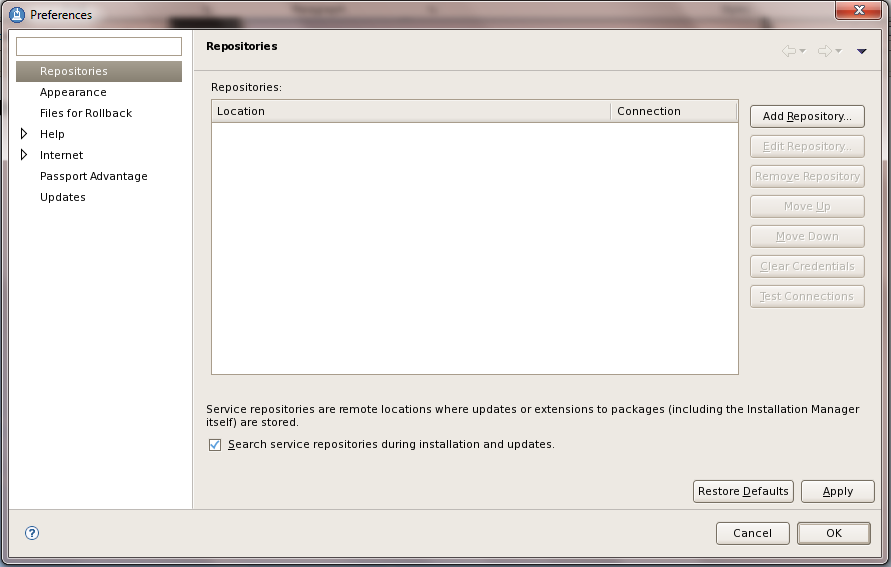
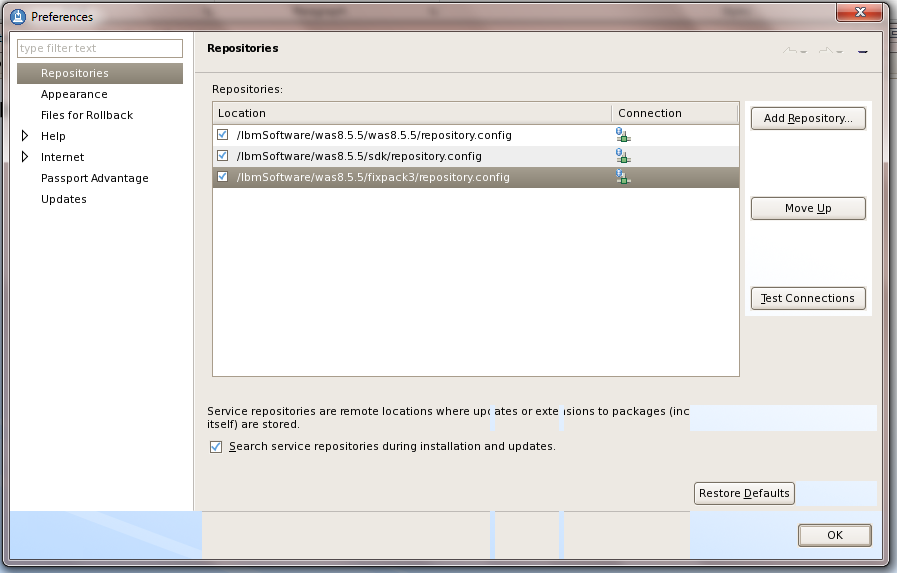
b) Add the repositories needed for WAS 8.5.5 install
c) We will be installing the fixpack also together along with the base install
Select the repository.config for was8.5.5
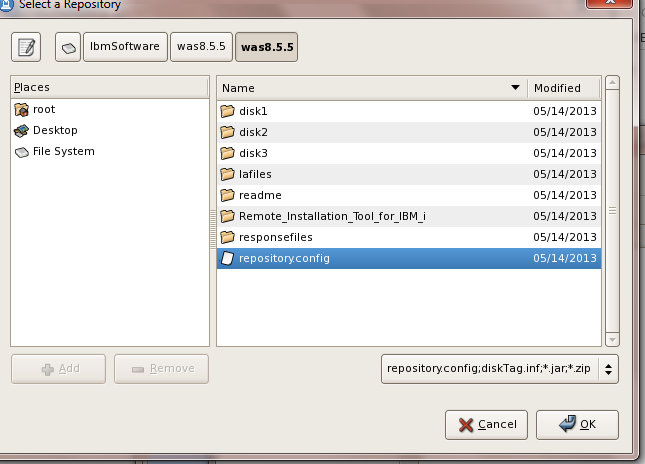
Similarly do it for the repository.config for SDK folder and the fixpack 3
c) Then Click Install to launch the installer function
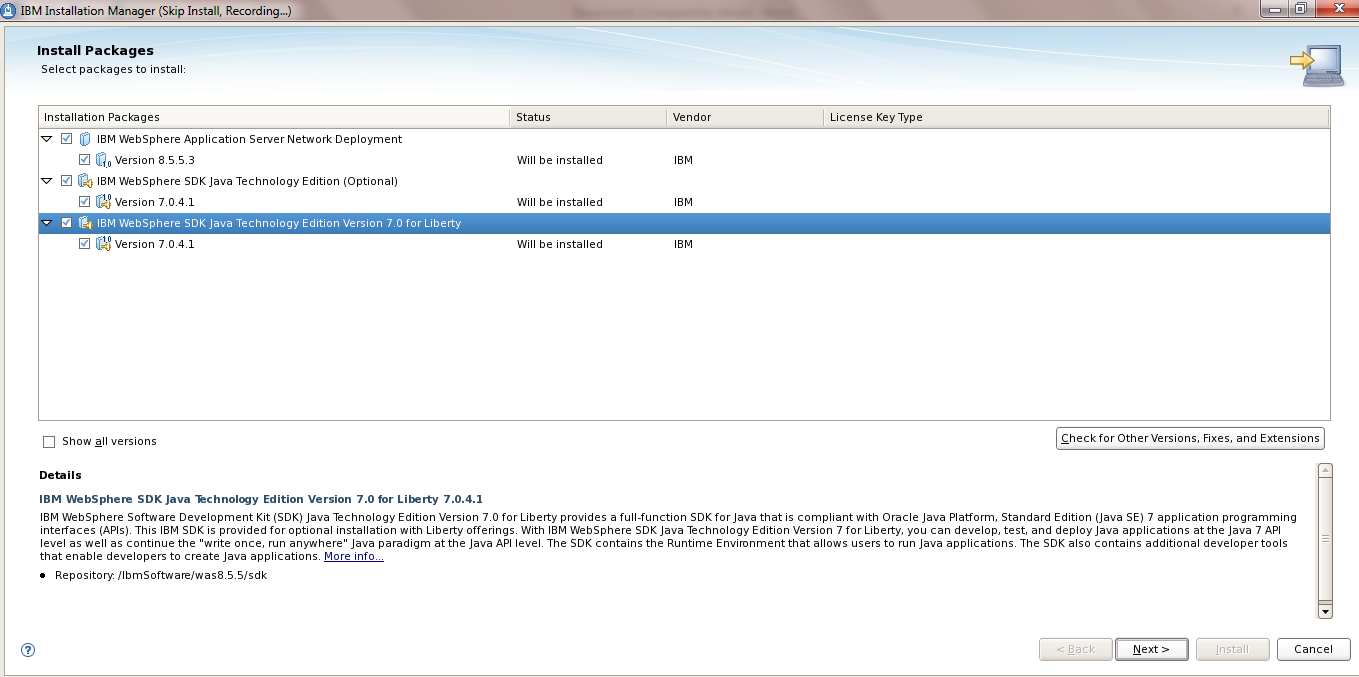
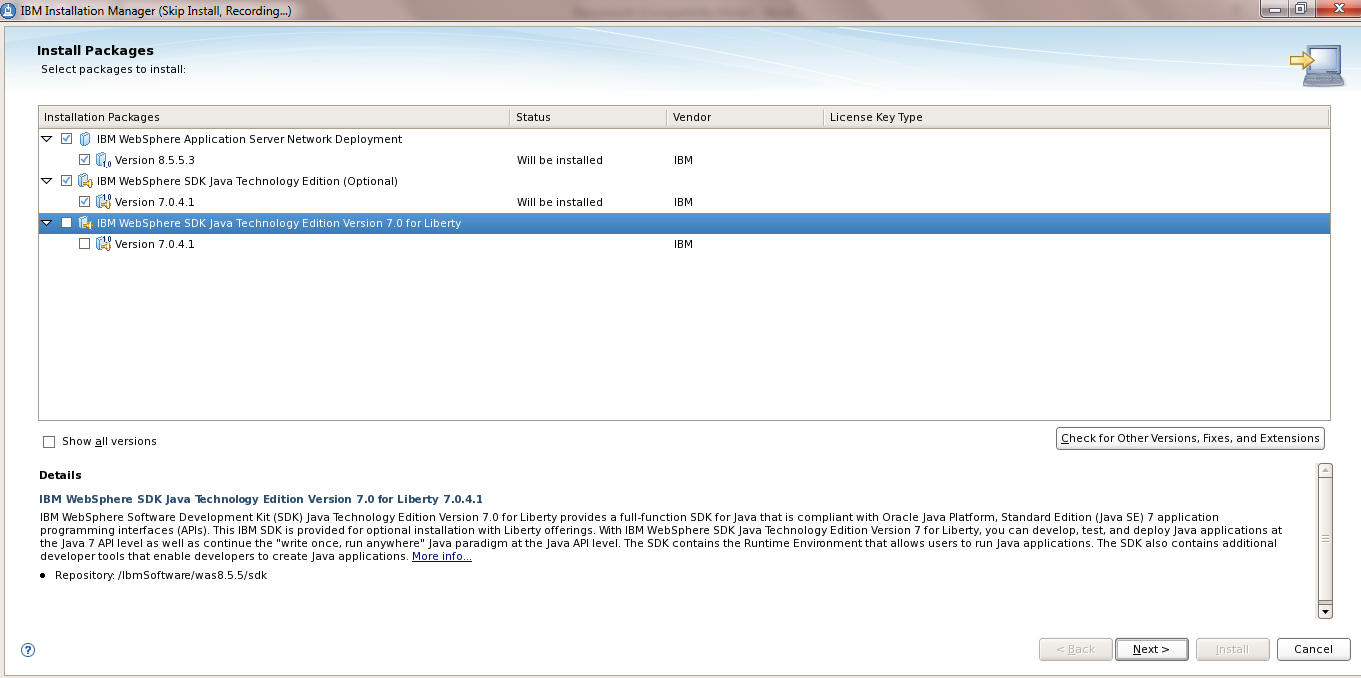
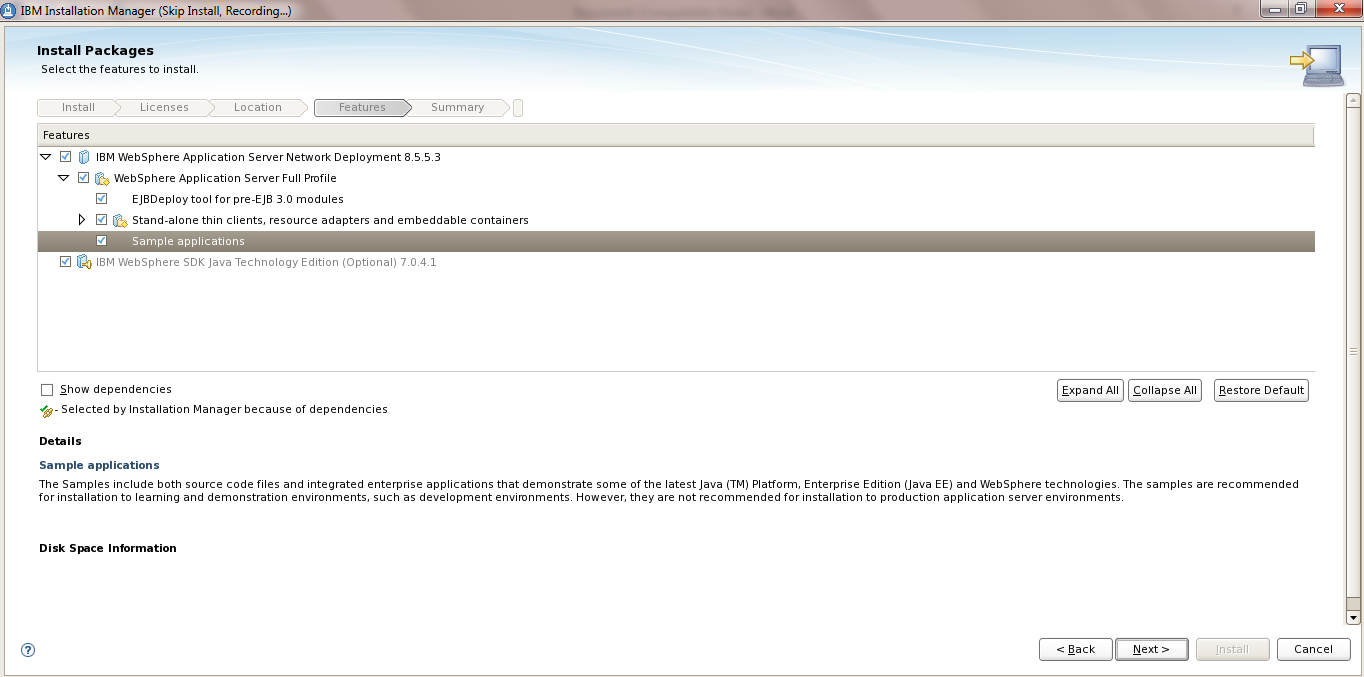
This will display the packages for the installation ( We wil deselect the SDK for Liberty profile as its not needed for now)
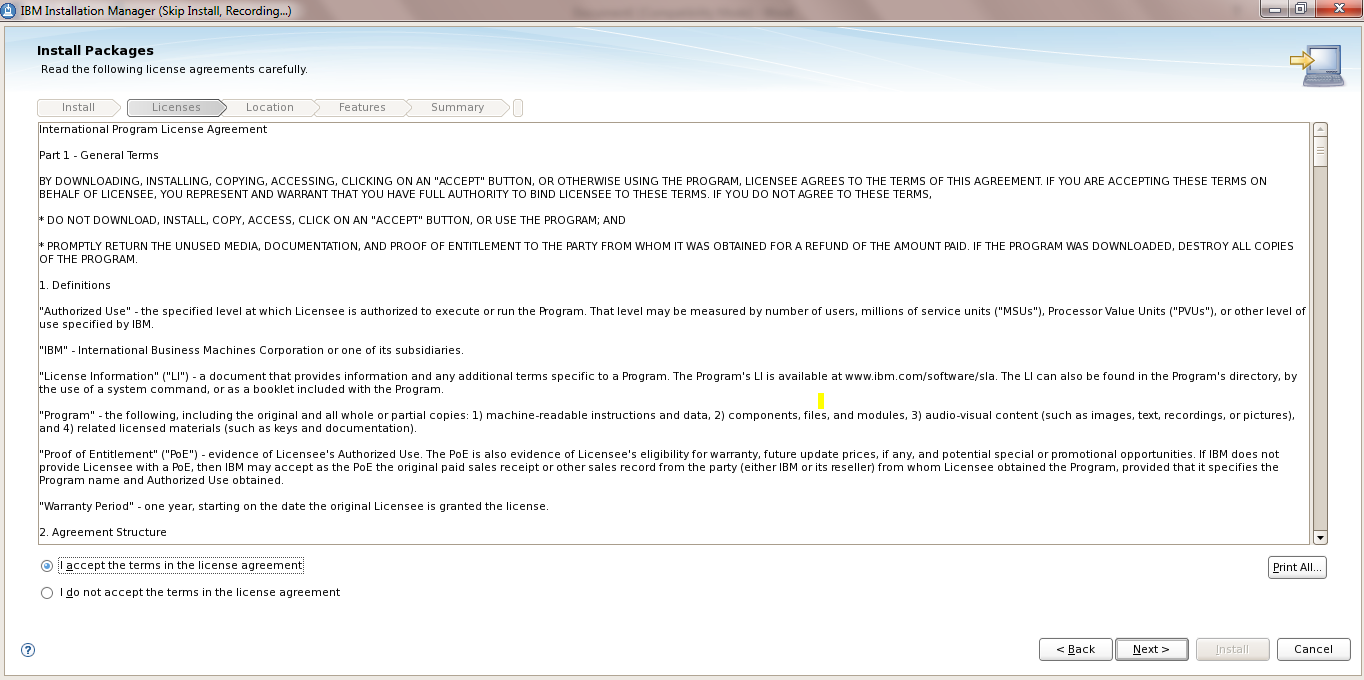
e) Accept the License
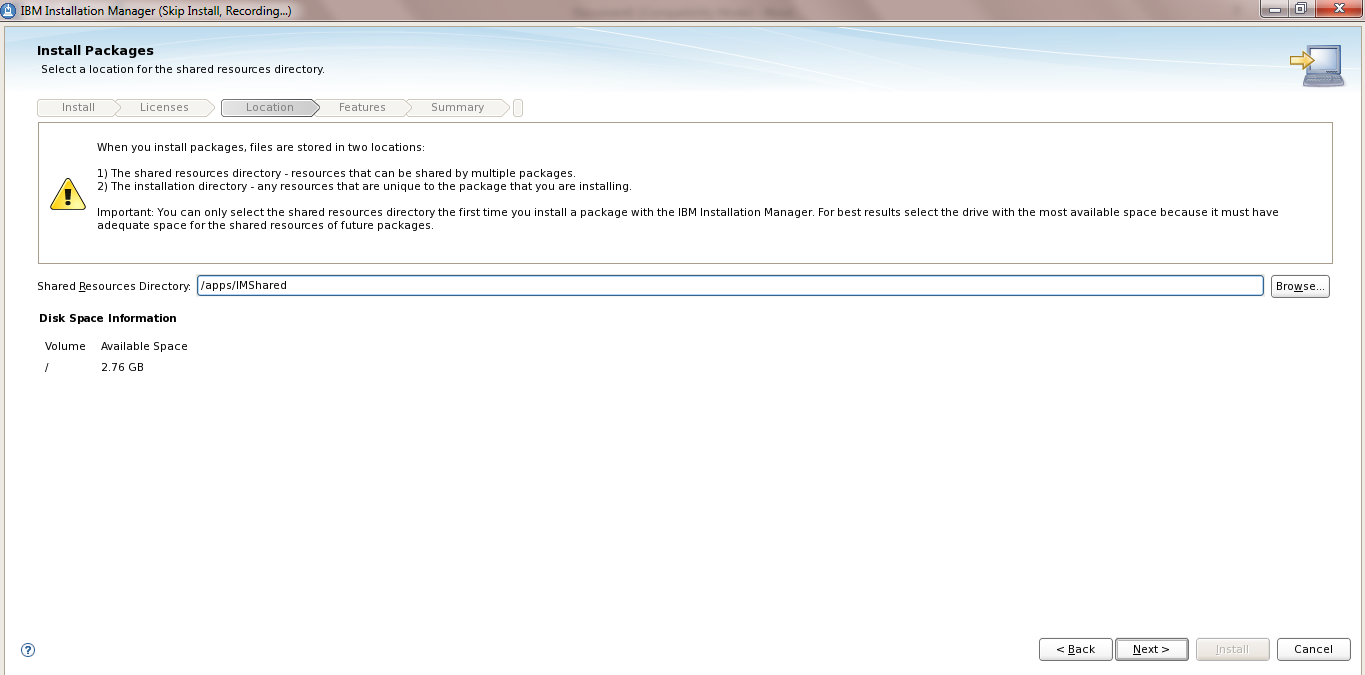
f) Provide the path of the Shared Repository Directory ..
I gave it /apps/IMShared as I want all the installation binaries in /apps
g) Provide the path where you want the WAS8.5.5.3 to be installed
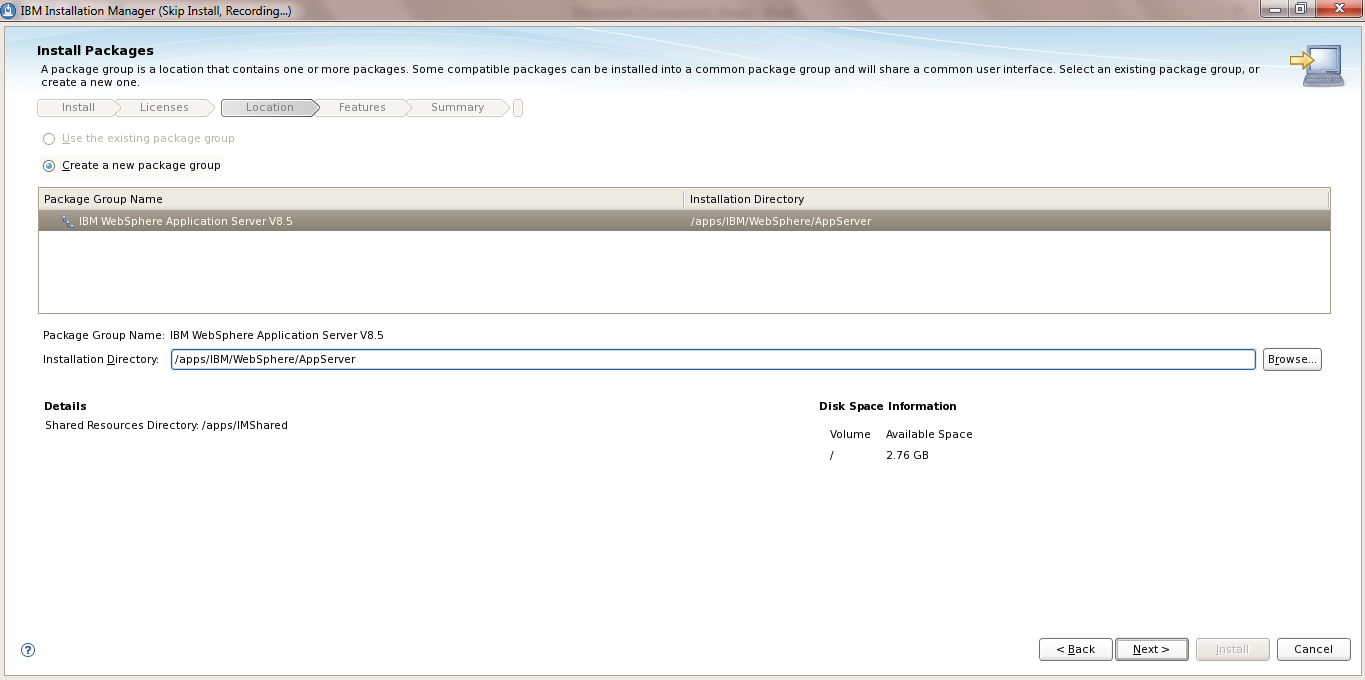
h) Select the options needed
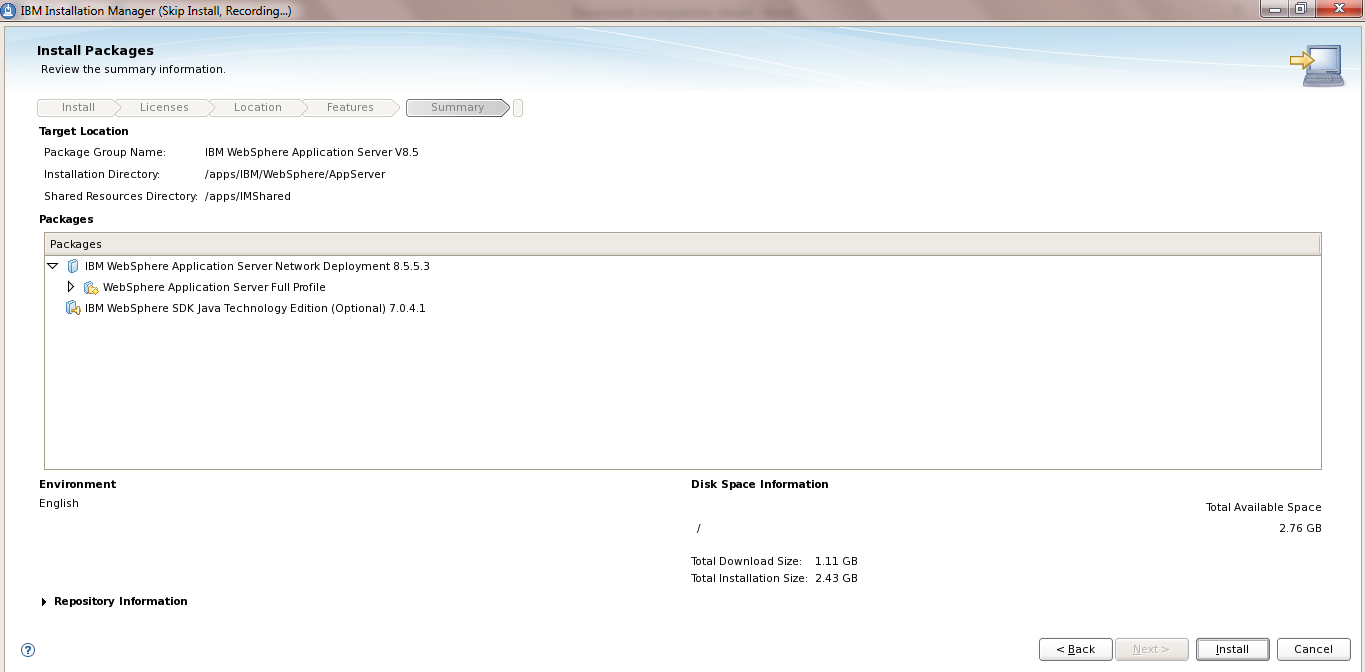
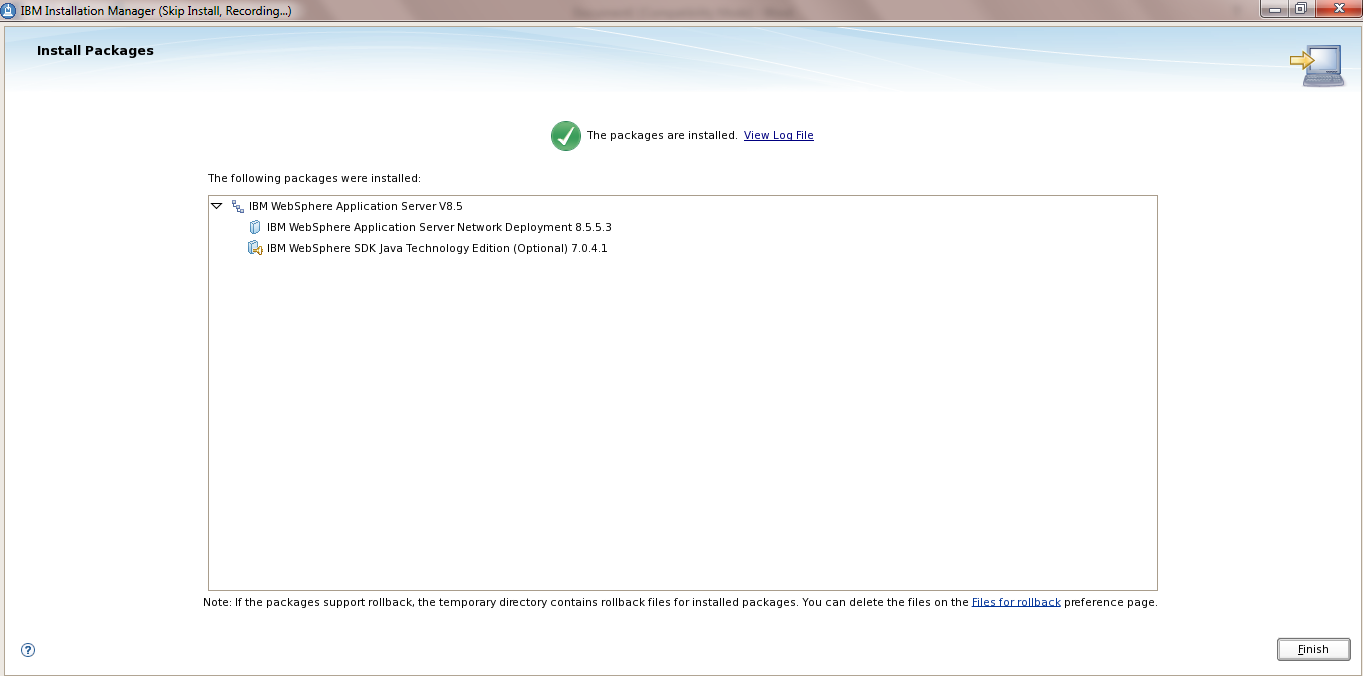
Summary screen is displayed. Click Install
Here you can observe that the IBM WAS version is provided 8.5.5.3
IM has automatically detected the Fixpack also added in the repository
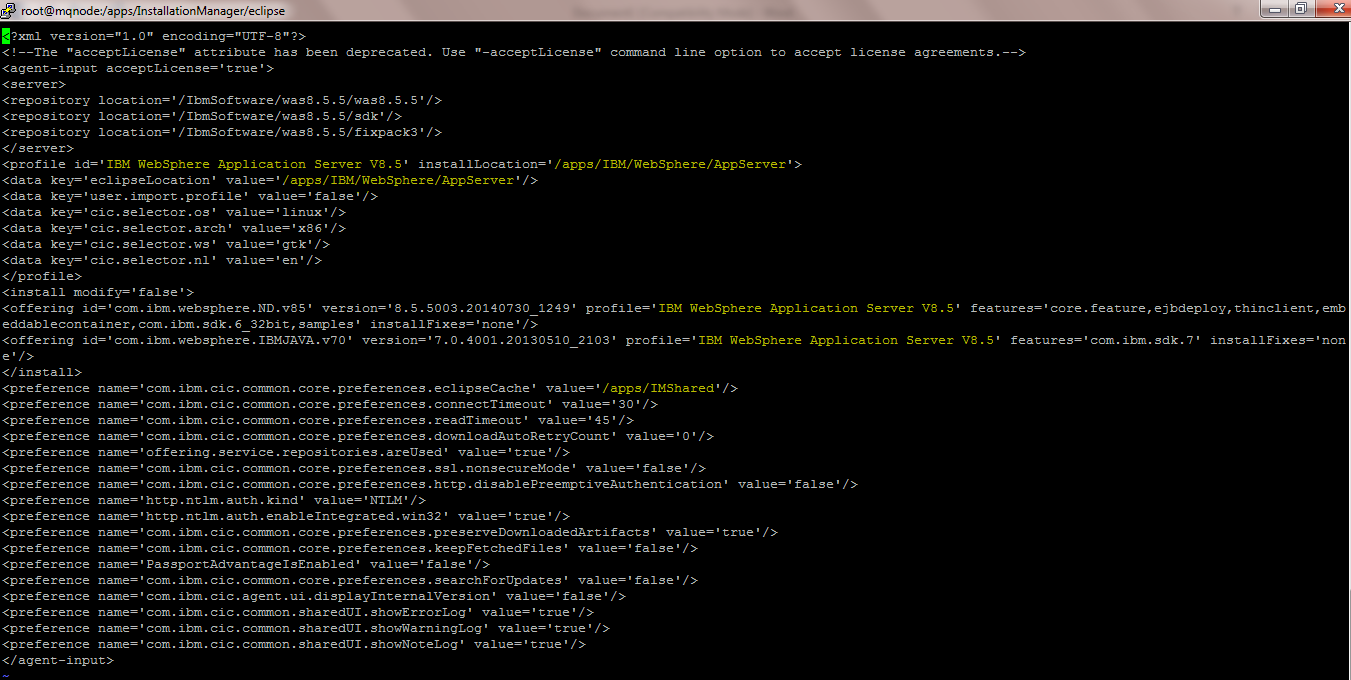
i) A file /apps/WAS8.8.8_Install.xml which is the response file for WAS8.5.5.3 Installation

Open the file /apps/WAS8.8.8_Install.xml
Some observation :
We can see the repository location for the packages
“/ibmSoftware…….”
j) Modify the installLocation as per your needs
Change the Profile id as required .. though not necessary unless you allready have an installation of was with the same profile id
Eg “ IBM WebSphere Application Server V8.5 MY SERVER”
Verify that the files once again for any typo error and save it
k) Execute the imcl to install the WAS
[root@mqnode was8.5.5]# /apps/InstallationManager/eclipse/tools/imcl input /apps/WAS8.5.5_Install.xml -acceptLicense -sP

After few minutes if all is well then it will give the output that WAS 8.5.5.3 is installed

l) Verify the Installation

m) Check the version using ./versionInfo.sh
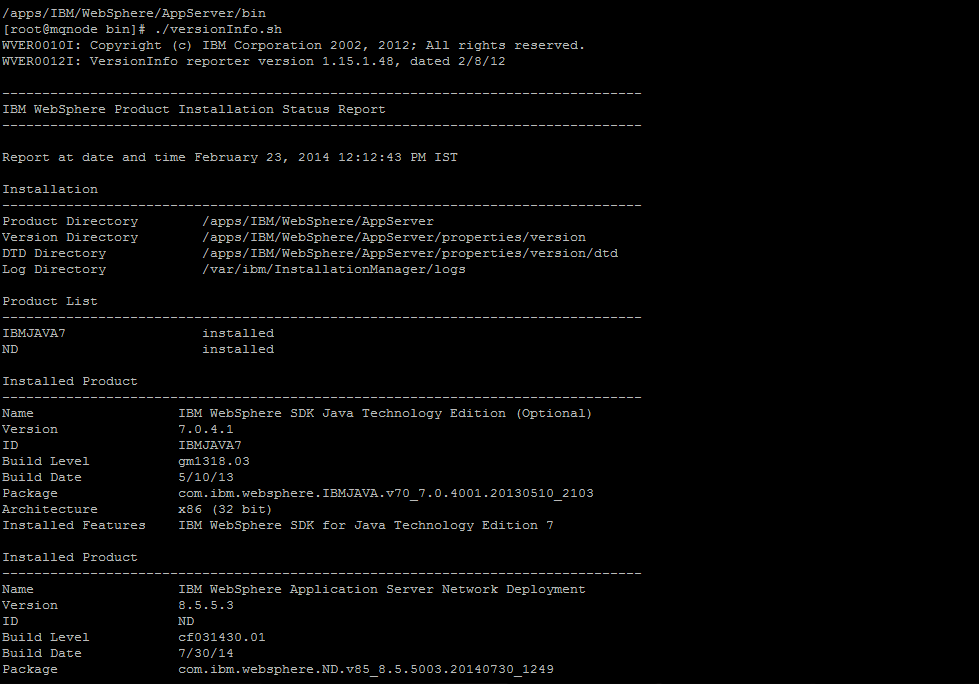
Here we can see WAS ND 8.5.5.3 is installled at /apps/IBM location
NOTE:This response file can be used to install similar was8.5.5.3 on different machines
Also using the record function any Installation response file can be created ie for IHS , BPM8, Websphere Portal 8 etc .
WebSphere Application Server 8.5.5 ND Installation Guide

Invicti Web Application Security Scanner – the only solution that delivers automatic verification of vulnerabilities with Proof-Based Scanning™.
As an IBM WebSphere administrator, you should be aware of how to install the product. This is essential.
Following instructions to guide you on how to install WebSphere Application Server (WAS) 8.5.5 Network Deployment on Linux 64 bit.
We will use IBM Installation Manager to install WAS 8.5.5 ND. For Windows installation, you can refer “WAS ND 8.5.5. Installation Guide for Windows”
There are four sections in this articles.
- Download IBM Installation Manager
- Install IBM Installation Manager
- Download IBM WAS ND
- Install IBM WAS ND
Downloading IBM Installation Manager
Installing IBM Installation Manager
unzip agent.installer.linux.gtk.x86_64_1.7.0.20130828_2012.zip
- Execute ./install to start installation
- Click on Next
- Select the license agreement and click Next
- Select the Installation Manager Directory to be installed. You can leave it to default if you wish to install under /opt/IBM
- Review the summary information and click on Install to begin installation
- Click on Restart Installation Manager on completion wizard
Great, IBM Installation Manager 1.7 is installed now!
Downloading IBM WAS 8.5.5 ND
was.repo.8550.ndtrial_part1.zip was.repo.8550.ndtrial_part2.zip was.repo.8550.ndtrial_part3.zip
Installing WAS 8.5.5 Network Deployment
unzip was.repo.8550.ndtrial_part1.zip unzip was.repo.8550.ndtrial_part2.zip unzip was.repo.8550.ndtrial_part3.zip
- Launch IBM Installation Manager if you have closed already. To launch you can go to /opt/IBM/InstallationManager/eclipse and execute
- Click on File >> Preferences
- Click on Add Repository
- Click on Browse and select repository.config which you got after extracting from was.repo.8550.ndtrial_part1.zip
- Click on Ok
- Click on Install
- Select Version 8.5.5.0 and click on Next
- Select the license agreement and click Next
- Click on browse to select Installation Directory, or you can leave it to default location /opt/IBM/WebSphere/AppServer and click on Next
- Select the additional language if you wish else click on Next
- You can customize the features, for ex: you can install sample applications and click on Next
- Review the installation summary and click on Install
- Select None and click on Finish
You just installed WebSphere Application Server 8.5.5 Network Deployment. You see it’s not that complex, but you should be aware of the procedure.
WAS 8.5.5 Installation guide RHEL 7
As a WebSphere administrator, you should be aware of how to install the product. This is essential.
Following instructions to guide you on how to install WebSphere Application Server (WAS) 8.5.5 Network Deployment on Linux 64 bit.
We will use IBM Installation Manager to install WAS 8.5.5 ND. For Windows installation, you can refer “WAS ND 8.5.5. Installation Guide for Windows”
There are four sections in this articles.
- Download IBM Installation Manager
- Install IBM Installation Manager
- Download IBM WAS ND
- Install IBM WAS ND
Downloading IBM Installation Manager

- After download, you should have agent.installer.linux.gtk.x86_64_1.7.0.20130828_2012.zip
Installing IBM Installation Manager
unzip agent.installer.linux.gtk.x86_64_1.7.0.20130828_2012.zip


- Select the license agreement and click Next
- Select the Installation Manager Directory to be installed. You can leave it to default if you wish to install under /opt/IBM


Great, IBM Installation Manager 1.7 is installed now!
Downloading IBM WAS 8.5.5 ND

was.repo.8550.ndtrial_part1.zip was.repo.8550.ndtrial_part2.zip was.repo.8550.ndtrial_part3.zip
Installing WAS 8.5.5 Network Deployment
unzip was.repo.8550.ndtrial_part1.zip unzip was.repo.8550.ndtrial_part2.zip unzip was.repo.8550.ndtrial_part3.zip
- Launch IBM Installation Manager if you have closed already. To launch you can go to /opt/IBM/InstallationManager/eclipse and execute

- Click on Browse and select repository.config which you got after extracting from was.repo.8550.ndtrial_part1.zip
- Click on Ok
- Click on Install


- Select the license agreement and click Next
- Click on browse to select Installation Directory or you can leave it to default location /opt/IBM/WebSphere/AppServer and click on Next

- Select the additional language if you wish else click on Next
- You can customize the features, for ex: you can install sample applications and click on Next


That’s all! You just installed WebSphere Application Server 8.5.5 Network Deployment. You see it’s not that complex but you should be aware of the procedure.