- How to Properly Install and Setup KDE Plasma on Arch Linux
- How to install and setup KDE desktop environment on Arch Linux
- Step 1: Create a sudo user (if you have only root user)
- Step 2: Installing KDE Plasma desktop
- What next?
- Arch Linux Installation with KDE Desktop
- Why Arch Linux
- Installation
- Setup LVM
- Install Packages
- New Root Directory
- Configure LVM and GRUB
- Installing Desktop Environment
- Encrypted Installation (Optional)
- Setup Encrypted LVM
- Configure LVM and GRUB
How to Properly Install and Setup KDE Plasma on Arch Linux
I believe you followed the fantastic It’s FOSS guide on installing Arch Linux. The guide ends with steps mentioning the installation procedure for GNOME desktop.
Now, not everyone is a GNOME fan and several readers requested that we show them how to configure the KDE desktop on Arch Linux.
And thus I created this guide to demonstrate the steps for properly installing and configuring KDE desktop (also known as KDE Plasma desktop) on Arch Linux.
How to install and setup KDE desktop environment on Arch Linux
Please keep in mind that KDE doesn’t allow login as root directly. If you have installed Arch Linux and using it as root, you should create a new user and give it sudo rights for running commands as root.
If you just have a bare minimum installation of Arch Linux, you probably are logging into a TTY terminal. If you are using some other desktop environment, steps remain the same.
Step 1: Create a sudo user (if you have only root user)
You can use the useradd command for creating a new user. I am creating user named dimitrios (that’s my name). You can use something that matches your name.
The option -m creates a home directory for the newly created user.
You should also set a password for this user. Use this command:
Now that you have created the user, give it sudo access. First, install sudo and a command line text editor like nano:
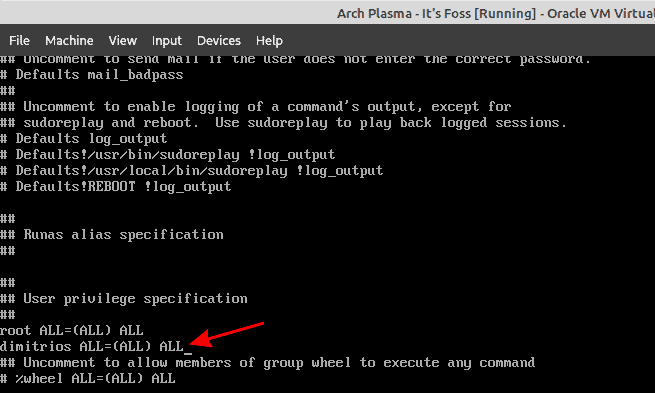
The configuration file for sudo is /etc/sudoers. It should always be edited with the visudo command. visudo locks the sudoers file, saves edits to a temporary file, and checks that file’s grammar before copying it to /etc/sudoers.
To use nano as the visudo editor, use:
Add the following line like I do in the example, then save and exit.
Save your changes and exit the editor. You now have a sudo user on Arch Linux.
Step 2: Installing KDE Plasma desktop
To run KDE desktop, you need the following packages:
- Xorg group
- KDE Plasma Desktop Environment
- Wayland session for KDE Plasma
- KDE applications group (consists of KDE specific applications including the Dolphin manager and other useful apps)
You can install of the above using the following command:
pacman -S xorg plasma plasma-wayland-session kde-applications Once installed, enable the Display Manager and Network Manager services:
systemctl enable sddm.service systemctl enable NetworkManager.serviceAlmost there. Shutdown your system:
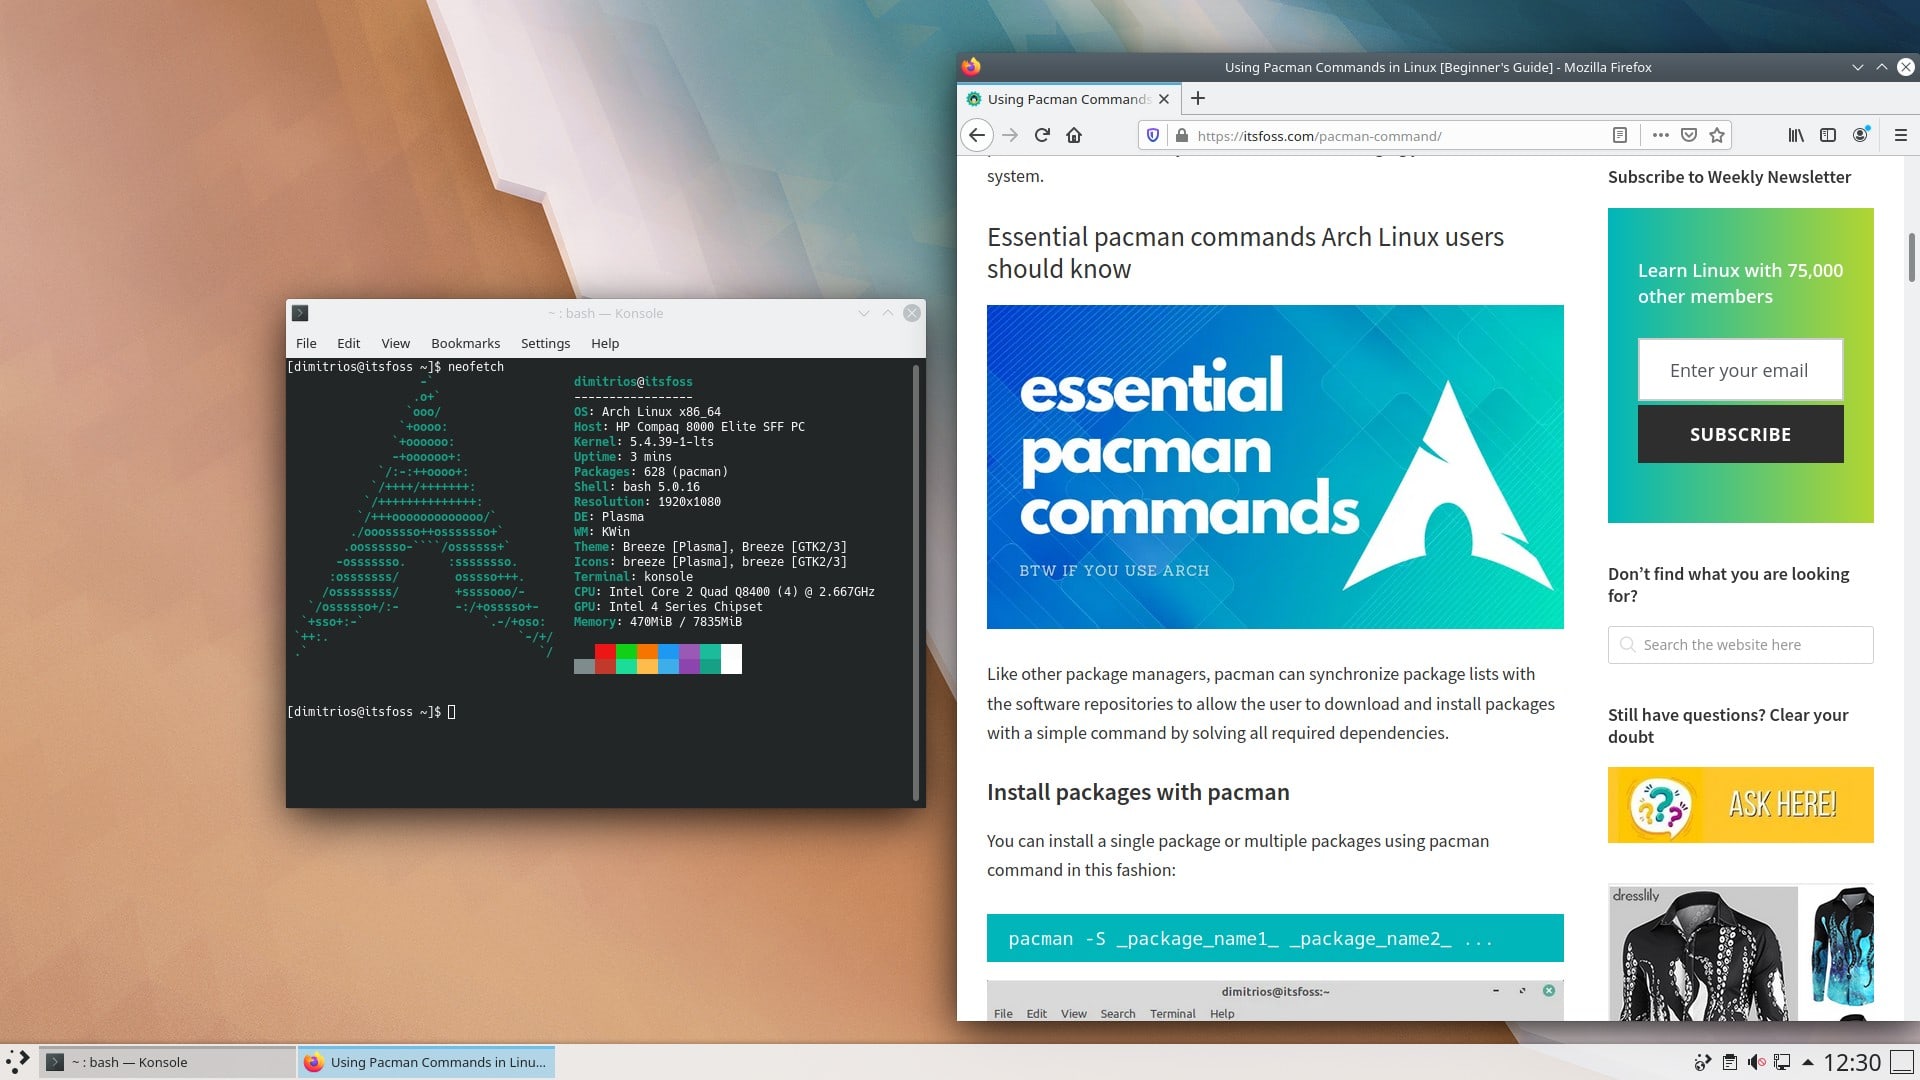
Power on your system and you should see the KDE login. Do you remember the password you set up for your sudo user? Use it to login.
What next?
You may want to explore the essential pacman commands, to know what’s going on with the Arch User Repository and learn more about AUR helpers.
I hope you found this tutorial helpful in installing KDE desktop on Arch Linux. Please let us know in the comments below, if you encountered any obstacle or difficulty during the installation.
What’s your favourite Desktop environment or Window Manager? Let us know and don’t forget to subscribe on our social media.
Arch Linux Installation with KDE Desktop
WARNING! This article is outadated. I wrote this article when I was using Arch Linux. I have since moved to Gentoo Linux and then to Debian Linux.
WARNING! Following this article, improvise if necessary. Your environment may be different than mine. I am not responsible if you screw up!
Disk encryption steps are optional. Its a good idea to encrypt disk on a laptop or in a hostile environments like your office.
Why Arch Linux
I used Kubuntu 12.04 as my desktop of choice as a novice. Kubuntu was (and still is for novices) no doubt a fairly good Ubuntu distribution and Ubuntu’s font patches to cairo libraries were the main reason for me sticking to it.
One of the issues I had with Ubuntu was that when I added 3rd party repositories to the distro and installed software, the system started to become slower and gradually unstable. I started looking for a distribution when would have Ubuntu’s font clarity. Add to it a package management system that helps install almost every open source software out there without any fear of installing software from 3rd party repositories and system corruption.
After searching around I found many other distros including Arch Linux. Arch Linux’s own wiki has enough information that there’s no need to look anywhere they have documented almost everything. Arch Linux has its own AUR. AUR is the place where you can find almost all those packages that are not found in Arch Linux’s own official repositories.
So I decided to install Arch Linux and give it a try.
Installation
I have a 250 GB disk for which I will create the layout. I used dd to write Arch ISO to USB and booted from it for installation. My USB device was /dev/sdb :
# dd if=/home/saadali/Downloads/archlinux-2014.01.05-dual.iso of=/dev/sdb bs=1MB
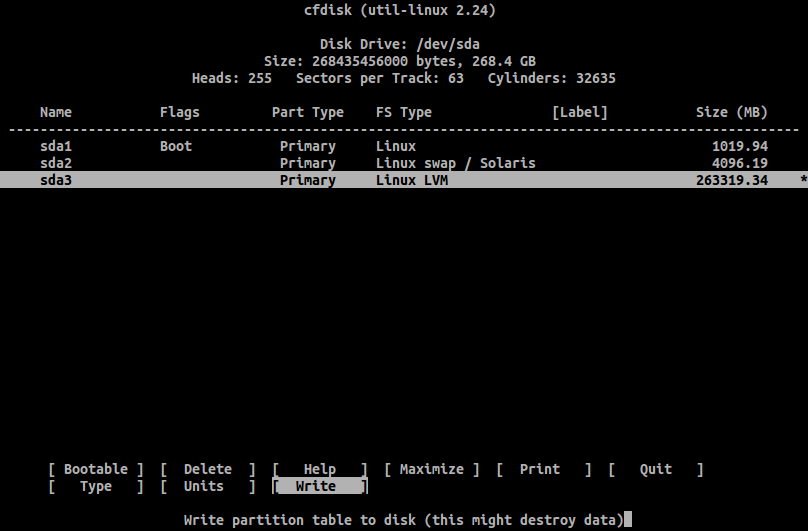
After booting from the drive, use cfdisk to partition your hard drive. I used the following partition layout on my 250 GB disk:
Remember to set /boot partition to bootable otherwise the OS will not be boot from disk after installation. If you don’t want to create a separate boot partition and want a single partition with the entire rootfs in it then set that partition to bootable.
Setup LVM
If you want to setup an encrypted install you should jump to Setup Encrypted LVM sub-section of the Encrypted Installation section of the tutorial. Instructions below are for an unencrypted install. Create a partition for the rest of root using LVM as follows:
# pvcreate /dev/sda3 # vgcreate NIXKNIGHT /dev/sda3 # lvcreate --extents 100%FREE NIXKNIGHT --name ROOTFS
Now format and mount partitions to /mnt as follows:
# mkfs.ext4 /dev/sda1 # mkfs.ext4 /dev/mapper/NIXKNIGHT-ROOTFS # mount /dev/mapper/NIXKNIGHT-ROOTFS /mnt # mkdir /mnt/boot # mount /dev/sda1 /mnt/boot
Create and turn on SWAP partition:
# mkswap /dev/sda2 # swapon /dev/sda2
You can use following command to make sure that your disk’s layout is according to your needs:
Install Packages
Arch Linux uses pacstrap to install packages to a specified new root directory which in our case is /mnt . Install base and base-devel packages as follows:
# pacstrap -i /mnt base base-devel Our base distribution is installed now. We need to generate an fstab file:
# genfstab -U -p /mnt >> /mnt/etc/fstab New Root Directory
Although our base distribution is installed, it still isn’t ready yet. We need to do some modification to make it usable. Enter the new root directory as follows:
Configure locale by opening /etc/locale.gen in a text editor and uncomment:
# locale-gen # echo LANG=en_US.UTF-8 > /etc/locale.conf
# useradd -m -g users -G wheel,storage,power -s /bin/bash nixknight Set passwords of root and the new user:
Link your local timezone to /etc/localtime :
# ln -s /usr/share/zoneinfo/Asia/Karachi /etc/localtime # systemctl enable dhcpcd.service
For 64-bit installations, edit /etc/pacman.conf and uncomment multilib repository:
[multilib] Include = /etc/pacman.d/mirrorlist
Install packages as follows:
# pacman -Sy bash-completion vim htop grub-bios os-prober mlocate lsof strace wget openssh Configure LVM and GRUB
For encrypted installation, you should jump to Configure LVM and GRUB sub-section of the Encrypted Installation section of the tutorial.
Since we have setup LVM we need to enable LVM module in initial ramdisk environment. We do that by adding LVM to HOOKS variable in /etc/mkinitcpio.conf :
HOOKS="base udev autodetect modconf block filesystems keyboard fsck"
HOOKS="base udev autodetect modconf keymap block lvm2 filesystems keyboard fsck"
Modify /etc/default/grub and add the following line:
# grub-install /dev/sda # cp /usr/share/locale/en\@quot/LC_MESSAGES/grub.mo /boot/grub/locale/en.mo # grub-mkconfig -o /boot/grub/grub.cfg
Set system hostname in /etc/hostname .
Exit chroot environment, umount partitions and reboot:
# exit # umount /mnt/boot # umount /mnt # reboot
Installing Desktop Environment
I am fond of KDE. I just love it. I don’t have any other way to describe what greatness exists in this desktop environment.
My desktop system has both AMD (x16) and Intel graphics (integrated) so I’ll be installing drivers for both chipsets. You can get more information regarding graphics drivers from ArchWiki graphics page. install packages as follows:
# pacman -Sy xf86-video-ati xf86-video-intel xf86-video-vesa xorg-server xorg-xinit xorg-server-utils mesa xorg-twm xorg-xclock xterm xdg-user-dirs kde oxygen-gtk2 oxygen-gtk3 kde-gtk-config packagekit apper p7zip unrar freerdp flashplugin firefox chromium seamonkey icedtea-web-java7 kpartsplugin hunspell thunderbird skype amarok smplayer smtube smplayer-themes smplayer-skins libdvdcss gstreamer0.10-good-plugins gstreamer0.10-bad-plugins gstreamer0.10-ugly-plugins gstreamer0.10-ffmpeg dialog net-tools openvpn pptpclient wireless_tools autoconf dmxproto expac freeglut libgtop libgksu gksu libgnomeui python2-egg gtkspell python2-gtkspell gnome-python-extras gtkmm gparted libdmx libftdi libotr3 mtr vpnc openconnect networkmanager-openconnect networkmanager-openvpn networkmanager-pptp networkmanager-vpnc ntfs-3g ntp pm-quirks pm-utils python-cairo python2-lxml python2-pysqlite python2-rsvg xorg-xdpyinfo unrar exfat-utils extundelete fuse-exfat iftop iotop python2-ecdsa python2-paramiko python2-pexpect rekonq screenfetch tinyxml lib32-libtxc_dxtn ttf-ubraille ttf-khmer font-mathematica ttf-dejavu ttf-droid ttf-freefont ttf-inconsolata ttf-liberation adobe-source-code-pro-fonts dina-font artwiz-fonts profont tamsyn-font terminus-font bdf-unifont ttf-linux-libertine ttf-ubuntu-font-family libmtp kio-mtp linux-headers pulseaudio pulseaudio-alsa lib32-libpulse lib32-alsa-plugins pavucontrol kdemultimedia-kmix Yeah I know thats a lot of packages. Enable KDM and NetworkManager and disable dhcpcd:
# systemctl enable kdm.service # systemctl enable NetworkManager # systemctl disable dhcpcd
The reason for disabling DHCP service is that NetworkManager has its own means of acquiring IP address on a DHCP enabled network and believe me if both services are enabled, you’ll never get an IP.
Reboot the system at this point.
Arch’s official repositories contained a package kdeplasma-applets-networkmanagement . But its not there anymore and has been replced by kdeplasma-applets-plasma-nm . Fortunately Arch still has the old one in its AUR. To install the old kdeplasma-applets-networkmanagement we need to compile and install the package. Download the tarball from AUR page, compile and install it as follows:
# cd /usr/src # wget https://aur.archlinux.org/packages/kd/kdeplasma-applets-networkmanagement/kdeplasma-applets-networkmanagement.tar.gz # tar zxf kdeplasma-applets-networkmanagement.tar.gz # cd kdeplasma-applets-networkmanagement # makepkg -s --asroot # pacman -U kdeplasma-applets-networkmanagement--x86_64.pkg.tar.xz
I chose Arch Linux because I could have Ubuntu’s patches to cairo and freetype libraries. These packages are also not in official repositories but they exist in AUR. You need to install freetype2-ubuntu , fontconfig-ubuntu and cairo-ubuntu just as above installed AUR package.
You might want to fix KDM cursor as follows:
# ln -s /usr/share/icons/Oxygen_White /usr/share/icons/default Encrypted Installation (Optional)
Encrypted installation requires to perform some extra steps while setting up LVM and configuring GRUB.
Setup Encrypted LVM
# cryptsetup -c aes-xts-plain -y -s 512 luksFormat /dev/sda3 # cryptsetup luksOpen /dev/sda3 luks
Setup LVM on the encrypted disk space:
# pvcreate /dev/mapper/luks # vgcreate NIXKNIGHT /dev/mapper/luks # lvcreate --extents 100%FREE NIXKNIGHT --name ROOTFS
Now format and mount partitions to /mnt as follows:
# mkfs.ext4 /dev/sda1 # mkfs.ext4 /dev/mapper/NIXKNIGHT-ROOTFS # mount /dev/mapper/NIXKNIGHT-ROOTFS /mnt # mkdir /mnt/boot # mount /dev/sda1 /mnt/boot
Create and turn on SWAP parition:
# mkswap /dev/sda2 # swapon /dev/sda2
You can use following command to make sure that your disk’s layout is according to your needs:
After generating fstab verify that /dev/sda1 points to /boot directory.
At this point you need to return to Install Packages.
Configure LVM and GRUB
Since we have setup an encrypted LVM we need to enable LVM and encryption module in initial ramdisk environment. We do that by adding LVM to HOOKS variable in /etc/mkinitcpio.conf .
HOOKS="base udev autodetect modconf block filesystems keyboard fsck"
HOOKS="base udev autodetect modconf block keymap encrypt lvm2 filesystems keyboard fsck"
Modify /etc/default/grub and add the following line:
GRUB_DISABLE_SUBMENU=y GRUB_CMDLINE_LINUX="cryptdevice=/dev/sda3:vgroup:allow-discards"
# grub-install /dev/sda # cp /usr/share/locale/en\@quot/LC_MESSAGES/grub.mo /boot/grub/locale/en.mo # grub-mkconfig -o /boot/grub/grub.cfg
Set system hostname in /etc/hostname .
Exit chroot environment, umount partitions and reboot:
# exit # umount /mnt/boot # umount /mnt # reboot


