- Saved searches
- Use saved searches to filter your results more quickly
- ChromeDriver
- Установка драйвера chromedriver для Chrome Selenium
- Какую версию chromedriver установить?
- Скачать ChromeDriver для Linux, Windows и Mac
- Установка ChromeDriver под Linux, Windows и Mac
- Install Selenium on Ubuntu/Debian with a ChromeDriver for Python
- Prerequistes
- Create Python3 Virtual Environment
- How to Install Selenium Python Library
- How to Install Chrome Driver for Chrome Browser
- Download ChromeDriver
- Write Basic Code in Python to use Selenium
- Run Python Script
- Wrap Up
Saved searches
Use saved searches to filter your results more quickly
You signed in with another tab or window. Reload to refresh your session. You signed out in another tab or window. Reload to refresh your session. You switched accounts on another tab or window. Reload to refresh your session.
ChromeDriver
This wiki is not where you want to be! Visit the Wiki Home for more useful links
For Developers and Contributors
Binding Specific Information
This content is being evaluated for where it belongs
Clone this wiki locally
Developed in collaboration with the Chromium team, ChromeDriver is a standalone server which implements WebDriver’s wire protocol.
The ChromeDriver consists of three separate pieces. There is the browser itself («chrome»), the language bindings provided by the Selenium project («the driver») and an executable downloaded from the Chromium project which acts as a bridge between «chrome» and the «driver». This executable is called «chromedriver», but we’ll try and refer to it as the «server» in this page to reduce confusion.
The server expects you to have Chrome installed in the default location for each system:
| OS | Expected Location of Chrome |
|---|---|
| Linux | /usr/bin/google-chrome 1 |
| Mac | /Applications/Google\ Chrome.app/Contents/MacOS/Google\ Chrome |
| Windows XP | %HOMEPATH%\Local Settings\Application Data\Google\Chrome\Application\chrome.exe |
| Windows Vista and newer | C:\Users\%USERNAME%\AppData\Local\Google\Chrome\Application\chrome.exe |
1 For Linux systems, the ChromeDriver expects /usr/bin/google-chrome to be a symlink to the actual Chrome binary. See also the section on overriding the Chrome binary location .
- Mac users with Homebrew installed: brew install —cask chromedriver
- Debian based Linux distros: sudo apt-get install chromium-driver
- Windows users with Chocolatey installed: choco install chromedriver
Running ChromeDriver as a standalone process
Since the ChromeDriver implements the wire protocol, it is fully compatible with any RemoteWebDriver client. Simply start up the ChromeDriver executable (that works as a server), create a client, and away you go:
WebDriver driver = new RemoteWebDriver("http://localhost:9515", DesiredCapabilities.chrome()); driver.get("http://www.google.com"); If you are using the RemoteWebDriver and you get the The path to the chromedriver executable must be set by the webdriver.chrome.driver system property error message you likely need to check that one of these conditions is met:
- The chromedriver binary is in the system path, or
- The Selenium Server was started with -Dwebdriver.chrome.driver=c:\path\to\your\chromedriver.exe
ChromeDriver user documentation provides more information on the known issues and workarounds.
Check if the bug has been reported yet. If it hasn’t, please open a new issue and be sure to include the following:
- What platform are you running on?
- What version of the chromedriver are you using?
- What version of Chrome are you using?
- The failure stacktrace, if available.
- The contents of chromedriver’s log file (chromedriver.log).
Of course, if your bug has already been reported, you can update the issue with the information above. Having more information to work on makes it easier for us to track down the cause of the bug.
Testing earlier versions of Chrome
ChromeDriver is only compatible with Chrome version 12.0.712.0 or newer. If you need to test an older version of Chrome, use Selenium RC and a Selenium-backed WebDriver instance:
URL seleniumServerUrl = new URL("http://localhost:4444"); URL serverUnderTest = new URL("http://www.google.com"); CommandExecutor executor = new SeleneseCommandExecutor(seleniumServerUrl, serverUnderTest, DesiredCapabilities.chrome()); WebDriver driver = new RemoteWebDriver(executor); Установка драйвера chromedriver для Chrome Selenium

Для запуска тестов Selenium в Google Chrome, помимо самого браузера Chrome, должен быть установлен ChromeDriver. Установить ChromeDriver очень просто, так как он находится в свободном доступе в Интернете. Загрузите архив в зависимости от операционной системы, разархивируйте его и поместите исполняемый файл chromedriver в нужную директорию.
Какую версию chromedriver установить?
Мы должны установить именно ту версия которая была бы совместима с установленным Google Chrome на нашем ПК или VDS. В случае, если версии не совпадают, то мы получим данную ошибку:
selenium.common.exceptions.SessionNotCreatedException: Message: session not created: This version of ChromeDriver only supports Chrome version 81
Введите в адресную строку Google Chrome данный путь:
У вас появится вот такое окно:
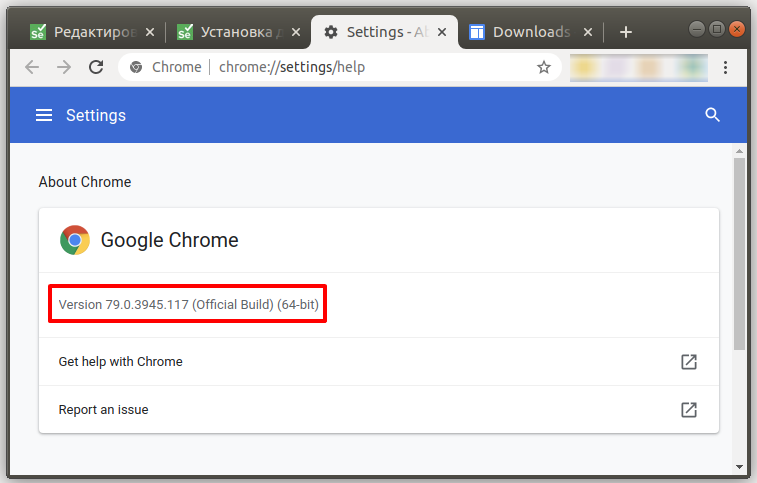
Рисунок 1 — Узнаем версию браузера Google Chrome
Скачать ChromeDriver для Linux, Windows и Mac
На данный момент актуальная версия драйвера 81.0.40 хотя у меня установлен более старый Google Chrome и последняя версия мне не подойдет. Как видно на рисунке выше, мне нужна версия 79.0.39 у вас может быть другая версия, нужно её скачать.
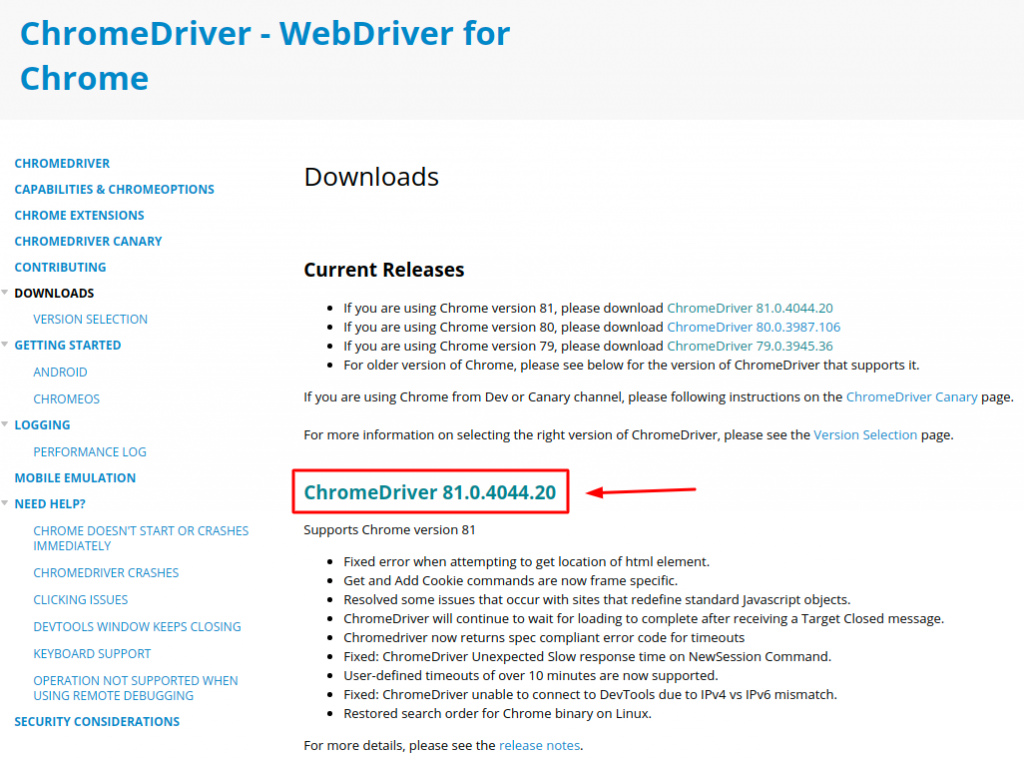
Рисунок 2 — Официальный сайт Google для загрузки драйвера chromedriver
На момент прочтения этой статьи версия может быть другой. Всегда выбирайте более новую версию, чтобы не поймать старые баги которые уже давно исправили в новой версии. НО! Помните, что вам нужно обновить и свой браузер Google Chrome если вы хотите работать с новой версией ChromeDriver.
Установка ChromeDriver под Linux, Windows и Mac
- Заходим на сайт https://chromedriver.storage.googleapis.com/index.html?path=79.0.3945.36/ (Проверьте сайт с Рис. 2 на обновления, тут версия: 79.0.3945);
- Скачиваем архив под вашу операционную систему;
- Распаковываем файл и запоминаем где находится файл chromedriver или chromedriver.exe (Windows).
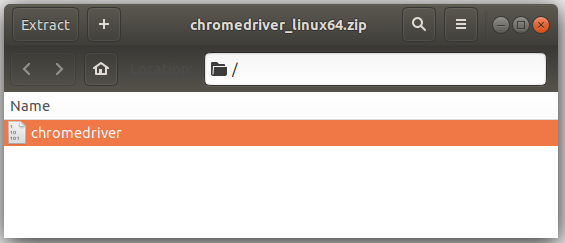
Рисунок 3 — Скаченный архив с ChromeDriver
Если у вас Linux дистрибутив или Mac, вам нужно дать файлу chromedriver нужные права на выполнения. Открываем терминал и вводим команды одна за другой.
Install Selenium on Ubuntu/Debian with a ChromeDriver for Python
Selenium is an open-source tool or framework that helps testers or developers run automated tests on web browsers using any of these popular languages for testing: C#, Groovy, Perl, Java, PHP, Python, Ruby, and Scala.
You can install and use Selenium on major operating systems like Windows, MacOS, and Linux with ease. However, you need a necessary driver to automate browser tasks.
Like for the Firebox browser, you need the Gecko driver, and Chrome requires the ChromeDriver.
Through this article, you will see how to install Chromedriver and Selenium, as well as will run a sample Python script to verify our installation and ensure that everything is working correctly.
Prerequistes
In this guide, you will use a Python program to automate tests, so to move ahead, you should make sure the following applications and dependencies are preinstalled:
Once the prerequisite is fulfilled, you can move to Create Virtual Environment.
Create Python3 Virtual Environment
This step is not necessary, but I suggest you create a Python 3 virtual environment, which will ensure that your old Python programs do not interfere with the new project.
But how will virtualenv keep my old programs safe to run without error? Once you install and activate virtualenv, it will create a separate or isolated environment where you can install different Python libraries or modules without touching your old available libraries.
Once you are satisfied with the above explanation, you are bound to install virtualenv using the below command:
$ sudo pip3 install virtualenvThe result of the above command, as shown below:

The next step is to create a project directory where you will install Selenium. To create a directory, pass the following commands:
$ mkdir -p selenium_chrome/driversThis will create multiple directories in the current folder. After that, change your current directory to selenium_chrome.
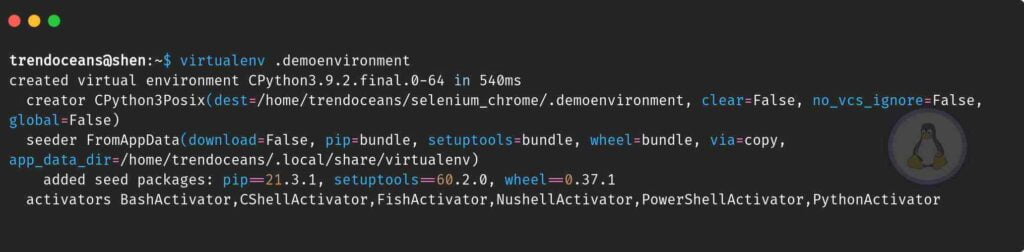
$ cd selenium_chromeThis is a final step where you will create a python virtual environment in the above directory using the virtualenv command:
$ virtualenv .set_your_virtual_environment_nameThe result of the above command, as shown below:
After that you need to activate virtual enviornment by running the below command:
$ source .your_virtual_environment_name/bin/activateOnce the virtual environment is enabled, you will see the changes shown below.

How to Install Selenium Python Library
Next, after creating a virtual environment, we will install the Selenium library from the pip command, and then we will move ahead for getting ChromeDriver.
$ pip3 install seleniumThe output of the above command

How to Install Chrome Driver for Chrome Browser
You may be thinking, “Why do we need to install the Chrome driver? If you are thinking, then let me clear it up.
The reason behind downloading the Chrome driver is to support automated testing; without the driver, your script will not be able to launch Chrome with a required task such as navigating, user input, JavaScript execution, and other operations.
Now you may understand why Selenium needs Chrome as a companion.
Download ChromeDriver
Steps to Install a chrome driver in Ubuntu as follows: First go to the official page .

Once the page gets loaded, you will see a different release or version of the Chrome driver.
To download ChromeDriver, you should know which version of the Chrome browser you are currently using. To check Chrome’s version, follow the below steps.
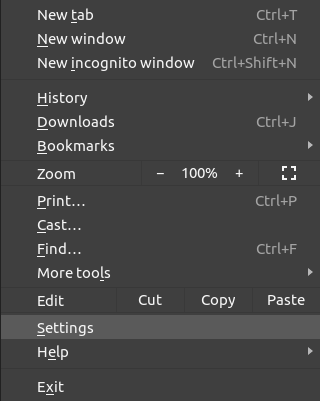
- Step 1. Click on the three dots which is below the close button
- Step 2. Next step is to click on Settings
Step 3. Go to About Chrome tab and check the chrome version. In my case chrome version is 113.0.5672
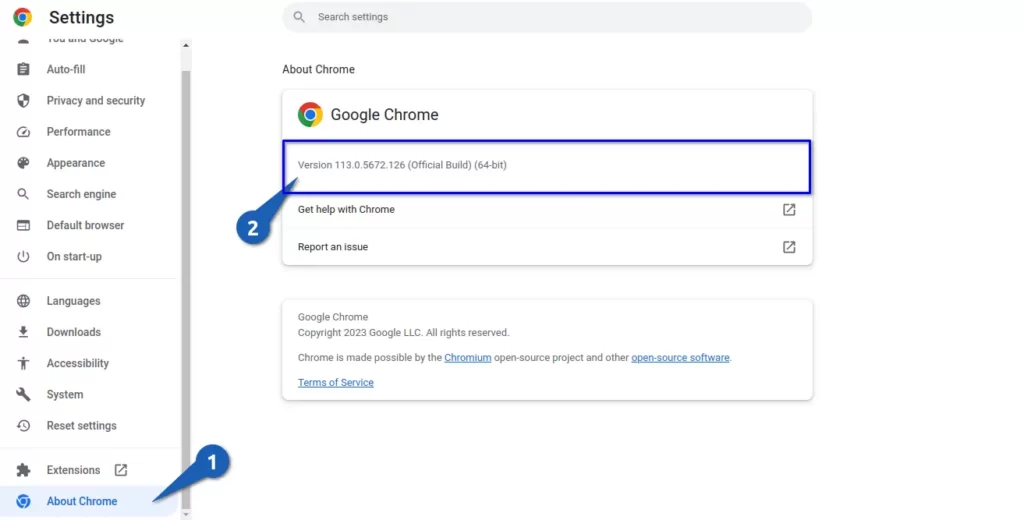
Once you are confirmed about a Chrome version, let’s download the Chrome driver.
In my case, I’ll download ChromeDriver 114.0.5735.16, and you may download the Chrome driver according to the respective Chrome browser version.
If you have downloaded the wrong version of ChromeDriver, then it won’t show up in the browser, so make sure that you have downloaded the right version.
When you click on the respective version, it will redirect you to the index page to download the Chrome driver for the Linux-based system.
Once the file is downloaded, extract it and move it to the driver directory of a project directory.
$ unzip ~/Downloads/chromedriver_linux64.zip -d ~/selenium_chrome/drivers After that, pass the ls command to verify whether the file was extracted as per our intention or not.
$ ls -l drivers/Write Basic Code in Python to use Selenium
Once you are done with the above process, we will write a short Python script to test the workings of Selenium on a system.
To write a script, you can use any command-line editor such as vim , nano , emacs , or any other GUI editor.
Before writing the script, let’s first understand what our script will do.
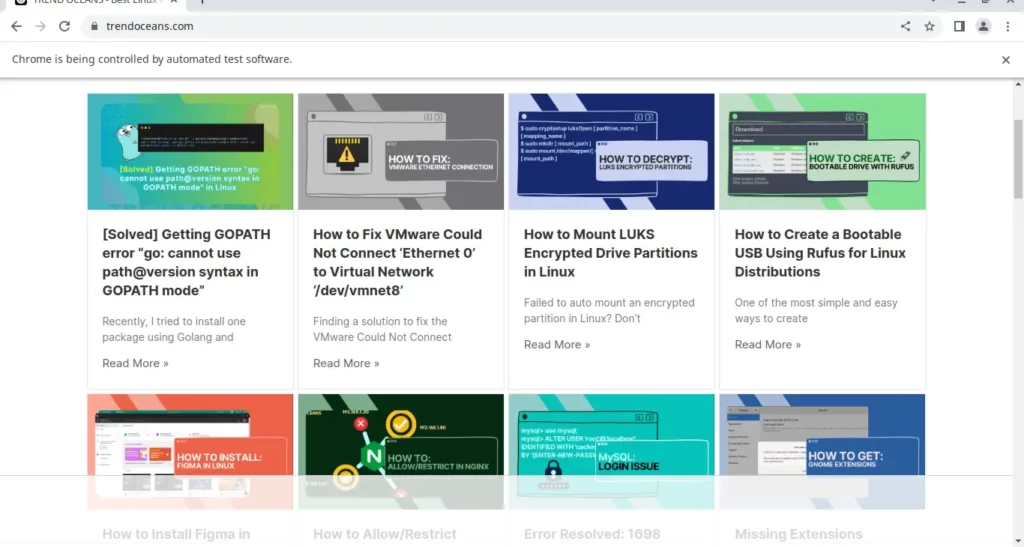
Basically, this script will open a Chrome browser automatically, and it will go to a webpage called “trendoceans.”
After that, the script will fetch the webpage title, and once it fetches the information, it will wait for 10 seconds before the browser gets closed automatically, and the webpage title will display on the terminal screen.
I believe you are in the virtual environment, then pass the following code to create a new Python file:
$ nano seleniumscript.pyAfter that, copy-paste the below code, and to save, press Ctrl +O to exit, use Ctrl + X.
import time from selenium import webdriver from selenium.webdriver.common.keys import Keys browser = webdriver.Chrome(executable_path="./drivers/chromedriver") browser.get('https://trendoceans.com') print('Title: %s' % browser.title) time.sleep(10) browser.quit()Run Python Script
You are almost done with the setup.
Now it’s time to check whether everything runs as per our plan or not. To check, type the below command:
$ python3 seleniumscript.pyOnce you run the above script, it will load the web page, and after getting the web page title, a browser will close automatically after 10 seconds.
The very next moment webpage title will be displayed on your terminal window.

Wrap Up
That’s all for this guide, in which you learned how to download and use ChromeDriver with Selenium on Ubuntu. Personally, I have tested installation on Debian 11 and Ubuntu 20.04, and I believe it works on all major Linux distributions.
- Step 1: Install Python & PIP
- Step 2:Install Google Chrome and ChromeDriver
- Step 3:Install Selenium by running pip3 install selenium
- Step 4: Run Short Script to test
If you are stuck somewhere, please feel free to comment down and If you like the article, or somewhere I missed something, please let me know to make this article more useful.
A man with a tech effusive who has explored some of the amazing technology stuff and is exploring more. While moving towards, I had a chance to work on Android development, Linux, AWS, and DevOps with several open-source tools.