- How to install a device driver on Linux
- Two approaches to finding drivers
- 1. User interfaces
- 2. Command line
- Check if a driver is already installed
- Add the repository and install
- For more information
- How To Install The Ubuntu 18.04.4 LTS Hardware Enablement Stack (HWE)
- How to install a device driver on Linux
- Two approaches to finding drivers
- 1. User interfaces
- 2. Command line
- Check if a driver is already installed
- Add the repository and install
- For more information
How to install a device driver on Linux

One of the most daunting challenges for people switching from a familiar Windows or MacOS system to Linux is installing and configuring a driver. This is understandable, as Windows and MacOS have mechanisms that make this process user-friendly. For example, when you plug in a new piece of hardware, Windows automatically detects it and shows a pop-up window asking if you want to continue with the driver’s installation. You can also download a driver from the internet, then just double-click it to run a wizard or import the driver through Device Manager.
This process isn’t as easy on a Linux operating system. For one reason, Linux is an open source operating system, so there are hundreds of Linux distribution variations. This means it’s impossible to create one how-to guide that works for all Linux distros. Each Linux operating system handles the driver installation process a different way.
Second, most default Linux drivers are open source and integrated into the system, which makes installing any drivers that are not included quite complicated, even though most hardware devices can be automatically detected. Third, license policies vary among the different Linux distributions. For example, Fedora prohibits including drivers that are proprietary, legally encumbered, or that violate US laws. And Ubuntu asks users to avoid using proprietary or closed hardware.
To learn more about how Linux drivers work, I recommend reading An Introduction to Device Drivers in the book Linux Device Drivers.
Two approaches to finding drivers
1. User interfaces
If you are new to Linux and coming from the Windows or MacOS world, you’ll be glad to know that Linux offers ways to see whether a driver is available through wizard-like programs. Ubuntu offers the Additional Drivers option. Other Linux distributions provide helper programs, like Package Manager for GNOME, that you can check for available drivers.
2. Command line
What if you can’t find a driver through your nice user interface application? Or you only have access through the shell with no graphic interface whatsoever? Maybe you’ve even decided to expand your skills by using a console. You have two options:
- Use a repository
This is similar to the homebrew command in MacOS. By using yum, dnf, apt-get, etc., you’re basically adding a repository and updating the package cache.
- Download, compile, and build it yourself
This usually involves downloading a package directly from a website or using the wget command and running the configuration file and Makefile to install it. This is beyond the scope of this article, but you should be able to find online guides if you choose to go this route.
Check if a driver is already installed
Before jumping further into installing a driver in Linux, let’s look at some commands that will determine whether the driver is already available on your system.
The lspci command shows detailed information about all PCI buses and devices on the system:
Or with grep:
$ lscpci | grep SOME_DRIVER_KEYWORDFor example, you can type lspci | grep SAMSUNG if you want to know if a Samsung driver is installed.
The dmesg command shows all device drivers recognized by the kernel:
Or with grep:
$ dmesg | grep SOME_DRIVER_KEYWORDAny driver that’s recognized will show in the results.
If nothing is recognized by the dmesg or lscpi commands, try these two commands to see if the driver is at least loaded on the disk:
Tip: As with lspci or dmesg, append | grep to either command above to filter the results.
If a driver is recognized by those commands but not by lscpi or dmesg, it means the driver is on the disk but not in the kernel. In this case, load the module with the modprobe command:
$ sudo modprobe MODULE_NAMERun as this command as sudo since this module must be installed as a root user.
Add the repository and install
There are different ways to add the repository through yum, dnf, and apt-get; describing them all is beyond the scope of this article. To make it simple, this example will use apt-get, but the idea is similar for the other options.
1. Delete the existing repository, if it exists.
$ sudo apt-get purge NAME_OF_DRIVER*where NAME_OF_DRIVER is the probable name of your driver. You can also add pattern match to your regular expression to filter further.
2. Add the repository to the repolist, which should be specified in the driver guide.
$ sudo add-apt-repository REPOLIST_OF_DRIVERwhere REPOLIST_OF_DRIVER should be specified from the driver documentation (e.g., epel-list).
3. Update the repository list.
4. Install the package.
$ sudo apt-get install NAME_OF_DRIVER5. Check the installation.
Run the lscpi command (as above) to check that the driver was installed successfully.
For more information
This article was originally published on Opensource.com.
How To Install The Ubuntu 18.04.4 LTS Hardware Enablement Stack (HWE)
Ubuntu 18.04.2 LTS was released on Friday for Desktop, Server and Cloud. This point release includes application updates, bug fixes, and a new hardware enablement stack.
[[Edit]] Ubuntu 18.04.4 is out, and with it an updated Hardware Enablement Stack.
Let me quickly explain what «point release» and «hardware enablement stack» mean. An Ubuntu LTS (Long Term Support) point release contains bug fixes and package updates since the initial release, as well as support for newer hardware through a hardware enablement stack. A LTS hardware enablement stack (HWE) provides newer kernel and X for an existing Ubuntu LTS release.
In the first hardware enablement stack (18.04.2) for Ubuntu 18.04, the kernel and X are backported from Ubuntu 18.10. In the second HWE, released in August 2019 (18.04.3), the kernel and X packages will be backported from Ubuntu 19.04. For the Ubuntu 18.04.4 hardware enablement stack, the kernel and X packages are backported from Ubuntu 19.10. You can view an Ubuntu 18.04.x kernel support schedule here.
If you’re already using Ubuntu 18.04 with all available updates installed, you already have the fixes and package updates from the Ubuntu 18.04.4 release, but not the Ubuntu 18.04.4 LTS hardware enablement stack.
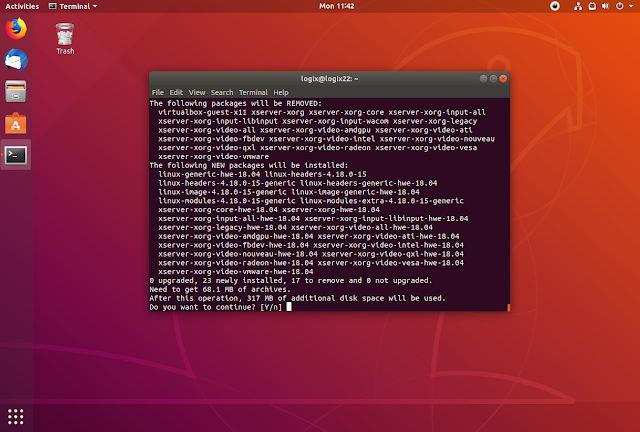
If you want to use the LTS hardware enablement stack on Ubuntu 18.04 desktop, you can install it using (this always install the latest HWE, version 18.04.4 right now):
sudo apt install --install-recommends linux-generic-hwe-18.04 xserver-xorg-hwe-18.04On Ubuntu 18.04 server only install the hardware enablement stack kernel package (this always install the latest HWE, version 18.04.4 right now):
sudo apt install --install-recommends linux-generic-hwe-18.04Reboot your system after the installation is completed.
[[Edit: The latest HWE for Ubuntu 18.04 is 18.04.4]] This installs a newer kernel (it installs Linux 5.3; the first iteration of Ubuntu 18.04 used Linux 4.15) and X (it installs version 1.20.5+git; initially Ubuntu 18.04 used version 1.19.6).
If you’ve installed a previous (not the latest version) HWE, like the Ubuntu 18.04.3 hardware enablement stack, you’ll receive an update (like for any other package) for the latest Ubuntu 18.04.4 HWE. That’s because the hardware enablement stack packages are called the same for every Ubuntu 18.04 point release (.2, .3, or .4). So there’s no need to install any extra packages to get the latest hardware enablement stack if you’ve installed these packages previously, you just have to install all available system updates.
If you want to check the date until your system is supported by Canonical, and see if you have a hardware enablement stack installed, you can use this command:
This is output of the hwe-support-status —verbose command in Ubuntu 18.04, without and with the LTS hardware enablement stack installed:
$ hwe-support-status --verbose You are not running a system with a Hardware Enablement Stack. Your system is supported until April 2023.$ hwe-support-status --verbose Your Hardware Enablement Stack (HWE) is supported until April 2023.How to install a device driver on Linux

One of the most daunting challenges for people switching from a familiar Windows or MacOS system to Linux is installing and configuring a driver. This is understandable, as Windows and MacOS have mechanisms that make this process user-friendly. For example, when you plug in a new piece of hardware, Windows automatically detects it and shows a pop-up window asking if you want to continue with the driver’s installation. You can also download a driver from the internet, then just double-click it to run a wizard or import the driver through Device Manager.
This process isn’t as easy on a Linux operating system. For one reason, Linux is an open source operating system, so there are hundreds of Linux distribution variations. This means it’s impossible to create one how-to guide that works for all Linux distros. Each Linux operating system handles the driver installation process a different way.
Second, most default Linux drivers are open source and integrated into the system, which makes installing any drivers that are not included quite complicated, even though most hardware devices can be automatically detected. Third, license policies vary among the different Linux distributions. For example, Fedora prohibits including drivers that are proprietary, legally encumbered, or that violate US laws. And Ubuntu asks users to avoid using proprietary or closed hardware.
To learn more about how Linux drivers work, I recommend reading An Introduction to Device Drivers in the book Linux Device Drivers.
Two approaches to finding drivers
1. User interfaces
If you are new to Linux and coming from the Windows or MacOS world, you’ll be glad to know that Linux offers ways to see whether a driver is available through wizard-like programs. Ubuntu offers the Additional Drivers option. Other Linux distributions provide helper programs, like Package Manager for GNOME, that you can check for available drivers.
2. Command line
What if you can’t find a driver through your nice user interface application? Or you only have access through the shell with no graphic interface whatsoever? Maybe you’ve even decided to expand your skills by using a console. You have two options:
Check if a driver is already installed
Before jumping further into installing a driver in Linux, let’s look at some commands that will determine whether the driver is already available on your system.
The lspci command shows detailed information about all PCI buses and devices on the system:
Or with grep:
$ lscpci | grep SOME_DRIVER_KEYWORDFor example, you can type lspci | grep SAMSUNG if you want to know if a Samsung driver is installed.
The dmesg command shows all device drivers recognized by the kernel:
Or with grep:
$ dmesg | grep SOME_DRIVER_KEYWORDAny driver that’s recognized will show in the results.
If nothing is recognized by the dmesg or lscpi commands, try these two commands to see if the driver is at least loaded on the disk:
Tip: As with lspci or dmesg, append | grep to either command above to filter the results.
If a driver is recognized by those commands but not by lscpi or dmesg, it means the driver is on the disk but not in the kernel. In this case, load the module with the modprobe command:
$ sudo modprobe MODULE_NAMERun as this command as sudo since this module must be installed as a root user.
Add the repository and install
There are different ways to add the repository through yum, dnf, and apt-get; describing them all is beyond the scope of this article. To make it simple, this example will use apt-get, but the idea is similar for the other options.
1. Delete the existing repository, if it exists.
$ sudo apt-get purge NAME_OF_DRIVER*where NAME_OF_DRIVER is the probable name of your driver. You can also add pattern match to your regular expression to filter further.
2. Add the repository to the repolist, which should be specified in the driver guide.
$ sudo add-apt-repository REPOLIST_OF_DRIVERwhere REPOLIST_OF_DRIVER should be specified from the driver documentation (e.g., epel-list).
3. Update the repository list.
4. Install the package.
$ sudo apt-get install NAME_OF_DRIVER5. Check the installation.
Run the lscpi command (as above) to check that the driver was installed successfully.