- How to install Brew on Ubuntu 20.04 LTS Linux
- Homebrew on Linux
- Features
- Install
- Requirements
- ARM (unsupported)
- 32-bit x86 (incompatible)
- Windows Subsystem for Linux (WSL) 1
- Homebrew on Linux Community
- Installing and Using Homebrew Package Manager on Linux
- Why use Homebrew package manager on Linux when you have got apt, dnf, snap etc?
- Install Homebrew on Ubuntu and other Linux distributions
- Step 1: Install dependencies
- Step 2: Install Homebrew
- Step 3: Verify brew installation
- Using brew command for installing, removing and managing packages
- Removing Homebrew from Linux
- Conclusion
How to install Brew on Ubuntu 20.04 LTS Linux
Homebrew is one of the popular package managers for Mac OS X but can be installed on Linux as well to download and install various packages. Homebrew Cask extends Homebrew with support for quick installation of applications like Google Chrome, VLC, and more.
On Linux, it is known as Linuxbrew. On Ubuntu Linux, we already have an APT package manager with a wide range of applications and other packages to install, then what is the need for Linuxbrew?
What is the difference between APT and Homebrew or Linuxbrew?
1. Both HomeBrew and APT’s main goal is the same that is the installation of various packages using the command line. However, on one hand, APT is the native and well-integrated manager of Debian-based systems including Ubuntu, HomerBrew is a third-party package manager that the user can install manually.
2. Difference in the command syntax, if a user is already familiar with the brew command line on macOS and new to Ubuntu then he or she can use it to install programs without learning new command hooks. However, if you are a user of Ubuntu or Debian, then for sure you don’t need to install it.
3. Homebrew maintains a separate user-owned directory, thus no need to run it with sudo to install applications.
4. Where apt-get is generally designed to overwrite previous versions; in the brew, it compiles packages and saves them according to its version in subdirectories. This means we can have multiple versions of a package on the same machine at the same time, however, only one of them will get symlinked into your main Homebrew hierarchy.
5. APT cleanup or uninstall older packages automatically with the update, whereas, in Homebrew, a user needs to run the brew cleanup command.
Homebrew on Linux
The Homebrew package manager may be used on Linux and Windows Subsystem for Linux (WSL) 2. Homebrew was formerly referred to as Linuxbrew when running on Linux or WSL. Homebrew does not use any libraries provided by your host system, except glibc and gcc if they are new enough. Homebrew can install its own current versions of glibc and gcc for older distributions of Linux.
Features, installation instructions and requirements are described below. Terminology (e.g. the difference between a Cellar, Tap, Cask and so forth) is explained in the documentation.
Features
- Install software not packaged by your host distribution
- Install up-to-date versions of software when your host distribution is old
- Use the same package manager to manage your macOS, Linux, and Windows systems
Install
Instructions for the best, supported install of Homebrew on Linux are on the homepage.
The installation script installs Homebrew to /home/linuxbrew/.linuxbrew using sudo. Homebrew does not use sudo after installation. Using /home/linuxbrew/.linuxbrew allows the use of most binary packages (bottles) which will not work when installing in e.g. your personal home directory.
Technically, you can install Homebrew wherever you want. However, you shouldn’t install outside the default, supported, best prefix. Many things will need to be built from source outside the default prefix. Building from source is slow, energy-inefficient, buggy and unsupported. The main reason Homebrew just works is because we use bottles (binary packages) and most of these require using the default prefix. If you decide to use another prefix: don’t open any issues, even if you think they are unrelated to your prefix choice. They will be closed without response.
The prefix /home/linuxbrew/.linuxbrew was chosen so that users without admin access can ask an admin to create a linuxbrew role account and still benefit from precompiled binaries. If you do not yourself have admin privileges, consider asking your admin staff to create a linuxbrew role account for you with home directory set to /home/linuxbrew .
Follow the Next steps instructions to add Homebrew to your PATH and to your bash shell profile script, either ~/.profile on Debian/Ubuntu or ~/.bash_profile on CentOS/Fedora/Red Hat.
test -d ~/.linuxbrew && eval "$(~/.linuxbrew/bin/brew shellenv)" test -d /home/linuxbrew/.linuxbrew && eval "$(/home/linuxbrew/.linuxbrew/bin/brew shellenv)" test -r ~/.bash_profile && echo "eval \"\$($(brew --prefix)/bin/brew shellenv)\"" >> ~/.bash_profile echo "eval \"\$($(brew --prefix)/bin/brew shellenv)\"" >> ~/.profile You’re done! Try installing a package:
If you’re using an older distribution of Linux, installing your first package will also install a recent version of glibc and gcc. Use brew doctor to troubleshoot common issues.
Requirements
To install build tools, paste at a terminal prompt:
sudo apt-get install build-essential procps curl file git sudo yum groupinstall 'Development Tools' sudo yum install procps-ng curl file git ARM (unsupported)
Homebrew can run on 32-bit ARM (Raspberry Pi and others) and 64-bit ARM (AArch64), but as they lack binary packages (bottles) they are unsupported. Pull requests are welcome to improve the experience on ARM platforms.
You may need to install your own Ruby using your system package manager, a PPA, or rbenv/ruby-build as we no longer distribute a Homebrew Portable Ruby for ARM.
32-bit x86 (incompatible)
Homebrew does not run at all on 32-bit x86 platforms.
Windows Subsystem for Linux (WSL) 1
Due to known issues with WSL 1, you may experience issues running various executables installed by Homebrew. We recommend you switch to WSL 2 instead.
Homebrew on Linux Community
Installing and Using Homebrew Package Manager on Linux
Homebrew, also known as Brew, is a command line package manager primarily created for macOS.
Homebrew grew quite popular among macOS users as more developers created command line tools that could be easily installed with Homebrew.
This popularity resulted in the creation of Linuxbrew, a Linux port for Homebrew. Since it is primarily Git and Ruby, and Linux and macOS are both Unix-like systems, Brew works good on both kind of operating systems.
Linuxbrew project eventually merged with Homebrew project and now you just have one Brew project called Homebrew.
Why am I calling it brew, instead of Homebrew? Because the command starts with brew. You’ll see it in detail in a later section.
Why use Homebrew package manager on Linux when you have got apt, dnf, snap etc?
I know the feeling. You already have a good package manager provided by your distribution. In addition to that, you have Snap, Flatpak and other universal package system.
Do you really need Homebrew package manager on your Linux system? The answer depends on your requirement, really.
See, apart from the distribution’s package manager and universal packages, you’ll come across situations where you need other package managers like Pip (for Python applications) and Cargo (for Rust packages).
Imagine you came across a good command line utility and want to try it. It’s repository mentions that it can be installed using brew or source code only. In such a case, having brew on your system could be helpful. After all, installing from source code in the 2020s is not fashionable (and comfortable).
In other words, you’ll have an additional option in case you come across some interesting CLI tool that provides only brew installation option.
Install Homebrew on Ubuntu and other Linux distributions
The installation is quite easy. You just have to make sure that you have got all the dependencies.
Step 1: Install dependencies
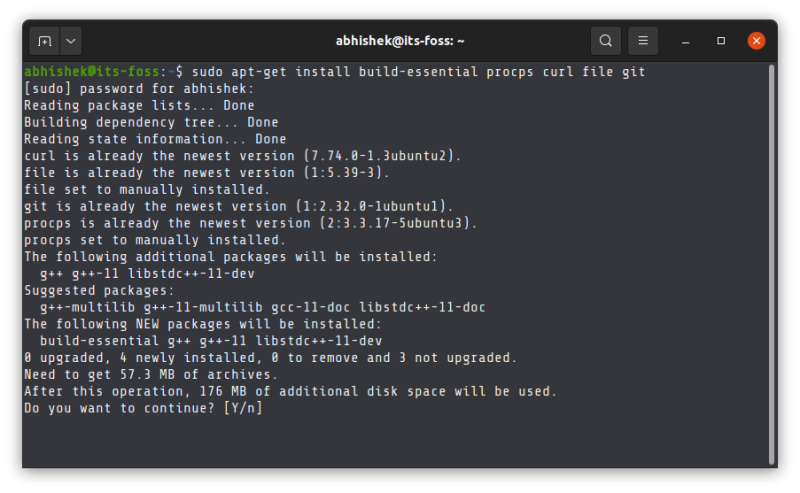
You need to have relatively newer version of gcc and glibc. You can install build-essential package on Ubuntu to get them. Apart from that, you also need to install Git, Curl and procps (used for monitoring system process).
You can install all of them together like this in Ubuntu and Debian based systems:
sudo apt-get install build-essential procps curl file gitFor other distributions, please use your package manager and install these dependencies.
Step 2: Install Homebrew
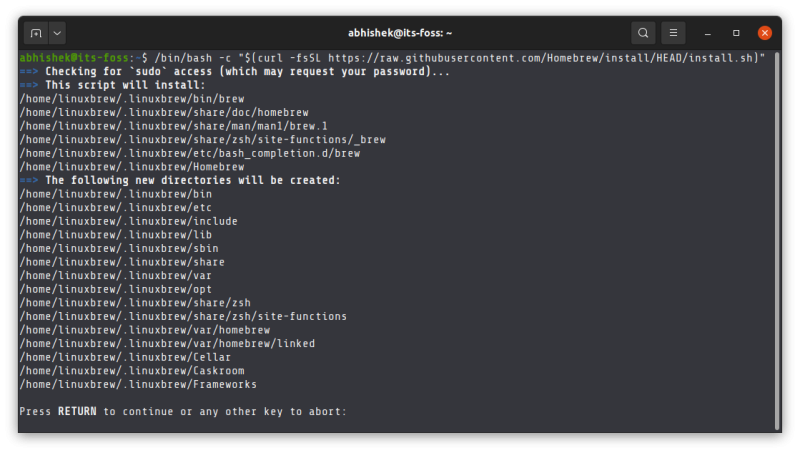
/bin/bash -c "$(curl -fsSL https://raw.githubusercontent.com/Homebrew/install/HEAD/install.sh)"When asked for RETURN key, press enter:
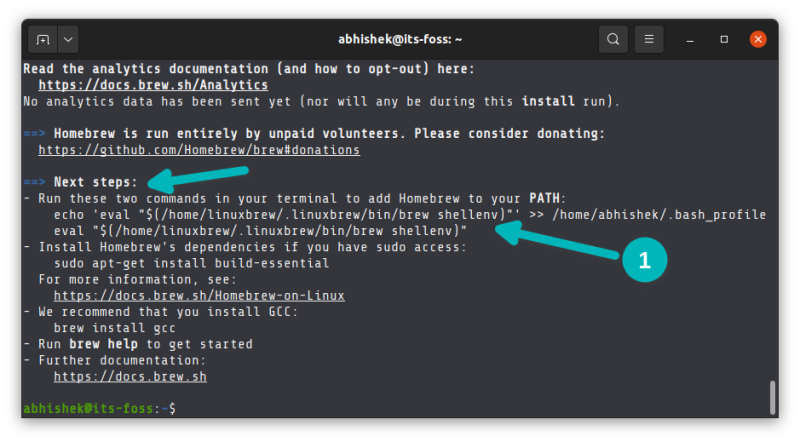
At the end of the script competition, it recommends to run a few commands to add it to the PATH variable. Homebrew is actually installed in your home directory and then soft linked to the /usr/local directory.
You can copy and paste in terminal easily. Just select the command it suggests and press Ctrl+Shift+C to copy and Ctrl+Shift+V to paste.
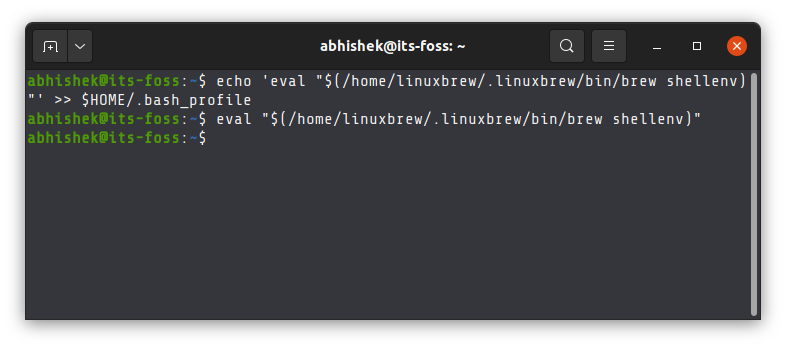
Alternatively, you can just copy paste this command:
echo 'eval "$(/home/linuxbrew/.linuxbrew/bin/brew shellenv)"' >> $HOME/.bash_profileeval "$(/home/linuxbrew/.linuxbrew/bin/brew shellenv)"Step 3: Verify brew installation
You are almost done. Just verify that brew command is ready to run by using the brew doctor command:
The brew doctor command will tell you if there is any issue.
You may double verify by installing the sample hello project:
If you see no errors, you can enjoy the Homebrew package manager on Linux.
Using brew command for installing, removing and managing packages
Let me quickly tell you a few brew commands you can use for installing, removing and managing packages.
Since Homebrew is installed in your home directory, you do not need sudo to run it (just like Pip and Cargo).
To install a package with brew, use the install option:
brew install package_nameThere is no autocompletion for the package name here. You need to know the exact package name.
To remove a brew package, you can use either remove or uninstall option. Both works the same.
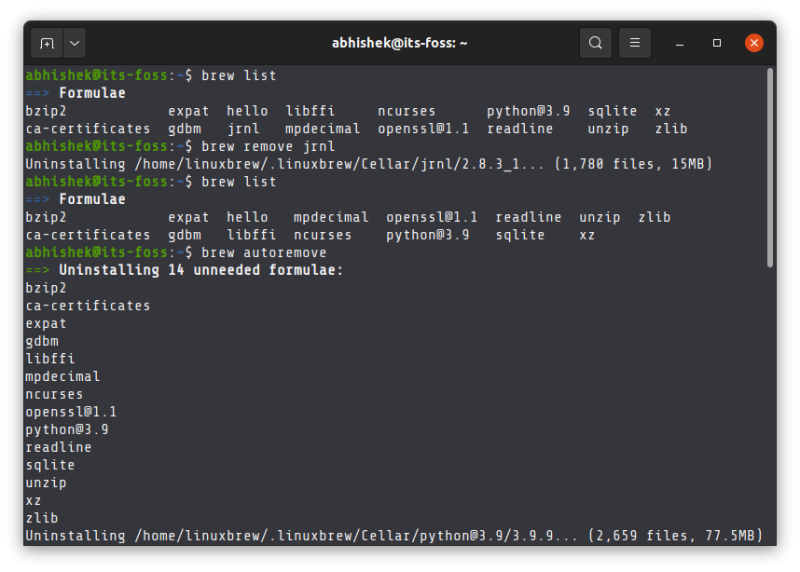
You can also list the installed brew packages with this command:
You can also remove the unneeded dependencies with the autoremove option:
In the next screenshot, I had only two packages installed with brew but it also shows the dependencies installed for those packages. Even after removing the package, dependencies remained. The autoremove finally removed them.
There are a lot more brew command options but that is out of scope for this tutorial. You can always go through their documentation and explore it further.
Removing Homebrew from Linux
This tutorial won’t complete without adding the steps for removing Homebrew from your Linux system.
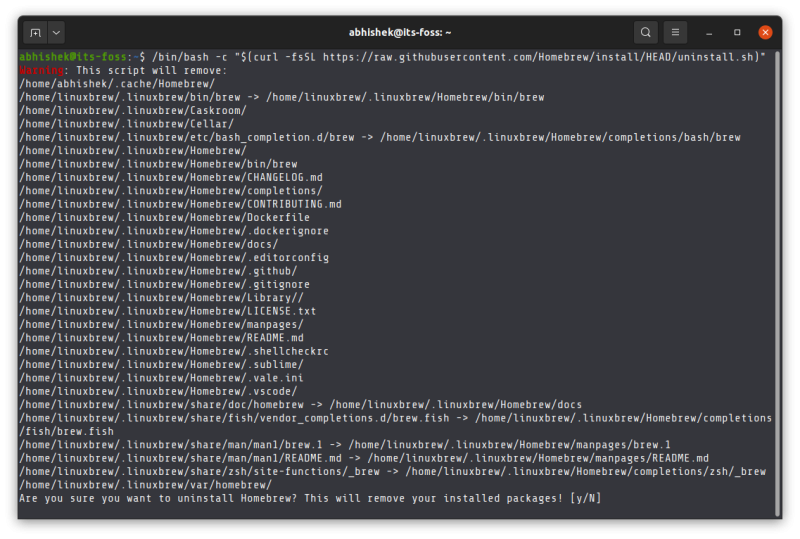
As per the steps mentioned on its GitHub repository, you have to download and run the uninstall script using this command:
/bin/bash -c "$(curl -fsSL https://raw.githubusercontent.com/Homebrew/install/HEAD/uninstall.sh)"You’ll be asked to confirm the removal by entering the Y key.
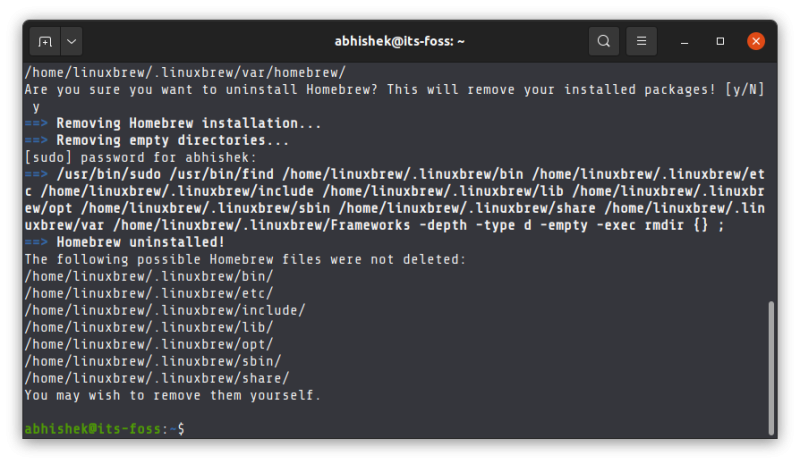
When the uninstallation of Homebrew completes, it lists the files and directories it has leftover:
I let you remove the files and directories on your own.
Conclusion
As I explained earlier, Homebrew provides an extension to what you have already got. If you stumble upon an application that has only brew as installation method, having Homebrew installed on your Linux system will come handy.
Anything you want to add to this topic or share your question or opinion? Please use the comment section.
