- How to Install Nvidia Drivers on Debian
- Install Nvidia Drivers Via Debian Repository
- Step 1: Enable Non-Free Repositories
- Step 2: Install Nvidia Detect
- Step 3: Detect and Install Drivers
- Install Nvidia Drivers Via Official Nvidia.com Package
- Step 1: Enable Non-Free Repositories and Install Nvidia Detect
- Step 2: Detect Nvidia Card
- Step 3: Download Suggested Drivers
- Step 4: Install Driver Prerequisites
- Step 5: Disable Default Drivers
- Step 6: Reboot to Multi-User Login
- Step 7: Install Nvidia Drivers
- Step 8: Enable GUI
How to Install Nvidia Drivers on Debian
Nvidia GPUs (Graphics Processing Units) have a wide variety of uses, from gaming, 3D rendering, and visualization, to cryptocurrency mining and machine learning. Keeping the drivers for these GPUs up to date ensures your system is performing at peak efficiency.
In this tutorial, we will guide you through the step-by-step process of installing Nvidia drivers on Debian 10.
- A system running Debian 10 (Buster)
- An account with sudo privileges
- Access to the terminal window
- A working Internet connection
Install Nvidia Drivers Via Debian Repository
The first method focuses on installing Nvidia drivers using Debian repositories. Follow the steps below to complete the installation.
Step 1: Enable Non-Free Repositories
1. Open the Linux’s Advance Packing Tool configuration file using a text editor. For example:
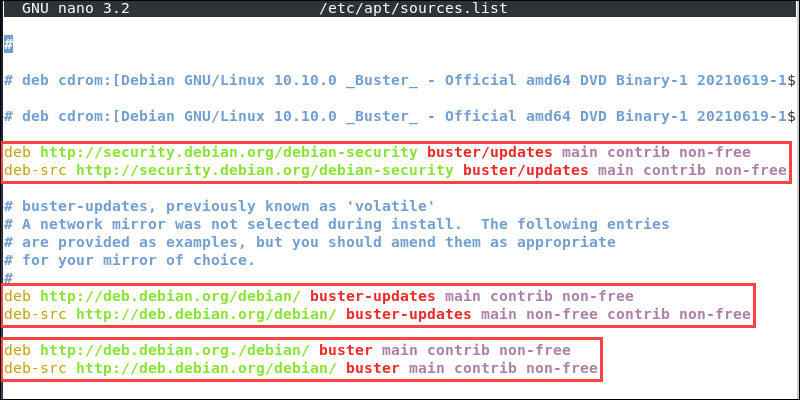
sudo nano /etc/apt/sources.list2. Alter the configuration as necessary, so it contains the following lines:
deb http://deb.debian.org/debian/ buster main contrib non-free deb-src http://deb.debian.org/debian/ buster main contrib non-free deb http://security.debian.org/debian-security buster/updates main contrib non-free deb-src http://security.debian.org/debian-security buster/updates main contrib non-free deb http://deb.debian.org/debian/ buster-updates main contrib non-free deb-src http://deb.debian.org/debian/ buster-updates main contrib non-free Note: Some of the lines listed above are already included in the configuration file as comments. Uncomment them by removing the pound symbol (#) at the start of the line.
3. Press Ctrl+X, then type Y and press Enter to save changes and exit the configuration file.
4. Update the system repository index:
Step 2: Install Nvidia Detect
Install the Nvidia Detect Utility with:
sudo apt install nvidia-detectStep 3: Detect and Install Drivers
1. Use the Nvidia Detect Utility to check the model of your GPU and get a compatible driver recommendation:
2. Install the driver the utility recommends. The syntax is:
sudo apt install [driver name]In our example, the name is nvidia-driver:
sudo apt install nvidia-driver3. Type Y and press Enter to confirm the installation.
4. Once the installation completes, reboot your system with:
Install Nvidia Drivers Via Official Nvidia.com Package
This method allows you to manually download and install an Nvidia driver package from the official website.
Note: You have to be logged in as the root user on your system for this method to work.
Step 1: Enable Non-Free Repositories and Install Nvidia Detect
Start by going through steps 1 and 2 of the previous method. Enabling non-free and contrib repositories and install the Nvidia Detect Utility.
Step 2: Detect Nvidia Card
Use the following command to check your GPU model. Pay attention to the driver series number:
Step 3: Download Suggested Drivers
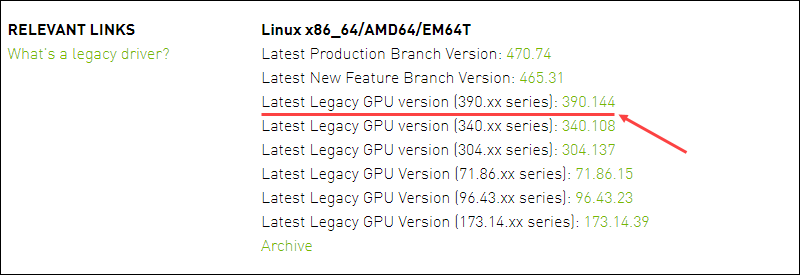
1. Navigate to the Nvidia driver download page and find the driver that matches the number as suggested by the Nvidia Detect Utility. In this example, we are looking for the legacy driver series 390:
Click the version number to go to the download page.
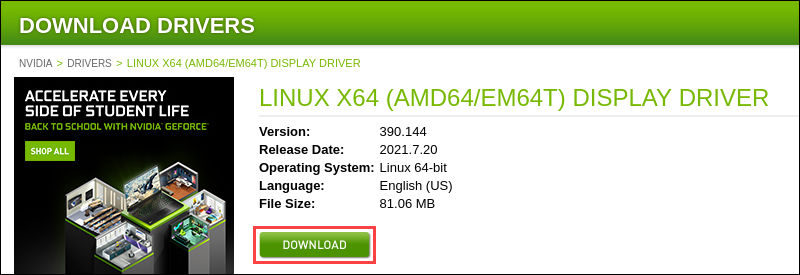
2. Click the DOWNLOAD button and download the driver package to your Home directory.
Step 4: Install Driver Prerequisites
Install the Nvidia driver compilation prerequisites by using:
apt -y install linux-headers-$(uname -r) build-essential libglvnd-dev pkg-configStep 5: Disable Default Drivers
Before proceeding with the installation, disable the default nouveau GPU driver:
1. Create and open a new configuration file. We used nano:
nano /etc/modprobe.d/blacklist-nouveau.conf2. Add the following lines to the file:
blacklist nouveau options nouveau modeset=0 3. Save the changes and exit. In nano, press Ctrl+X, then type Y and press Enter.
4. Rebuild the kernel initramfs with:
Step 6: Reboot to Multi-User Login
1. Since the default GPU drivers are now disabled, switching to a text-based login allows you to install Nvidia drivers without using the GUI. Enable the text-based, multi-user login prompt:
systemctl set-default multi-user.target2. Once prompted, enter your administrator password and press Enter to confirm.
3. Reboot your system with:
Step 7: Install Nvidia Drivers
1. Once your system restarts, log in as the root user.
2. Install the Nvidia drivers using the package you downloaded:
In our example, the name is:
bash NVIDIA-Linux-x86_64-390.144.run3. If prompted, choose the following options during the install process:
- The CC version check failed: Ignore CC version check
- Install NVIDIA’s 32-bit compatibility libraries: Yes
- An incomplete installation of libglvnd was found. Do you want to install a full copy of libglvnd? This will overwrite any existing libglvnd libraries: Install and overwrite existing filesort installation
- Would you like to run the nvidia-xconfig utility to automatically update your X configuration file so that the NVIDIA X driver will be used when you restart X? Any pre-existing X configuration file will be backed up: Yes
Step 8: Enable GUI
1. Switching back to the GUI login brings back the option of using a GUI like GNOME and starts up the new Nvidia drivers. Enable the GUI login prompt with:
systemctl set-default graphical.target2. Reboot your system to finish the installation:
After following this tutorial, you should have Nvidia GPU drivers set up and ready to use with your Debian 10 system.


