- qemu on Linux Mint 21 «Vanessa»
- 2. Uninstall / Remove qemu package
- 3. Details of qemu package
- 4. References on Linux Mint 21 «Vanessa»
- Installing qemu on linux mint
- Problem
- Solution
- Share this:
- Like this:
- Related
- About krzysztoftomaszewski
- 4 Responses to How to install KVM/QEMU on Linux Mint 20.1
- Installing qemu on linux mint
- Re: Установка и настройка QEMU в Linux Mint (Ubuntu) 1. Введение
- How to Install KVM on Linux Mint 21?
- Guide
- How to Create a Virtual Machine(VM) in KVM?
- Conclusion
- About the author
- Karim Buzdar
qemu on Linux Mint 21 «Vanessa»
Please follow the guidance below to install qemu package:
2. Uninstall / Remove qemu package
Learn how to uninstall qemu package:
3. Details of qemu package
Package: qemu
Architecture: amd64
Version: 1:6.2+dfsg-2ubuntu6.3
Multi-Arch: foreign
Priority: optional
Section: universe/metapackages
Origin: Ubuntu
Maintainer: Ubuntu Developers
Original-Maintainer: Debian QEMU Team
Bugs: https://bugs.launchpad.net/ubuntu/+filebug
Installed-Size: 135
Filename: pool/universe/q/qemu/qemu_6.2+dfsg-2ubuntu6.3_amd64.deb
Size: 15640
MD5sum: 3f441c3d6c9ba0f167fe9b1296d72ea3
SHA1: 1ce0947ce0dc19c5ef3245113cdd968726b33fe3
SHA256: 7344595efc8d2d5f1f5f37d3fdd812daf954bbfcaa6f0d5d9a20b1a0a01446ae
SHA512: 4dcdf99eb10056e6b51839ab76b4a653fc703806025352957b7cad67fb55ace18a4c434622fe63959ef4a7f5403dff5170b376e27c1b155822617fba31b5bffb
Homepage: http://www.qemu.org/
Description: fast processor emulator, dummy package
Description-md5: 44f7142780922102776874dd65554fb0
Package: qemu
Architecture: amd64
Version: 1:6.2+dfsg-2ubuntu6.2
Multi-Arch: foreign
Priority: optional
Section: universe/metapackages
Origin: Ubuntu
Maintainer: Ubuntu Developers
Original-Maintainer: Debian QEMU Team
Bugs: https://bugs.launchpad.net/ubuntu/+filebug
Installed-Size: 135
Filename: pool/universe/q/qemu/qemu_6.2+dfsg-2ubuntu6.2_amd64.deb
Size: 15908
MD5sum: 535230fbf16aa6c72106999fe6fea869
SHA1: 7adb372b390c88c1adfd99cb126bf199a7932d7c
SHA256: 7e3a677f7da7c435b000005e54643d5ca363e802651e69def5856d3dd131982a
SHA512: c6fa5357b36f8abcd69072c6202d0228e134f3e000a0adfb98caeca4b41f8780027e261a322114fa5444556db16b5bfc92da47fec7a17ab3575b68750ea847eb
Homepage: http://www.qemu.org/
Description: fast processor emulator, dummy package
Description-md5: 44f7142780922102776874dd65554fb0
Package: qemu
Architecture: amd64
Version: 1:6.2+dfsg-2ubuntu6
Multi-Arch: foreign
Priority: optional
Section: universe/metapackages
Origin: Ubuntu
Maintainer: Ubuntu Developers
Original-Maintainer: Debian QEMU Team
Bugs: https://bugs.launchpad.net/ubuntu/+filebug
Installed-Size: 135
Filename: pool/universe/q/qemu/qemu_6.2+dfsg-2ubuntu6_amd64.deb
Size: 15640
MD5sum: f0a73af01138ad1d6e35d454c56e21c9
SHA1: a127fe58e55b4115020955008ad6cf4f3efd769f
SHA256: 9af8be17c1ba441cb94bc2233eb30215ad1e46f126bb0b1962eb3c6448d10f49
SHA512: 8beb83babf375d42ac1c780635350c7b9a98bb0f8838ce6c970389105a7615f5e5d30ce0827d064abe4815e9f748a7934592f54df132c80d54315fb6c5f6990c
Homepage: http://www.qemu.org/
Description: fast processor emulator, dummy package
Description-md5: 44f7142780922102776874dd65554fb0
4. References on Linux Mint 21 «Vanessa»
Installing qemu on linux mint
From time to time I want to run a virtual machine on my computer, a sandbox containing another operating system with some programs running in total isolation. Under Linux my answer for this need is a set of three components:
- KVM – a virtualization module in the Linux kernel that allows the kernel to function as a hypervisor. (Wikipedia)
- QEMU – a machine emulator and virtualizer that can perform hardware virtualization. It can cooperate with KVM to run virtual machines at near-native speed (Wikipedia)
- Virtual Machine Manager – a nice GUI to use above things as simply as possible.
Problem
How prepare all above components on a fresh installation of Linux Mint 20.1?
Solution
This solution is based on the article “Install KVM Virtualization on Linux Mint 20” with my additions.
First execute following commands:
sudo apt-get install qemu-kvm libvirt-daemon-system libvirt-clients bridge-utils virt-manager sudo adduser $USER libvirt sudo adduser $USER kvm sudo adduser $USER libvirt-qemu
Here the above-mentioned article claimed everything is ready and working. But it wasn’t in my case. So just restart Linux now. Then proceed with verification steps:
systemctl status libvirtd.service
The output should start with following lines:
● libvirtd.service - Virtualization daemon Loaded: loaded (/lib/systemd/system/libvirtd.service; enabled; vendor preset: enabled) Active: active (running) since Wed 2021-02-03 22:54:41 CET; 31s ago

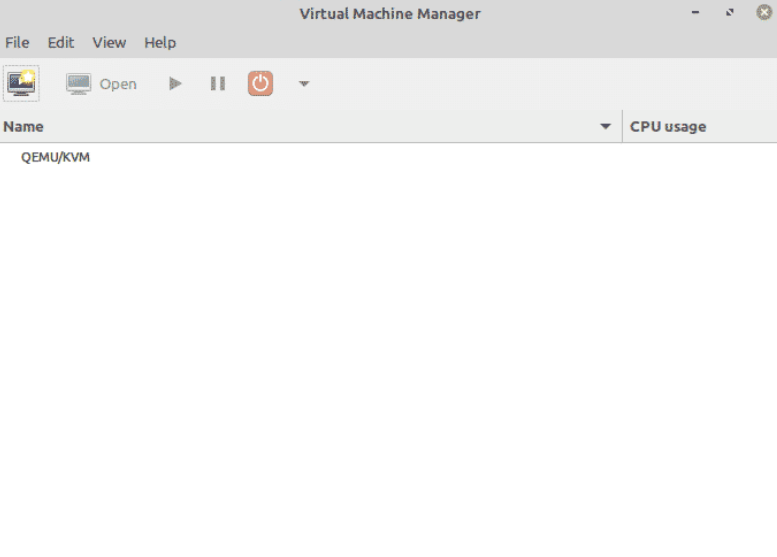
Then start Virtual Machine Manager. It should show that it is connected to KVM/QEMU. It should look like this:
Share this:
Like this:
Related
About krzysztoftomaszewski
I’ve got M.Sc. in software engineering. I graduated in 2005 at Institute of Computer Science, Warsaw University of Technology, Faculty of Electronics and Information Technology. I’m working on computer software design and engineering continuously since 2004.
This entry was posted in Linux and tagged kvm, qemu, virt-manager, virtual machine. Bookmark the permalink.
4 Responses to How to install KVM/QEMU on Linux Mint 20.1
Hello To share the libraries such as copy/paste, devices, folders, etc, from the virtualized machine wath the main system, what else should I do? Greetings
This works except all I had to do was “sudo apt install qemu-kvm libvirt-daemon-system libvirt-clients bridge-utils virt-manager”, reboot, and it just worked. @ Dero ; I had the same issue and while I suspect it’s possible to get other methods working I just setup a basic Samba share on the host Mint 20 machine and then from the Windows (Win10) virtual machine I just did the following (without the “) on the section you can type stuff in bottom left area of screen… “\\192.168.1.100\” (or whatever is the IP of the machine running Samba) and it showed the folder name I was sharing and I select it and it just worked (since I did not setup any username/password stuff anyone on my network can access that share straight up). because trying to setup a more standard way of sharing seems more difficult on this QEMU/KVM than in VirtualBox.
You don’t have to reboot. Just log out of the GUI and log back in and your user’s groups will be refreshed and you’re GTG.
Installing qemu on linux mint
Как Linux-энтузиаст, я тестирую немало приложений и дистрибутивов практически ежедневно. Наряду с известным многим Oracle Virtualbox, есть еще немало интересных продуктов в сфере виртуализации, таких как Vmware, openVZ, KVM, Proxmox и т.д.. Сегодня мы будем говорить про QEMU.


Chocobo Сообщения: 10010 Зарегистрирован: 27 авг 2016, 22:57 Решено: 215 Откуда: НН Благодарил (а): 812 раз Поблагодарили: 3000 раз Контактная информация:
Re: Установка и настройка QEMU в Linux Mint (Ubuntu) 1. Введение
QEMU — нативный и открытый машинный эмулятор и виртуализатор. Этот свободный интсрумент с открытым исходным кодом позволяет пользователям создавать и управлять виртуальными машинами внутри операционной системы(т.н. хост-системы). Аппаратные ресурсы хост-системы,такие как дисковое пространство, RAM, ЦПУ, будут отделены и поделены между гостевыми операционными системами(виртуальными машинами).
Когда используется как машинный эмулятор, QEMU сможет запускать ОС и программы созданные для какой либо платформы(например на ARM платах) на вашем ПК. Используя динамическую трансляцию, это происходит с хорошей производительностью.
Использая режим виртуализатора, QEMU получает схожую с нативной производительность путем испольнения кода напрямую на ЦПУ хост-ситемы. QEMU поддерживат виртуализацию с помощью гипервизора Xen или используя KVM модули ядра Linux. Для KVM, QEMU может виртуализировать такие платформы как x86, PowerPC и S390 в качестве гостевых.
В QEMU есть два режима работы:
Полная эмуляция системы: в этом режиме, QEMU эмулирует гостевую систему полностью (для примера PC), включая процессор и разнообразные периферийные устройства. Этот режим может использоваться для запуска других операционных систем или дебага системного кода.
Пользовательский режим эмуляции (только для Linux хостов): В этом режиме, QEMU Может запускать Linux-процессы собранные для одного CPU, на другом. Для примра это может быть облегченная кросс-компиляция.
QEMU Отлично работает с следующими аппаратными платформами:
- PC (x86 or x86_64 processor) ;
ISA PC (old style PC without PCI bus) ;
PREP (PowerPC processor) ;
G3 Beige PowerMac (PowerPC processor) ;
Mac99 PowerMac (PowerPC processor, in progress) ;
Sun4m/Sun4c/Sun4d (32-bit Sparc processor) ;
Sun4u/Sun4v (64-bit Sparc processor, in progress) ;
Malta board (32-bit and 64-bit MIPS processors) ;
MIPS Magnum (64-bit MIPS processor) ;
ARM Integrator/CP (ARM) ;
ARM Versatile baseboard (ARM) ;
ARM RealView Emulation/Platform baseboard (ARM) ;
Spitz, Akita, Borzoi, Terrier and Tosa PDAs (PXA270 processor) ;
Luminary Micro LM3S811EVB (ARM Cortex-M3) ;
Luminary Micro LM3S6965EVB (ARM Cortex-M3) ;
Freescale MCF5208EVB (ColdFire V2) ;
Arnewsh MCF5206 evaluation board (ColdFire V2) ;
Palm Tungsten|E PDA (OMAP310 processor) ;
N800 and N810 tablets (OMAP2420 processor) ;
MusicPal (MV88W8618 ARM processor) ;
Gumstix “Connex” and “Verdex” motherboards (PXA255/270) ;
Siemens SX1 smartphone (OMAP310 processor) ;
AXIS-Devboard88 (CRISv32 ETRAX-FS) ;
Petalogix Spartan 3aDSP1800 MMU ref design (MicroBlaze) ;
Avnet LX60/LX110/LX200 boards (Xtensa).
- x86 (32 and 64 bit),
PowerPC (32 and 64 bit),
ARM, MIPS (32 bit only),
Sparc (32 and 64 bit),
Alpha, ColdFire(m68k),
CRISv32
MicroBlaze CPUs
How to Install KVM on Linux Mint 21?
![]()
“Today, we will learn how to install KVM on Linux Mint 21 using the command line. KVM is a complete virtualization solution for Linux on x86 hardware. Using this, we can easily create Virtual Machines just like we do in VMware or VirtualBox. The best part about KVM is that it is open source and more efficient than its rival virtualization solutions.”
We have used basic Linux commands implemented on Linux Mint’s Terminal to install KVM. Let’s see how it is done!
Guide
Following are the steps involved in installing KVM on Linux Mint 21:
Step 1: Update and Upgrade Linux Mint
Before installing KVM, it is recommended to update your system and upgrade it. The following commands will help us in updating and upgrading our Linux Mint machine:


Step 2: Check System Compatibility With KVM
Next, we need to check whether KVM is compatible with our system or not. If it is not compatible, then we’ll keep running into errors.


If you get an output above 0, that means KVM is compatible with your system and can be easily installed. In our case, we got an 8. This means we can install KVM on our system.
Step 3: Install KVM
Now that we have made sure that KVM can be installed, let’s install it by executing this command:

Step 4: Add Your User to the KVM and Libvirt Group
It is now time to add your user to KVM and libvirt group to set up KVM so that you don’t run into any permissions-related errors. Add the user to the KVM group like this::

Add the user to the libvirt group with this command:

How to Create a Virtual Machine(VM) in KVM?
Now that we have installed KVM let’s see how we can create a VM on it. First, download the iso you want to create a VM of. We have downloaded an iso for Ubuntu 20.04.
Now open Virtual Machine Manager on your machine. This is how the interface will appear:
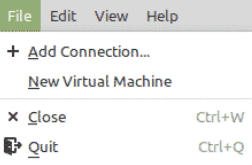
Click on File; you will see a list of options to choose from. Now click on New Virtual Machine:
This window will open with a list of options to choose from for your VM:
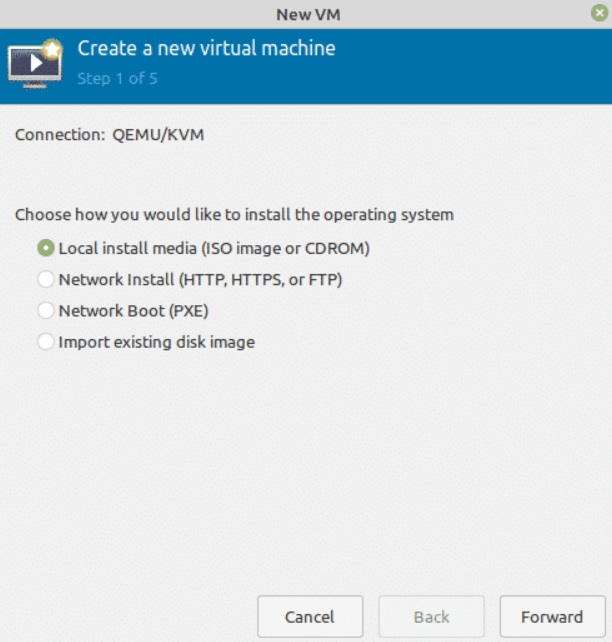
Please select the first option, as it allows you to create a VM using an ISO image. Once selected, click Forward.
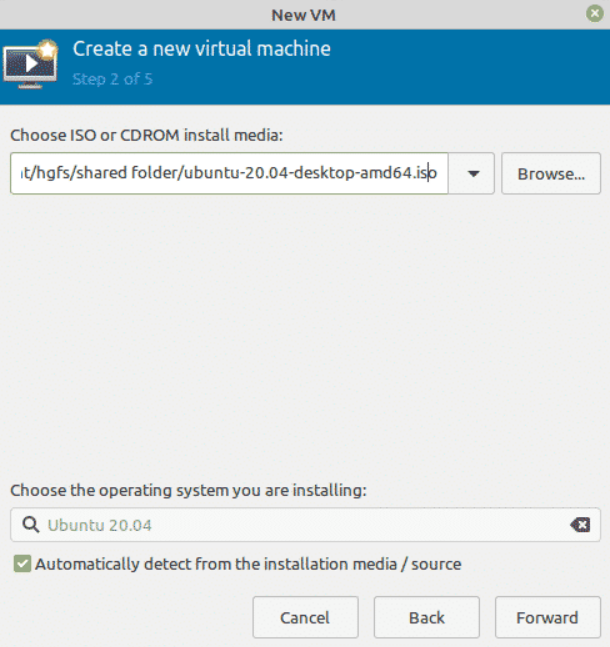
Now select the iso that you downloaded, as shown below:
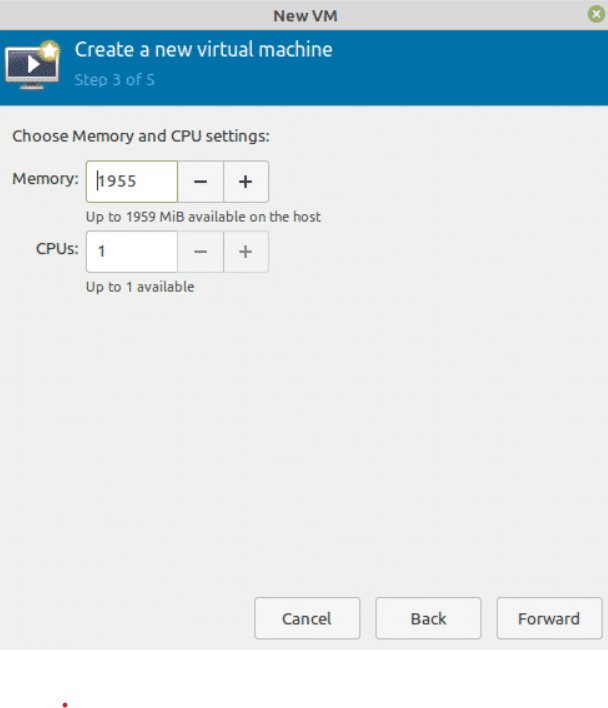
After that, allot memory and CPU utilization for the VM like this:
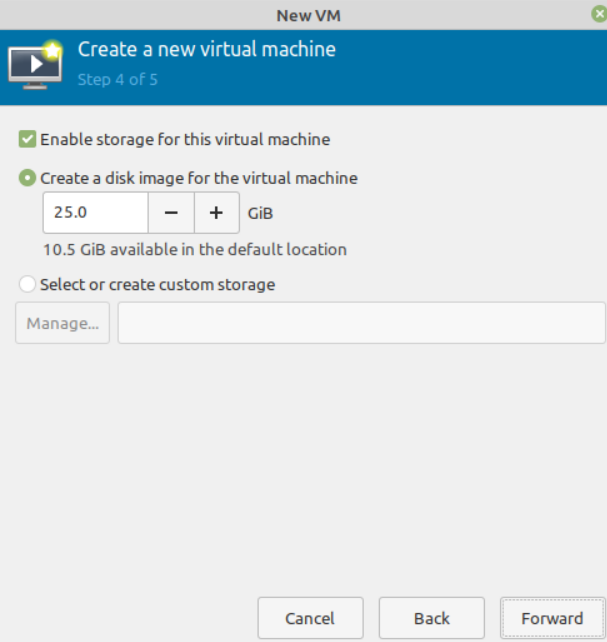
Next, allot storage to the VM:
Now, give the VM a name. For example, if the VM is Ubuntu, you can name it Ubuntu, followed by its version.
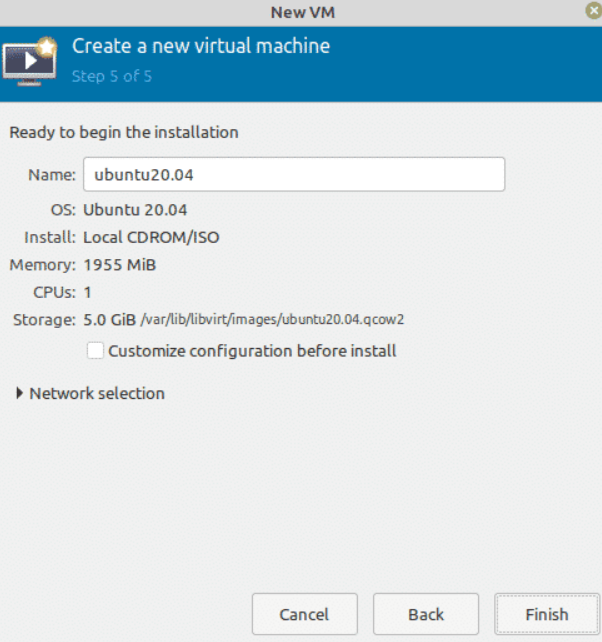
These are all the settings that were required. Click on Finish to finish the VM setup. The VM creation process will begin after that.
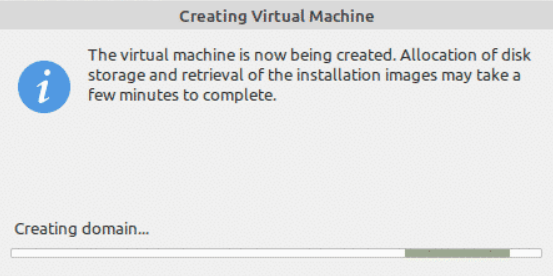
Once the VM is created, a new window will open for OS installation. You can then install the OS easily.
Conclusion
In today’s guide, we saw in detail how to install KVM on Linux Mint 21. We began by updating and upgrading the system. Then we verified KVM compatibility. Afterward, we installed KVM on our machine. In the end, we also saw how to create a Virtual Machine on KVM.
About the author
Karim Buzdar
Karim Buzdar holds a degree in telecommunication engineering and holds several sysadmin certifications. As an IT engineer and technical author, he writes for various web sites. He blogs at LinuxWays.