Компиляция и установка программ из исходников
Не редко необходимые пакеты можно найти только в виде исходных текстов, в данной статье описывается метод установки пакета из исходных текстов.
Распаковка
Программы обычно распространяются в упакованных архивах, это файлы с расширениями
Нужно понимать отличие между архиватором и упаковщиком.
Для архивации директорий и файлов используется программа tar; результатом её работы является файл с расширением .tar. Грубо говоря, это копия файловой системы — директорий и файлов с их атрибутами и правами доступа, помещённая в один файл.
Данный файл по размеру будет чуть больше, чем суммарный размер файлов, которые были архивированы. Поэтому (а может и по другой причине) используют упаковщики — программы, которые позволяют уменьшить размер файла без потери данных.
Программа tar умеет распаковывать, поэтому не нужно вызывать gunzip, а можно просто указать программе tar, что файл нужно cначала распаковать. Например, команда
tar -xvf some_app_name>.tar.gz
сразу распакует и разархивирует. Отличие файлов с расширениями
лишь в том, что использовались разные упаковщики, программа tar определяет метод сжатия автоматически и дополнительных опций в данном случае не требуется.
После распаковки необходимо перейти в полученный каталог, все описываемые ниже команды выполняются в каталоге с исходными текстами пакета.
Сборка пакета
Для сборки программ в GNU/Linux используется (в основном) программа make, которая запускает инструкции из Makefile, но поскольку дистрибутивов GNU/Linux много, и они все разные, то для того чтобы собрать программу, нужно для каждого дистрибутива отдельно прописывать пути,где какие лежат библиотеки и заголовочные файлы. Программисты не могут изучать каждый дистрибутив и для каждого отдельно создавать Makefile. Поэтому придумали конфигураторы, которые «изучают» систему, и в соответствии с полученными знаниями создают Makefile. Но на конфигураторе они не остановились и придумали конфигураторы конфигураторов ![]() …на этом они остановились
…на этом они остановились ![]()
Для сборки нам нужны компиляторы: они прописаны в зависимостях пакета build-essential, так что достаточно установить его со всеми зависимостями. Ещё нужны autoconf и automake.
Итак, чтобы собрать что-то из исходников, нужно сначала собрать конфигуратор; как собрать конфигуратор, описано в файле configure.in. Для сборки конфигуратора необходимо выполнить
Если таких скриптов в архиве не оказалось, то можно выполнить последовательно следующие команды:
aclocal autoheader automake --gnu --add-missing --copy --foreign autoconf -f -Wall
Все эти команды используют файл configure.in. После выполнения этих команд создастся файл configure. После этого необходимо запустить конфигуратор для проверки наличия всех зависимостей, а также установки дополнительных опций сборки (если возможно) и просмотра результата установки (опционально- может не быть)
Конфигуратор построит Makefile основываясь на полученных знаниях и файле makefile.am. Можно передать конфигуратору опции, предусмотренные в исходниках программы, которые позволяют включать/отключать те или иные возможности программы, обычно узнать о них можно командой
Также есть набор стандартных опций, вроде
, которая указывает, какой каталог использовать для установки. Для Ubuntu обычно
БЕЗ слеша в конце! Теперь можно запустить процесс сборки самой программы командой
Для сборки достаточно привелегий обычного пользователя. Окончанием сборки можно считать момент, когда команды в консоли перестанут «беспорядочно» выполняться и не будет слова error. Теперь всё скомпилировано и готово для установки.
Установка
Усилия потраченные на Правильную установку в последствии с лихвой окупятся в случае удаления или обновления устанавливаемого программного обеспечения.
Правильная установка(Вариант №1)
Установка при помощи утилиты checkinstall. Для установки выполните
sudo apt-get install checkinstall
Минус данного способа: checkinstall понимает не все исходники, поскольку автор программы может написать особые скрипты по установке и checkinstall их не поймёт.
Для создания и установки deb-пакета необходимо выполнить
Правильная установка(Вариант №2)
Быстрое создание deb-пакета «вручную».
Основное отличие от предыдущего способа заключается в том, что в данном случае вы создаете пакет вручную и отслеживаете все вносимые изменения. Так же этот способ подойдет вам, если исходники не поддерживают сборку пакета с checkinstall.
fakeroot make install DESTDIR=`pwd`/tempinstall
Создадим в «корне пакета» директорию DEBIAN и сложим в DEBIAN/conffiles список всех файлов, которые должны попасть в /etc:
сd tempinstall mkdir DEBIAN find etc | sed "s/^/\//" > DEBIAN/conffiles
Package: имя_пакета Version: 1.2.3 Architecture: amd64/i386/armel/all Maintainer: Можете вписать своё имя, можете дребедень, но если оставить пустым, то dpkg будет ругаться Depends: Тут можно вписать список пакетов через запятую. Priority: optional Description: Тоже надо что-нибудь вписать, чтобы не кидало предупреждения
sudo dpkg -i tempinstall.deb
How to Install Packages from Source on Linux
Most modern Linux distributions enjoy standard repositories that include most of the software you’ll need to successfully run your Linux server or desktop. Should a package come up missing, more than likely you’ll find a repository you can add, so that the installation can be managed with the built-in package manager. This should be considered a best practice. Why? Because it’s important for the integrity of the platform to ensure the package manager is aware of installed software. When that is the case, packages can easily be updated (to fix vulnerabilities and the like). Another reason to install from repositories is that dependencies are easily met. When installing from source, you can sometimes find yourself trapped in a convoluted dependency nightmare.
Fortunately, repositories have become so inclusive, that it is rare you will ever need to install a package by any other means. However, you may find, on occasion, a reason to install from source. Reasons could include:
- A package that is not found in any repository
- A package developed in-house
- You need to install a package with custom dependencies or options
When you do have to install from source, there are certain things you will need to know. Let’s walk through the process of installing Audacity from source on Ubuntu 16.10 (with the help of build-dep ). Although this can be easily installed from repositories, it serves as a fine illustration for installing from source.
First things first
Installing from source used to be very common and also quite simple. You would download the source file, unpack it (with either zip or tar), change into the newly created directory, and then issue the commands:
./configure make make install
That still works for applications built with autoconf/automake. As long as your distribution met the necessary dependencies (which were almost always outlined in a README file within the source), the package would install and could be used. Although some source installations are still that simple, things are now a bit more complicated.
Another glitch in the modern system is that Ubuntu doesn’t ship with all the necessary tools to build from source. To solve that issue, you must first install autoconf with the command:
sudo apt-get install autoconf Depending upon which version of Ubuntu you installed, you may even have to install the build-essential and build-dep packages (which includes the gcc/g++ compilers and libraries as well as a few other necessary utilities). These two packages can be installed with the command:
sudo apt-get install build-essential build-dep For the likes of Fedora, a similar installation would be:
sudo yum install yum-utils The above command would install the yum-builddep package.
Installing from source with build-dep
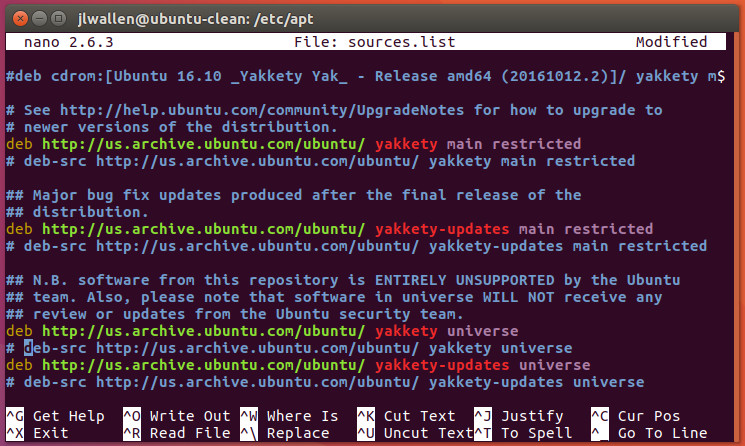
One way to install from source, but avoid the dependency nightmare, is to first work with the build-dep tool. Say you want to install audacity using build-dep ; the first thing you must do is uncomment the deb-src listings in /etc/apt/sources.list . Open that file in your favorite editor and then uncomment out the two deb-src listings, by removing the leading # characters ( Figure 1 ).
Save and close that file. Now run sudo apt-get update to update apt. Once that is done, you’re ready to build Audacity from source. Here’s what you must do. The first step is to use apt to install the necessary dependencies for Audacity. This is taken care of with the command:
sudo apt-get build-dep audacity Allow that command to finish. The next step is to download the source package with the command:
sudo apt-get source audacity In your current working directory, you should see a new directory called audacity-XXX (where XXX is the release number). Change into that directory. At this point, you can now issue the old tried and true:
./configure make sudo make install
Audacity should now be installed and ready to use.
If the installation fails, you might have to revert to using the dpkg tool like so:
sudo dpkg-buildpackage -b -uc -us The options above are as follows:
- b – build binary
- uc – do not sign the .changes file
- us – do not sign the source package
Why might a source package fail to install? Beyond not having all of the necessary dependencies, the answer very well might lie in the ./configure command.
The magic of configure
That configure command does have some magic hidden within. Most often you can run the ./configure command without any arguments. However, there are times you might want (or be required) to issue the command such that it configures the software to meet certain needs. Fortunately, the make tool can help us here. If you issue the command ./configure –help (from within the application source directory you’ve downloaded), you will be presented with a list of configuration options that can be used ( Figure 2 ), specific to that package.
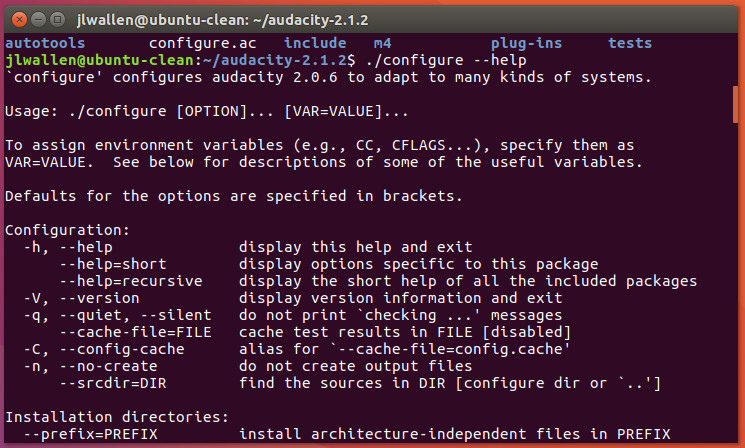
These options can sometimes mean the difference between an application installing or not. Every application you attempt to install will display different options for the ./configure command, so make sure to issue ./configure –help before issuing ./config . Possible configuration options include:
- –prefix=PREFIX (install architecture-independent files in a non-standard location such as –prefix=/opt )
- –build=BUILD (configure for a specific system architecture)
- –host=HOST (the architecture of the system you want the file to run on, so you can compile the application on one machine and run it on another)
- –disable-FEATURE (this allows you to disable specific features of an application)
- –enable-FEATURE (this allows you to enable specific features of an application)
- –with-PACKAGE=yes (use a specific PACKAGE)
- –without-PACKAGE (do not use a specific PACKAGE)
As I mentioned, every software to be installed will offer different configuration options. Once you’ve decided on your options, you would then run the ./configure command (with all options). Once the configure script completes, follow it up with make and then make install to complete the installation.
Using Git
Let’s walk through another example, this time with the help of Git. As Ubuntu doesn’t ship with Git installed, we’ll first have to install it with the command:
Once this is installed, let’s pull down the source for the Clementine audio player with the command:
git clone https://github.com/clementine-player/Clementine.git With the source downloaded, change into the newly added directory with the command cd Clementine . At this point, run the following commands to build the player from source:
cd bin cmake .. make -j8 sudo make install
That’s it. You should now have a working install of Clementine (so long as you’ve met the necessary dependencies). If the installation complains about dependencies, you can scan back through the output to find out what all needs to be installed. In the case of Clementine, you could always pick up the dependencies with the command:
sudo apt-get build-dep clementine And there you go
That, my friends, is your introduction to installing from source. You might now not only have a better understanding as to how such an installation is handled, but why so many opt to bypass installing from source, and go straight to their distribution’s package manager. Dependency nightmares and a lack of consistency in steps helps to make the likes of apt , dpkg, yum, zypper, and dnf all the more appealing.
Yes, installing from source offers far more flexibility, but that flexibility comes at the price of simplicity.
Learn more about Linux through the free “Introduction to Linux” course from The Linux Foundation and edX.