- Install Clear Linux* OS from the live desktop
- System requirements
- Preliminary steps
- Install from live image
- Choose boot menu option
- Verify integrity of installer media (optional)
- Launch the Clear Linux OS installer
- Network Proxy (optional)
- Minimum installation requirements
- Clear Linux OS Desktop Installer
- Navigation
- Required options
- Select Time Zone
- Select Keyboard
- Select Installation Media
- Safe Installation
- Destructive Installation
- Disk encryption
- Advanced Installation
- boot partition
- swap partition (optional)
- root partition
- Manage User
- Modify User
- Telemetry
- Advanced options
- Select Additional Bundles
- Assign Hostname
- Kernel Configuration
- Software Updater Configuration
- Finish installation
- Default partition schema
- Установка ОС Clear Linux на ноутбук
- Для начала необходимо скачать и сделать загрузочную USB-флеш-ку
- Установка операционной системы Clear Linux:
- После в окно установки Clear Linux вам необходимо ввести следующее:
- 1 Запуск системы Клеар Линукс
- Настройка операционной системы Clear Linux:
Install Clear Linux* OS from the live desktop
This page explains how to boot the Clear Linux* OS live desktop image, from which you can install Clear Linux OS or explore without modifying the host system. Alternatively, use a YAML configuration file to install Clear Linux OS.
- System requirements
- Preliminary steps
- Install from live image
- Minimum installation requirements
- Clear Linux OS Desktop Installer
- Navigation
- Required options
- Advanced options
- Finish installation
- Troubleshooting
- Related topics
System requirements
Before installing Clear Linux OS, verify that the host system supports the installation:
Preliminary steps
- Visit our Downloads page.
- Download the file clear—live-desktop.iso , also called the Clear Linux OS Desktop.
Install from live image
After you download and burn the live desktop image on a USB drive, follow these steps.
- Insert the USB drive into an available USB slot.
- Power on the system.
- Open the system BIOS setup menu by pressing the F2 key. Your BIOS setup menu entry point may vary.
- In the setup menu, enable the UEFI boot and set the USB drive as the first option in the device boot order.
- Save these settings, e.g. F10 , and exit.
- Reboot the target system.
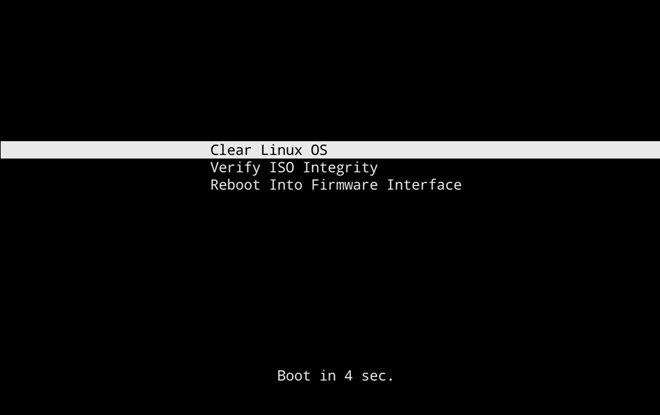
Choose boot menu option
- Choose one of the options shown in Figure 1.
- Follow Verify integrity of installer media (optional).
- Select Clear Linux OS in the boot menu.

Figure 1: Clear Linux OS in boot menu 
Verify integrity of installer media (optional)
Use Verify ISO Integrity to verify the checksum of the image burned to the installer media. The checksum ensures that the ISO is uncorrupted (see Figure 1). For every ISO generated, the clr-installer implants checksums, which are verified during early boot stage as part of initrd.
- Select Verify ISO Integrity . The media will be validated.
- If the check passes, it will boot into the live image. Continue in the next section.
- If the check fails, a failure message appears.
- Restart the process at Preliminary Steps.
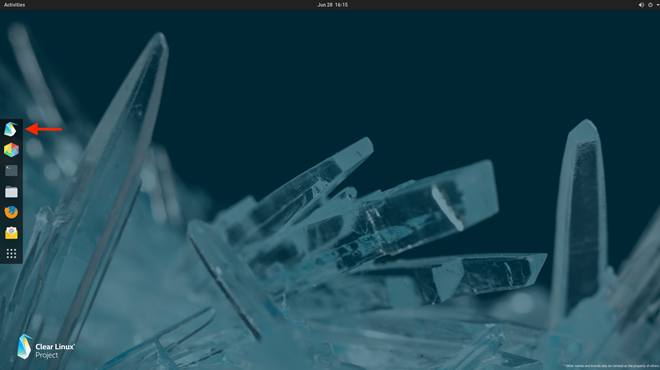
Launch the Clear Linux OS installer
- After the live desktop image boots, scroll over the vertical Activities menu at left.
- Click the Clear Linux OS penguin icon to launch the installer, shown in Figure 2.
Figure 2: Clear Linux OS installer icon 
Figure 3: Clear Linux OS OS Desktop Installer 
Network Proxy (optional)
- Configure Network Proxy settings.
- In the top right menu bar, select the Power button .
- Select Wired Connected and then Wired Settings .
- In Network Proxy , select the Gear icon to view options.
- Select an option from Automatic , Manual or Disabled .
- Close Network Proxy .
Minimum installation requirements
To fulfill minimum installation requirements, complete the Required options. We also recommend completing Advanced options.
- The Install button is only highlighted after you complete Required options.
- Check marks indicate a selection has been made.
- The installer image contains the default bundles required for installation. An Internet connection is only required if you install additional bundles from Advanced options.
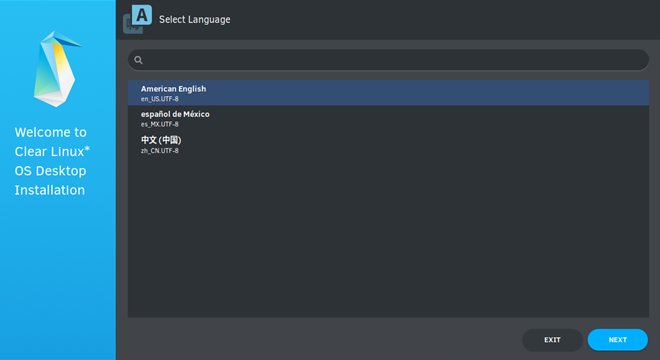
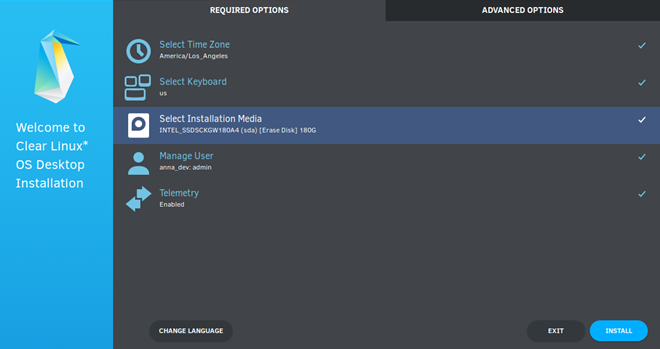
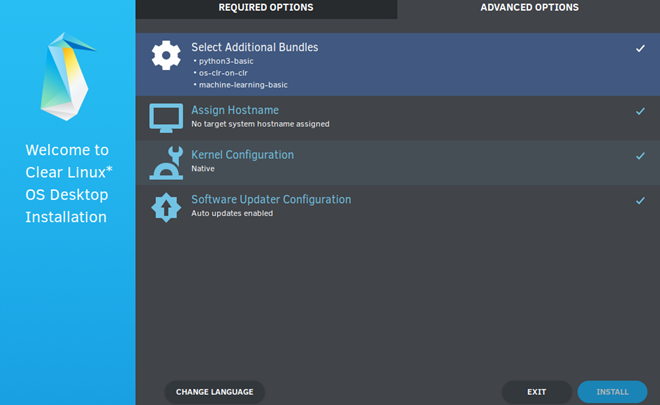
Clear Linux OS Desktop Installer
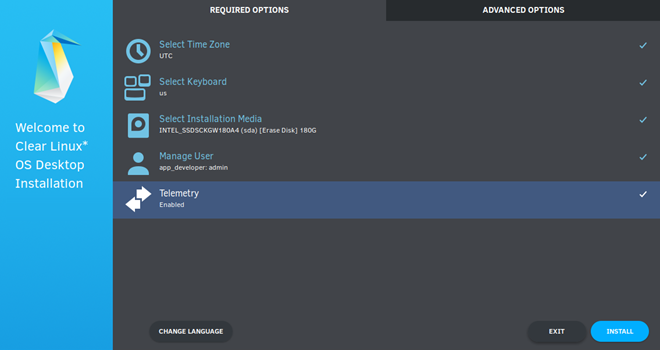
The Clear Linux OS Desktop Installer Main Menu appears as shown in Figure 4. To meet the minimum requirements, enter values in all submenus for the Required options . After you complete them, your selections appear below submenus and a check mark appears at right.
Figure 4: Clear Linux OS Desktop Installer — Main Menu 
Navigation
- Use the mouse to navigate or select options.
- Use Tab key to navigate between Required options and Advanced options
- Use Up or Down arrow keys to navigate the submenus.
- Select Confirm , or Cancel in submenus.
Required options
Select Time Zone
- From the Main Menu, select Select Time Zone . UTC is selected by default.
- In Select Time Zone , navigate to the desired time zone. Or start typing the region and then the city. (.e.g., America/Los_Angeles ).
- Select Confirm .
Figure 5: Select System Time Zone 
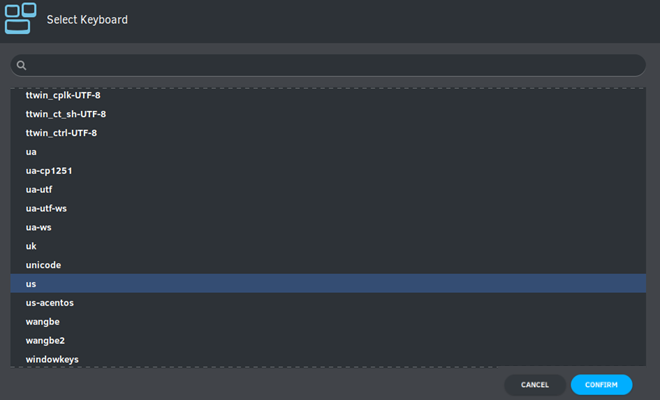
Select Keyboard
- From the Main Menu, select Select Keyboard .
- Navigate to your desired keyboard layout. We select “us” for the United States.
- Select Confirm .
Figure 6: Select Keyboard menu 
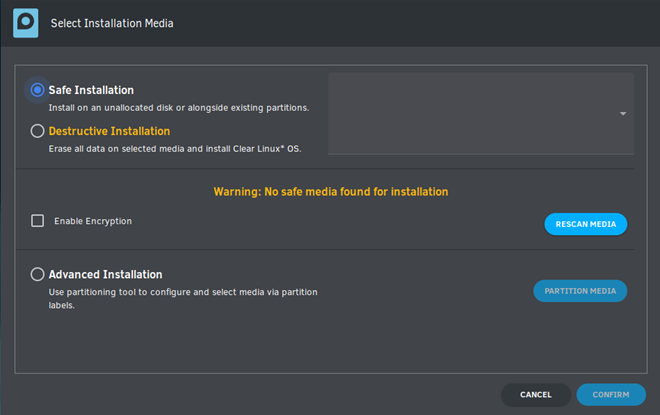
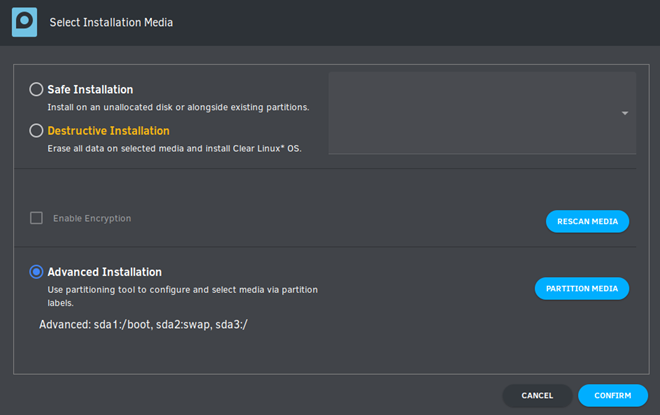
Select Installation Media
- From the Main Menu, select Select Installation Media .
- Choose an installation method: Safe Installation or Destructive Installation.
Figure 7: Select Installation Media 
Safe Installation
Use this method to safely install Clear Linux OS on media with available space, or alongside existing partitions, and accept the Default partition schema. If enough free space exists, safe installation is allowed.
Clear Linux OS allows installation alongside another OS. Typically, when you boot your system, you can press an F key to view and select a bootable device or partition during the BIOS POST stage. Some BIOSes present the Clear Linux OS partition, and you can select and boot it. However, other BIOSes may only show the primary partition, in which case you will not be able boot Clear Linux OS. Be aware of this possible limitation.
Destructive Installation
Use this method to destroy the contents of the target device, install Clear Linux OS on it, and accept the Default partition schema.
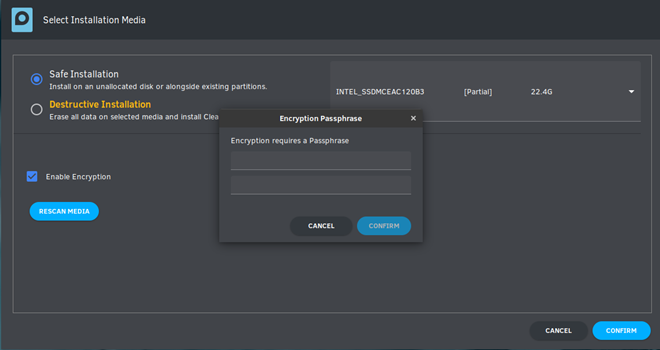
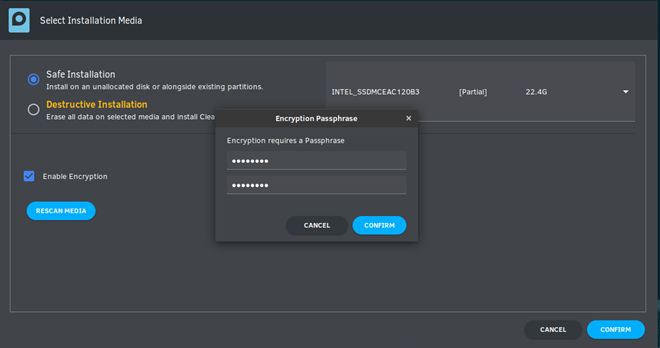
Disk encryption
For greater security, disk encryption is supported using LUKS. Encryption is optional.
- To encrypt the root partition, select Enable Encryption , as shown in Figure 8.
Figure 8: Enable Encryption 
Figure 9: Encryption Passphrase 
Advanced Installation
Use this method to manually partition the target media using gparted . Our example uses the Default partition schema. The space you allocate for root , or additional partitions, may vary.
- Select Advanced Installation .
- Select Partition Media , shown in Figure 11.
Figure 10: Advanced Installation 
boot partition
Figure 11: Advanced Disk Partitioning 
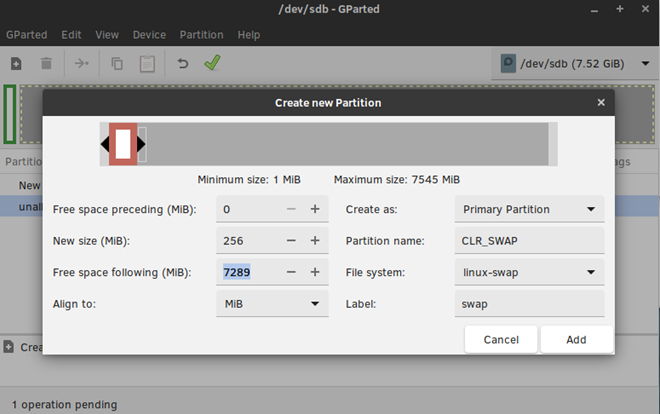
swap partition (optional)
A swapfile is generated by default during installation. However, if you prefer to create a swap partition, follow the steps below.
- With unallocated highlighted, select from the menu Partition ‣ New .
- In Create new Partition , complete the following fields to match Figure 13. Don’t change other default values.
- New size: 256
- Partition name: CLR_SWAP
- File system: linux-swap
- Label: swap
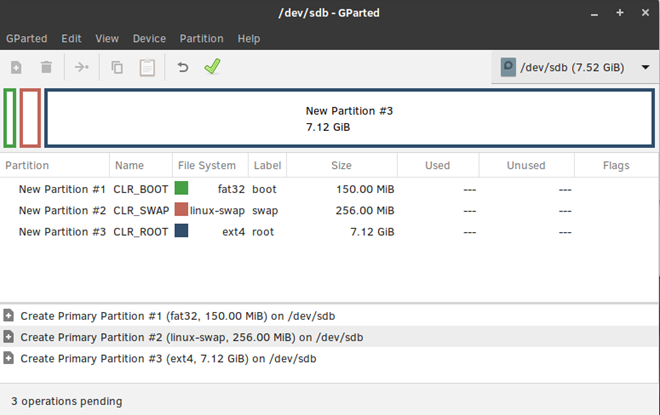
root partition
- With unallocated highlighted, select from the menu Partition ‣ New .
- In Create new Partition , complete the following fields to match Figure 14. Don’t change other default values.
- In New size , enter the desired size, or leave as is to accept the default: remaining size.
- New size:
- Partition name: CLR_ROOT
- File system: ext[234], XFS, or f2fs
- Label: root
Figure 15: Final partition configuration 
You are returned to installer.
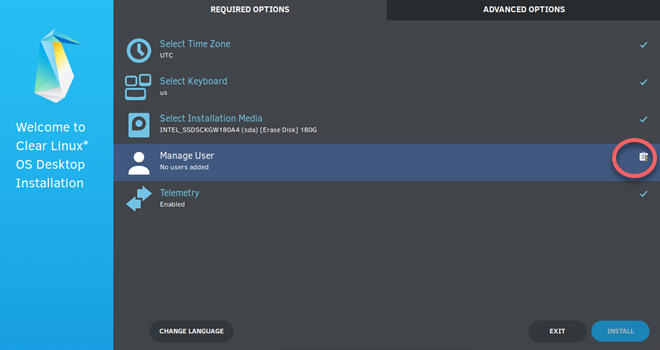
Manage User
Note Administrator rights are selected by default. For security purposes, the default user must be assigned as an Administrator.
Modify User
- In Manager User, select Manage User .
- Modify user details as desired.
- Select Confirm to save the changes you made.
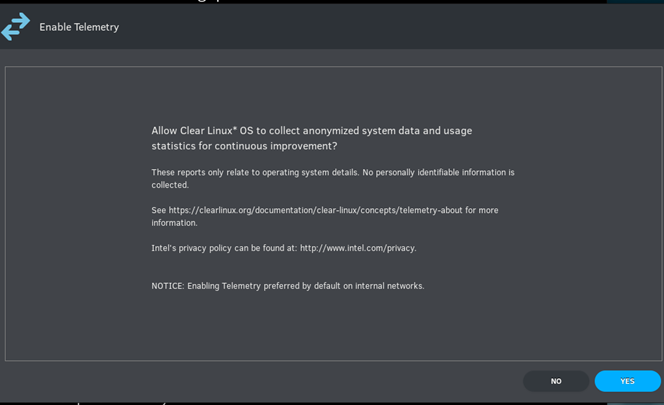
Telemetry
Choose whether to participate in telemetry . Telemetrics is a Clear Linux OS feature that reports failures and crashes to the Clear Linux OS development team for improvements.
- From Required Options , select Telemetry .
- Select Yes .
Figure 17: Enable Telemetry 
Advanced options
After you complete the Required options, we recommend completing Advanced options –though they’re not required. Doing so customizes your development environment, so you’re ready to go immediately after reboot.
You can always add more bundles later with swupd .
Select Additional Bundles
This option is only available with a valid network connection. Bundle selection is disabled if no network connection exists.
- On the Advanced menu, select Select Additional Bundles .
- Select your desired bundles.
Figure 18: Bundle Selection 
Figure 19: Select Additional Bundles 
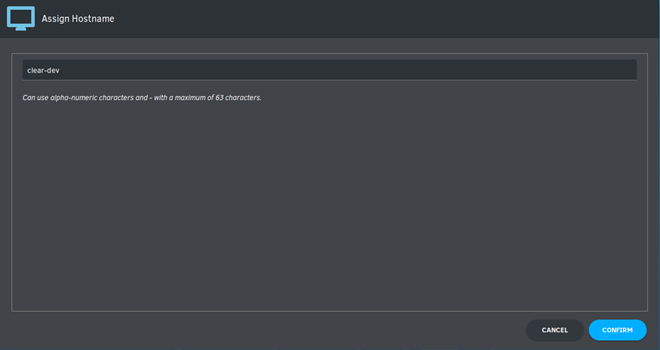
Assign Hostname
- In Advanced Options, select Assign Hostname .
- In Hostname , enter the hostname only (excluding the domain).
Figure 20: Assign Hostname 
Note Hostname does not allow empty spaces. Hostname must start with an alphanumeric character but may also contain hyphens. Maximum length of 63 characters.
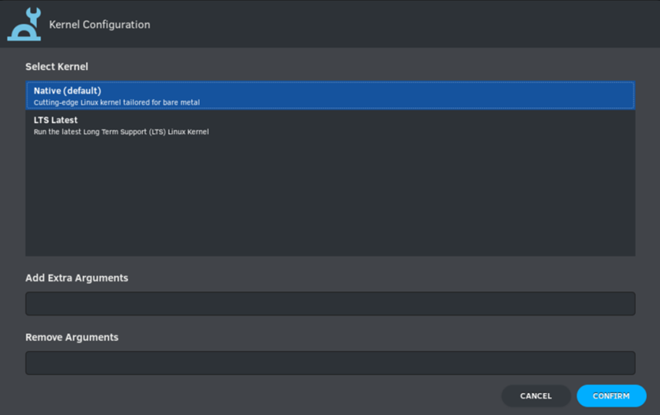
Kernel Configuration
Figure 21: Kernel Configuration 
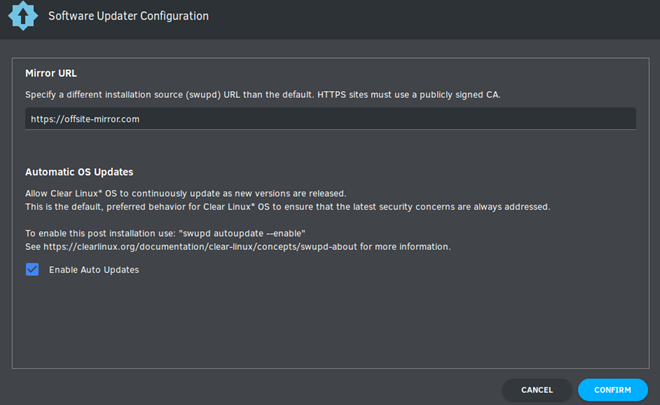
Software Updater Configuration
- In Advanced Options, select Software Updater Configuration .
- In Mirror URL , follow the instructions if you wish to specify a different installation source.
- Enable Auto Updates is selected by default. If you do not wish to enable automatic software updates, uncheck the box.
Figure 22: Software Updater Configuration 
Finish installation
Figure 23: Finish installation 
Figure 24: Required Options — Incomplete 
Note Allow time for the graphical login to appear. A login prompt shows the administrative user that you created.
Congratulations. You successfully installed Clear Linux OS.
Default partition schema
Create partitions per requirements in Table 1.
Table 1. Default partition schema 
Установка ОС Clear Linux на ноутбук

По словам производителя Intel, для установки Clear Linux в идеале требуется процессор Intel Core четвертого поколения или Intel Xeon E5 v3. Те, все CPU Intel, начиная с Haswell, идеально подходят для Clear Linux. У нас будет установка ОС Clear Linux на ноутбук от Lenovo с CPU : Intel i3-2310M (4) @ 2.100GHz/Intel 2nd Generation Core Processor Family/ Memory: 6712MiB / 7788MiB.
Для начала необходимо скачать и сделать загрузочную USB-флеш-ку
Скачать установщик с графическим интерфейсом для установки на «голое железо» вы можете по ссылке – ОС Clear Linux. Для полного выбора программного обеспечения вы можете зайти на сайт clearlinux.org и там уже выбрать что то подходящее для вас…
После загрузки ISO при помощи Rufus , Ventoy или другого ПО вы сможете сделать загрузочную флешку для установки на голое железо. Напомним вам, минимальные требования железа для установки Clear Linux:
- Графика: Устройство с поддержкой openGL (например, Intel HD/UHD Graphics)
- Процессор: Совместимый 64-разрядный процессор x86
- Сеть: Активное подключение к Интернету
- Память: 4 ГБ ОЗУ
- Диск: 20 ГБ
Установка операционной системы Clear Linux:
После выставления приоритета в биосе на usb носитель сохраняем и перезагружаем компьютер. Далее вы увидите загрузочную среду типа LIVE CD /Clear Linux. Проверить совместимость комплектующих и программного обеспечения для настольных версий вы можете по команде через терминал.
На рабочем столе установочной среды найдёте иконку Clear Linux, на которую вам и необходимо нажать для установки системы. Выглядит она примерно так, как на картинке ниже:
После в окно установки Clear Linux вам необходимо ввести следующее:
Временную зону. В выборе участвует в том числе Europa/Moscow, на которой мы и сделаем остановку.

Язык, в выборе будет представлено из 3, выберите более подходящий, потом можно будет его изменить в настройках, после 1 запуска системы.

Диск для установки, желательно использовать SSD с чистым пространством для чистой установки системы Clear Linux. Не обязательно SSD-накопитель от Intel 535 Series. Можно любой другой.

Имя пользователя. Логин и пароль.
Разрешить функция телеметрии, которая собирает информацию об ошибках в системе, но не собирает ничего, что можно было бы отследить до пользователей. Функцию можно отключить.
1 Запуск системы Клеар Линукс
После процесса установки будет поставлена точка. Далее систему необходимо перезагрузить и залогиниться в ней. Те авторизоваться/ вести в поле имя пользователя и пароль.

После запуска системы можно будет найти настройки её, где и внести изменения в настройки языка. На тот который вам более ближе и понятней.

Настройка операционной системы Clear Linux:
Настройки в системе Clear Linux очень чувствительные, но в целом они могут вас порадовать. Для установки необходимых приложений есть – центр приложений. На рабочем столе вы увидите в меню, нажав горячею клавишу Win.

В центре приложений вы сможете выбрать направление сопутствующее вашим интересам. Тематики программного обеспечения там делятся на: «Инструменты разработчика», «Образование», «Игры», «Безопасность», «Производительность», «Программирование» и т. д.
В целом система радует и достаточна лояльна работает с ноутбуком 8 летней давности на ура!
Поддержка и помощь в установке операционных систем
Если вам нужна помощь в подборе и установке операционных систем, а так же их настроек – обращайтесь. «Компью-помощь» придёт на помощь в нужное время и в нужно место. Установка линуксовых: Kali Linux, openSUSE, Clear Linux, Семейства Windows и так далее и тому подобное …