- This page is depreciated.
- Ubuntu* 22.04 (jammy)
- Pre-installation setting
- Step 1 Add package repository
- Step 2 Install Linux kernel
- Update the kernel grub options
- Step 3 Install DKMS kernel modules
- Step 4 Install run-time packages
- OPTIONAL: Install developer packages
- Step 5 Configuring permissions
- Step 6 Verify the installations
- Verify the device is working with i915 driver
- Verify Media drivers installation
- Verify Computing drivers installation
- Verify 3D drivers installation
- Включение гибридной графики в Ubuntu на ноутбуках Nvidia + Intel (OpenGL, Vulkan)
- 1. Устанавливаем драйвер
- 2. Настраиваем видеокарту
- 3. Запуск приложения с использованием дискретной графики
- Заключение
This page is depreciated.
Please refer to the latest installation guide.
Ubuntu* 22.04 (jammy)
Driver installation instructions assume the Linux distribution is already installed. Refer to 3rd party instructions to load the distribution, if not already present.
If you need to update your GPU firmware, refer to the system’s Original Equipment Manufacturer (OEM) for the latest version.
Pre-installation setting
Please note that Resizable BAR (ReBAR) is currently required to be enabled in the system BIOS on the host platform. For Intel based platforms, this includes most systems based on 10th Generation Intel® Core™ Processors and newer. Follow this link for more on What Is Resizable BAR and How Do I Enable It?. Intel continues to optimize the SW stack to reduce the dependency on ReBAR enabled hosts in future.
Please use below instruction to check Resizable BAR enabled or not.
Similar information will be showed as below:
03:00.0 VGA compatible controller: Intel Corporation Device 56a0 (rev 08) (prog-if 00 [VGA controller]) Subsystem: Intel Corporation Device 4905 Flags: bus master, fast devsel, latency 0, IRQ 182 Memory at 84000000 (64-bit, non-prefetchable) [size=16M] Memory at 4000000000 (64-bit, prefetchable) [size=16G] Expansion ROM at 85000000 [disabled] [size=2M] Capabilities: access denied> Kernel driver in use: i915 Kernel modules: i915
With Resizable BAR support, “Memory at 4000000000 (64-bit, prefetchable) [size=16G]” should match the graphics memory size of your Arc GPU.More details, please refer to Arc Specifications
Step 1 Add package repository
To install the repositories.intel.com/graphics package repository, add the following to your Ubuntu installation. Prior to copy/pasting to your console, you may want to run sudo ls and enter your password to prevent the commands from being swallowed by the sudo password prompt:
sudo apt-get install -y gpg-agent wget wget -qO - https://repositories.intel.com/graphics/intel-graphics.key | \ sudo gpg --dearmor --output /usr/share/keyrings/intel-graphics.gpg echo 'deb [arch=amd64,i386 signed-by=/usr/share/keyrings/intel-graphics.gpg] https://repositories.intel.com/graphics/ubuntu jammy arc' | \ sudo tee /etc/apt/sources.list.d/intel.gpu.jammy.list
The above will make sure your system has gpg-agent and wget installed. It will then download and install the public key used to verify the integrity of the package repository. Finally, it adds the repositories.intel.com/graphics repository to the system.
Step 2 Install Linux kernel
Please install the Ubuntu 5.19.0 kernel (ie “linux-image-5.19.0-35-generic”).
sudo apt-get update && sudo apt-get install -y --install-suggests linux-image-5.19.0-35-generic Update the kernel grub options
sudo sed -i "s/GRUB_DEFAULT=.*/GRUB_DEFAULT=\"1> $(echo $(($(awk -F\' '/menuentry / ' /boot/grub/grub.cfg \ | grep -no '5.19.0-35' | sed 's/:/\n/g' | head -n 1)-2)))\"/" /etc/default/grub sudo update-grub
Reboot the system for these changes to take effect
If you have enabled Secure Boot in the BIOS, you might get the prompt during the reboot.Please make sure you choose Enroll MOK to make the new kernel to be effective.
Please ensure you are using 5.19.0-35. Then proceed with the below instructions.
Install dkms and kernel header files
sudo apt-get update sudo apt-get -y install \ gawk \ dkms \ linux-headers-$(uname -r) \ libc6-dev
Step 3 Install DKMS kernel modules
sudo apt-get install -y intel-platform-vsec-dkms intel-platform-cse-dkms sudo apt-get install -y intel-i915-dkms intel-fw-gpu
Step 4 Install run-time packages
You can install the GPU software packages by running the following:
sudo apt-get install -y gawk libc6-dev udev\ intel-opencl-icd intel-level-zero-gpu level-zero \ intel-media-va-driver-non-free libmfx1 libmfxgen1 libvpl2 \ libegl-mesa0 libegl1-mesa libegl1-mesa-dev libgbm1 libgl1-mesa-dev libgl1-mesa-dri \ libglapi-mesa libgles2-mesa-dev libglx-mesa0 libigdgmm12 libxatracker2 mesa-va-drivers \ mesa-vdpau-drivers mesa-vulkan-drivers va-driver-all vainfo
OPTIONAL: Install developer packages
If you will be doing development, you may want to install optional development packages. oneAPI users will need to install these packages for some of the oneAPI tools to function correctly:
sudo apt-get install -y \ libigc-dev \ intel-igc-cm \ libigdfcl-dev \ libigfxcmrt-dev \ level-zero-dev
To support Steam games, please install i386 packages.
sudo dpkg --add-architecture i386 sudo apt-get update sudo apt-get install -y \ udev mesa-va-drivers:i386 mesa-common-dev:i386 mesa-vulkan-drivers:i386 \ libd3dadapter9-mesa-dev:i386 libegl1-mesa:i386 libegl1-mesa-dev:i386 \ libgbm-dev:i386 libgl1-mesa-glx:i386 libgl1-mesa-dev:i386 \ libgles2-mesa:i386 libgles2-mesa-dev:i386 libosmesa6:i386 \ libosmesa6-dev:i386 libwayland-egl1-mesa:i386 libxatracker2:i386 \ libxatracker-dev:i386 mesa-vdpau-drivers:i386 libva-x11-2:i386
Reboot the system for these changes to take effect
Step 5 Configuring permissions
In order to access GPU capabilities, a user needs to have the correct permissions on system. The following will list the group assigned ownership of the render nodes, and list the groups the active user is a member of:
stat -c "%G" /dev/dri/render* groups $USER>
If a group is listed for the render node which isn’t listed for the user, you will need to add the user to the group using gpasswd. In the following, the active user will be added to the ‘render’ group and a new shell spawned with that group active:
sudo gpasswd -a $USER> render newgrp render Step 6 Verify the installations
Verify the device is working with i915 driver
sudo apt-get install hwinfo hwinfo --display
Similar information will be showed as below:
28: PCI 02.0: 0300 VGA compatible controller (VGA) [Created at pci.386] Unique ID: _Znp.rCilE76BCCB SysFS ID: /devices/pci0000:00/0000:00:02.0 SysFS BusID: 0000:00:02.0 Hardware Class: graphics card Device Name: "GPU" Model: "Intel VGA compatible controller" Vendor: pci 0x8086 "Intel Corporation" Device: pci 0x5690 SubVendor: pci 0x8086 "Intel Corporation" SubDevice: pci 0x2081 Revision: 0x04 Driver: "i915" Driver Modules: "i915"
Verify Media drivers installation
Similar information will be showed as below:
libva info: VA-API version 1.14.0 libva info: Trying to open /usr/lib/x86_64-linux-gnu/dri/iHD_drv_video.so libva info: Found init function __vaDriverInit_1_14 libva info: va_openDriver() returns 0 vainfo: VA-API version: 1.14 (libva 2.12.0)
Verify Computing drivers installation
sudo apt-get install clinfo clinfo
Similar information will be showed as below:
Number of platforms 2 Platform Name Intel(R) OpenCL HD Graphics Platform Vendor Intel(R) Corporation Platform Version OpenCL 3.0 Platform Profile FULL_PROFILE
Verify 3D drivers installation
Below verification needs a running desktop UI on top of your Linux distribution.
sudo apt-get install mesa-utils glxinfo |grep OpenGL
Similar information will be showed as below:
OpenGL vendor string: Intel OpenGL renderer string: Mesa Intel(R) Graphics (DG2) OpenGL core profile version string: 4.6 (Core Profile) Mesa 22.2.0-devel (git-44289c46d9) OpenGL core profile shading language version string: 4.60 OpenGL core profile context flags: (none) OpenGL core profile profile mask: core profile OpenGL core profile extensions: OpenGL version string: 4.6 (Compatibility Profile) Mesa 22.2.0-devel (git-44289c46d9)
Включение гибридной графики в Ubuntu на ноутбуках Nvidia + Intel (OpenGL, Vulkan)
Это простая инструкция как включить гибридную графику intel-nvidia на ноутбуке. Чтобы определенные приложения запускались на дискретном чипе, а другие на встроенном. На свое удивление в интернете не нашел простую инструкцию того, как запускать определенные приложения, используя дискретную графику. Так что напишу так просто, на сколько считаю нужным
У меня система KDE Neon 5.21 — по большому счету — Ubuntu LTS с окружением рабочего стола KDE Plasma 5.21, видеочип GeForce MX150
1. Устанавливаем драйвер
a) Если у вас система на Qt (Как правило окружение KDE или LXQt), то с помощью данной команды через терминал загрузим программу для установки драйверов:
sudo apt install software-properties-qtЕсли у вас система на GTK то с помощью это команды:
sudo apt install software-properties-gtkХотя разницы принципиальной нет
b) Затем запускаем ее с правами root
sudo software-properties-qtВ папке ~/.local/share/applications/ создадим файл software properties qt.desktop с таким содержанием
[Desktop Entry] Categories=System;Settings; Comment[ru_RU]=drivers Comment=drivers Exec=konsole -e "~/.local/share/applications/software-properties-qt.sh" GenericName[ru_RU]=Установка драйверов\s GenericName=Установка драйверов\s Icon=systemsettings MimeType= Name[ru_RU]=software properties qt\n Name=software properties qt\n Path= StartupNotify=true Terminal=false TerminalOptions= Type=Application X-DBUS-ServiceName= X-DBUS-StartupType= X-KDE-SubstituteUID=false X-KDE-Username= И файл software properties qt.sh в той же папке:
#! /bin/bash echo software-properties-qt sudo /usr/bin/software-properties-qt После перезагрузки ярлык появится в меню
Но это далеко не обязательно, вполне достаточно запустить из консоли для наших целей настройки гибридной графики
c) Переходим на последнюю вкладку Additional drivers и устанавливаем нужный драйвер. Я выбрал самой последней версии, который не tested и не server

d) После установки перезагружаем устройство
2. Настраиваем видеокарту
a) Загружаем следующую программу:
sudo apt install nvidia-settingsb) Переходим в PRIME Profiles Здесь мы видим три пункта:
- NVIDIA (Performance Mode) — работать только на дискретной графике. Сильно потребляет батарею в несложных задачах, а так же ноутбук начинает греться. Зато система работает намного быстрее, но это того не стоит. У меня после установки драйвера этот пункт включился автоматически
- NVIDIA On-Demand — некоторые приложения будут использовать дискретную графику nvidia, но по-умолчанию встроенная intel. Как запустить конкретное приложение с дискретной графикой напишу дальше
- NVIDIA (Power Saving Mode) — отключение дискретной графики
Выбираем второй вариант — NVIDIA On-Demand , и перезагружаем систему

3. Запуск приложения с использованием дискретной графики
Это то, что сложнее всего гуглилось.
Для запуска приложения с использованием графики nvidia нужно задать для OpenGL две переменные среды:
__NV_PRIME_RENDER_OFFLOAD=1 __GLX_VENDOR_LIBRARY_NAME=nvidia__NV_PRIME_RENDER_OFFLOAD=1Делать это надо перед командой для запуска приложения. Например, нам нужно запустить из терминала приложение program с использованием дискретной графики. Нужно вызвать его так:
__NV_PRIME_RENDER_OFFLOAD=1 __GLX_VENDOR_LIBRARY_NAME=nvidia programСоответственно, если у приложения есть ярлык (.desktop) в меню приложений, то надо изменить команду запуска в ярлыке. В KDE Plasma нужно нажать на него ПКМ, открыть свойства (или «изменить приложение. «), перейти во вкладку «приложение» и перед командой приписать данную приставку. В других средах похожего стола примерно так же
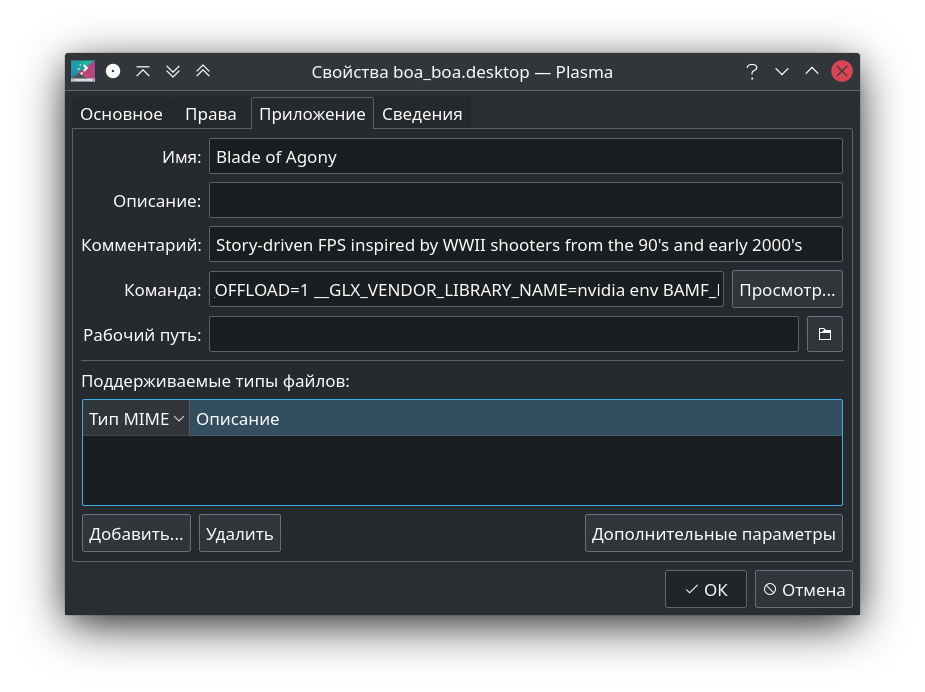
Можно сделать это же действие через текстовый редактор. Открываем ярлык, находим Exec= , и приписываем перед коммандой данную приставку __NV_PRIME_RENDER_OFFLOAD=1 __GLX_VENDOR_LIBRARY_NAME=nvidia
Заключение
Данный метод, как я понял, точно работают для программ, использующих библиотеки OpenGL и Vulkan. У меня, к сожалению, не получилось запустить так Windows приложение через Wine, которое использует DirectX, но это уже совсем другая история. (OpenGL приложения под Wine работают)
P.S. в комментариях (#comment_23011444) немного подсказали, что для работы с Proton (DirectX) есть такой док