- Intel RAID Web Console 2 Utility 13.04.03.01_r2 for Linux x86/x64
- Computer science Experience Knowledge SHAring (CEKSHA)
- Labels
- 17 July 2011
- Manage Intel RAID under GNU/Linux using mdadm tool
- intel 631xesb 6321esb sata raid controller utility
- Legacy
- by Gigabyte Technology Co., Ltd.
- Find Gigabyte Technology Device Drivers by Model Name or Number
- Browse by Device Category
- How to Update Gigabyte Technology Device Drivers Quickly & Easily
- Step 1 — Download Your Driver
- Step 2 — Install Your Driver
- How to Open Device Manager
- How to Install drivers using Device Manager
Intel RAID Web Console 2 Utility 13.04.03.01_r2 for Linux x86/x64
This download supports Intel RAID controllers using SAS software stack (RS3DC080, RS3DC040, RS3WC080, RCS25ZB040, RCS25ZB040LX, RMS25PB080, RMS25PB040, RMT3PB080, RMS25CB080, RMS25CB040, RMT3CB080, RMS25CB080N, RMS25PB080N, RS25AB080, RS25SB008, RS25DB080, RS25NB008, RS2VB080, RS2VB040, RT3WB080, RS2WC040, RS2WC080, RS2SG244, RS2WG160, RMS2MH080, RMS2AF080, RMS2AF040, RS2MB044, RS2BL080, RS2BL080DE, RS2BL040, RS2PI008DE, RS2PI008, SRCSASJV, SRCSASRB, SRCSATAWB, SROMBSASFC, SROMBSASMP2, SROMBSASMR, SRCSASPH16I, SRCSASBB8I, SRCSASLS4I, SRCSAS18E, SRCSAS144E, SROMBSAS18E), Intel IT/IR RAID products (RMS25KB080, RMS25KB040, RMS25JB080, RMS25JB040, RMS2LL080, RMS2LL040, AXX4SASMOD, SASUC8I, SASWT4I), Intel RAID SAS controller FALSASMP2(supports S5000PAL/S5000XAL and S5520UR without RAID activation key AXXRAKSAS2 installed); Intel RAID SAS Riser controller AFCSASRISER in Intel Server System S7000FC4UR without RAID Activation Key AXXRAKSAS2 installed) and Intel Embedded Server RAID Technology II RAID products (Intel Server Boards which are C600/C200 Chipset Based, Intel RAID controller SASMF8I; Intel RAID SAS controller AXX4SASMOD; on server boards enabled for ICH9R SATA RAID, ICH10R SATA RAID, S5000 (ESB2) SATA RAID, LSI1064e/1068 SAS RAID — including S1200KP/ S1200BTS/ S1200BTL/ S2600JF/ S2600WP/ S1600JP/ S2600GL/S2600GZ/ S2600IP/ S2600CP/ S2600CO/ S2600KI/ W2600CR/ S3200SH/S3210SH, X38ML, S5400SF, S7000FC4UR, S5000PAL / S5000XAL, S5000PSL / S5000XSL / S5000XVN / SC5400RA, S5000VSA, S5000VCL / SR1530HCL, S5520WB12V / S5520WB / S5500WB, S5520HC / S5500HCV / S5500HCT, S5520UR / S5520URT, S5520SC, S3420GP).
- SWR — User can login MSM without giving the credentials in SLES 11 SP2 64 bit in THOR_RX300_S7 Server.
- MSM is not dynamically reporting configuration changes and events when connected to VMWare.
- BIOS
- Blu-Ray / Media Players
- Camcorder
- Digital Camera
- HDTV
- Keyboard & Mouse
- LAN / Network Adapter
- Modem
- Motherboard
- MP3 Player
- Notebook & Tablet PC
- PDA & Mobile
- Printer
- RAID & HD Controller
- Scanner
- Sound Card
- Video / Graphic Adapter
- User Manuals
Computer science Experience Knowledge SHAring (CEKSHA)
sharing knowledge earned into design/development/technical delicate and/or difficult situations .
Labels
17 July 2011
Manage Intel RAID under GNU/Linux using mdadm tool
You may be interesting to read some history about RAID first.
This article is about managing Intel RAID, with mdadm tool, but some information may apply to others kinds.
To begin, you can find lots of information about RAID under GNU/Linux.
IMPORTANT: for Intel’s IMSM support you need at least
version 3.2 of mdadm tool (thanks to Iwan for this information).
Usually, there is a container device (let’s call it /dev/md127 in this article), and the RAID device (let’s call it /dev/md126 in this article).
Instead of long blabla, this article will give some common commands to help manage Intel RAID with mdadm tool.
To report the RAID information from the Option ROM (for instance «Intel(R) Matrix Storage Manager»):
mdadm —detail-platform
To get general details:
mdadm -D /dev/md127
To examine information (including members):
mdadm -E /dev/md127
To assemble the RAID array inside the container, and/or to start it (the -e option declares the style of RAID metadata (superblock) to be used):
mdadm -I -e imsm /dev/md127
To check the current state:
cat /proc/mdstat
Output sample (with a RAID 10 having 4 members):
Personalities : [raid10]
md126 : active raid10 sda[3] sdb[2] sdc[1] sdd[0]
3907023872 blocks super external:/md127/0 64K chunks 2 near-copies [4/4] [UUUU]
[=>. ] resync = 6.6% (258923904/3907024128) finish=305.7min speed=198882K/sec
md127 : inactive sdb[3](S) sda[2](S) sdc[1](S) sdd[0](S)
9028 blocks super external:imsm
To add it to the configuration file (to be activated automagically at boot):
mdadm —examine —scan >> /etc/mdadm.conf
For advanced commands (including repairing), you should read this.
intel 631xesb 6321esb sata raid controller utility
Trimode Windows* Driver package version 10-2.60.78.00 for Intel® Storage Controllers.
Trimode firmware package version 10.00.01.02 for Intel® Storage Controllers.
For Intel® RAID Controllers RMS3JC080, RMS3VC160, RS3FC044, RS3GC008, RS3UC080, RS3KC, RS3PC, AHWKPTP12GBGBIT, FHWKPTPBGB24. (16.0-2.51.21.02)
This download record provides Intel® RAID Web Console 3 version 7.009.011.000 for Windows*.
Provides flash update for Windows*, Linux*, and UEFI. (24.21.0-0091)
Provides flash update version 24.21.0-0091 for Windows*, Linux*, and UEFI.
This download contains the Intel 12G SAS3 IT/IR SAS driver for RHEL* 7.5 x64
This record provides the Trimode RAID firmware package version 50.8.0-2066 — MR7.8
Provides hardware RAID driver for various Linux* distributions. (07.708.03.00)
Provides firmware for selected Intel® RAID Controllers and Intel® Integrated RAID Modules.
This download provides Intel® RAID Web Console 3 version 4.186 for Linux*.
This Firmware supports Intel® RAID Controller RMS3VC160. (15.00.03.00)
Supports Intel® RAID Controllers. (07.705.04.00)
Flash update version 24.22.0-0037 for Windows*, Linux*, and UEFI.
Command-line utility to check status and manage the controller. StorCli Unified version (7.0813.00).
Supports Trimode Intel® RAID Controllers (07.704.04.00).


Во многих материнках Supermicro есть встроенный софтварный RAID контроллер. Для входя в управление нужно при загрузке нажать Ctrl+I. Но есть ньюанс — управлялка работает только в режиме Legacy. Legacy не поддерживает разделы более 2 Тб, как быть? Расскажу как настроить RAID и для Legacy и в UEFI.
Если вы не планируете разделов более 2 Тб, не заморачивайтесь и настройте загрузку в Legacy.
Legacy
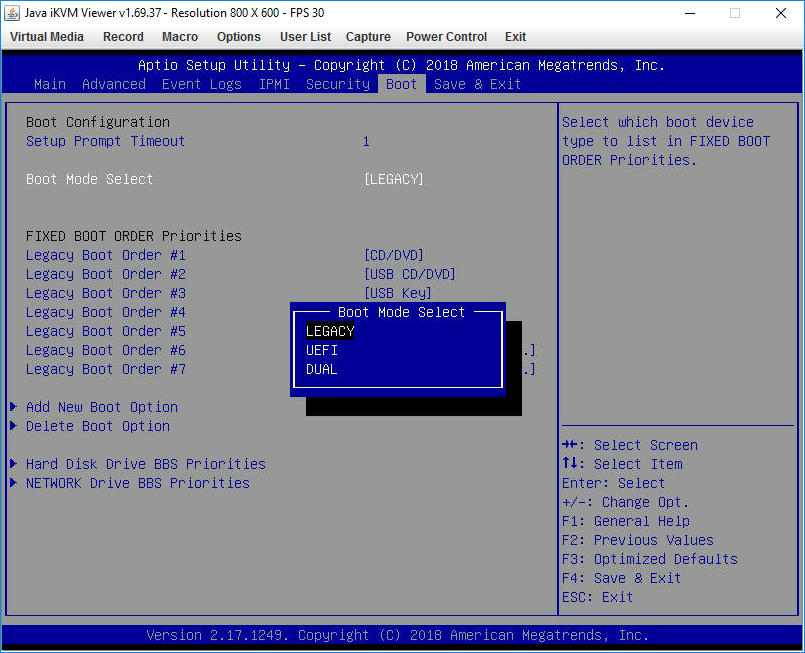
При загрузке жмём DEL и попадаем в BIOS.
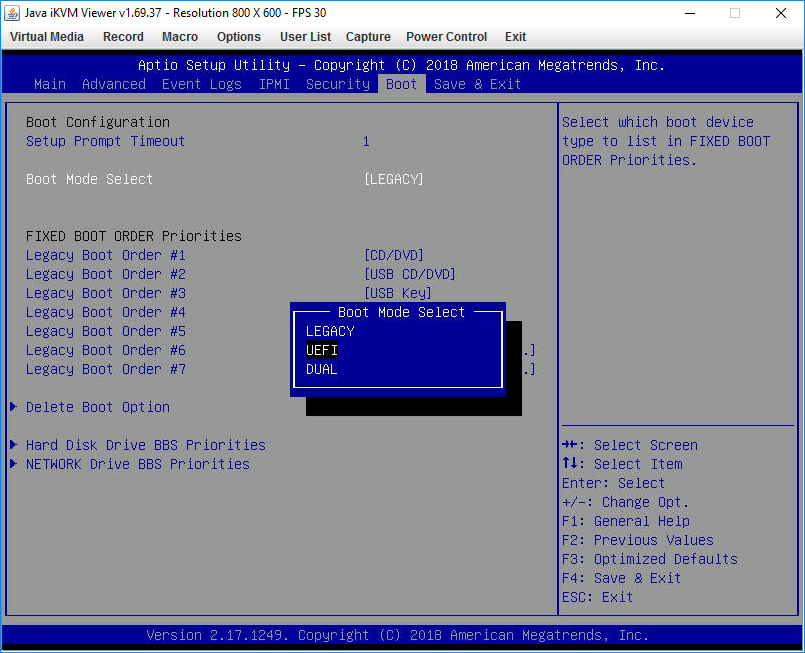
В разделе Boot меняем Boot Mode Select на Legacy:
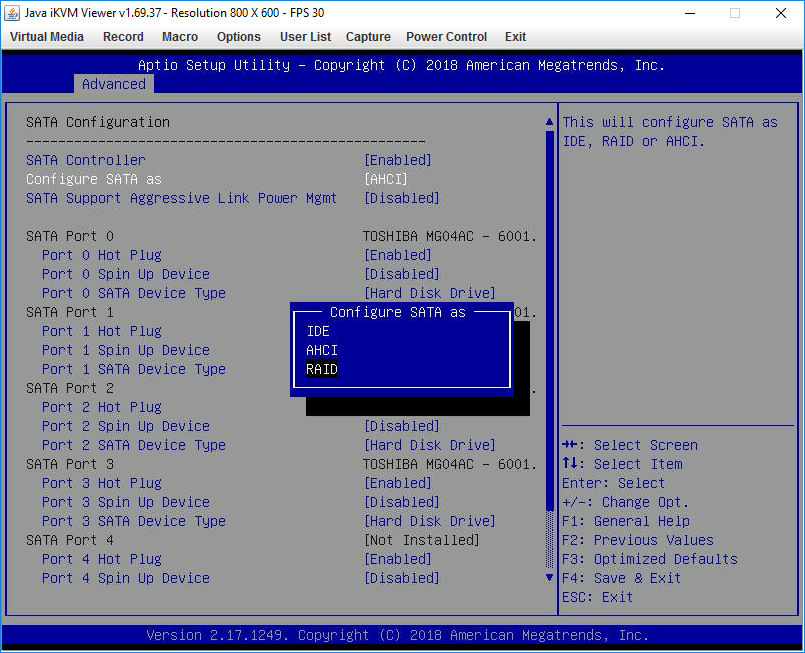
В разделе Advanced выполняем SATA Configuration, Configure SATA as RAID:
Появляются дополнительные пункты настройки. Оставляем SATA RAID Option ROM/UEFI Driver как Legacy:
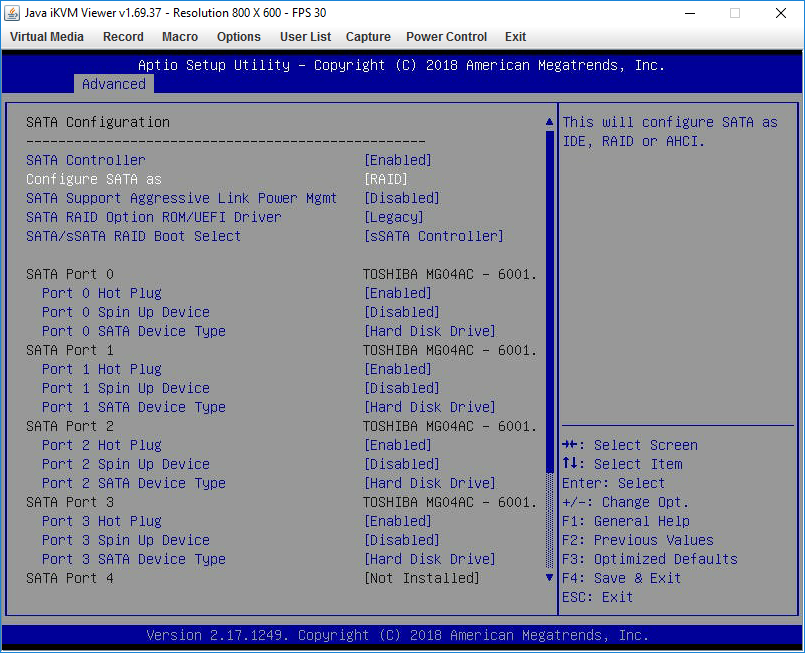
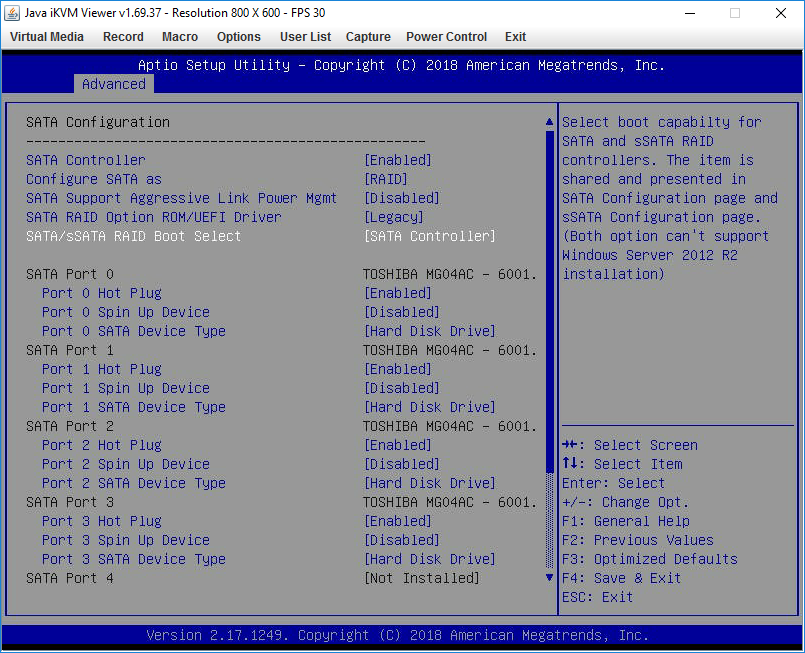
SATA/sSATA RAID Boot Select меняем на SATA Controller:
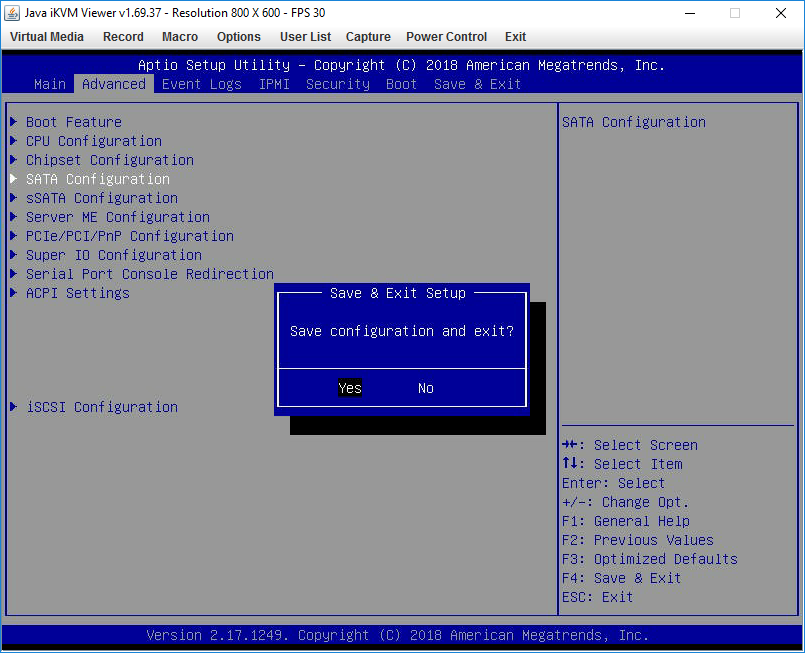
Перезагружаем сервер, при загрузке жмём Ctrl+I, попадаем в раздел конфигурации Intel Rapid Storage Technology:
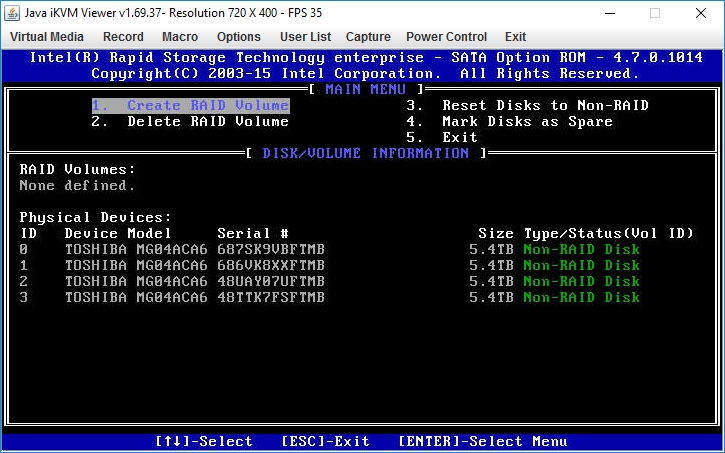
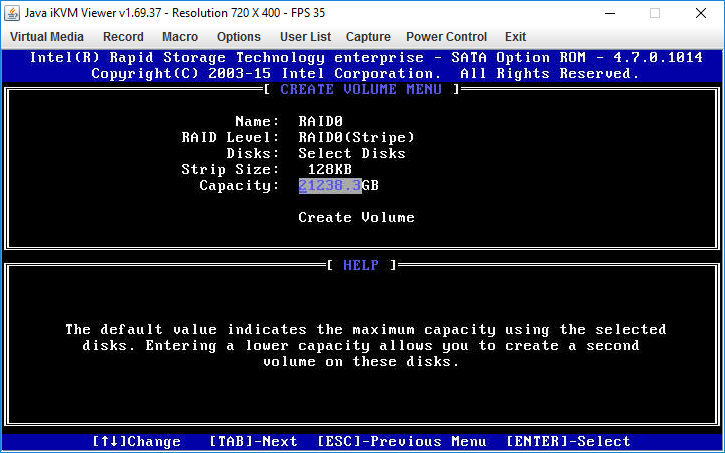
Создаём RAID. Я объединяю 4 диска в RAID0:
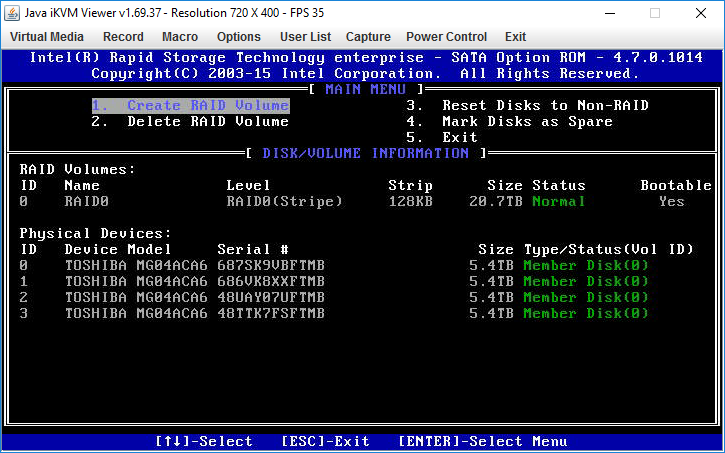
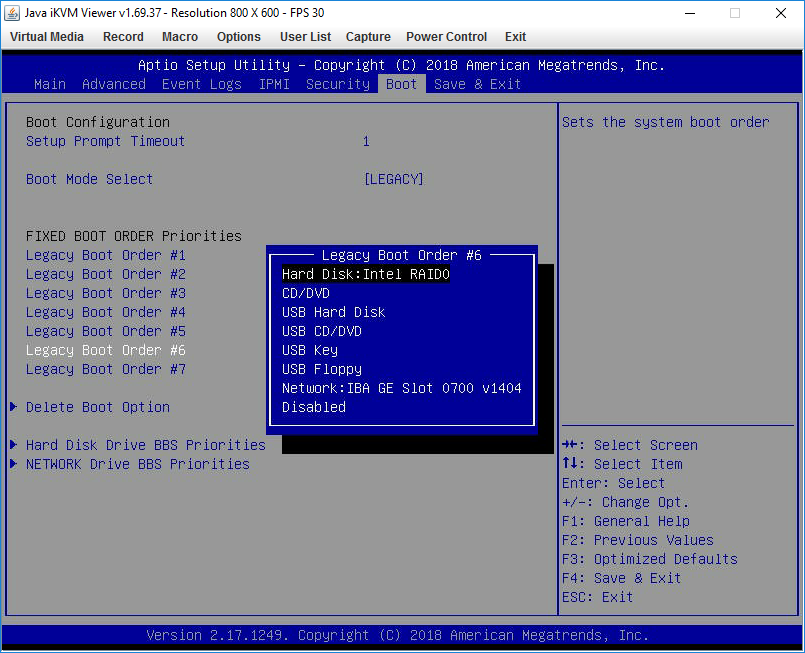
Перезагружаемся, снова входим в BIOS. В разделе Boot в FIXED BOOT ORDER Priorities появляется возможность выбрать Hard Disk:Intel RAID0 — наш новый массив:
Можно пользоваться. Однако, если вы, вдруг, попытаетесь поставить Oracle Linux, то в инсталляторе не сможете создать раздел более 2 Тб. Что делать?
Итак, для перехода в UEFi внесём в предыдущую инструкцию некоторые изменения.
Выполняем все инструкции для Legacy и снова загружаемся в BIOS (Продвинутые могут смерджить инструкции и сократить количество перезагрузок). Вносим изменения в Advanced > SATA Configuration. Меняем SATA RAID Option ROM/UEFI Driver на EFI:

В Boot > Boot Mode Select ставим DUAL. Можно, наверное, и просто UEFI, но тогда при перезагрузке не сможете попадать в раздел конфигурирования контроллера:
FIXED BOOT ORDER Priorities становится значительно больше. Двигаем все пункты с EFI вверх.
Теперь можно загружать инсталлятор Oracle Linux в режиме UEFI, он нормально видит RAID и может создать раздел более 2 Тб.
Ура, товарищи! Да здравствует то, во имя чего мы все приложили усилия!
by Gigabyte Technology Co., Ltd.
The best way to fix your PC to run at peak performance is to update your drivers. If your system is slow, unresponsive or crashes often, the problem may be with your drivers. Sometimes, after upgrading to a newer operating system such as Windows 10, problems can occur because your current driver may only work with an older version of Windows. To download and update your drivers, follow the instructions below.
Find Gigabyte Technology Device Drivers by Model Name or Number
Browse by Device Category
How to Update Gigabyte Technology Device Drivers Quickly & Easily
Tech Tip: Updating drivers manually requires some computer skills and patience. A faster and easier option is to use the Driver Update Utility for Gigabyte Technology to scan your system for free. The utility tells you which specific drivers are out-of-date for all of your devices.
Step 1 — Download Your Driver
To get the latest driver, including Windows 10 drivers, you can choose from a list of most popular Gigabyte Technology downloads. Click the download button next to the matching model name. After you complete your download, move on to Step 2.
If your driver is not listed and you know the model name or number of your Gigabyte Technology device, you can use it to search our driver archive for your Gigabyte Technology device model. Simply type the model name and/or number into the search box and click the Search button. You may see different versions in the results. Choose the best match for your PC and operating system.
If you don’t know the model name or number, you can start to narrow your search down by choosing which category of Gigabyte Technology device you have (such as Printer, Scanner, Video, Network, etc.). Start by selecting the correct category from our list of Gigabyte Technology Device Drivers by Category.
Need more help finding the right driver? You can request a driver and we will find it for you. We employ a team from around the world. They add hundreds of new drivers to our site every day.
Tech Tip: If you are having trouble deciding which is the right driver, try the Driver Update Utility for Gigabyte Technology. It is a software utility that will find the right driver for you — automatically.
Gigabyte Technology updates their drivers regularly. To get the latest Windows 10 driver, you may need to go to Gigabyte Technology website to find the driver for to your specific Windows version and device model.
Step 2 — Install Your Driver
After you download your new driver, then you have to install it. To install a driver in Windows, you will need to use a built-in utility called Device Manager. It allows you to see all of the devices recognized by your system, and the drivers associated with them.
How to Open Device Manager
In Windows 8.1 & Windows 10, right-click the Start menu and select Device Manager
In Windows 8, swipe up from the bottom, or right-click anywhere on the desktop and choose «All Apps» -> swipe or scroll right and choose «Control Panel» (under Windows System section) -> Hardware and Sound -> Device Manager
In Windows 7, click Start -> Control Panel -> Hardware and Sound -> Device Manager
In Windows Vista, click Start -> Control Panel -> System and Maintenance -> Device Manager
In Windows XP, click Start -> Control Panel -> Performance and Maintenance -> System -> Hardware tab -> Device Manager button
How to Install drivers using Device Manager
Locate the device and model that is having the issue and double-click on it to open the Properties dialog box.
Click the Update Driver button and follow the instructions.
In most cases, you will need to reboot your computer in order for the driver update to take effect.
Tech Tip: Driver downloads and updates come in a variety of file formats with different file extensions. For example, you may have downloaded an EXE, INF, ZIP, or SYS file. Each file type has a slighty different installation procedure to follow.
If you are having trouble installing your driver, you should use the Driver Update Utility for Gigabyte Technology. It is a software utility that automatically finds, downloads and installs the right driver for your system. You can even backup your drivers before making any changes, and revert back in case there were any problems.
Try it now to safely update all of your drivers in just a few clicks. Once you download and run the utility, it will scan for out-of-date or missing drivers:
When the scan is complete, the driver update utility will display a results page showing which drivers are missing or out-of-date. You can update individual drivers, or all of the necessary drivers with one click.
For more help, visit our Driver Support Page for step-by-step videos on how to install drivers for every file type.