- Подключение Kali Linux к беспроводной сети
- Способ подключения Kali Linux к беспроводной сети
- Способ 1
- Способ 2
- Заключение
- How To Connect Wi-Fi On Kali Linux (GUI, Command, Hidden, …)
- Kali Linux: Wi-Fi connection during the system installation
- Wireless card not detected?
- Wi-Fi configuration during Kali Linux installation
- Connect to Wi-Fi via the desktop interface on Kali Linux
- Quick connection from the top bar
- Advanced settings
- Install a wireless driver
- Using the command line to connect to a Wi-Fi network on Kali Linux
Подключение Kali Linux к беспроводной сети

Добавить в избранное
Главное меню » Kali Linux » Подключение Kali Linux к беспроводной сети

С егодня беспроводные сети более распространены на открытых площадках и в крупных корпорациях, где требуется усиление безопасности для управления аутентичностью и конфиденциальностью. Беспроводная сеть позволяет участникам оставаться на связи в роуминге без проводов. Поскольку точки доступа усиливают сигналы Wi-Fi, машина может находиться далеко от маршрутизатора и при этом оставаться подключенной к сети. Вы подключаетесь к беспроводной сети этого учреждения, когда подключаетесь к точке доступа Wi-Fi в кафе или другом общественном месте. Радиочастотная (RF) технология управляет беспроводными сетями, частота, связанная с передачей радиоволн в электромагнитном спектре. Всякий раз, когда RF-ток направляется в антенну, он создает электромагнитное поле, которое может перемещаться по космосу. Большинству людей знаком значок беспроводной связи на ноутбуке или телефоне, обозначающий исправное беспроводное подключение к локальной сети, но немногие знакомы с древностью технологии Wi-Fi. Удивительно, но Wi-Fi был создан как маркетинговый термин для продвижения и облегчения взаимодействия между различными системами беспроводных локальных сетей, а не самой технологии. Wi-Fi никогда не задумывался как более короткая версия беспроводной связи; это была просто игра на фразе hi-fi (высокое качество воспроизведения), дань уважения большим аудиотехнологиям. Поскольку беспроводные сети передают данные по воздуху, утечка данных всегда возможна. По сравнению с медным кабелем беспроводные сети имеют больший риск утечки и взлома данных. В результате в беспроводных сетях повышенная концентрация шифрования данных является обязательной. Емкость устройства беспроводной сети может быть увеличена без необходимости прокладки дополнительных кабелей. В кабельных сетях LAN необходима дополнительная медная проводка для увеличения числа рабочих. Мы можем запустить Kali Linux по беспроводной сети после настройки нашей беспроводной сети. Мы можем получить все свободы типичного ПК в законном этическом тесте на проникновение, потому что нам не нужен провод Ethernet.
Способ подключения Kali Linux к беспроводной сети
Цель этой статьи — показать, как разрешить и остановить Wi-Fi в Kali Linux. Это можно сделать через графический интерфейс или командную строку, и в этом руководстве мы научим вас, как это сделать.
Это пригодится, если у вас возникли проблемы с доступом к беспроводному маршрутизатору или вы собираетесь использовать Aircrack-ng для мониторинга и взлома WiFi.
Способ 1
Первый способ связан с реализацией терминала Kali Linux. Запустите терминал и введите IP-адрес, чтобы увидеть метку вашего WiFi-адаптера и сведения о подключении, а также предположим, что вы уже подключены к сети Wi-Fi.
Идентификатор нашего WiFi-соединения в этом примере — eth0. Введите следующую прикрепленную команду, чтобы отключить соединение WiFi.
Введите следующую команду, чтобы перезагрузить устройство и активировать Wi-Fi. Затем мы также запускаем команду «IP a», чтобы увидеть, работает ли ссылка.
Способ 2
Программа Network Manager Text User Interface (nmtui) предоставляет вам текстовый интерфейс для работы с Network Manager и настройки вашей сети Kali Linux. Поскольку инструмент nmtui управляет Network Manager, мы должны сначала убедиться, что служба NetworkManager присутствует в нашей системе Kali Linux.
Выполните указанную ниже инструкцию на терминале Kali Linux.
Как только выполнение вышеперечисленной команды завершится, в вашем окне kali Linux появится графический пользовательский интерфейс, который покажет эти три параметра:
- Редактировать соединение
- Активировать соединение
- Установить имя хоста системы
Нажмите «ОК» после выбора «Активировать соединение».

Как только вы выберете опцию «Активировать соединение», вы увидите другой экран. Отсюда вы можете построить беспроводную сеть.

Заключение
Эта статья научила нас, как разрешать и ограничивать Wi-Fi в Kali Linux с помощью графического интерфейса и командной строки. Если ваш компьютер не подключается к сети Wi-Fi или не имеет доступа к Интернету, используйте это как средство устранения неполадок. Я надеюсь, что вам будет легко следовать этой статье в вашей системе Kali Linux.
Если вы нашли ошибку, пожалуйста, выделите фрагмент текста и нажмите Ctrl+Enter.
How To Connect Wi-Fi On Kali Linux (GUI, Command, Hidden, …)

Connecting to a Wi-Fi network on Kali Linux is often an important step, especially if you keep the Ethernet connection free for other purposes (or don’t have other choice). Anyway, whether you try to connect to the Wi-Fi during the installation, via the GUI or in command line, this guide will help you to get connected quickly.
Kali Linux can be connected to a Wi-Fi network by using the SSID and password from one of these interfaces: during the installation, from the desktop interface or by using command lines in a terminal.
Let’s see how to do this in each situation.
Note: I’m explaining here how to connect to your own wireless network, not how to hack another Wi-Fi network. You need the SSID and password before going further, whatever the option you choose.
Kali Linux: Wi-Fi connection during the system installation
Hide your IP address and location with a free VPN:
Try it for free now, companies are paying for you.
1500 servers in 120 countries. It’s free. Forever. No email required.
A network connection is mandatory to install Kali Linux on a computer. If you don’t use a network cable, a Wi-Fi network needs to be configured during the installation.
Wireless card not detected?
Kali Linux is based on Debian, so most wireless adapters should work with it. If you are not using something too new or exotic, your wireless card will be detected and can be used directly.
Stay tuned with the latest security news!
You’ll enjoy receiving the recent articles directly in your inbox every week!
If you aren’t lucky, you may need to install an additional driver to make it work. In this case, I would recommend completing the installation with a RJ45 cable plugged to your network, and fix the wireless connection later. It will be easier from the full interface rather than doing it during the installation.
Wi-Fi configuration during Kali Linux installation
If you don’t have any network cable connected, a Wi-Fi connection will be asked during the installation of Kali Linux. As most packages are downloaded from the Internet servers, a connection is mandatory.
Here is how to connect to a Wi-Fi network during the installation:
- Start the installation by configure your locales (localization, language, keyboard layout, etc.).
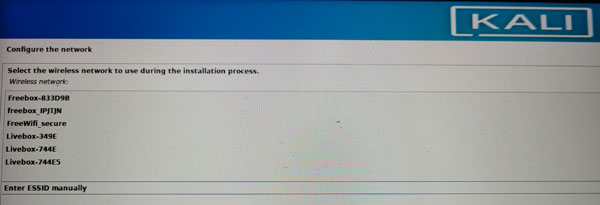
- The wizard will then detect your network configuration, and ask for a Wi-Fi network:

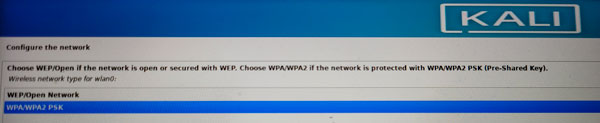
You can pick one in the list, or choose “Enter ESSID manually” if your Wi-Fi network is hidden or not displayed there. - You’ll then have the options to configure it, mostly choose the security options and type the password:
- If everything goes as expected, you’ll be connected to your Wi-Fi network, and the installer will use it to download packages and updates from the Kali Linux servers.
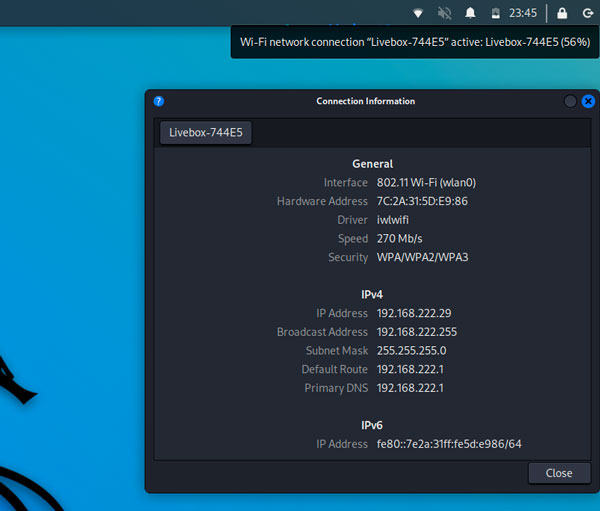
- Once the system installed, you’ll be automatically connected to the same network, nothing more to do after that:
Connect to Wi-Fi via the desktop interface on Kali Linux
The easiest way to connect to a Wi-Fi network on Kali Linux is to use the desktop interface after the installation. XFCE includes various tools and shortcuts to do it quickly and easily.
Quick connection from the top bar
If your wireless adapter is detected, you can quickly connect to your Wi-Fi network by clicking on the network icon in the top panel:

Kali Linux For Beginners
Learn how the good and the bad guys hack!
Learn from the pros how to use Kali Linux easily and quickly.
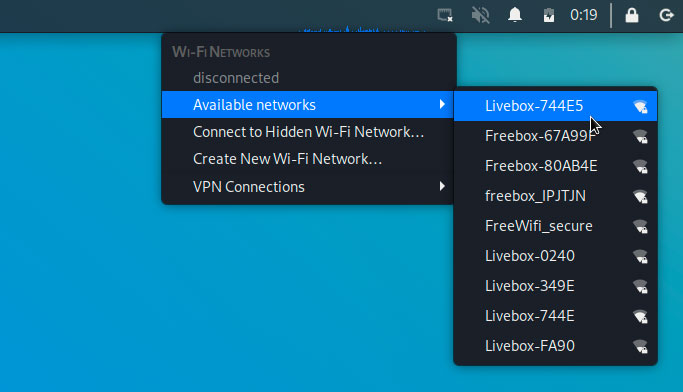
- Click on the network icon in the top-right corner.
It should be a “disconnected” network icon if you don’t have any network configured, or the “connected” alternative if you only have the RJ45 configuration done. - When you click on it, you’ll get the option to choose a network, or connect to a hidden network manually:
- Type your password, and you’ll be connected to it a few seconds later.
That’s it, in most cases it shouldn’t be that complicated.
I understand it might be new for you if you have no experience with Linux, but it’s not different from configuring it on other Linux distributions, the interface is really intuitive.
Advanced settings
If your Wi-Fi setup requires more advanced options, you can open the system settings from the main menu and go to the “Advanced Network Configuration” tool to get more options.
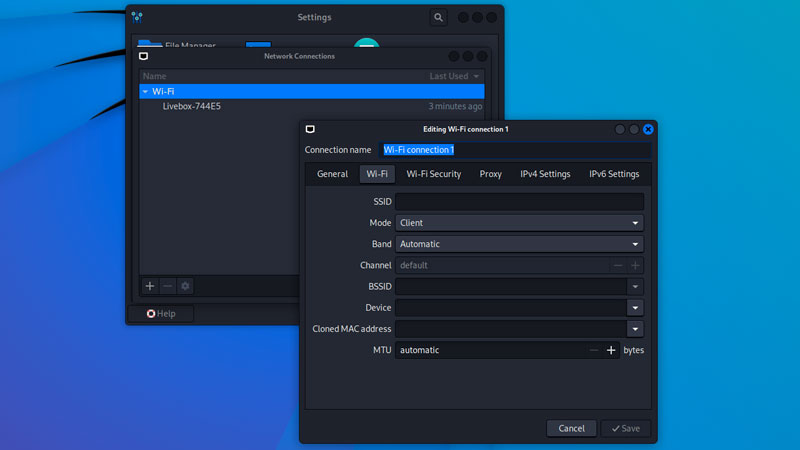
It looks like that:
Stay tuned with the latest security news!
You’ll enjoy receiving the recent articles directly in your inbox every week!
From there, you can either edit an existing configuration, or create a new one, with all the advanced options you might need (channel, MAC address, security, proxy, IP configuration, etc.).
For example, if there is no DHCP on your network, you will need this tool to set your IP address, gateway and DNS server.
Install a wireless driver
As explained earlier, even if Kali Linux comes with the most common wireless drivers, you may have a situation where your hardware is not detected, and you can’t connect directly to a Wi-Fi network. In this case, you’ll need to download and install the driver manually before you can use the Wi-Fi.
A few steps are involved, so I recommend watching this video to understand the idea:
Obviously, it will be slightly different depending on your Wi-Fi adapter manufacturer, but I hope it will help you to understand the procedure, so you can then do your research for your specific needs.
Using the command line to connect to a Wi-Fi network on Kali Linux
If you don’t have other options, it’s still possible to connect to a Wi-Fi network from a terminal on Kali Linux. Just expect to be a little more challenging, but it’s doable by following these steps:
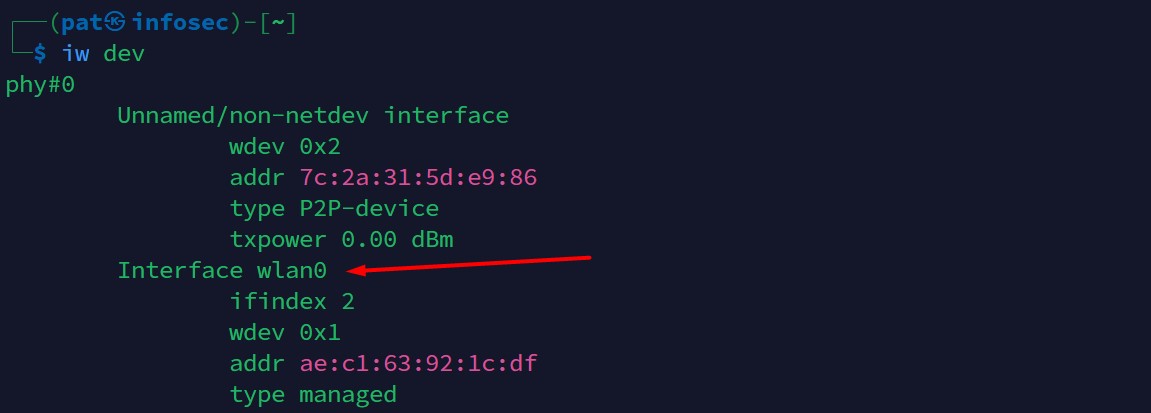
- First, make sure your Wi-Fi interface is detected, and take not of it’s name:
iw dev
You’ll get something like that:
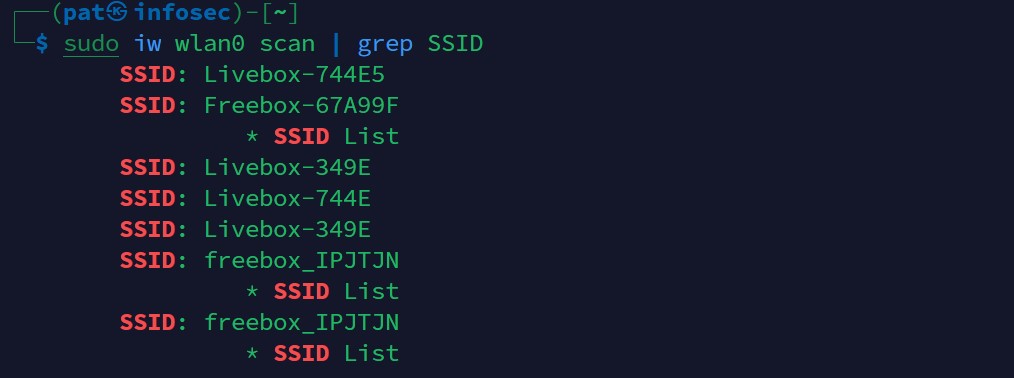
In most cases, the interface’s name will be “wlan0”. - You can then do a scan to find all the SSID available:
sudo iw wlan0 scan
You can use grep to filter the results and display only the networks names:
sudo iw wlan0 scan | grep SSID - We’ll now generate a configuration file, with the SSID we want to use and the corresponding password:
sudo su
wpa_passphrase >> /etc/wpa_supplicant.conf
Type the Wi-Fi password when asked for it, it will create the wpa_supplicant configuration file for you.
It looks like sudo doesn’t work for this command, so I used “sudo su” to switch to the administrator account.
You can then get back to the normal user with:
exit - The last step is to connect to your Wi-Fi network with wpa_supplicant:
wpa_supplicant -B -i wlan0 -c /etc/wpa_supplicant.conf
If there is any issue with your configuration, you’ll get the error directly in the terminal.
You can remove the “-B” option (run in background) to see all the details, and the next attempts. It will be held to understand and debug any misconfiguration at this point.
Hi, my name is Patrick, I’m a web developer and network administrator. I have always been interested in security, and I created this website to share my findings with you.