Starting iPhone app development in Linux? [closed]
Closed. This question is seeking recommendations for books, tools, software libraries, and more. It does not meet Stack Overflow guidelines. It is not currently accepting answers.
We don’t allow questions seeking recommendations for books, tools, software libraries, and more. You can edit the question so it can be answered with facts and citations.
I’ve heard that you need to get a Mac if you want to develop iPhone apps. Is this true? Is it possible to develop iPhone apps using Linux? If yes, what do I need and where do I download the necessary tools?
@GoodPerson Then you’d be blurring the line between OS X and other OSes, which is what this question is about.
17 Answers 17
To provide a differing response, I’m running OS X and Xcode on a virtualised (VMware) machine on Linux. CPU is a Core2Quad (Q8800), and it is perfectly fast. I found a prebuilt VM online (I’ll leave it to you to find) Xcode/iPhone development works perfectly, as does debugging via USB to the phone itself.
It actually surprised me a lot — but I’ve had no issues at all.
Yep — no problems. You’re using XCode, the signing works fine, I’ve now got a production app on the store, submitted from the VM. I won’t name it for obvious reasons.
Ok. My opinion on this. Once you have the app developed you can use this service to publish macincloud.com
The answer to this really depends on whether or not you want to develop apps that are then distributed through the iPhone store. If you don’t, and don’t mind developing for the «jailbroken» iPhone crowd — then it’s possible to develop from Linux.
Check this chap’s page for a comprehensive (if a little complex) guide on what to do :
It seems to be true so far. The only SDK available from Apple only targets the macOS environment. I’ve been upset about that, but I’m looking into buying a mac now, just to do iPhone development. I really dislike what they are doing, and I hope a good SDK come out for other environments, such as Linux and Windows.
Obstacles regarding the SDK:
The iPhone SDK and free software: not a match
Apple’s recently released a software development kit (SDK) for the iPhone, but if you were hoping to port or develop original open source software with it, the news isn’t good. Code signing and nondisclosure conditions make free software a no-go.
The SDK itself is a free download, with which you can write programs and run them on a software simulator. But in order to actually release software you’ve written, you must enroll in the iPhone Developer Program — a step separate from downloading the SDK, and one that requires Apple’s approval.
I think it’s rather elitist for them to think only macOS users are good enough to write programs for their phone, and the fact you need to buy a $100 license if you want to publish your stuff, really makes it more difficult for the hobbyist programmer. Though, if that’s what you need to do, I’m planning on jumping through their hoops; I’d really like to get some stuff developed on my iPhone.
As has been said before, I don’t think it’s elitism at fault here. XCode and all the rest of the development tools (with the exception of low-level items such as GCC) are written in Cocoa, as are all the iPhone frameworks. They’d need to port all this to other OSs first. That’s no small task.
Let me know when Microsoft release Visual Studio, Access, Frontpage, XNA, DirectX, Office (with all the features), Movie Maker, Visio, IIS or Exchange for Mac / Linux.
Let me know when Microsoft makes it against the EULA to run Visual Studio, Access, Frontpage, XNA, DirectX, Office, Movie Maker, Visio, IIS or Exchange in (Dar)Wine.
There used to be a project dedicated to solve this defect: iphone-dev
The goal of the iphone-dev project is to create a free, portable, high quality toolchain to enable development for the Apple iPhone and other embedded devices based on the ARM/Darwin platform.
The project doesn’t appear to be undergoing regular development or maintenance from the site (e.g. Wiki entries on building the tool / portability are from Feb. 2010).
Regarding the alternative tool chain, Saurik’s site is useful but for latest firmware development he indicates building on the iPhone itself and stays clear of indicating that you may need to copy necessary iPhone firmware files to your Linux environment. It’s not impossible, but just requires additional work, especially for signing the code (there are open alternative solutions out there as well).
Also, take a look at other guides (for the same tool chain) that approach it more methodically.
I’d suggest to still do the final build and code signing and packaging in XCode (which may mean borrowing someone’s Mac) in case you run into problems when submitting the application to Apple. Using the alternative tool chain opens up (at least on the Mac) the possibility of using other IDEs other than XCode for developing the application and again resorting to XCode for the deployment and testing with the simulator.
Of course if you do get the code signing / certificate generation working from the command line outside of XCode then you can install a certificate on your actual iPhone and test there (installing the app via iTunes w/your certificate).
Intro
If you are a developer writing mobile applications in the year 2019, chances are you are working with React Native. React Native workflow is split into two separate steps. One is the packager, an engine which lets you work with the native mobile UI components through JavaScript, that reloads every time you save your JavaScript code. The other is the simulator.
Unfortunately, to run the iOS simulator and do any kind of iOS development you need a macOS and the XCode IDE. If you’re like me, my Linux setup is just paramount to my productivity and I can’t imagine working without e.g. a tiling window manager or keyboard shortcuts perfected by the years of practice 🙂
In this blog post I will show you the setup and workflow that allows you to write your code in the OS and code editor of your choice 1 , while still running the iOS simulator.
Re-Natal is a CLI tool to automate the setup of a React Native app running on ClojureScript. In a few simple commands it will bootstrap a skeleton application with reagent + re-frame, REPL and hot reloading (using Figwheel) directly to the simulated iOS device, just like you would if it was a web app running in a browser.
If you like the idea let’s get started.
We are going to install all the neccessary development tools on the host machine, and just the bare minimum required to run the iOS simulator on a guest macOS running in a VirtualBox, then make the two machines talk to each other via forwarded ports.
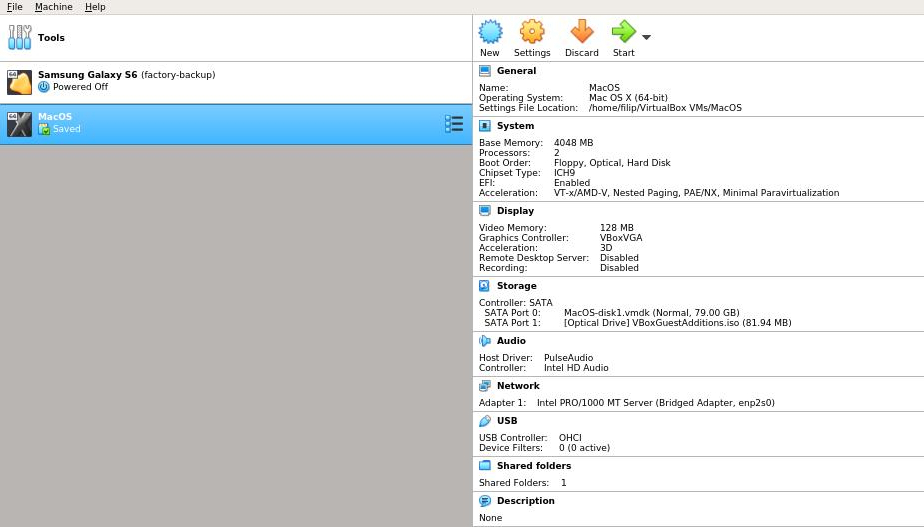
Running macOS in a VirtualBox
Begin by insatlling VirtualBox 6.X for your distribution, you can get it from here or directly from your OS repositories:
sudo apt install virtualbox virtualbox-dkms virtualbox-ext-pack virtualbox-guest-additions-iso virtualbox-guest-utils virtualbox-qt Now download the vmdk with macos, for example from Techsviewer. Launch VB and create new virtual machine from the image. Make sure to name the VM without using spaces (e.g. macos). Give the machine at least 2 cores, 4GB of RAM, and 128MB of graphics with 3D acceleration turned on, set the VB Network Adapter to Bridged:
Close Virtualbox for now. Now you can download the setup script, graciously made availiable by hkdb.
Save the script, make it executable and call it with the name of your vm and the desired resolution as the arguments:
./setup.sh -v "macos" -r 1920x1080 Launch VirtualBox again and start the MacOS VM.
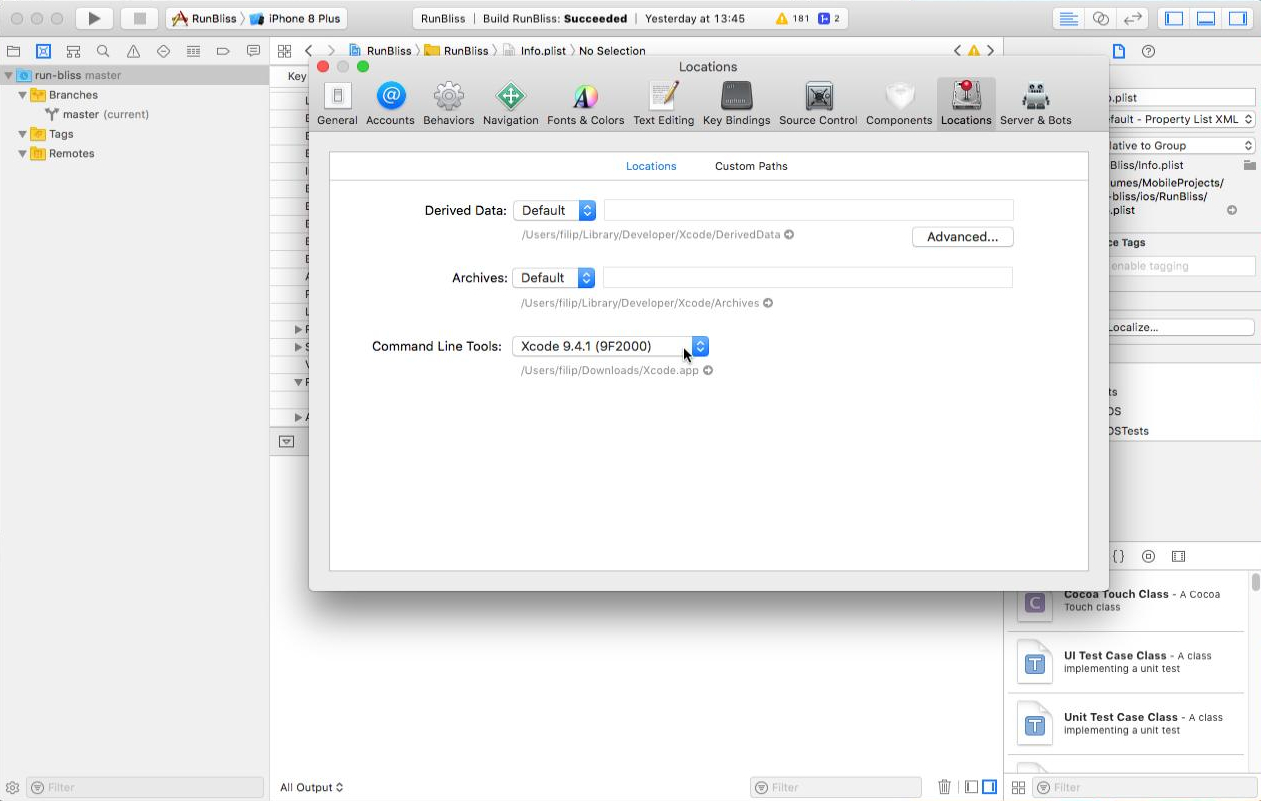
Install XCode
Once the VM boots you can install the XCode version for the MacOS version you are running:
You can use the App Store, or for the older versions of the IDE they can be downloaded from here.
Once installed launch Xcode, select menu > Preferences > Locations and choose your Xcode version from the dropdown:
Install socat
For bidirectional data communication between the Linux host and macOS guest we will use socat. MacOS doesn’t have a native package manager, therefore we will need Homebrew installed. Start the Terminal and install it:
/usr/bin/ruby -e "$(curl -fsSL https://raw.githubusercontent.com/Homebrew/install/master/install)" then using homebrew install socat:
We are done with the guest for now, lets go to the host and create our project.
Creating the project
Lets start by installing re-natal and react-native. Both come as convenient node packages, that we can install globally:
npm install -g re-natal react-native You will also need Leiningen and Java 8, but we won’t cover installing them here.
Once that’s done we can create the skeleton app. Mind the CamelCase in the apps name:
re-natal init AppName -i reagent6 Now execute some basic setup commands that will bootstrap the app as an iOS project:
cd app-name/ re-natal use-ios-device simulator re-natal use-figwheel Share the project folder
We will need to share the projects directory with the guest. In principle virtualbox can share folders betwen the host and the guest using Guest Additions, however I was unable to get it going 2 .
Instead I opted for using the samba server. Every major Linux distro should have it in its repositories:
sudo apt-get install samba Now create a user (samba will prompt you for the password):
Next edit the samba config:
sudo nano /etc/samba/smb.conf Add to the end of the config, substitutting path with the path to the just created re-natal project and user with the created samba user:
[] path = /home// valid users = read only = no You can test the config file for configuration errors by calling: testparm on the command line. If all is fine with the config, go ahead and start the Samba service daemon plus enable it at startup:
systemctl restart smbd systemctl enable smbd Development tools: React Native and Figwheel
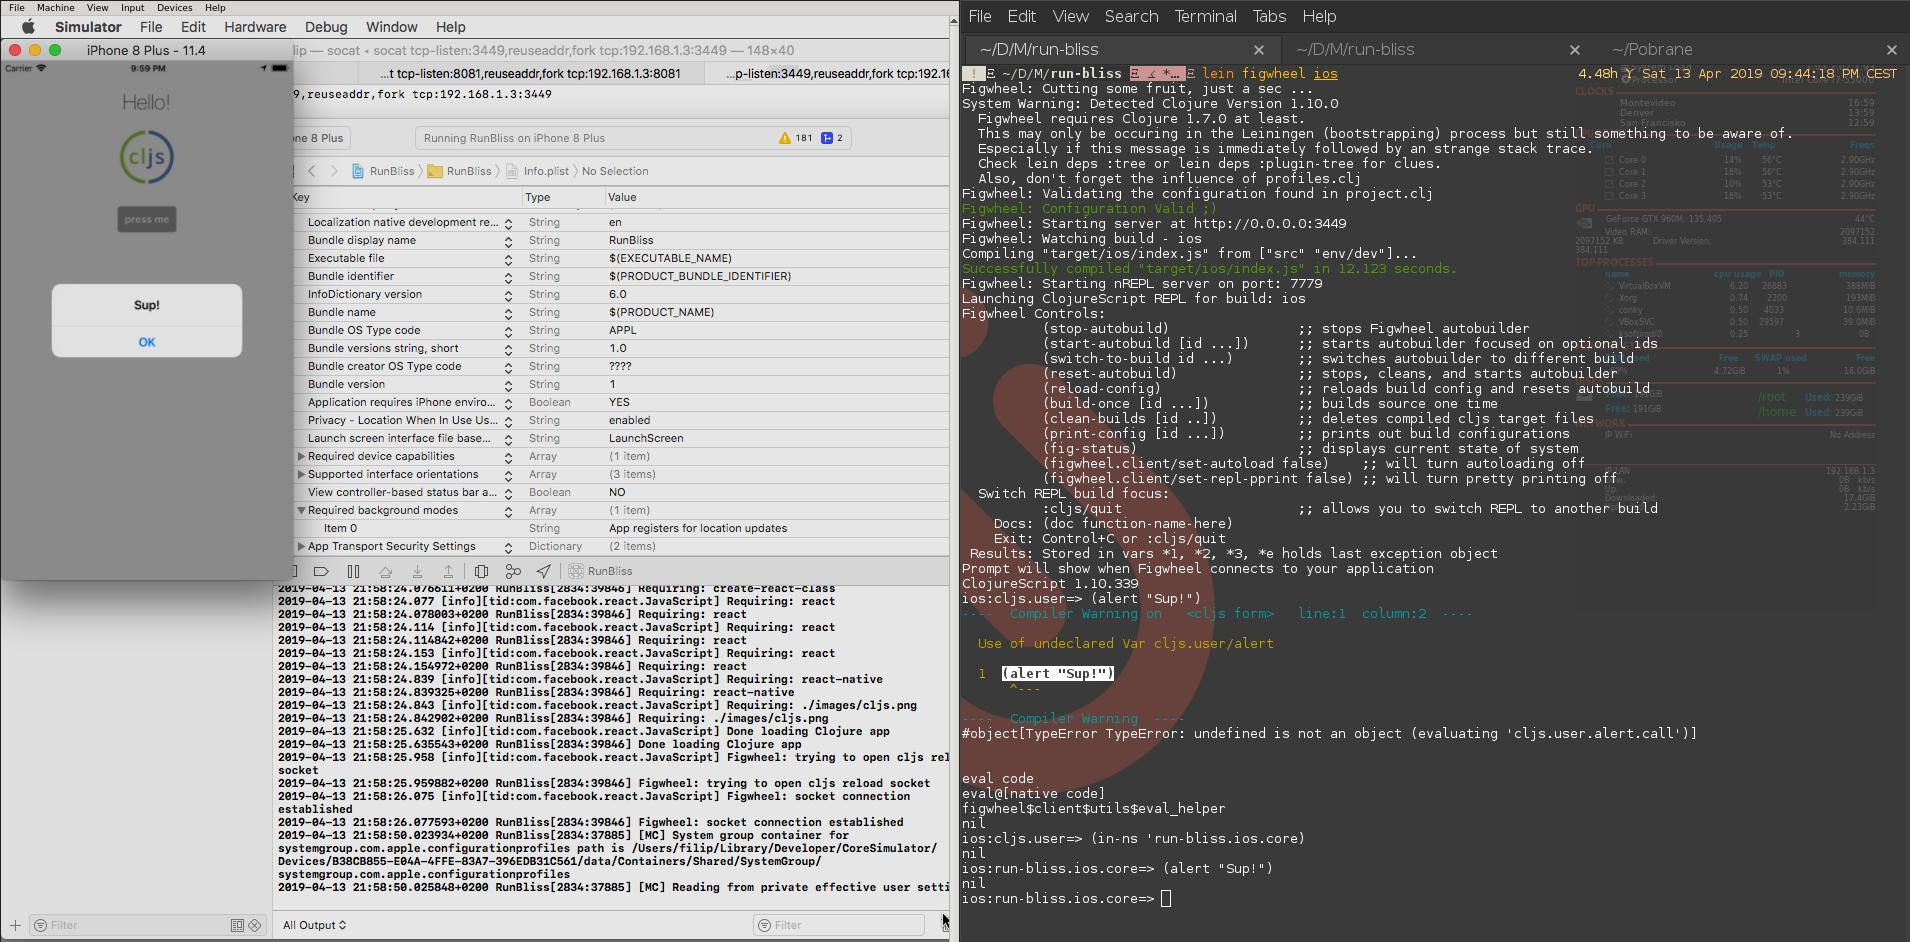
We will now start the react-native packager, binding it to port 8081 and broadcasting on 0.0.0.0:
react-native start --host 0.0.0.0 --port 8081 Next we can start Figwheel, which will give us the REPL, as well as watch and recompile on source code changes:
Figwheel will recompile the sources and just hang for now, waiting for connection with the simulator to give us the REPL, but not before printing the port on which it is running (3449 by default). Last piece of information we need is the local IPv4 address of the host (e.g. 192.168.1.3 ), which we can get with:
Now let’s go back to the guest OS.
Run the project
On the guest we can now start listening on the ports occupied by the react-native and Figwheel servers:
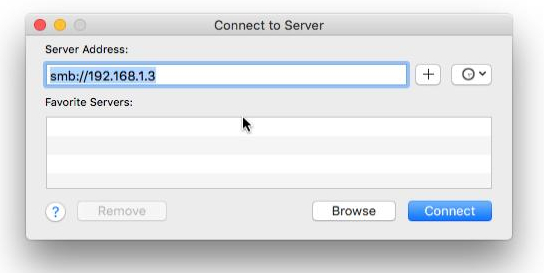
socat tcp-listen:3449,reuseaddr,fork tcp:192.168.1.3:3449 socat tcp-listen:8081,reuseaddr,fork tcp:192.168.1.3:8081 Next lets mount the shared folder. Click on the Go -> connect to server…, paste smb://192.168.1.3 and click on Connect:
When prompted for the username and password use the ones created when Sharing the project folder. by default the directory is mounted as /Volumes/app-name/ . Open this directory in XCode, wait until it indexes the project and run it.
Once the project is up and running Figwheel on the host box should now give you a fully functional REPL, with live reloading on code edits:
From now on the workflow is quite snappy and un-obtrusive, you can for example keep you editor and the simulator tiled one next to the other and quickly iterate during development.
1: Allthough I don’t see how you could use anything else but Linux/Emacs combo.
2: Please let me know in the comment box if you had any luck yourself and how have you done it.