- How to Change IP Address on Linux?
- Method 1: Using the “ip” Command
- Method 2: Using the “ifconfig” Command
- Method 3: Using the “nmcli” Tool
- Method 4: Using the “Network” Window (GUI)
- Conclusion
- Как назначить IP адрес в Linux
- В дистрибутивах на базе Debian
- В дистрибутивах c менеджером пакетов RPM
- Дополнительные статьи
- Об этой статье
How to Change IP Address on Linux?
An “IP” (Internet Protocol) corresponds to a unique numeric address used to identify the network device. In Linux, It is automatically assigned by the “DHCP (Dynamic Host Configuration Protocol)” server. Sometimes, the user needs to change the dynamic IP address to the static because the static IP addresses provide a stable and reliable connection.
This post will provide possible different methods to change the IP address on Linux.
- Method 1: Using the “ip” Command
- Method 2: Using the “ifconfig” Command
- Method 3: Using the “nmcli” Tool
- Method 4: Using the “Network” Window (GUI)
Note: All the implementation is performed as a root user to change the system IP address.
Method 1: Using the “ip” Command
The “ip” is an advanced built-in “Internet Protocol” command line tool to assign, show and configure the interface IP addresses. To perform this task following essential steps are required:
Step 1: Check Existing IP Address
First, use the “ip” command with the “-c(highlight IP address)” flags to show the IP addresses of all the network interfaces available in the system:
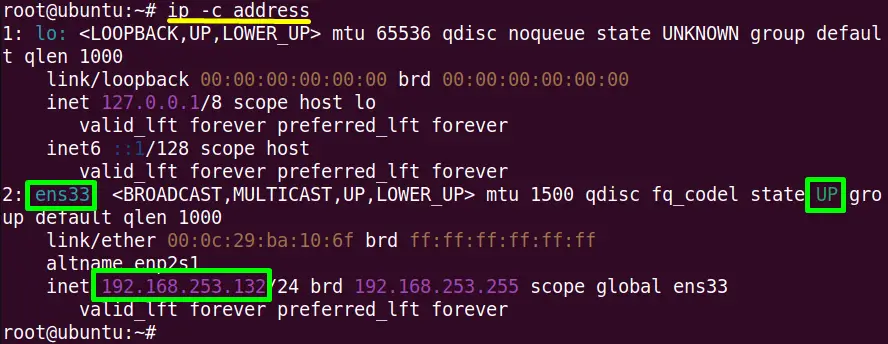
The “ens33” interface is running having an “IP” address “192.168.253.132”
Step 2: Assign New IP Address
Assign a new IP address to the “ens33” interface by utilizing the following “ip” command. The “add” keyword assigns the specified new IP address to the the “dev(device)” “ens33”:
# ip address add 192.168.157.150 dev ens33

The above command has successfully assigned the “192.168.157.150” to an interface “ens33”.
Step 3: Verify IP Address
Run the “ip” command to verify the IP address assigned to the device “ens33”:
The output verifies that the “ens33” IP address has been changed to “192.168.157.150”.
Method 2: Using the “ifconfig” Command
The “ifconfig” stands for “interface configuration” command line tool to show the current network configuration information. It is used in the older version of the Linux system, having a minimal range of functionalities, then the “ip” command.
Follow these steps to check how “ifconfig” changes the IP address of a network:
Step 1: Display Network Details
Execute the “ifconfig” command to display the current interface details, including its IP address:
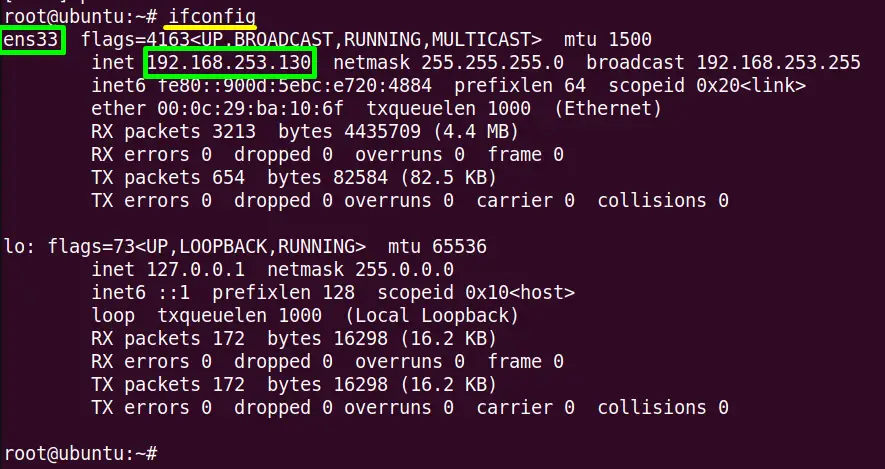
Here, the “ens33” is the network interface having an IP address “192.168.253.130”.
Step 2: Network Interface Down
The “ens33” interface is in running status. So bring it “down”(offline) using the “ifconfig” command in the following way:

The “ens33” interface has been “down,” i.e., not running.
Step 3: Change IP Address
Type the “ifconfig” command with the targeted network interface “ens33” assigning the new IP address “192.168.253.132”. Specify the “netmask” “255.255.255.0” that is associated with the IP address:
# ifconfig ens33 192.168.253.132 netmask 255.255.255.0
It is verified that a new IP address has been assigned to the “ens33” network interface.
Method 3: Using the “nmcli” Tool
The Linux distribution supports the “Network Manager” tool that allows the user to change device connections settings. It can be managed through the “nmcli” command line tool.
Following these steps, let’s check the functionality of “nmcli” to change the IP address:
Step 1: Change IP Address
Execute the “nmcli” command to change the “ens33” network card by specifying the “ipv4.address” “192.168.253.134”:
# nmcli device modify ens33 ipv4.address 192.168.253.134
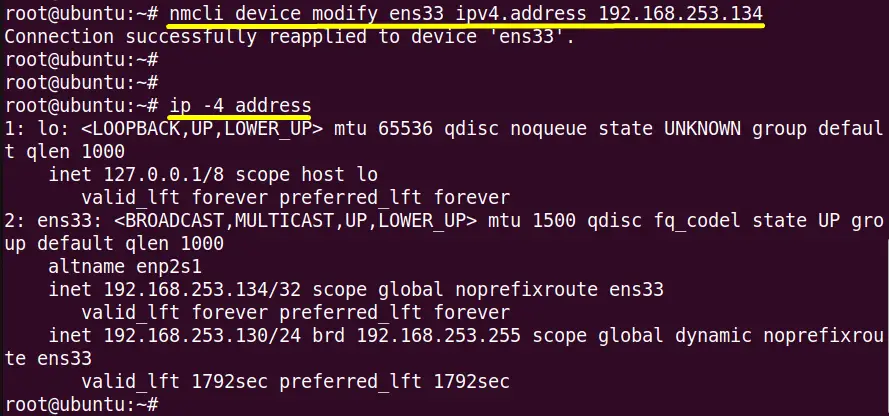
The output shows that “192.168.253.134” of “ens33” has been changed successfully.
Step 2: Verify IP Address
Once the IP address is changed, verify it using either the “ifconfig” or the “ip” command specifying the device name, i.e., “ens33” in this scenario:
It is confirmed that the IP address of the “ens33” network card has been changed.
Method 4: Using the “Network” Window (GUI)
The GUI method also allows the Linux user to change “IPv4” address using the “Network” window by following the below-mentioned steps:
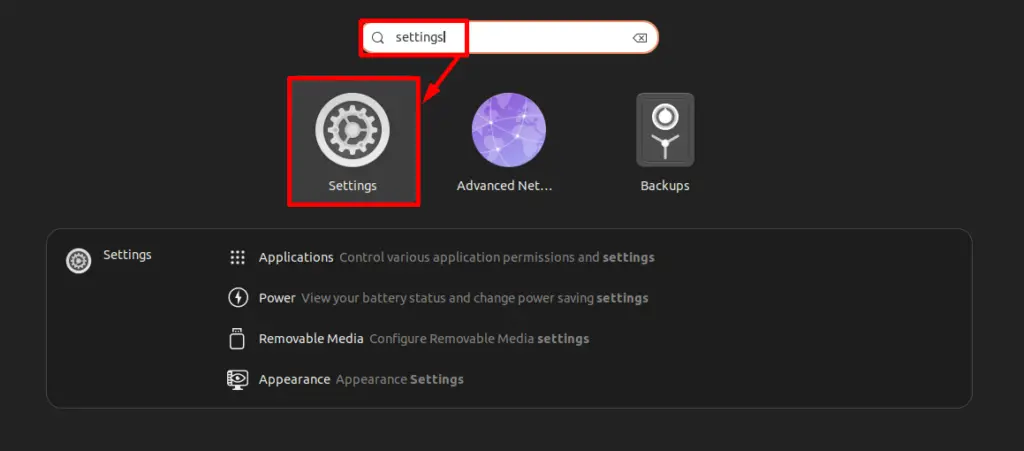
Step 1: Access the Network Window
Open the default “Settings” tool using the “Search” bar of the “Application” menu:
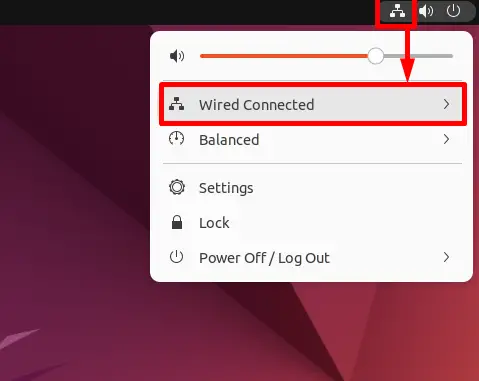
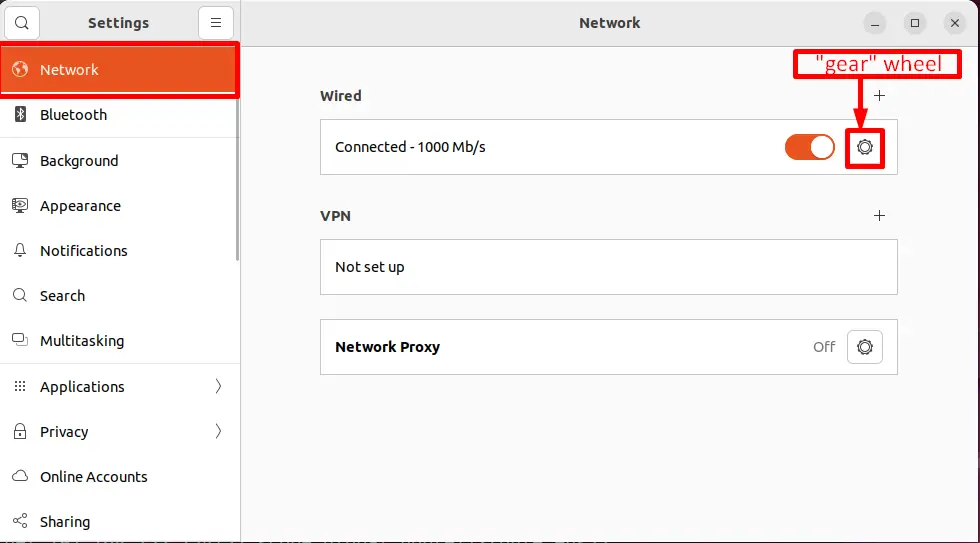
The “Settings” tool is being opened. Navigate to the “Network” window located in the left side panel of the system:

Tip: The user can also open the “Network” window using the “Wired Connected” icon present on the top right corner of the screen:
Step 2: Change IPv4 Address
Click on the “gear(settings)” wheel in front of the “connected” tab to change the IPv4 address:
The “Wired” window is opened with the “IPv4” tab. Mark the “Manual” checkbox to set the IPv4 address manually:
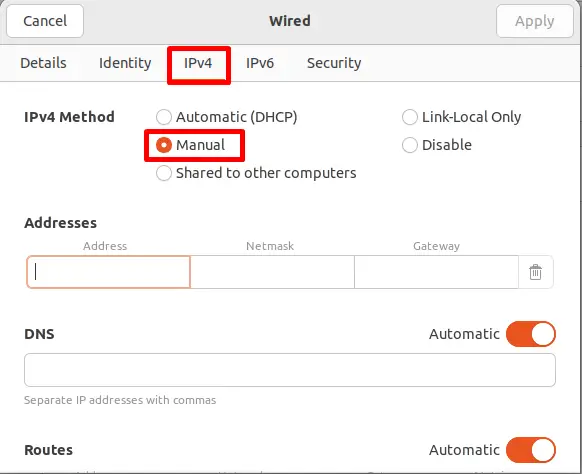
Type the new IPv4 address and also the default “Netmask” and the “Gateway” in its sections:
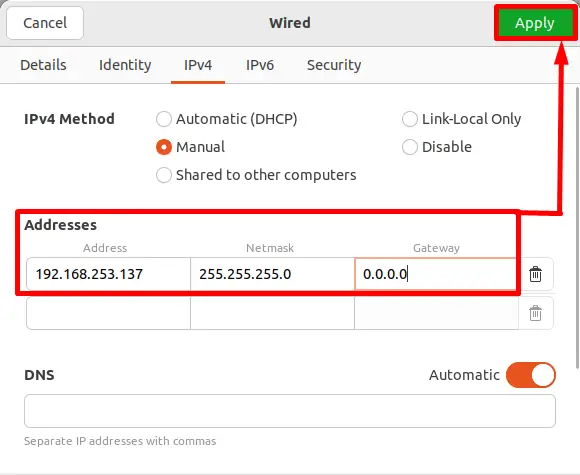
At last, hit the green “Apply” button to save the new changes.
Step 3: Confirm IPv4 Address
Move on to the “Details” tab from the “Wired” window and check the “ipv4” details:
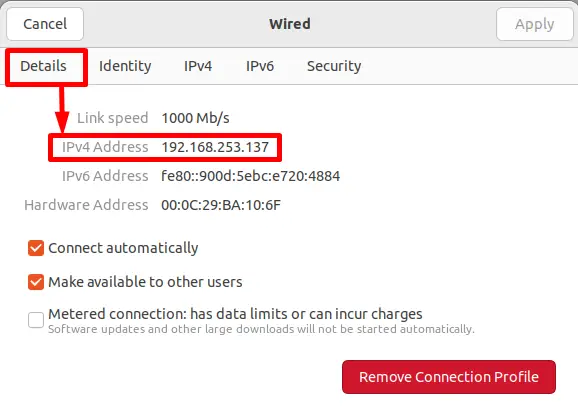
It shows the new IP address “192.168.253.137”.
Note: The GUI method is applicable to the Linux distributions supporting the GUI.
Conclusion
To change an IP address in Linux, utilize the “ip”, “ifconfig”, and the “nmcli” command line tools. The user can also perform this task using the “Network” window provided by the graphical user interface. Once the new IP address is changed, execute the commonly used “ip” command for verification.
This guide has illustrated both CLI and GUI tools to change the IP address on Linux.
Как назначить IP адрес в Linux
В создании этой статьи участвовала наша опытная команда редакторов и исследователей, которые проверили ее на точность и полноту.
Команда контент-менеджеров wikiHow тщательно следит за работой редакторов, чтобы гарантировать соответствие каждой статьи нашим высоким стандартам качества.
Количество просмотров этой статьи: 94 491.
Из данной статьи вы узнаете, как назначить компьютеру с Linux новый IP-адрес. Это поможет решить проблемы с подключением к интернету.
В дистрибутивах на базе Debian

Обновите свою версию Linux. Популярными дистрибутивами Linux на базе Debian являются Ubuntu, Mint и Raspbian.

- Нажмите Ctrl + Alt + T или Ctrl + Alt + F1 (в Mac OS X вместо Ctrl зажмите ⌘ Command ).
- Если возможно, щелкните по текстовому полю в верхней или нижней части экрана.
- Откройте окно «Меню» и щелкните по «Терминал».

- Учетная запись суперпользователя в Linux является аналогом учетной записи администратора в Windows или Mac OS X.

- Возглавляет список активный сетевой интерфейс (Wi-Fi или Ethernet). Он помечен как «eth0» (Ethernet) или «wifi0» (Wi-Fi).


- Например, чтобы назначить IP-адрес «192.168.2.100» Ethernet-соединению («eth0»), введите sudo ifconfig eth0 192.168.0.100 netmask 255.255.255.0 .

Назначьте адрес основного шлюза. Введите route add default gw 192.168.1.1 и нажмите ↵ Enter . [1] X Источник информации


Проверьте, изменился ли IP-адрес выбранного сетевого интерфейса. Введите ifconfig , найдите сетевой интерфейс и посмотрите на адрес справа от имени интерфейса. Скорее всего, вы увидите IP-адрес, который вы только что назначили.
В дистрибутивах c менеджером пакетов RPM

Обновите свою версию Linux. Популярными дистрибутивами Linux с менеджером пакетов RPM являются CentOS, Red Hat и Fedora.

- Нажмите Ctrl + Alt + T или Ctrl + Alt + F1 (в Mac OS X вместо Ctrl зажмите ⌘ Command ).
- Если возможно, щелкните по текстовому полю в верхней или нижней части экрана.
- Откройте окно «Меню» и щелкните по «Терминал».

- Учетная запись суперпользователя в Linux является аналогом учетной записи администратора в Windows или Mac OS X.

Найдите сетевой интерфейс, которому нужно назначить новый IP-адрес. Обычно это Ethernet-соединение или Wi-Fi-соединение, текущий IP-адрес которого можно найти в правой части окна.


Выведите на экран параметры сети. Введите ls и нажмите ↵ Enter . Имя текущего соединения отобразится в верхнем левом углу параметров сети.


- BOOTPROTO: измените dhcp на none .
- Any IPV6 entry: удалите все записи с IPV6; для этого поставьте курсор возле I (слева) и нажмите Del .
- ONBOOT: измените no на yes .

- Введите PREFIX=24 и нажмите ↵ Enter . Также можно ввести NETMASK=255.255.255.0 .
- Введите GATEWAY=192.168.2.1 и нажмите ↵ Enter . Если нужно, замените адрес шлюза на свой.

Сохраните внесенные изменения и закройте файл. Для этого воспользуйтесь меню «Файл» или введите :wq и нажмите ↵ Enter .
- В некоторых специфических дистрибутивах Linux необходимо выполнить другие действия, чтобы назначить новый IP-адрес. Подробную информацию ищите в интернете.
Дополнительные статьи


Об этой статье
В создании этой статьи участвовала наша опытная команда редакторов и исследователей, которые проверили ее на точность и полноту.
Команда контент-менеджеров wikiHow тщательно следит за работой редакторов, чтобы гарантировать соответствие каждой статьи нашим высоким стандартам качества. Количество просмотров этой статьи: 94 491.