- Configure Linux as a Router (IP Forwarding)
- Use Cases for a Cloud-based Router
- Configure a Linux System as a Router
- Deploy Compute Instances
- Enable IP Forwarding
- Как включить/выключить IP Forwarding в Linux
- Проверяем включен или нет IP Forwarding в данный момент
- Временно включаем/отключаем IP Forwarding
- Постоянно включаем/отключаем IP Forwarding в системе
- 🖧 Как отключить / включить IP форвардинг на Linux
- Как проверить текущий статус переадресации IP
- Включение или отключение IP переадресации
Configure Linux as a Router (IP Forwarding)
Estamos traduciendo nuestros guías y tutoriales al Español. Es posible que usted esté viendo una traducción generada automáticamente. Estamos trabajando con traductores profesionales para verificar las traducciones de nuestro sitio web. Este proyecto es un trabajo en curso.
A computer network is a collection of computer systems that can communicate with each other. To communicate with a computer that’s on a different network, a system needs a way to connect to that other network. A router is a system that acts as a intermediary between multiple different networks. It receives traffic from one network that is ultimately destined for another. It’s able to identify where a particular packet should be delivered and then forward that packet over the appropriate network interface.
There are lots of options for off-the-shelf router solutions for both home and enterprise. In most cases, these solutions are preferred as they are relatively easy to configure, have lots of features, tend to have a user-friendly management interface, and may come with support options. Under the hood, these routers are stripped down computers running common operating systems, like Linux.
Instead of using one of these pre-built solutions, you can create your own using any Linux server, like a Linode Compute Instance. Using routing software like iptables, you have total control over configuring a router and firewall to suit your individual needs. This guide covers how to configure a Linux system as a basic router, including enabling IP forwarding and configuring iptables.
Use Cases for a Cloud-based Router
Many workloads benefit from custom routing or port forwarding solutions, including those workloads hosted on cloud platforms like Linode. For example, it’s common practice for security-minded applications to connect most of their systems together through a private network, like a VLAN. These systems might need access to an outside network, like other VLANs or the public internet. Instead of giving each one their own interface to the other network, one system on the private network can act as a router. The router is configured with multiple network interfaces (one to the private VLAN and one to the other network) and forwards packets from one interface to another. This can make monitoring, controlling, and securing traffic much easier, as it can all be done from a single system. Linode Compute Instances can be configured with up to 3 interfaces, each connecting to either the public internet or a private VLAN.
- Connect systems on private VLAN to the public internet.
- Connect systems on two separate private VLANs.
- Forward IPv6 addresses from a /56 routed range.
Configure a Linux System as a Router
- Deploy at least 2 Compute Instances (or other virtual machines) to the same data center. All systems should be connected to the same private network, like a VLAN. One system should be designated as the router and should also be connected to the public internet or a different private network. See Deploy Compute Instances.
- Enable IP forwarding on the Compute Instance designated as the router. See Enable IP Forwarding.
- Configure the routing software on that same instance (the router). This guide covers using iptables, but you can also use other software. See Configure iptables.
- Define a gateway on each system other than the router. This gateway should point to the router’s IP address on that network. See Define the Gateway.
Deploy Compute Instances
To get started, you can use the Linode platform to deploy multiple Compute Instances. These can mimic a basic application that is operating on a private VLAN with a single router. If you already have an application deployed and just wish to know how to configure ip forwarding or iptables, you can skip this section.
- Deploy 2 or more Compute Instances and designate one as the router. Each of these should be deployed to the same region. On the deployment page, you can skip the VLAN section for now. See Creating a Compute Instance to learn how to deploy Linode Compute Instances.
- On each Compute Instance other than the router, edit the instance’s configuration profile. See Managing Configuration Profiles for information on viewing and editing configuration profiles.
- On the Compute Instance designated as the router, leave eth0 as the public internet and set eth1 to be configured as a VLAN. Enter a name for the VLAN and assign it an IP address from whichever subnet range you wish to use. For instance, if you wish to use the 10.0.2.0/24 subnet range, assign the IP address 10.0.2.1/24 . By convention, the router should be assigned the value of 1 in the last segment.
- On each Compute Instance other than the router, remove all existing network interfaces. Set eth0 as a VLAN, select the VLAN you just created, and enter another IP address within your desired subnet (such as 10.0.2.2/24 and 10.0.2.3/24 ).
- Confirm that Network Helper is enabled and reboot each Compute Instance for the changes to take effect.
- Test the connectivity on each Compute Instance to ensure proper configuration. Log in to each instance and confirm the following is true:
- Ping the VLAN IPv4 address of another system within the same VLAN. Each Compute Instance should be able to ping the IP addresses of all other instances within that VLAN.
Enable IP Forwarding
IP forwarding plays a fundamental role on a router. This is the functionality that allows a router to forward traffic from one network interface to another network interface. In this way, it allows computers on one network to reach a computer on a different network (when configured along with routing software). Forwarding for both IPv4 and IPv6 addresses are controlled within the Linux kernel. The following kernel parameters are used to enable or disable IPv4 and IPv6 forwarding, respectively.
- IPv4: net.ipv4.ip_forward or net.ipv4.conf.all.forwarding
- IPv6: net.ipv6.conf.all.forwarding
By default, forwarding is disabled on most Linux systems. To configure Linux as a router, this needs to be enabled. To enable forwarding, the corresponding parameter should be set to 1 . A value of 0 indicates that forwarding is disabled. To update these kernel parameters, edit the /etc/sysctl.conf file as shown in the steps below.
- Log in to the Linux system you intend to use as a router. You can use SSH or Lish (if you’re using a Linode Compute Instance).
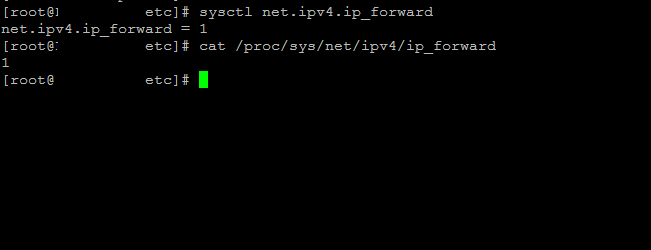
- Determine if IPv4 forwarding is currently enabled or disabled. The command below outputs the value of the given parameter. A value of 1 indicates that the setting is enabled, while 0 indicates it is disabled. If you intend to configure IPv6 forwarding, check that kernel parameter as well.
sudo sysctl net.ipv4.ip_forward Как включить/выключить IP Forwarding в Linux

Почти во всех распространенных дистрибутивах IP Forwarding выключен по-умолчанию и это имеет смысл, так как далеко не каждый его использует. Но в том случае, если вы планируете поднять собственный маршрутизатор на ОС Linux, настроить VPN сервер и так далее, вам необходимо включить форвардинг пакетов (маршрутизацию транзитных IP-пакетов, т.е. тех пакетов, которые не предназначены именно для вашего компьютера) в вашей ОС. В данной мини-инструкции я расскажу как это можно сделать:
Проверяем включен или нет IP Forwarding в данный момент
Для проверки в каком состоянии в данный момент находится форвардинг пакетов (включен или выключен), мы должны сделать запрос к ядру через команду sysctl. Делается это так:
Временно включаем/отключаем IP Forwarding
Чтобы включить форвардинг пакетов «на лету» и не перезагружать систему, нам достаточно выполнить следующую команду:
sudo sysctl -w net.ipv4.ip_forward=1Чтобы выключить форвардинг пакетов «на лету» и не перезагружать систему, нам достаточно выполнить следующую команду:
sudo sysctl -w net.ipv4.ip_forward=0Постоянно включаем/отключаем IP Forwarding в системе
В том случае, если нам необходимо перманентно включить или отключить форвардинг пакетов в системе, нам необходимо внести правки в конфигурационный файл /etc/sysctl.conf Для перманентного включения IP Forwarding, в конец данного файла добавляем следующую строчку:
Для перманентного отключения IP Forwarding, в конец данного файла добавляем следующую строчку:
Если в конфигурационном файле /etc/sysctl.conf уже есть настройка net.ipv4.ip_forward и она не закомментирована, то можно в ней выставить нужное значение и добавлять в конец файла эту настройку еще раз — нет необходимости
Далее, чтобы применить новую настройку, которую мы добавили, нам необходимо выполнить следующую команду:
Все, теперь в зависимости от значения в /etc/sysctl.conf, после перезагрузки ОС, форвардинг пакетов будет либо включен (net.ipv4.ip_forward = 1), либо выключен (net.ipv4.ip_forward = 0).
🖧 Как отключить / включить IP форвардинг на Linux

В определенных сценариях может потребоваться настроить переадресацию IP в системе Linux.
Если сервер Linux действует как брандмауэр, маршрутизатор или устройство NAT, он должен быть способен пересылать пакеты, предназначенные для других пунктов назначения (кроме него самого).
И наоборот, проброс IP обычно следует отключать, если вы не используете одну из вышеупомянутых конфигураций.
Вы же не хотите, чтобы ваша система тратила впустую полосу пропускания или ресурсы для пересылки пакетов в другое место, если только она не предназначена для этой работы.
В этом руководстве мы рассмотрим пошаговые инструкции по включению или отключению IP-переадресации с помощью примеров командной строки.
Вы можете применить эти команды к любому крупному дистрибутиву Linux, включая популярные версии, такие как Ubuntu и Red Hat.
Как проверить текущий статус переадресации IP
Большинство систем смогут использовать команду sysctl, которая может применять переменные ядра.
Следовательно, вы можете использовать следующую команду sysctl, чтобы проверить, включена или отключена переадресация IP.
# sysctl net.ipv4.ip_forward net.ipv4.ip_forward = 0
В приведенном выше примере параметр ядра net.ipv4.ip_forward равен 0.
Это означает, что переадресация выключена.
Если бы значение было бы 1, это означало бы, что включена.
Этот параметр также можно просмотреть в файле /proc/sys/net/ipv4/ip_forward в системах с systemd или любой другой системой инициализации.
Включение или отключение IP переадресации
Вы можете использовать следующую команду sysctl, чтобы включить или отключить переадресацию IP в вашей системе.
# sysctl -w net.ipv4.ip_forward=0 или # sysctl -w net.ipv4.ip_forward=1
Вы также можете изменить настройку внутри /proc/sys/net/ipv4/ip_forward, чтобы включить или выключить настройку.
# echo 0 > /proc/sys/net/ipv4/ip_forward или # echo 1 > /proc/sys/net/ipv4/ip_forward
Чтобы убедиться, что новый параметр сохранится после перезагрузки, вам необходимо отредактировать файл /etc/sysctl.conf.
Добавьте одну из следующих строк в конец файла в зависимости от того, хотите ли вы, чтобы переадресация IP была отключена или включена, соответственно.
net.ipv4.ip_forward = 0 или net.ipv4.ip_forward = 1
После редактирования файла вы можете запустить следующую команду, чтобы изменения сразу вступили в силу: