- If your iPhone or iPad won’t connect to a Wi-Fi network
- Make sure that your router is on and that you’re within range
- Make sure that Wi-Fi is on and that you can see your network
- If asked, enter your Wi-Fi password
- Check for issues with your Wi-Fi network
- Check your cables and connections
- Restart
- Reset your network settings
- Get more help
- Как включить Wi-Fi на iPhone
- Как подключиться к защищенной сети WiFi
- Подключение к скрытой сети
- Автоматическое подключение к сети WiFI
- Продление аренды сети WiFi
- Использование HTTP-прокси
- Что можно сделать, чтобы устранить неполадки WiFi
- iPhone Not Connecting to Wi-Fi: How to Fix?
- iPhone Not Connecting to Wi-Fi Network
- 1. Turn WiFi ON/OFF
- 2. Restart iPhone
- 3. Renew DHCP Lease
- 4. Forget WiFi Network and Rejoin
- 5. Turn OFF Wi-Fi Assist
- 6. Restart Modem/Router
- 7. Reset Network Settings
- 8. Switch to Google DNS
If your iPhone or iPad won’t connect to a Wi-Fi network
Make sure that your router is on and that you’re within range
If you’re too far from your Wi-Fi router, you can’t get a signal, so make sure that you’re within range.
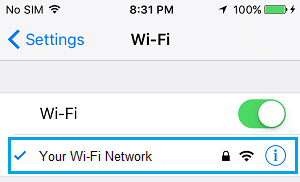
Make sure that Wi-Fi is on and that you can see your network
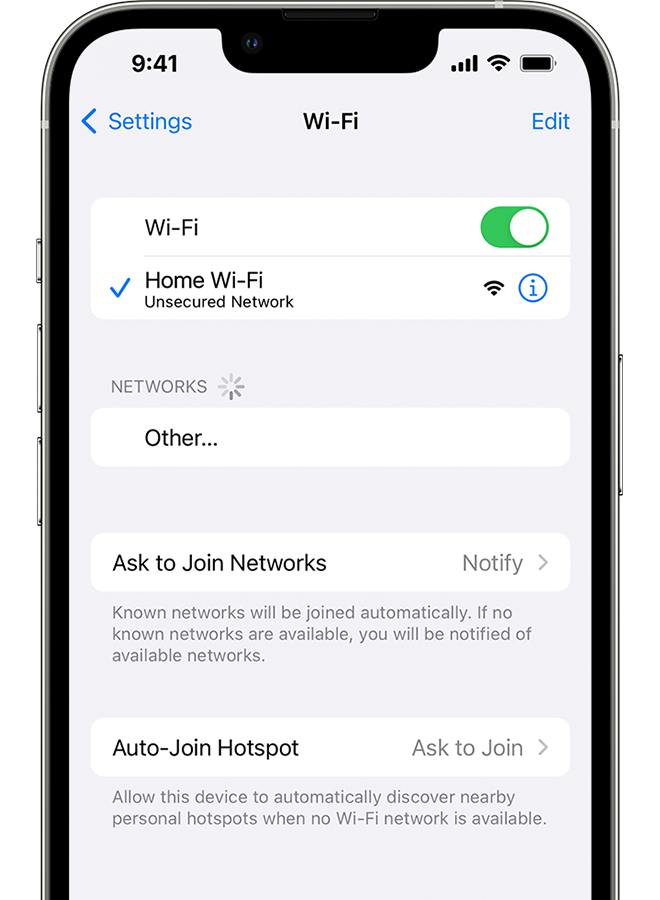
Go to Settings > Wi-Fi and make sure that Wi-Fi is on. Tap the name of your Wi-Fi network to join. A blue checkmark beside a network name means that you’re connected. If you see Auto Join disabled under Settings > Wi-Fi > [Your Network], tap the More Info button and then tap Auto-Join.
If asked, enter your Wi-Fi password
If asked, enter the password for your Wi-Fi network. Get help if you don’t know your password. Even if you enter the correct password, you might see an «unable to join the network» message or an «incorrect password» message. Restart all of your devices, then try to enter your password again.
Check for issues with your Wi-Fi network
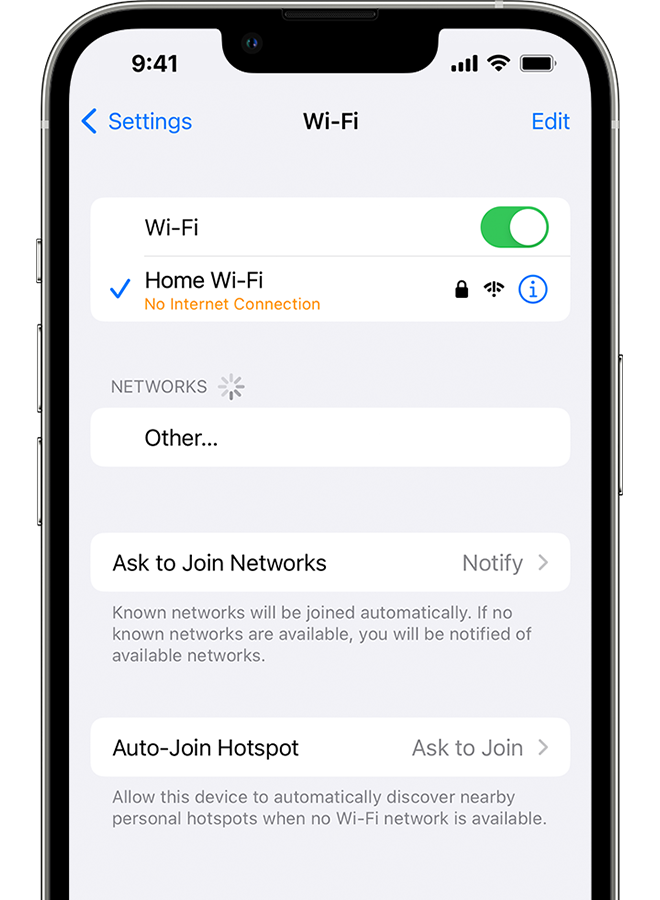
If iOS or iPadOS detects an issue with your Wi-Fi connection, you might see a Wi-Fi recommendation under the name of the Wi-Fi network that you’re connected to. For example, you might see the alert «No Internet Connection.» To get more information, tap the Wi-Fi network.
Check your cables and connections
If you still can’t connect to your network or get online, make sure that your router is connected to the modem and turned on.
Restart
Restart your iOS or iPadOS device. Restart your router and cable or DSL modem by unplugging the device and then plugging it back in. After you restart each device, see if you fixed the issue.
Reset your network settings
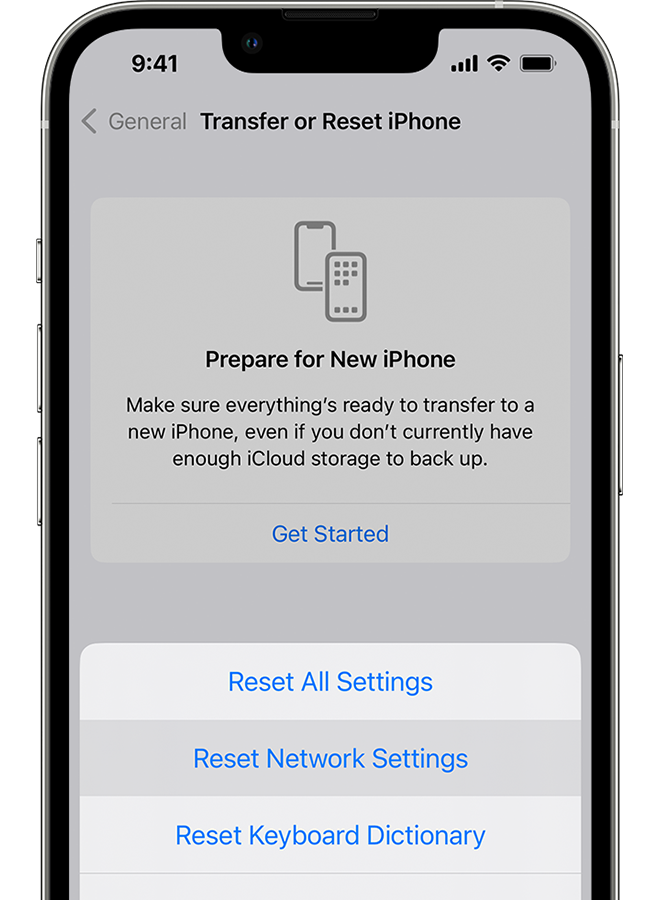
If you’re using iOS or iPadOS 15 or later, tap Settings > General > Transfer or Reset [Device] > Reset > Reset Network Settings. If you’re using iOS or iPadOS 14 or earlier, tap Settings > General > Reset > Reset Network Settings. This also resets Wi-Fi networks and passwords, cellular settings, and VPN and APN settings that you’ve used before.
Get more help
- If you’re connected to a Wi-Fi network but you can’t get online, try to use your Wi-Fi network on other devices. If you can’t get online using your other devices, there might be a service outage. Call your cable company or internet provider for help.
- Try connecting to a Wi-Fi network in a different location. If your device can connect, you need to get help with your Wi-Fi network. If your device can’t connect to any Wi-Fi networks, contact Apple.
- Update your Wi-Fi router with the latest firmware and make sure that the router supports your Apple product. For more information, contact the router’s manufacturer.
Как включить Wi-Fi на iPhone
Есть два способа как включить Вай-Фай на Айфоне: через трафик вашего сотового оператора или через WiFi. Если трафик имеет свои лимиты, то интернет, раздаваемый через точку доступа, не имеет подобных ограничений.

Если вы не знаете, как включить Вай-Фай на Айфоне 6, 5 и 4, то следуйте этой инструкции:

- На экране “Домой” выбрать значок “Настройки” и нажать на него, после найти пункт “WiFi” (он должен быть вторым по списку).
- После этого откроется окно с настройками WiFi. Провести пальцем вправо, чтобы включить его.
- Как только кнопка окрасится в синий или зеленый цвет (в зависимости от версии вашего устройства), автоматически начнется поиск доступных подключений, это занимает всего несколько секунд.
- Когда поиск закончится, выберите необходимое подключение. Нажмите на него.
- После удачного подключения рядом с выбранным вариантом появится синяя галочка, а наверху — 3 дуги.
Аналогичным образом подключается WiFi Директ, необходимый для соединения с телевизором.
Как подключиться к защищенной сети WiFi
Как включить Вай Фай на Айфоне 4s, если сеть защищена паролем? Об этом свидетельствует значок в виде закрытого замочка рядом с названием.
Подключиться к такого рода сети очень просто:

- Для начала выберите её из списка.
- Сразу после перед вами откроется окно для ввода пароля. Его можно узнать у владельца данной точки доступа.
- Введите правильную комбинацию и нажмите кнопку “Подключение”.
- Если всё сделано правильно, рядом с названием появится синяя галочка.
Подключение к скрытой сети
Не все точки доступа отражаются во время поиска. Чтобы включить Вай-Фай на Айфоне 4, 5 и 6, подключившись к так называемой “скрытой” сети, выполните следующие действия:

- После завершения основного поиска выберите пункт “Другая. ”, который расположен внизу списка.
- Вам станет доступно окно, в котором необходимо ввести точное название запрашиваемой сети.
- Если соединение защищено паролем, нажмите на “Безопасность” и выберите нужный вариант.
- Вернитесь назад, нажав в левом верхнем углу “Другая сеть”. Введите пароль, если он необходим.
- Нажмите на “Подключение” в правом верхнем углу. Если всё сделано правильно, рядом с названием точки доступа появится синяя галочка.
Автоматическое подключение к сети WiFI
Пока вы держите WiFi включённым, Айфон будет автоматически присоединяться к ближайшей знакомой ему сети.
Если вам не нужна эта функция, следуйте инструкции ниже:
- Убедитесь, что вы подключены к WiFi, предварительно зайдя в “Настройки”> “WiFi”.
- Выберите подключение, к которому iPhone больше не должен автоматически подсоединяться, и нажмите на его название.
- Когда перед вами откроется окно с характеристиками, переведите ползунок “Автоподключение” в неактивное состояние.
Если ваш iPhonе автоматически подключается к незнакомым сетям, отключите “Запрос на подключение” в настройках WiFi, чтобы заблокировать ненужные соединения.

Продление аренды сети WiFi
Иногда у общедоступных соединений есть временные ограничения. Это вынуждает включать аренду каждый раз, когда время пользования точкой доступа подходит к концу.
Для того, чтобы обновить аренду, вам нужно:

- Убедиться, что вы подключены к WiFi, зайдя в “Настройки” > “WiFi”.
- Выбрать соединение, которое вы хотите продлить. Вы должны быть подключены к нему.
- Дважды нажмите на кнопку “Обновить”.
Использование HTTP-прокси
Если вы беспокоитесь о безопасности своих персональных данных, то при подключении к точкам доступа рекомендуется использовать HTTP-прокси. Настроить их использование можно в пункте “WiFi”. Для этого следуйте данной инструкции:

- Зайдите в “Настройки” > “WiFi” и выберите сеть, к которой вы подключены, нажатием на экран.
- В настройках находится пункт “Настроить прокси”. Активируйте его.
- После этого перед вами откроется выбор между “Ручной” и “Автоматической настройкой”. В зависимости от выбора необходимо будет заполнить информацию о прокси-сервере.
Подробнее о настройке прокси смотрите в видео.

Что можно сделать, чтобы устранить неполадки WiFi
Как правило, сбои в работе случаются из-за обновлений операционной системы. Но иногда встречаются иные проблемы.
Если вы хотите включить Вай Фай на Айфоне 4s, 5 и 6, но связь плохо работает или соединения нет вообще, попробуйте следовать инструкции ниже:

- Перезапустите роутер, к WiFi которого вы подключены, или попробуйте подключиться к другой сети;
- Если это не помогло, перезапустите смартфон;
- Попробуйте обновить операционную систему;
- Проверьте ваше устройство на наличие вирусов;
- Подключитесь к мобильному интернету.
Если ничто из этого не помогает, проверьте мобильный интернет. Его отсутствие говорит о поломке устройства. В этом случае обратитесь в сервисный центр.
iPhone Not Connecting to Wi-Fi: How to Fix?
If your iPhone is not connecting to Wi-Fi, you should be able to fix the problem using troubleshooting steps as provided below.
iPhone Not Connecting to Wi-Fi Network
There could be various reasons for iPhone Not Connecting to Wi-Fi, ranging from minor software glitches and network related problems to other issues.
Since the problem cannot be narrowed down to a single reason, any of the following troubleshooting steps might help you in fixing the WiFi Connectivity problems on your device.
1. Turn WiFi ON/OFF
The simple act of switching off Wi-Fi and switching it back ON again can often help in fixing Wi-Fi Connectivity issues on iPhone.
Go to Settings > WiFi > move the toggle next to WiFi to OFF position.
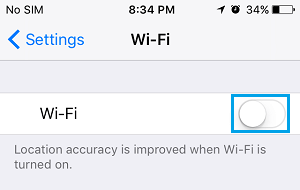
Wait for 30 seconds and switch ON WiFi by moving the toggle to ON position.
2. Restart iPhone
Another simple fix that often works in fixing network connectivity problems is to Power OFF and Restart your device.
Go to Settings > General > Shut Down . On the next screen, use the Slider to Power OFF your device.

Allow iPhone to completely Power OFF > Wait for 30 seconds and then Restart iPhone by pressing the Power Button .
3. Renew DHCP Lease
This step assigns a New IP Address, which should help in fixing Wi-Fi Connectivity problem on your device.
Go to Settings > Wi-Fi > select your Wi-Fi Network Name .
On the next screen, scroll down and tap on Renew Lease option.
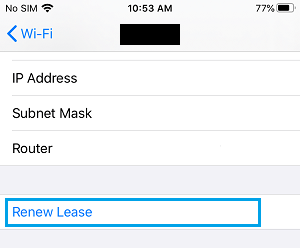
On the confirmation pop-up, tap on Renew Lease to confirm.
After this, your iPhone should be able to connect to WiFi Network.
4. Forget WiFi Network and Rejoin
Go to Settings > Wi-Fi > select your Wi-Fi network. On the next screen, select Forget This Network option.
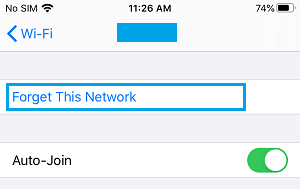
On the confirmation pop-up, tap on Forget to confirm.
Wait for 60 seconds > select your Wi-Fi Network > enter your Wi-Fi Network Password to join WiFi Network.
5. Turn OFF Wi-Fi Assist
Turning OFF Wi-Fi Assist feature has helped users to fix the problem of iPhone Not Connecting to Wi-Fi Network.
Go to Settings > Cellular > disable Wi-Fi Assist by moving the toggle to OFF position.
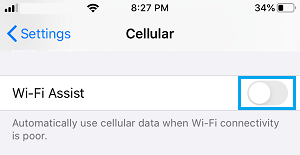
After disabling WiFi assist, reconnect to your Wi-Fi network and see if Wi-Fi is now working on your iPhone.
6. Restart Modem/Router
Switch OFF the Power Supply to your Modem/Router – Use the ON/OFF button (if available) or unplug the power cable from wall socket.
The above step Resets Wi-Fi Network, assigns a New IP Address to your iPhone (if required) and fixes most WiFi connectivity problems.
7. Reset Network Settings
Before following this step make sure that you note down your Wi-Fi Network Password as it will get erased.
Go to Settings > General > Transfer or Reset iPhone > Reset > On the pop-up, select Reset Network Settings option.
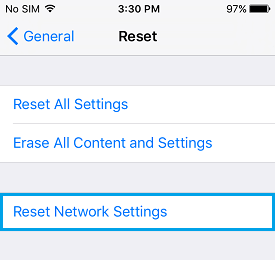
On the confirmation pop-up, tap on Reset Network Settings again confirm.
After this, connect iPhone to your Wi-Fi Network and see if the problem of iPhone not connecting to WiFi is gone.
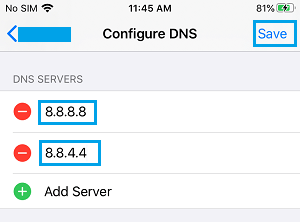
8. Switch to Google DNS
If you are frequently experiencing Network connectivity problems, the problem might be due to the DNS server of your Internet Service Provider being busy or going through problems.
In such cases, switching the DNS Servers on your iPhone to Google or OPEN DNS can help in fixing the problem.
Go to Settings > WiFi > select your WiFi Network . On the next screen, scroll down and tap on Configure DNS option.
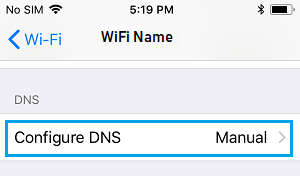
On Configure DNS screen, switch to Manual option and tap on Add Server .
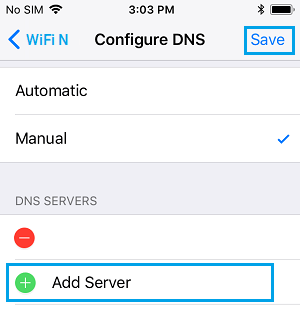
Type 8.8.8.8 and tap on Add Server > type 8.8.4.4 and tap on the Save option.
After adding Google DNS Servers, you can delete the DNS Servers of your service provider by tapping on the Red Minus icon .
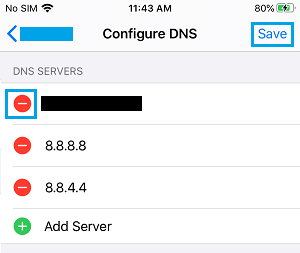
After deleting your service providers DNS Servers, make sure you tap on the Save option to save this change on your device.
Note: Type 208.67.222.222, 208.67.222.220 in case you want to switch to OPEN DNS.