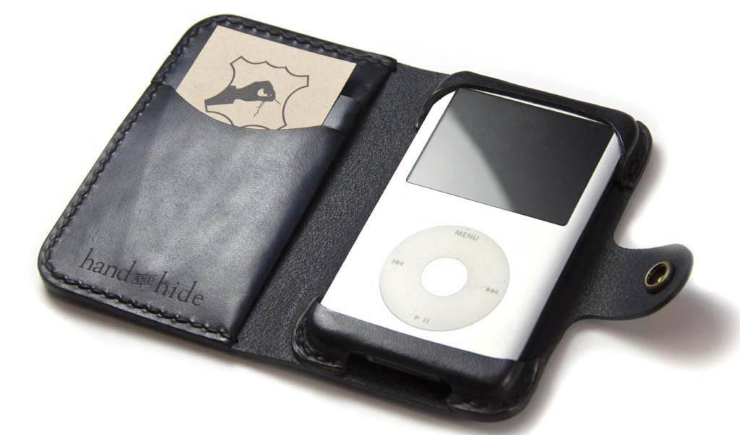
- Беспроводной Bluetooth передатчик HiFi аудио ключ адаптер для iPod ClassicTouch для наушников Bluetooth адаптер блютуз адаптер
- Bluetooth IPod Classic
- Step 1: Prepare the Bluetooth Board
- Step 2: Prepare the IPod Frame LED
- Step 3: Prepare IPod Frame Button Gap
- Step 4: Power Wiring!
- Step 5: Audio Wiring!
- Step 6: Finishing Prep
- Step 7: Placing the Unit Back Together
- Step 8: Notes and Thoughts
- Be the First to Share
- Ipod classic bluetooth adapter
- Как добавить в iPod Classic поддержку Bluetooth
Беспроводной Bluetooth передатчик HiFi аудио ключ адаптер для iPod ClassicTouch для наушников Bluetooth адаптер блютуз адаптер


Характеристики:Технология Bluetooth V2.1.Не нужно устанавливать программное обеспечение и очень прост в использовании.Профиль поддержки: A2DP и ARVCP.Поддержка сопряженных Bluetooth стерео гарнитур/наушников для управления воспроизведением/паузой, вперед/назад.Поддержка автоматизма в паре (без кнопки).Поддержка парного ПИН-кода: 1234, 0000, 8888.Диапазон частот: от 2,42 до 2,480 ГГц (SIM) спектр.Поддержка режима автоматического ожидания: режим ожидания запускается для экономии энергии, когда стерео Bluetooth гарнитуры/наушники не обнаружены в свое время.Поддержка iPhone, iPod mini, iPod nano, iPod video и т. д.Совместимость с 30-контактный док-станции. Тип: bluetooth-передатчикМатериал: АБС-пластикДиапазон частот: от 2,42 до 2,480 ГГц (SIM)Рабочий ток: 40 мА (макс.)Расстояние: 10 метровРазмеры: 9 см x 6 см x 1 см/3,54 «x 2,36» x 0,39 «(прибл.) Примечания:Благодаря светильник и экрана Цвет Товара может быть s светильник ly отличается из-за характеристик монитора компьютера.Возможны незначительные отклонения в размерах из-за различных измерений вручную. Посылка включает в себя:1 x bluetooth-передатчик
Bluetooth IPod Classic


iPod Classic (6th Gen+, let me know if it work with earlier models)(Thick or thin should be fine, I’ve only done thin)
3.5mm to Bluetooth Transmitter
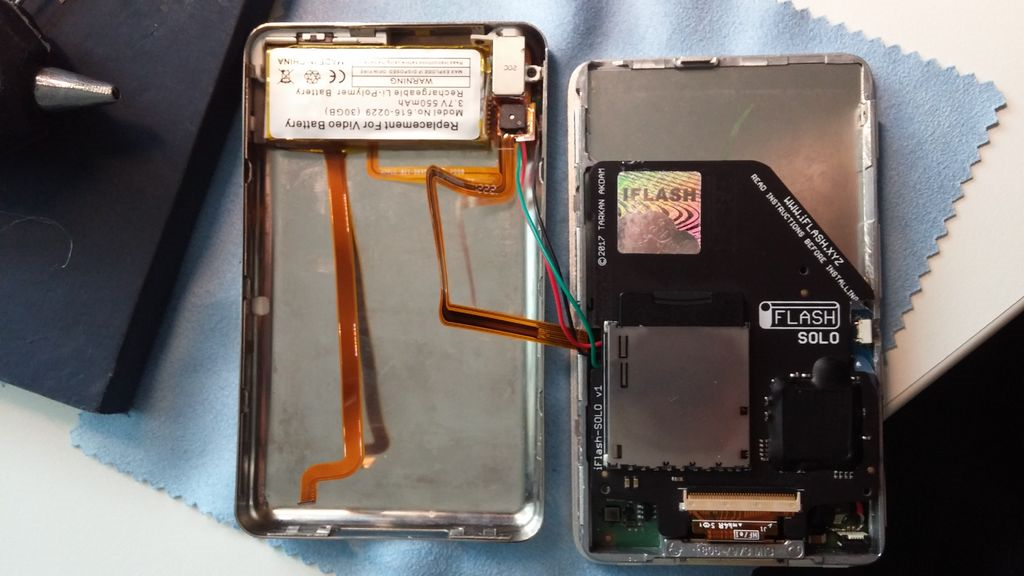
iFlash SD Card Board (Single or Quad, the Dual will not work)
Soldering Iron with fine tip
Drill with 1mm drill bit (And others)
Something to use as a button
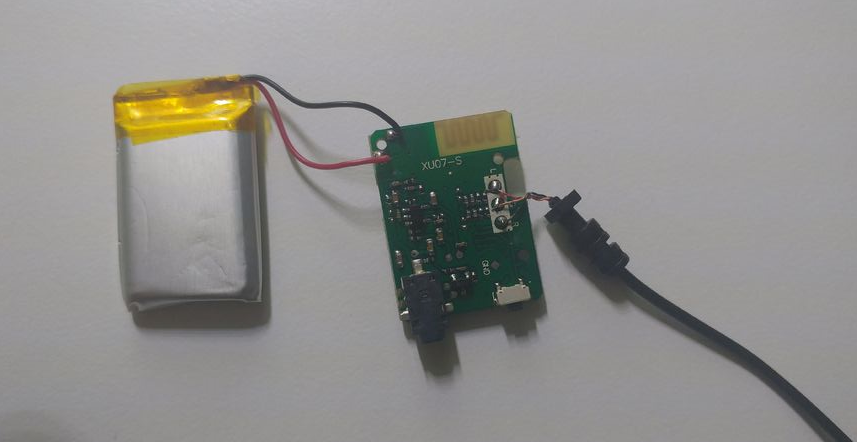
Step 1: Prepare the Bluetooth Board
I ordered 3 of the bluetooth modules and each one contained a different board (audio quality, battery consumption and remembering last paired device varies between the 3) , so it’s a bit of a lottery. The best I found was the one in a white case with board TS-BT35F01, if you search for these they should still be available. Obviously it has to have the form factor of the one in the picture for button/LED placement.
Prep the board by removing all the cables, and carefully removing the charge port from the board (I used a pair of wire cutters without issue).
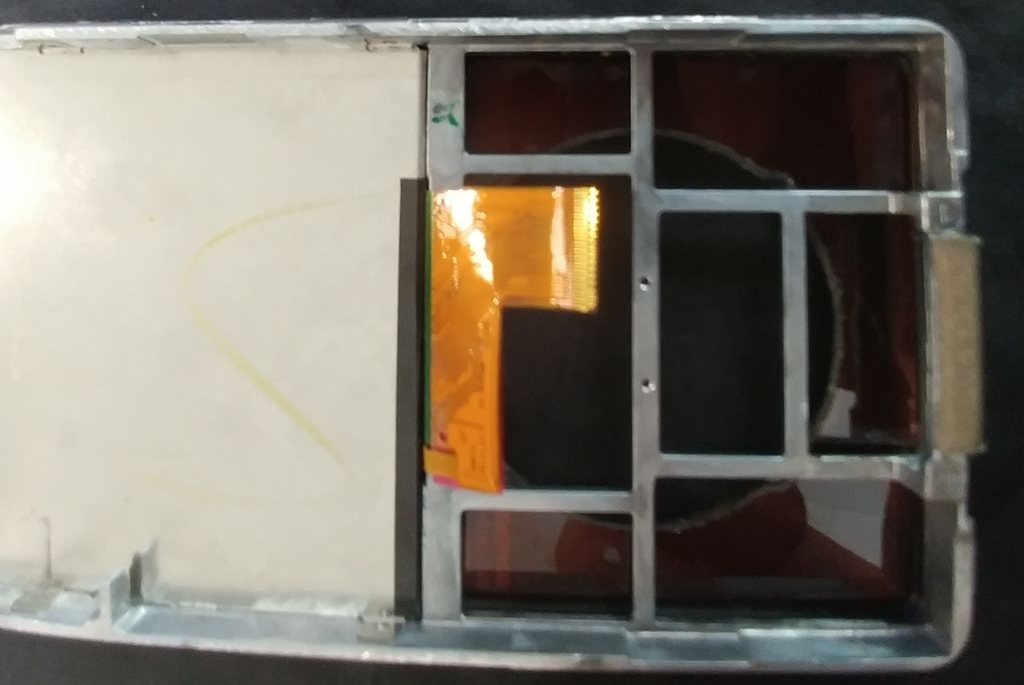
Step 2: Prepare the IPod Frame LED
Remove the logic board from the case just leaving the front panel, screen and the aluminium frame and drill a hole using the 1mm bit on the right hand side a little above the centre (Where I put the green ‘x’). I found that directly above the LED was too bright, and 10mm in from the side was too dim so measure twice cut once (12-13mm is probably a good distance).
In the second picture you can see (Very poorly) the notification LED. Once the hole was drilled I held the glue gun against the hole and put a little glue in, then pushed it flush with the front of the unit with a sim card tool.
Step 3: Prepare IPod Frame Button Gap
When you place the bluetooth board in the iPod you’ll notice that the button doesn’t quite sit flush. Mark with a pen where the center of the button lies and file it down around 2/3rds of the way through the side (Better too much than too little here).
Best to remove the frame for this and file it separately to avoid the shavings/dust short circuiting stuff on the iPod logic board. However if you are lazy like me just masking tape over it and use a paint brush to sweep any excess after.
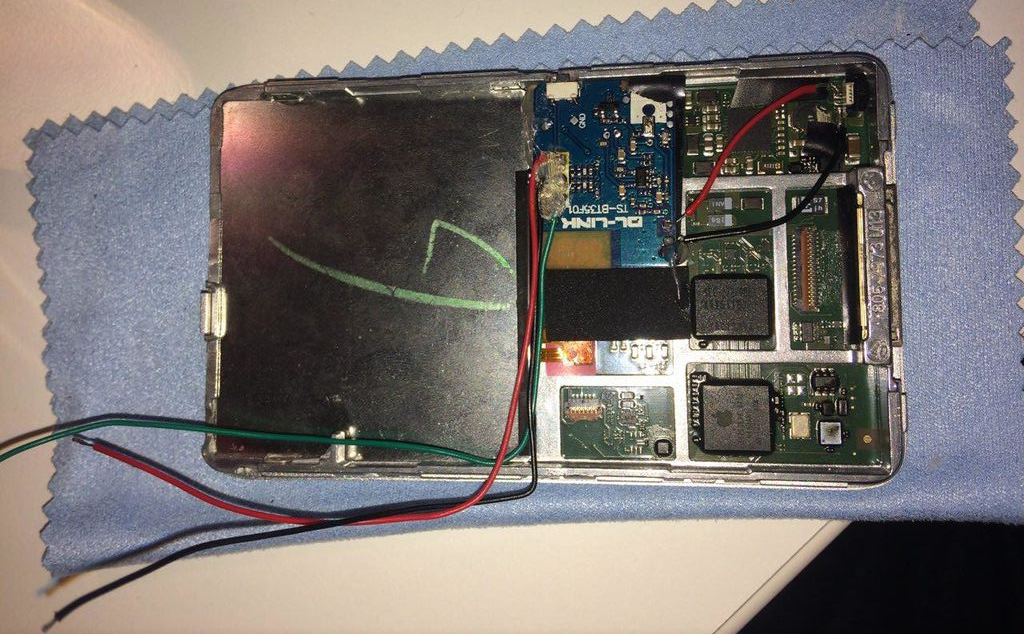
Step 4: Power Wiring!
Ok now for the tough part, using my super helpful wiring diagram you can see that of the 5 pins in the battery connector they are VCC VCC TEMP GND GND (Pull the plastic connector off to see all 5). You’ll want to remove the board to get the best access, get a decent amount of flux and carefully tin the outside pins for VCC and GND. Be gentle with them because they are a pain to put back on if they come out (But if they do you always have a spare, right?).
A smarter man might solder directly to + and — on the battery terminals, I tried this and it blew up. So back to the pauper method for me.
Firstly I measured the length of the wires and soldered them to the BT board, it can get very fiddly and tricky to solder stuff in the confined spaces in the iPod. Once they’re soldered to the BT board place the board in the iPod and solder the connectors to the iPod battery terminals (Tin the terminals first, seriously).
Once the wires are soldered on, they should look a little like the second picture, try and solder as close to the base as possible as putting the plastic battery connector back on top can break the solder if too much pressure is applied.
Now’s a good time to plug the battery in and check that the bluetooth board is getting power.
Step 5: Audio Wiring!
The part gets a bit tricky again. You’ll need to remove the headphone/hold switch assembly from the back frame. Once you’ve done so remove the plastic shell from the underside of the headphone jack to gain access to the solder pads. On older iPods (.. all of them?) the plastic can have degraded and need to be picked off in parts. Either way remove enough of it to be able to solder to the headphone jack pads.
Using more of my super helpful wiring diagrams note the 3 solder pads on the left hand side are standard TRS, Ground-Right-Left from top to bottom. Using my powers of deduction I reasoned that these should be connected to the G R and L connectors on the bluetooth board.
At the end of this step it’s a good idea to test everything again to make sure no solder points have broken/nothings short circuited. But you should have a working prototype!
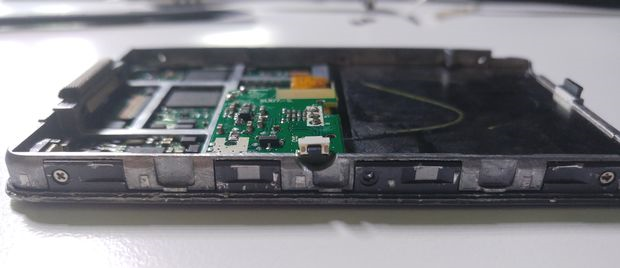
Step 6: Finishing Prep
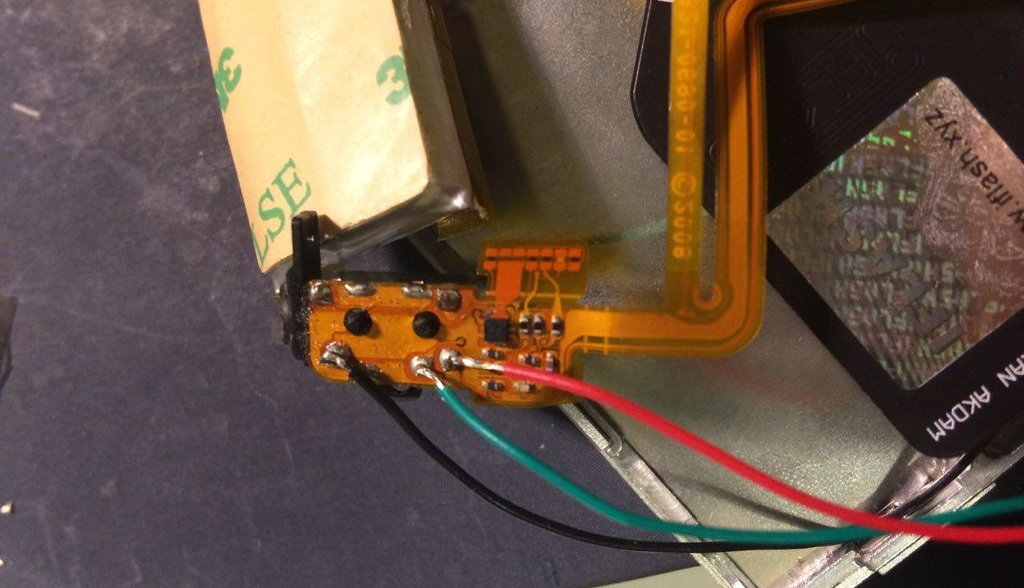
Using the same wire cutters from earlier snip a bit off the side the the iFlash connector, this is because the button gets in the way of it otherwise (See Image #2). I have done this twice with iFlash Single boards, triple check before you start cutting bits from your iFlash Quad but it should be fine too.
Before you put the iFlash connector in you may have noticed in most of the pictures there is one of the foam cutouts from the iFlash board behind the bluetooth chip, put that in there to stop the chip being pushed backwards by the button press.
Also from Image #2 mark on the case where you need to drill the whole for for the button in the backplate, it will need to be quite low on the case angled slightly downwards, I’ve not got it to work directly on the side. For buttons I have tried;
- Taking the tips from breadboard buttons
- Trimming down the button from the original bluetooth module
- A tiny screw
None of them work amazingly, although the screw was pretty good size-wise.
Once you find something to use as a button place it in the hole you drilled in the backplate and use hot glue to secure it from the outside (will make your life 10x easier). Once you’ve double checked everything’s still working you are ready for the last step..
Step 7: Placing the Unit Back Together
The last step can be fiddly, very carefully, starting by closing the right hand side of the case (the side without the button) and applying pressure to close the left hand side evenly, if there is a lot of resistance try and pin point where it is. You maybe need to remove some of the plastic from the switch on the inside edge and apply spots of hot gun glue to hold everything in place while the iPod is closed as it’s pretty tight in there now.
Once it’s done you should have something similar to the video! Congrats!
Step 8: Notes and Thoughts
So while having an iPod classic with integrated bluetooth is pretty sweet there are a few drawbacks:
- The range sucks. Seriously sucks. As long as you have line of sights you’re ok but I cannot have my iPod in my back pocket as my body will block the signal. You can alleviate this a little by replacing the front plate with a transparent plastic one. Or if you are an aerial wizard replacing the aerial on the board with an external one.
- Battery life is not as good. If I don’t use the bluetooth and stay cabled I get 24-30h playback time, using bluetooth get’s me 10-12h. But that’s still pretty good.
- Having to carry a 30pin charger.
- Cheaper than an iPhone 7, and you get to keep the audio jack.
- You can set the volume from the iPod, other mods use 30 pin BT connectors which use lineout volume.
- You can switch between headphone jack and bluetooth pretty seamlessly
- Having a 512GB storage, bluetooth and all day battery life is pretty neat.
Feedback and/or comments on my awful soldering always appreciated.

Be the First to Share
Did you make this project? Share it with us!
Ipod classic bluetooth adapter
Будь в курсе последних новостей из мира гаджетов и технологий

Как добавить в iPod Classic поддержку Bluetooth

Как говорил Шелдон Купер, «всё становится лучше с Bluetooth», тем более, когда речь идёт о музыкальных проигрывателях. В этой статье рассказано, как добавить поддержку Bluetooth плееру Apple iPod Classic. Вам потребуется:
— iPod Classic (шестого поколения, но можно и другой)
— Миниатюрный передатчик Bluetooth с 3,5-миллиметровым разъёмом (желательно на плате TS-BT35F01)
— Адаптер iFlash (Solo или Quad, но не Dual), карта памяти максимум на 128 ГБ
— Паяльник с тонким жалом и припой
— Дрель с небольшим сверлом (1 мм или больше)
— Провода
— Горячий клей с пистолетом
Разберите передатчик Bluetooth и отпаяйте от платы аккумулятор (если он есть). Запомните, куда подводится питание и аудисигнал (а лучше сфотографируйте).
Разберите плеер и просверлите в корпусе отверстие диаметром около 1 мм (место для него отмечено зелёным. Оно потребуется для того, чтобы передатчик могу излучать сигнал. Достаньте логическую плату. Наполните это отверстие клеем, чтобы внутрь корпуса не попадала пыль или вода. Если сделать несколько отверстий, качество приёма сигнала увеличится.
Поместите передатчик внутрь корпуса и отметьте на корпусе место для кнопки, которая будет его включать и выключать. Сделайте отверстие, чтобы корпус закрылся и кнопка работала. Под корпус передатчика можно подложить изоляцию, чтобы не закоротить контакты.
Запитайте передатчик от логической платы плеера и подведите к нему аудиосигнал от 3,5-миллиметрового разъёма. Используйте тонкие провода, чтобы корпус не вспучило, когда вы его закроете обратно.
Подключите аккумулятор и убедитесь, что работает и плеер, и передатчик. Если провода слишком длинные, укоротите их, иначе корпус будет трудно закрыть.
Вместо жёсткого диска установите адаптер iFlash и карту памяти. Они займут гораздо меньше места, чем винчестер, и в результате внутри корпуса останется место для передатчика Bluetooth.
Соберите плеер. Теперь он может воспроизводить музыку по Bluetooth, передавая её на беспроводную акустику. Имейте в виду, что время автономной работы Bluetooth окажется ниже: если в обычных наушниках батареи хватает на 25-30 часов прослушивания, то теперь энергия будет расходоваться на дополнительный модуль и время работы плеера сократится в 2,5-3 раза. Впрочем, это не страшно, ведь Bluetooth — дополнительная функция, и при желании вы сможете послушать музыку в проводных наушниках.
А новый iPhone и многое другое вы можете купить у наших друзей из Big Geek. Скидка по промокоду iGuides