- How to Create Your Own IPsec VPN Server in Linux
- Prerequisites:
- Setting Up IPsec/L2TP VPN Server in Linux
- How to Add or Remove a VPN User in Linux
- How to Upgrade Libreswan Installation in Linux
- How to Uninstall the VPN Server in Linux
- On RHEL/CentOS
- On Debian/Ubuntu
- Настройка IPSEC L2TP VPN-сервера на CentOS 7
- Подготовка сервера
- IPSEC
- L2TP
- PPP
- Настройка клиента
- VPN-сервер как шлюз
How to Create Your Own IPsec VPN Server in Linux
There are so many benefits of using a VPN (Virtual Private Network), some of which include keeping you safe on the internet by encrypting your traffic and helping you to access blocked content/sites/web applications from anywhere. Not to mention, VPN also helps you to browse the internet anonymously.
In this article, you will learn how to quickly and automatically set up your own IPsec/L2TP VPN server in CentOS/RHEL, Ubuntu, and Debian Linux distributions.
Prerequisites:
- A fresh CentOS/RHEL or Ubuntu/DebianVPS (Virtual Private Server) from any provider such as Linode.
Setting Up IPsec/L2TP VPN Server in Linux
To set up the VPN server, we will use a wonderful collection of shell scripts created by Lin Song, that installs Libreswan as the IPsec server, and xl2tpd as the L2TP provider. The offering also includes scripts to add or delete VPN users, upgrade the VPN installation and much more.
First, log into your VPS via SSH, then run the appropriate commands for your distribution to set up the VPN server. By default, the script will generate random VPN credentials (pre-shared key, VPN username, and password) for you and display them at the end of the installation.
However, if you want to use your own credentials, first you need to generate a strong password and PSK as shown.
# openssl rand -base64 10 # openssl rand -base64 16
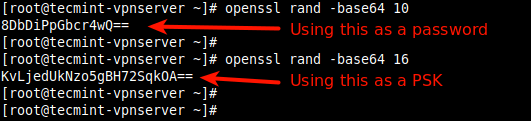
Next, set these generated values as described in the following command all values MUST be placed inside ‘single quotes‘ as shown.
- VPN_IPSEC_PSK – Your IPsec pre-shared key.
- VPN_USER – Your VPN username.
- VPN_PASSWORD – Your VPN password.
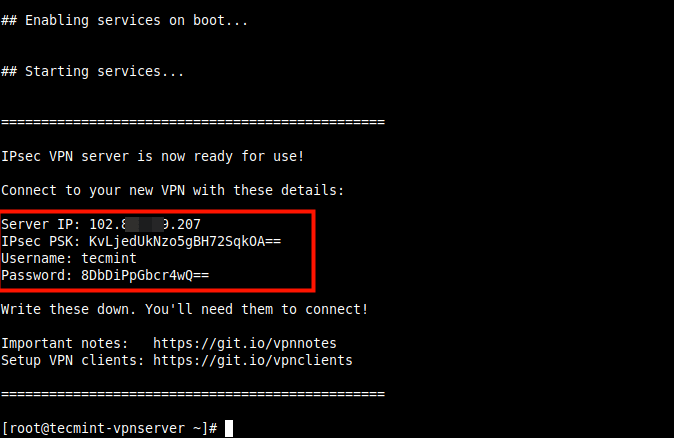
---------------- On CentOS/RHEL ---------------- # wget https://git.io/vpnsetup-centos -O vpnsetup.sh && VPN_IPSEC_PSK='KvLjedUkNzo5gBH72SqkOA==' VPN_USER='tecmint' VPN_PASSWORD='8DbDiPpGbcr4wQ==' sh vpnsetup.sh ---------------- On Debian and Ubuntu ---------------- # wget https://git.io/vpnsetup -O vpnsetup.sh && VPN_IPSEC_PSK='KvLjedUkNzo5gBH72SqkOA==' VPN_USER='tecmint' VPN_PASSWORD='8DbDiPpGbcr4wQ==' sudo sh vpnsetup.sh
The main packages that will be installed are bind-utils, net-tools, bison, flex, gcc, libcap-ng-devel, libcurl-devel, libselinux-devel, nspr-devel, nss-devel, pam-devel, xl2tpd, iptables-services, systemd-devel, fipscheck-devel, libevent-devel, and fail2ban(to protect SSH), and their respective dependencies. Then it downloads, compiles and installs Libreswan from source, enables and starts the necessary services.
Once the installation is complete, the VPN details will be displayed as shown in the following screenshot.
Next, you need to set up a VPN client, for desktops or laptops with a graphical user interface, refer to this guide: How To Setup an L2TP/Ipsec VPN Client on Linux.
To add the VPN connection in a mobile device such as an Android phone, go to Settings –> Network & Internet (or Wireless & Networks –> More) –> Advanced –> VPN. Select the option to add a new VPN. The VPN type should be set to IPSec Xauth PSK, then use the VPN gateway and credentials above.
How to Add or Remove a VPN User in Linux
To create a new VPN user or update an existing VPN user with a new password, download and use the add_vpn_user.sh script using the following wget command.
$ wget -O add_vpn_user.sh https://raw.githubusercontent.com/hwdsl2/setup-ipsec-vpn/master/extras/add_vpn_user.sh $ sudo sh add_vpn_user.sh 'username_to_add' 'user_password'
To delete a VPN user, download and use the del_vpn_user.sh script.
$ wget -O del_vpn_user.sh https://raw.githubusercontent.com/hwdsl2/setup-ipsec-vpn/master/extras/del_vpn_user.sh $ sudo sh del_vpn_user.sh 'username_to_delete'
How to Upgrade Libreswan Installation in Linux
You can upgrade the Libreswan installation using the vpnupgrade.sh or vpnupgrade_centos.sh script. Make sure to edit the SWAN_VER variable to the version you want to install, within the script.
---------------- On CentOS/RHEL ---------------- # wget https://git.io/vpnupgrade-centos -O vpnupgrade.sh && sh vpnupgrade.sh ---------------- On Debian and Ubuntu ---------------- # wget https://git.io/vpnupgrade -O vpnupgrade.sh && sudo sh vpnupgrade.sh
How to Uninstall the VPN Server in Linux
To uninstall the VPN installation, do the following.
On RHEL/CentOS
Then open /etc/sysconfig/iptables configuration file and remove the unneeded rules and edit /etc/sysctl.conf and /etc/rc.local file, and remove the lines after the comment # Added by hwdsl2 VPN script, in both files.
On Debian/Ubuntu
Next, edit /etc/iptables.rules configuration file and remove any unneeded rules. Additionally, edit /etc/iptables/rules.v4 if it exists.
Then edit /etc/sysctl.conf and /etc/rc.local files, remove the lines after the comment # Added by hwdsl2 VPN script, in both files. Do not remove exit 0 if it exists.
Optionally, you can remove certain files and directories that were created during the VPN set up.
# rm -f /etc/ipsec.conf* /etc/ipsec.secrets* /etc/ppp/chap-secrets* /etc/ppp/options.xl2tpd* /etc/pam.d/pluto /etc/sysconfig/pluto /etc/default/pluto # rm -rf /etc/ipsec.d /etc/xl2tpd
To set up a site-to-site IPSec-based VPN with Strongswan, check out our guides:
At this point, your own VPN server is up and running. You can share any queries or give us feedback using the comment form below.
Настройка IPSEC L2TP VPN-сервера на CentOS 7

Обновлено: 14.03.2020 Опубликовано: 09.04.2018
Один из лучших способов поднять сервер VPN — настроить OpenVPN. Однако, данный сервер не лишен недостатков — на клиенты потребуется устанавливать специальное программное обеспечение. Если мы хотим использовать стандартные средства операционных систем для подключения к серверу, настроим VPN IPSEC L2TP.
Подготовка сервера
Для установки ПО потребуется репозиторий EPEL:
firewall-cmd —permanent —add-port=1701/tcp
firewall-cmd —permanent —add-service=ipsec
IPSEC
Открываем конфигурационный файл racoon:
remote anonymous
exchange_mode main,aggressive,base;
doi ipsec_doi;
passive on;
proposal_check obey;
support_proxy on;
nat_traversal on;
ike_frag on;
dpd_delay 20;
proposal
encryption_algorithm aes;
hash_algorithm sha1;
authentication_method pre_shared_key;
dh_group modp1024;
>
proposal
encryption_algorithm 3des;
hash_algorithm sha1;
authentication_method pre_shared_key;
dh_group modp1024;
>
>
Теперь открываем следующий файл:
Для клиентов Windows добавляем:
ip-addres1 key-password1
ip-addres2 key-password2
* где ip-addres — ip-адрес клиента, с которого будет идти подключение; key-password — пароль для подключения.
Для клиентов Android добавляем:
identifier1 key-password1
identifier2 key-password2
* где identifier — идентификатор клиента, который будет использоваться при подключении; key-password — пароль для подключения.
Создаем скрипт с настройкой ipsec политик:
spdadd 0.0.0.0/0[l2tp] 0.0.0.0/0 any -P out ipsec esp/transport//require;
spdadd 0.0.0.0/0 0.0.0.0/0[l2tp] any -P in ipsec esp/transport//require;
chmod 755 /etc/rc.d/init.d/racoon.init
Добавляем скрипт на автозапуск:
Разрешаем запуск сервиса racoon и стартуем его:
L2TP
Устанавливаем пакет xl2tpd:
Открываем конфигурационный файл:
[global]
ipsec saref = yes
force userspace = yes
В секции [lns default] изменяем диапазон IP-адресов:
[lns default]
ip range = 176.16.10.10-176.16.10.200
local ip = 176.16.10.1
Разрешаем автозапуск сервиса и стартуем его:
PPP
Вносим небольшие изменения в DNS:
Открываем файл с пользователями:
* где dmosk — логин; первая звездочка — любой сервер; password — пароль, который должен вводить пользователь dmosk; вторая звездочка — подключение с любого IP-адреса.
Настройка клиента
Пример настройки клиента Windows:

На устройстве с Андроидом настраиваем выбираем в качестве VPN-сервера IPSEC-L2TP PSK и вводим данные из файла psk.txt (например, identifier1 и key-password1). Пример подключения на Android:

VPN-сервер как шлюз
Для этого настраиваем только CentOS.