- How to Set Up IPsec-based VPN with Strongswan on Debian and Ubuntu
- Testing Environment
- Step 1: Enabling Kernel Packet Forwarding
- Step 2: Installing strongSwan in Debian and Ubuntu
- Step 3: Configuring Security Gateways
- Step 4: Configuring PSK for Peer-to-Peer Authentication
- Related Posts
- 31 thoughts on “How to Set Up IPsec-based VPN with Strongswan on Debian and Ubuntu”
How to Set Up IPsec-based VPN with Strongswan on Debian and Ubuntu
strongSwan is an open-source, cross-platform, full-featured, and widely-used IPsec-based VPN (Virtual Private Network) implementation that runs on Linux, FreeBSD, OS X, Windows, Android, and iOS. It is primarily a keying daemon that supports the Internet Key Exchange protocols (IKEv1 and IKEv2) to establish security associations (SA) between two peers.
This article describes how to set up site-to-site IPSec VPN gateways using strongSwan on Ubuntu and Debian servers. By site-to-site we mean each security gateway has a sub-net behind it. Besides, the peers will authenticate each other using a pre-shared key (PSK).
Testing Environment
Remember to replace the following IPs with your real-world IPs to configure your environment.
Site 1 Gateway (tecmint-devgateway)
OS 1: Debian or Ubuntu Public IP: 10.20.20.1 Private IP: 192.168.0.101/24 Private Subnet: 192.168.0.0/24
Site 2 Gateway (tecmint-prodgateway)
OS 2: Debian or Ubuntu Public IP: 10.20.20.3 Private IP: 10.0.2.15/24 Private Subnet: 10.0.2.0/24
Step 1: Enabling Kernel Packet Forwarding
1. First, you need to configure the kernel to enable packet forwarding by adding the appropriate system variables in /etc/sysctl.conf configuration file on both security gateways.
Look for the following lines and uncomment them and set their values as shown (read comments in the file for more information).
net.ipv4.ip_forward = 1 net.ipv6.conf.all.forwarding = 1 net.ipv4.conf.all.accept_redirects = 0 net.ipv4.conf.all.send_redirects = 0
2. Next, load the new settings by running the following command.

3. If you have a UFW firewall service enabled, you need to add the following rules to the /etc/ufw/before.rules configuration file just before the filter rules in either security gateways.
Site 1 Gateway (tecmint-devgateway)
*nat :POSTROUTING ACCEPT [0:0] -A POSTROUTING -s 10.0.2.0/24 -d 192.168.0.0/24 -j MASQUERADE COMMIT
Site 2 Gateway (tecmint-prodgateway)
*nat :POSTROUTING ACCEPT [0:0] -A POSTROUTING -s 192.168.0.0/24 -d 10.0.2.0/24 -j MASQUERADE COMMIT
4. Once firewall rules have been added, then apply the new changes by restarting UFW as shown.
$ sudo ufw disable $ sudo ufw enable
Step 2: Installing strongSwan in Debian and Ubuntu
5. Update your package cache on both security gateways and install the strongswan package using the APT package manager.
$ sudo apt update $ sudo apt install strongswan
6. Once the installation is complete, the installer script will start the strongswan service and enable it to automatically start at system boot. You can check its status and whether it is enabled using the following command.
$ sudo systemctl status strongswan.service $ sudo systemctl is-enabled strongswan.service
Step 3: Configuring Security Gateways
7. Next, you need to configure the security gateways using the /etc/ipsec.conf configuration file.
Site 1 Gateway (tecmint-devgateway)
$ sudo cp /etc/ipsec.conf /etc/ipsec.conf.orig $ sudo nano /etc/ipsec.conf
Copy and paste the following configuration in the file.
config setup charondebug="all" uniqueids=yes conn devgateway-to-prodgateway type=tunnel auto=start keyexchange=ikev2 authby=secret left=10.20.20.1 leftsubnet=192.168.0.101/24 right=10.20.20.3 rightsubnet=10.0.2.15/24 ike=aes256-sha1-modp1024! esp=aes256-sha1! aggressive=no keyingtries=%forever ikelifetime=28800s lifetime=3600s dpddelay=30s dpdtimeout=120s dpdaction=restart
Site 2 Gateway (tecmint-prodgateway)
$ sudo cp /etc/ipsec.conf /etc/ipsec.conf.orig $ sudo nano /etc/ipsec.conf
Copy and paste the following configuration into the file.
config setup charondebug="all" uniqueids=yes conn prodgateway-to-devgateway type=tunnel auto=start keyexchange=ikev2 authby=secret left=10.20.20.3 leftsubnet=10.0.2.15/24 right=10.20.20.1 rightsubnet=192.168.0.101/24 ike=aes256-sha1-modp1024! esp=aes256-sha1! aggressive=no keyingtries=%forever ikelifetime=28800s lifetime=3600s dpddelay=30s dpdtimeout=120s dpdaction=restart
Here is the meaning of each configuration parameter:
- config setup – specifies general configuration information for IPSec which applies to all connections.
- charondebug – defines how much Charon debugging output should be logged.
- uniqueids – specifies whether a particular participant ID should be kept unique.
- conn prodgateway-to-devgateway – defines connection name.
- type – defines connection type.
- auto – how to handle connection when IPSec is started or restarted.
- keyexchange – defines the version of the IKE protocol to use.
- authby – defines how peers should authenticate each other.
- left – defines the IP address of the left participant’s public-network interface.
- leftsubnet – states the private subnet behind the left participant.
- right – specifies the IP address of the right participant’s public-network interface.
- rightsubnet – states the private subnet behind the left participant.
- ike – defines a list of IKE/ISAKMP SA encryption/authentication algorithms to be used. You can add a comma-separated list.
- esp – defines a list of ESP encryption/authentication algorithms to be used for the connection. You can add a comma-separated list.
- aggressive – states whether to use Aggressive or Main Mode.
- keyingtries – states the number of attempts that should be made to negotiate a connection.
- ikelifetime – states how long the keying channel of a connection should last before being renegotiated.
- lifetime – defines how long a particular instance of a connection should last, from successful negotiation to expiry.
- dpddelay – specifies the time interval with which R_U_THERE messages/INFORMATIONAL exchanges are sent to the peer.
- dpdtimeout – specifies the timeout interval, after which all connections to a peer are deleted in case of inactivity.
- dpdaction – defines how to use the Dead Peer Detection(DPD) protocol to manage the connection.
For more information about the above configuration parameters, read the ipsec.conf man page by running the command.
Step 4: Configuring PSK for Peer-to-Peer Authentication
8. After configuring both security gateways, generate a secure PSK to be used by the peers using the following command.
$ head -c 24 /dev/urandom | base64

9. Next, add the PSK in the /etc/ipsec.secrets file on both gateways.
Copy and paste the following line.
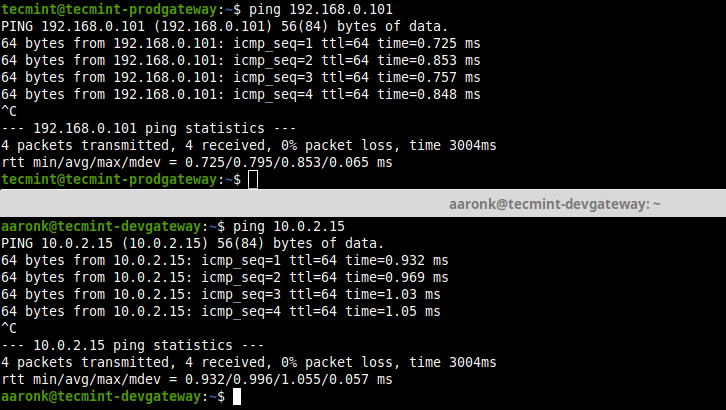
------- Site 1 Gateway (tecmint-devgateway) ------- 10.20.20.1 10.20.20.3 : PSK "qLGLTVQOfqvGLsWP75FEtLGtwN3Hu0ku6C5HItKo6ac=" ------- Site 2 Gateway (tecmint-prodgateway) ------- 10.20.20.3 10.20.20.1 : PSK "qLGLTVQOfqvGLsWP75FEtLGtwN3Hu0ku6C5HItKo6ac attachment_36110" aria-describedby="caption-attachment-36110" style="width: 872px" >View IPSec Connection Status 11. Finally, verify that you can access the private sub-nets from either security gateways by running a ping command.
$ ping 192.168.0.101 $ ping 10.0.2.15
12. Besides, you can stop and start IPSec as shown.
$ sudo ipsec stop $ sudo ipsec start13. To know more about IPSec commands to manually bring up connections and more, see the IPSec help page.
That’s all! In this article, we have described how to set up a site-to-site IPSec VPN using strongSwan on Ubuntu and Debian servers, where both security gateways were configured to authenticate each other using a PSK. If you have any questions or thoughts to share, reach us via the feedback form below.
Aaron Kili is a Linux and F.O.S.S enthusiast, an upcoming Linux SysAdmin, web developer, and currently a content creator for TecMint who loves working with computers and strongly believes in sharing knowledge.
Each tutorial at TecMint is created by a team of experienced Linux system administrators so that it meets our high-quality standards.
Related Posts
31 thoughts on “How to Set Up IPsec-based VPN with Strongswan on Debian and Ubuntu”
My tunnel seems to work both ways but after some time, I’m not able to SSH any of the two machines. looks like it is due to the NAT setting we have added!! Can anyone else faced the same issue where they are not able to SSH the machines. Reply
For those trying to make this work in AWS and ipsec status is stuck on “connecting“, the above guide will not work. After a full day of tearing my hair out and going down all kinds of rabbit holes. I discovered a post on serverfault by a user named Michael, about EIPs not being bound to system stack in EC2 instances. The EC2 doesn’t know about its own public EIP, so the config fails. You’ll need to add additional parameters, according to the below. Left is the system you’re working on, and right is the remote system.
left=10.10.10.10 # instance private IP of local system leftsourceip=10.10.10.10 # instance private IP of local system leftid=203.x.x.x # elastic IP of local system leftsubnet=10.x.x.x/xx rightsubnet=10.x.x.x/xx right=198.x.x.x # elastic IP of remote systemHi, Thank you for this tutorial. I just noticed a typo here: rightsubnet – states the private subnet behind the left participant. <– I think you mean the "right participant" Reply
Hi, Great tutorial, When configuration Site 2 Gateway (tecmint-prodgateway) you type sudo cp /etc/ipsec.conf , do you mean sudo nano /etc/ipsec.conf . I need to understand, or you have configured two ipsec.conf files. Reply
Hello, Great Tutorial, But where do you have 2 ipsec.conf files? or you just copy both configs (dev and prod) in the same ipsec.conf files? I don’t understand the sudo cp /etc/ipsec.conf you ran when configuring the second Site. Reply
Great Article. I can get IKE2 phase 1 and phase 2 in place. But I am not being able to route traffic from left to right am afraid. I don’t have any errors, but takes forever and nothing arrives at the final destination. Perhaps is using the default gateway. I am using Ubuntu 20.4, with UFW OpenVPN, one network adaptor in the cloud. I follow this example. Everything is ok except network traffic. Is there something missing besides this ufw before. rules example? is there anything to do on iptables? thanks Reply
network traffic is not routed to the final destination. If we have a ufw and OpenVPN in a ubuntu 20.04 box is anything else to do to route the traffic, to the left subnet to use IPsec tunnel? Reply
Please give me the correct configuration (site to site without NAT (Direct VPN)). I do not have a subnet in my VPS network card settings and I have set subnet “IP Public/32” or 0.0.0.0/0 tested it, but the following error message is received site B: establishing CHILD_SA devgateway-to-prodgateway
generating CREATE_CHILD_SA request 1 [ SA No TSi TSr ]
sending packet: from 23.254.231.x[4500] to 109.106.244.x[4500] (204 bytes)
received packet: from 109.106.244.x[4500] to 23.254.231.x[4500] (76 bytes)
parsed CREATE_CHILD_SA response 1 [ N(NO_PROP) ]
received NO_PROPOSAL_CHOSEN notify, no CHILD_SA built
failed to establish CHILD_SA, keeping IKE_SA
establishing connection ‘devgateway-to-prodgateway’ failed Output network card settings SiteA:ens3: flags=4163 mtu 1500 inet 23.254.231.x netmask 255.255.255.0 broadcast 23.254.231.255 inet6 x prefixlen 64 scopeid 0x20 inet6 x prefixlen 48 scopeid 0x0 ether fa:16:3e:7b:95:5b txqueuelen 1000 (Ethernet) RX packets 1883450584 bytes 114113785806 (114.1 GB) RX errors 0 dropped 0 overruns 0 frame 0 TX packets 1301943 bytes 175295442 (175.2 MB) TX errors 0 dropped 0 overruns 0 carrier 0 collisions 0 lo: flags=73 mtu 65536 inet 127.0.0.1 netmask 255.0.0.0 inet6 ::1 prefixlen 128 scopeid 0x10 loop txqueuelen 1000 (Local Loopback) RX packets 686 bytes 64421 (64.4 KB) RX errors 0 dropped 0 overruns 0 frame 0 TX packets 686 bytes 64421 (64.4 KB) TX errors 0 dropped 0 overruns 0 carrier 0 collisions 0lo: flags=73 mtu 65536 inet 127.0.0.1 netmask 255.0.0.0 inet6 ::1 prefixlen 128 scopeid 0x10 loop txqueuelen 1000 (Local Loopback) RX packets 32 bytes 2368 (2.3 KB) RX errors 0 dropped 0 overruns 0 frame 0 TX packets 32 bytes 2368 (2.3 KB) TX errors 0 dropped 0 overruns 0 carrier 0 collisions 0 venet0: flags=211 mtu 1500 inet 127.0.0.1 netmask 255.255.255.255 broadcast 0.0.0.0 destination 127.0.0.1 inet6 x prefixlen 64 scopeid 0x0 unspec 00-00-00-00-00-00-00-00-00-00-00-00-00-00-00-00 txqueuelen 0 (UNSPEC) RX packets 19171 bytes 8461202 (8.4 MB) RX errors 0 dropped 0 overruns 0 frame 0 TX packets 15727 bytes 1710249 (1.7 MB) TX errors 0 dropped 0 overruns 0 carrier 0 collisions 0 venet0:0: flags=211 mtu 1500 inet 109.106.244.x netmask 255.255.255.0 broadcast 109.106.244.255 destination 109.106.244.x unspec 00-00-00-00-00-00-00-00-00-00-00-00-00-00-00-00 txqueuelen 0 (UNSPEC)